Page 14 of 436
14
1. NAVIGATION OPERATION
CT200h_Navi_OM76078E_(EE)
14.02.06 12:29
INFORMATION
Remove dirt from the display and its surrounding area by lightly wiping with a soft,
dry cloth, such as a cloth used for cleaning glasses with plastic lenses. Scrubbing
too hard or using a hard cloth could scratch the display. Also, the display is treated
with a coating, and could be damaged by coming into contact with benzine or alka-
line solution.
When the screen is viewed through polarized sunglasses, a rainbow pattern may
appear on the screen due to optical characteristics of the screen. If this is disturbing,
please operate the screen without polarized sunglasses.
Page 37 of 436

37
1. BASIC INFORMATION BEFORE OPERATION
CT200h_Navi_OM76078E_(EE)
14.02.06 12:29
2
BASIC FUNCTION
2. DISPLAY OPERATION
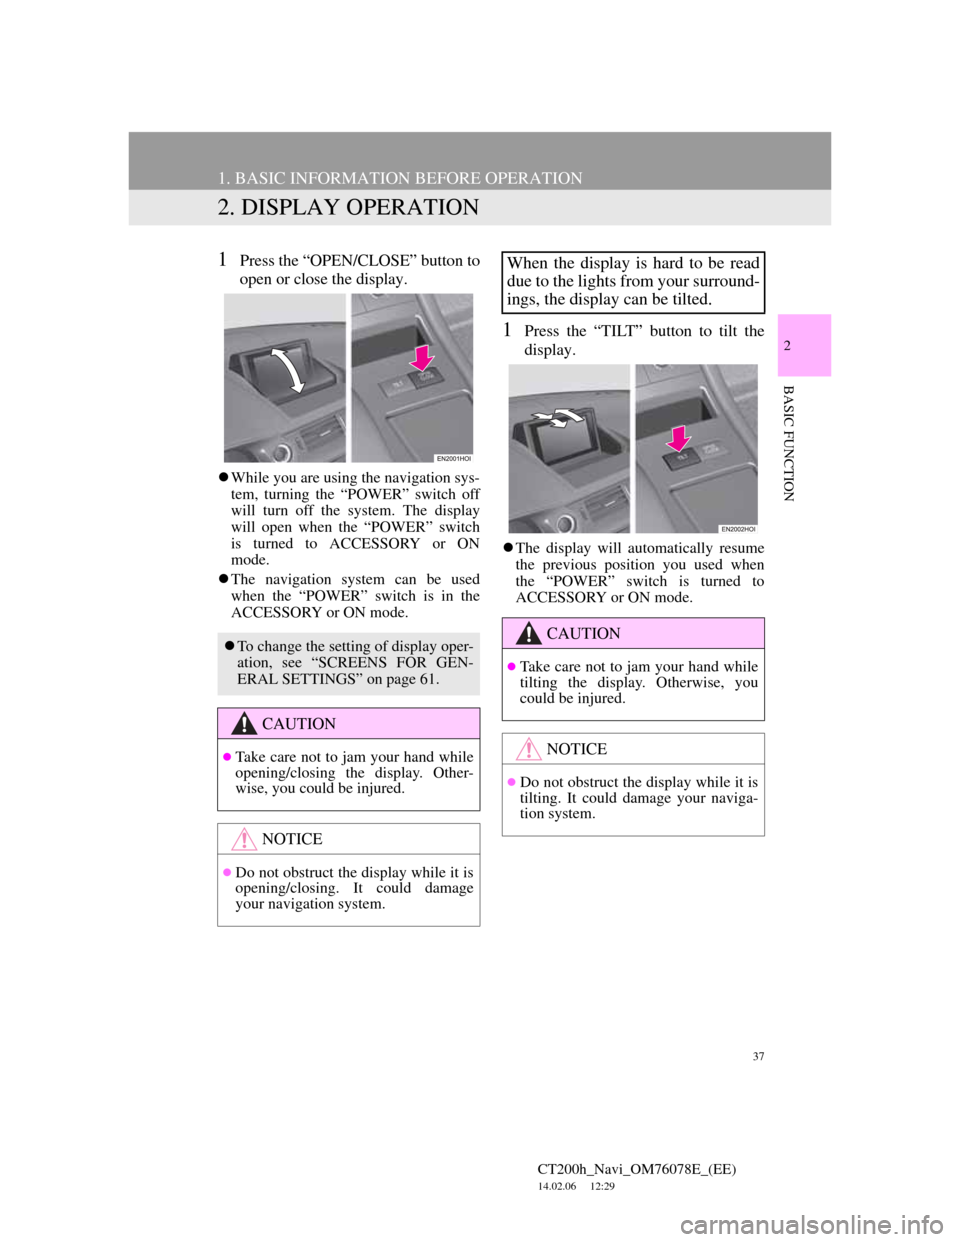
1Press the “OPEN/CLOSE” button to
open or close the display.
While you are using the navigation sys-
tem, turning the “POWER” switch off
will turn off the system. The display
will open when the “POWER” switch
is turned to ACCESSORY or ON
mode.
The navigation system can be used
when the “POWER” switch is in the
ACCESSORY or ON mode.
1Press the “TILT” button to tilt the
display.
The display will automatically resume
the previous position you used when
the “POWER” switch is turned to
ACCESSORY or ON mode.
To change the setting of display oper-
ation, see “SCREENS FOR GEN-
ERAL SETTINGS” on page 61.
CAUTION
Take care not to jam your hand while
opening/closing the display. Other-
wise, you could be injured.
NOTICE
Do not obstruct the display while it is
opening/closing. It could damage
your navigation system.
When the display is hard to be read
due to the lights from your surround-
ings, the display can be tilted.
CAUTION
Take care not to jam your hand while
tilting the display. Otherwise, you
could be injured.
NOTICE
Do not obstruct the display while it is
tilting. It could damage your naviga-
tion system.
Page 46 of 436

46
1. BASIC INFORMATION BEFORE OPERATION
CT200h_Navi_OM76078E_(EE)
14.02.06 12:29
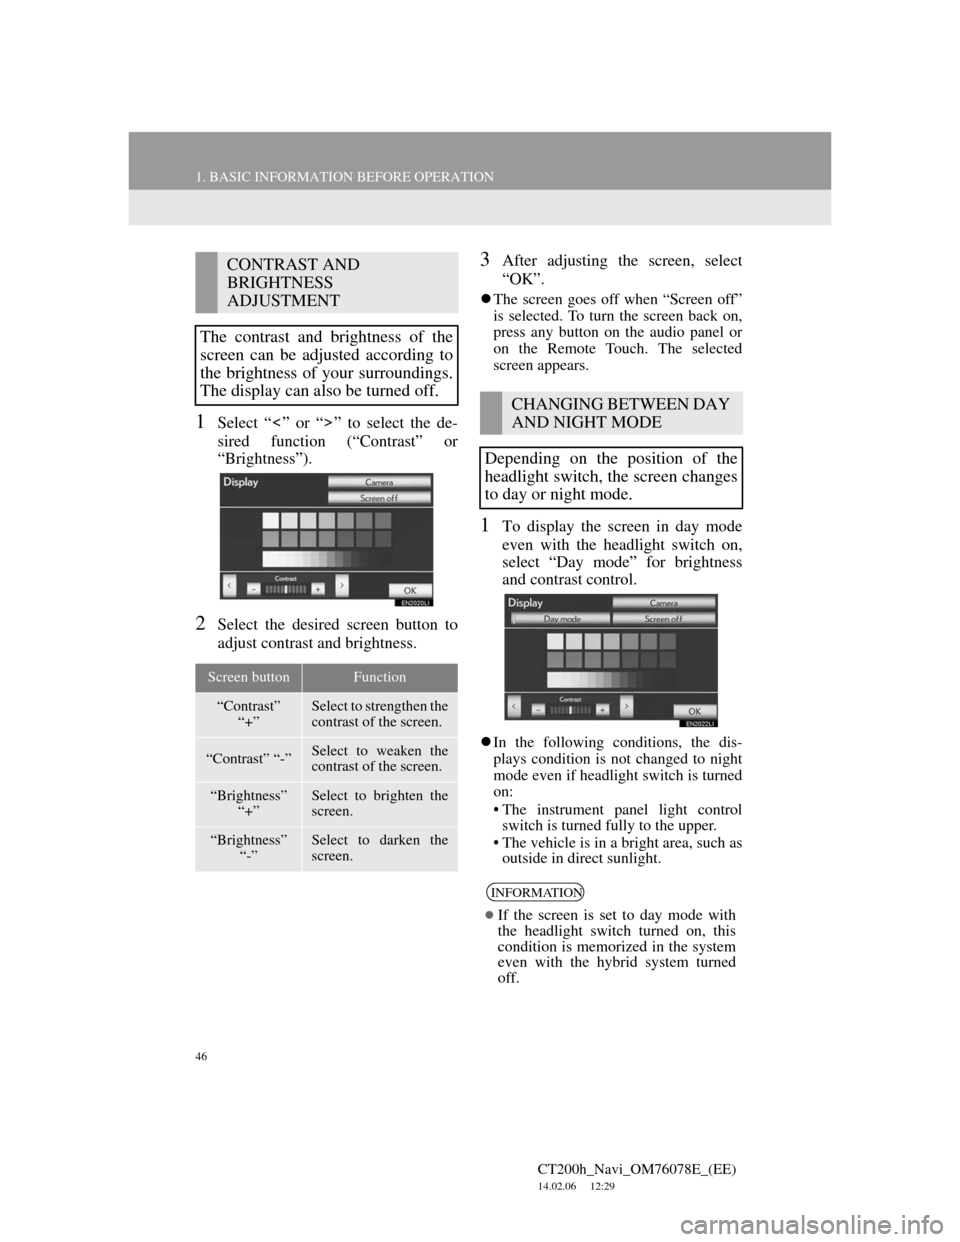
1Select “ ” or “ ” to select the de-
sired function (“Contrast” or
“Brightness”).
2Select the desired screen button to
adjust contrast and brightness.
3After adjusting the screen, select
“OK”.
The screen goes off when “Screen off”
is selected. To turn the screen back on,
press any button on the audio panel or
on the Remote Touch. The selected
screen appears.
1To display the screen in day mode
even with the headlight switch on,
select “Day mode” for brightness
and contrast control.
In the following conditions, the dis-
plays condition is not changed to night
mode even if headlight switch is turned
on:
• The instrument panel light control
switch is turned fully to the upper.
• The vehicle is in a bright area, such as
outside in direct sunlight.
CONTRAST AND
BRIGHTNESS
ADJUSTMENT
The contrast and brightness of the
screen can be adjusted according to
the brightness of your surroundings.
The display can also be turned off.
Screen buttonFunction
“Contrast”
“+”Select to strengthen the
contrast of the screen.
“Contrast” “-”Select to weaken the
contrast of the screen.
“Brightness”
“+”Select to brighten the
screen.
“Brightness”
“-”Select to darken the
screen.
CHANGING BETWEEN DAY
AND NIGHT MODE
Depending on the position of the
headlight switch, the screen changes
to day or night mode.
INFORMATION
If the screen is set to day mode with
the headlight switch turned on, this
condition is memorized in the system
even with the hybrid system turned
off.
Page 61 of 436
61
2. SETUP
CT200h_Navi_OM76078E_(EE)
14.02.06 12:29
2
BASIC FUNCTION
On this screen, the following functions
can be performed:SCREENS FOR GENERAL
SETTINGS
No
.Function
Select to change the time zone and
select “On” or “Off” for daylight
saving time. (See “CLOCK SET-
TINGS” on page 63.)
Select to change the language.
(See “SELECTING A LAN-
GUAGE” on page 65.)
Select to change the voice recog-
nition language. (See “SELECT-
ING A VOICE RECOGNITION
LANGUAGE” on page 65.)
Select to change the home screen
settings. (See “HOME SCREEN
SETTINGS” on page 66.)
Select to customize the opening
image. (See “CHANGING THE
OPENING IMAGE” on page 66.)
Select to customize the screen off
image. (See “CHANGING THE
SCREEN OFF IMAGE” on page
68.)
Page 63 of 436
63
2. SETUP
CT200h_Navi_OM76078E_(EE)
14.02.06 12:29
2
BASIC FUNCTION1Press the “MENU” button on the
Remote Touch, then select “Setup”.
2Select “General” on the “Setup”
screen.
3Select “Clock”.
4Select the items to be set.
On this screen, the following functions
can be performed:
5Select “OK”.
TIME ZONE
1Press the “MENU” button on the
Remote Touch, then select “Setup”.
2Select “General” on the “Setup”
screen.
3Select “Clock” on the “General set-
tings” screen.
CLOCK SETTINGS
Used for changing time zones, the
on/off settings of daylight saving
time and automatic adjustment of the
clock.No
.Function
Select to change the time zone.
(See “TIME ZONE” on page 63.)
Select “On” or “Off” for daylight
saving time.
Select “On” or “Off” for automat-
ic adjustment of the clock.
When “Auto adjust clock” is
turned “Off”, the clock can be
manually adjusted. (See “MANU-
AL CLOCK SETTING” on page
64.)
A time zone can be selected and
GMT can be set.
Page 111 of 436
111
2. ROUTE GUIDANCE
CT200h_Navi_OM76078E_(EE)
14.02.06 12:29
3
NAVIGATION SYSTEM
ROUTE INCLUDING IPD
ROADS
After the system has calculated a route,
it will advise the user whether IPD
roads are included in the route or not.
The portion of the route that covers IPD
roads is indicated by light blue.
*: The area that includes IPD roads.
No.Voice guidance
“There is the possibility that there
are traffic regulations that are not
known on the way to the destina-
tion.” (start point)
“In 400 meters, left turn.”
“Next left. Please obey all traffic
regulations.”
*
IPD roads are roads that are not yet
completely digitized in our database.
However, their geometry, name and
administrative coding are already
known.
CAUTION
Be sure to obey the traffic regulations
and keep the road condition in mind
especially when you are driving on
IPD roads. The route guidance may
not have the updated information
such as the direction of a one way
street.
Page 241 of 436

241
1. AUDIO/VIDEO SYSTEM OPERATION
5
AUDIO/VIDEO SYSTEM
CT200h_Navi_OM76078E_(EE)
14.02.06 12:30
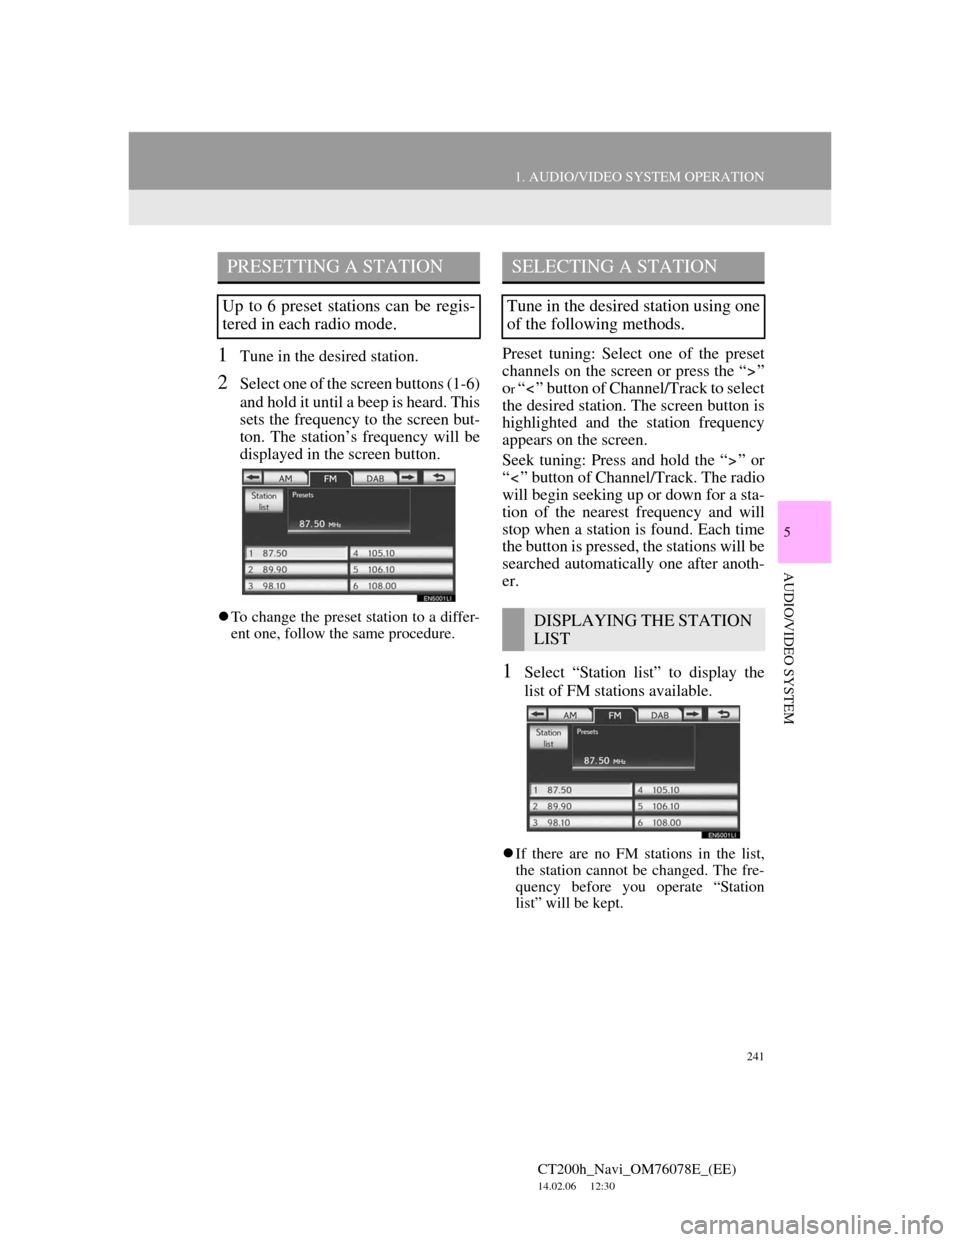
1Tune in the desired station.
2Select one of the screen buttons (1-6)
and hold it until a beep is heard. This
sets the frequency to the screen but-
ton. The station’s frequency will be
displayed in the screen button.
To change the preset station to a differ-
ent one, follow the same procedure.
Preset tuning: Select one of the preset
channels on the screen or press the “ ”
o
r “ ” button of Channel/Track to select
the desired station. The screen button is
highlighted and the station frequency
appears on the screen.
Seek tuning: Press and hold the “ ” or
“ ” button of Channel/Track. The radio
will begin seeking up or down for a sta-
tion of the nearest frequency and will
stop when a station is found. Each time
the button is pressed, the stations will be
searched automatically one after anoth-
er.
1Select “Station list” to display the
list of FM stations available.
If there are no FM stations in the list,
the station cannot be changed. The fre-
quency before you operate “Station
list” will be kept.
PRESETTING A STATION
Up to 6 preset stations can be regis-
tered in each radio mode.
SELECTING A STATION
Tune in the desired station using one
of the following methods.
DISPLAYING THE STATION
LIST
Page 244 of 436

244
1. AUDIO/VIDEO SYSTEM OPERATION
CT200h_Navi_OM76078E_(EE)
14.02.06 12:30
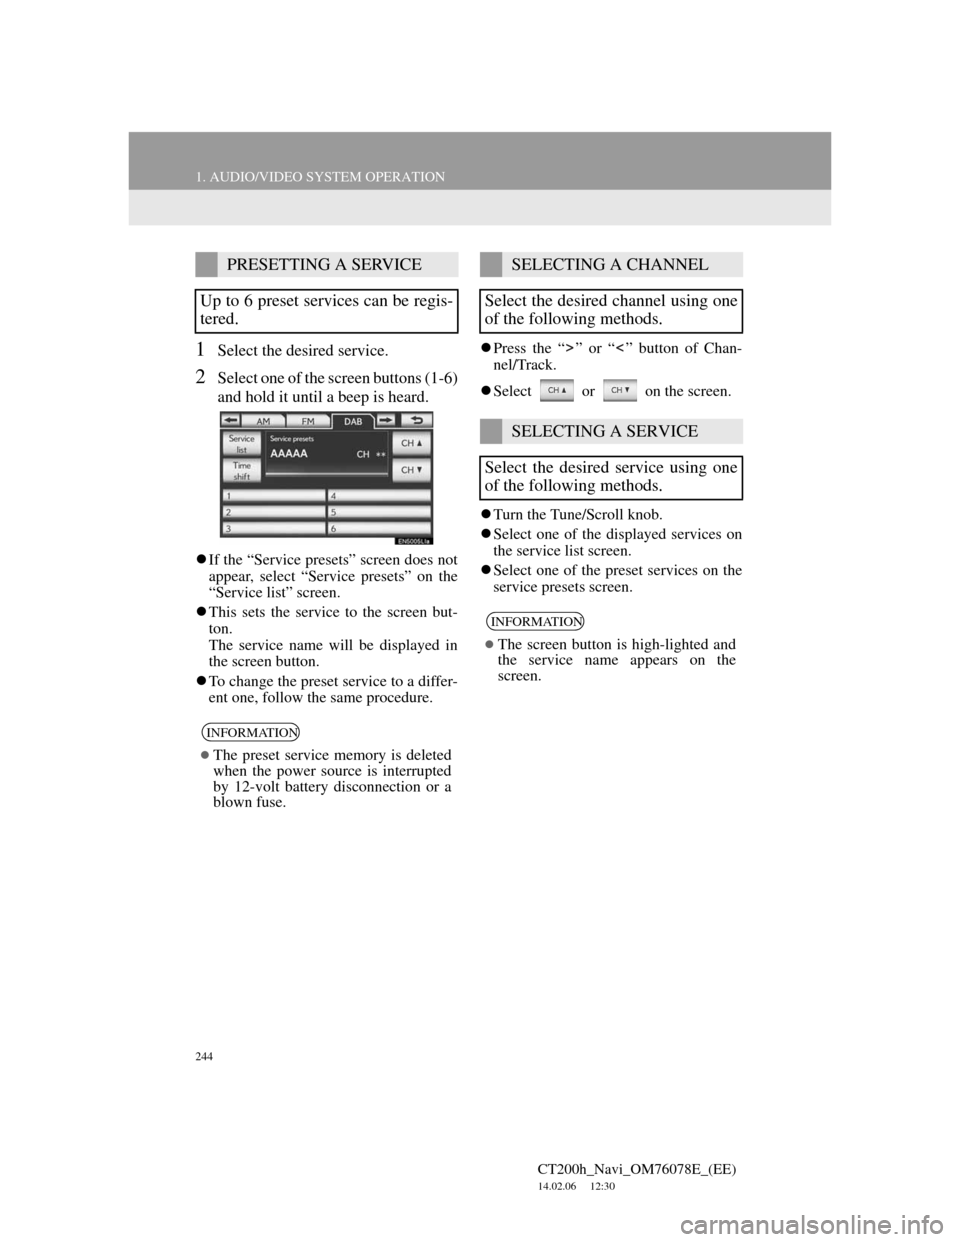
1Select the desired service.
2Select one of the screen buttons (1-6)
and hold it until a beep is heard.
If the “Service presets” screen does not
appear, select “Service presets” on the
“Service list” screen.
This sets the service to the screen but-
ton.
The service name will be displayed in
the screen button.
To change the preset service to a differ-
ent one, follow the same procedure.Press the “ ” or “ ” button of Chan-
nel/Track.
Select or on the screen.
Turn the Tune/Scroll knob.
Select one of the displayed services on
the service list screen.
Select one of the preset services on the
service presets screen.
PRESETTING A SERVICE
Up to 6 preset services can be regis-
tered.
INFORMATION
The preset service memory is deleted
when the power source is interrupted
by 12-volt battery disconnection or a
blown fuse.
SELECTING A CHANNEL
Select the desired channel using one
of the following methods.
SELECTING A SERVICE
Select the desired service using one
of the following methods.
INFORMATION
The screen button is high-lighted and
the service name appears on the
screen.