Page 24 of 436
24
2. FUNCTION INDEX
CT200h_Navi_OM76078E_(EE)
14.02.06 12:29
Useful functions
Before starting or during route guidancePage
Viewing the route102
Adding destinations115
Changing the route118
Displaying the estimated travel/arrival time to the destination112
During route guidancePage
Suspending route guidance113
Adjusting route guidance volume74
Deleting the destination116
Displaying the entire route map119
Memory pointsPage
Registering memory points133
Marking icons on the map134
InformationPage
Displaying vehicle maintenance157
Hands-free system (for cellular phone)Page
Initiating Bluetooth®172
Making a call on a Bluetooth® phone181
Receiving a call on the Bluetooth® phone188
Speech command systemPage
Operating the system with your voice322
Page 32 of 436
32
3. QUICK REFERENCE
CT200h_Navi_OM76078E_(EE)
14.02.06 12:29
No.NameFunctionPage
“General”
Select to change the selected language, oper-
ation sound, automatic screen change set-
tings, etc.
60
“Voice”Select to set the voice guidance settings.73
“Navigation”Select to access the page which enables the
setting of the average speed, displayed screen
contents, POI categories, etc.151
“Vehicle”Select to set vehicle information such as
maintenance information.157
“Info”Select to set traffic information, traffic predic-
tion information and parking information.338
“Audio”Select to set sound, radio and iPod settings.299
“Bluetooth*”Select to set Bluetooth® phones and
Bluetooth® audio devices.218
“Telephone”Select to set the telephone sound, phonebook,
message settings, etc.195
*: Bluetooth is a registered trademark of Bluetooth SIG, Inc.
Page 36 of 436

36
CT200h_Navi_OM76078E_(EE)
14.02.06 12:29
1. BASIC INFORMATION BEFORE OPERATION
1. INITIAL SCREEN
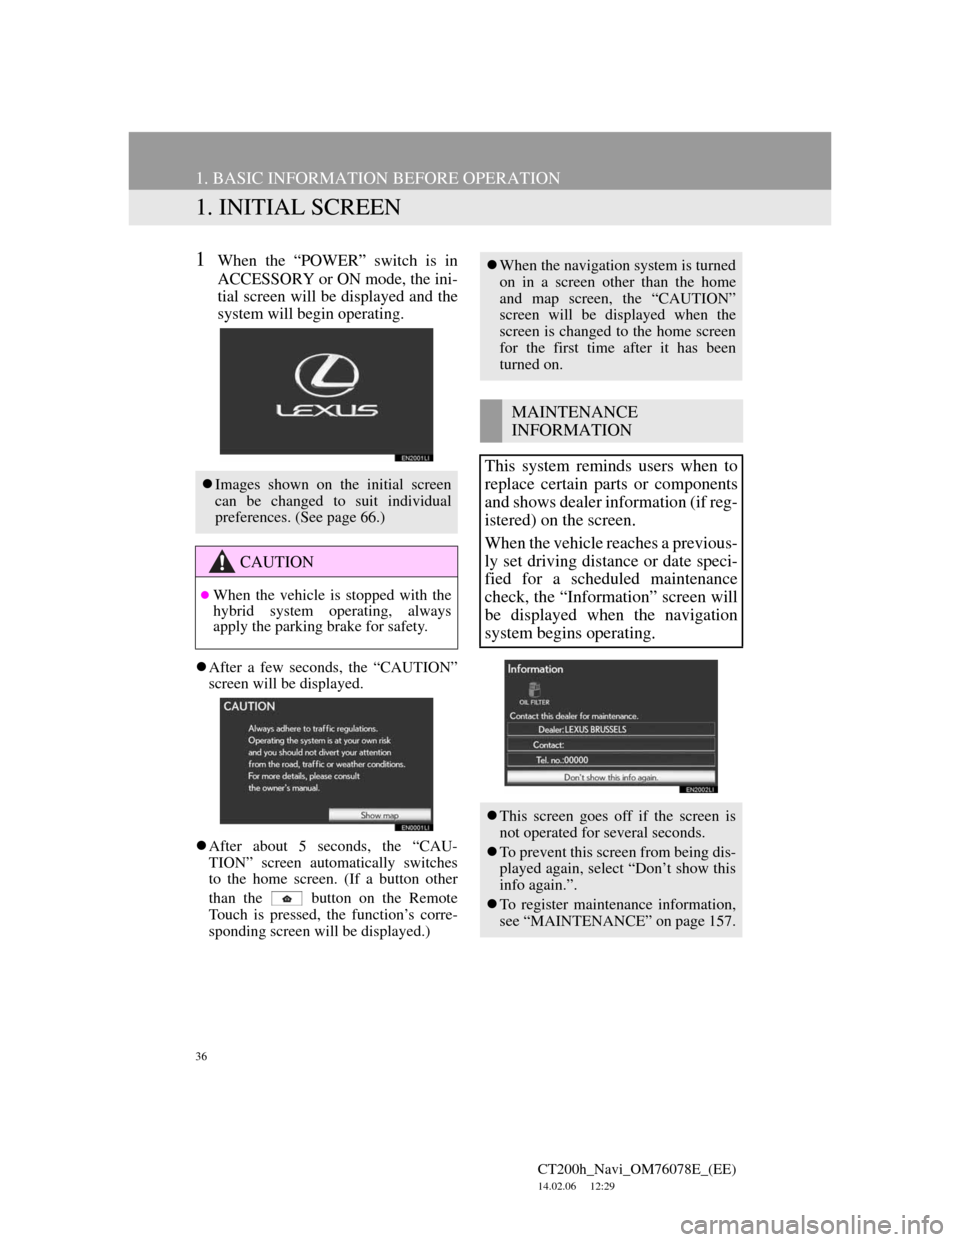
1When the “POWER” switch is in
ACCESSORY or ON mode, the ini-
tial screen will be displayed and the
system will begin operating.
After a few seconds, the “CAUTION”
screen will be displayed.
After about 5 seconds, the “CAU-
TION” screen automatically switches
to the home screen. (If a button other
than the
button on the Remote
Touch is pressed, the function’s corre-
sponding screen will be displayed.)
Images shown on the initial screen
can be changed to suit individual
preferences. (See page 66.)
CAUTION
When the vehicle is stopped with the
hybrid system operating, always
apply the parking brake for safety.
When the navigation system is turned
on in a screen other than the home
and map screen, the “CAUTION”
screen will be displayed when the
screen is changed to the home screen
for the first time after it has been
turned on.
MAINTENANCE
INFORMATION
This system reminds users when to
replace certain parts or components
and shows dealer information (if reg-
istered) on the screen.
When the vehicle reaches a previous-
ly set driving distance or date speci-
fied for a scheduled maintenance
check, the “Information” screen will
be displayed when the navigation
system begins operating.
This screen goes off if the screen is
not operated for several seconds.
To prevent this screen from being dis-
played again, select “Don’t show this
info again.”.
To register maintenance information,
see “MAINTENANCE” on page 157.
Page 72 of 436
72
2. SETUP
CT200h_Navi_OM76078E_(EE)
14.02.06 12:29
1Press the “MENU” button on the
Remote Touch, then select “Setup”.
2Select “General” on the “Setup”
screen.
3Select “Delete personal data”.
4Select “Delete”.
5Select “Yes”.
The following personal data can be
deleted or returned to their default set-
tings:
• Maintenance conditions
• Maintenance information off setting
• Memory point
• Password settings for backing up and
copying memory points
• Areas to avoid
• Previous points
• Route guidance
• Route trace
• Phonebook data
• Call history data
• Speed dial data
•Bluetooth
® phone data
• Phone sound settings
• Phone display settings
• Message settings
• Audio setting
•Bluetooth
® audio setting
• Search engine settings
• Opening image data
• Screen off image data
DELETING PERSONAL
DATA
INFORMATION
This function is not available while
driving.
Page 77 of 436

3
77
1
2
3
4
5
6
7
CT200h_Navi_OM76078E_(EE)
14.02.06 12:29
8
9
10
1. ROUTE GUIDANCE SCREEN ...... 105
2. TYPICAL VOICE GUIDANCE
PROMPTS ..................................... 109
3. DISTANCE AND TIME TO
DESTINATION............................. 112
4. SUSPENDING AND RESUMING
GUIDANCE .................................. 113
SUSPENDING GUIDANCE ................. 113
RESUMING GUIDANCE ..................... 113
5. SETTING ROUTE........................... 114
ADDING DESTINATIONS .................. 115
REORDERING DESTINATIONS ........ 115
DELETING DESTINATIONS .............. 116
SEARCH CONDITION ......................... 117
DETOUR SETTING .............................. 118
ROAD PREFERENCE .......................... 119
ROUTE OVERVIEW ............................ 119
ROUTE TRACE .................................... 121
6. DISPLAY POI* ICONS .................. 122
SELECTING POI* ICONS TO BE
DISPLAYED ....................................... 122
1. MEMORY POINT SETTINGS ...... 125
SETTING UP THE “Home”................... 126
SETTING UP THE “Quick access” ....... 129
SETTING UP THE “Memory points” .... 133
SETTING UP THE “Area to avoid”....... 141
DELETING PREVIOUS
DESTINATIONS ................................. 146
BACKUP TO A USB MEMORY .......... 147
COPYING FROM A USB MEMORY... 149
1. NAVIGATION SETTINGS ............ 151
SCREENS FOR NAVIGATION
SETTINGS ........................................... 151
2. VEHICLE SETTINGS .................... 157
MAINTENANCE ................................... 157
VEHICLE CUSTOMIZATION ............. 162
1. LIMITATIONS OF THE
NAVIGATION SYSTEM............. 163
2. MAP DATABASE VERSION AND
COVERED AREA ........................ 166
MAP INFORMATION ........................... 166
2ROUTE GUIDANCE3MEMORY POINTS
4SETUP
5GPS (GLOBAL POSITIONING
SYSTEM)
NAVIGATION SYSTEM
For vehicles sold outside Europe, some of the functions cannot be operated while
driving.
Page 157 of 436
157
4. SETUP
CT200h_Navi_OM76078E_(EE)
14.02.06 12:30
3
NAVIGATION SYSTEM
2. VEHICLE SETTINGS
1Press the “MENU” button on the
Remote Touch.
2Select “Setup”.
3Select “Vehicle”.
4Select “Maintenance”.
5Select the desired screen button.
Setting maintenance information (See
page 158.)
Setting dealer (See page 159.)
MAINTENANCE
When the navigation system is
turned on, the “Information” screen
displays when it is time to replace a
part or certain components. (See
page 36.)
Page 158 of 436

158
4. SETUP
CT200h_Navi_OM76078E_(EE)
14.02.06 12:30
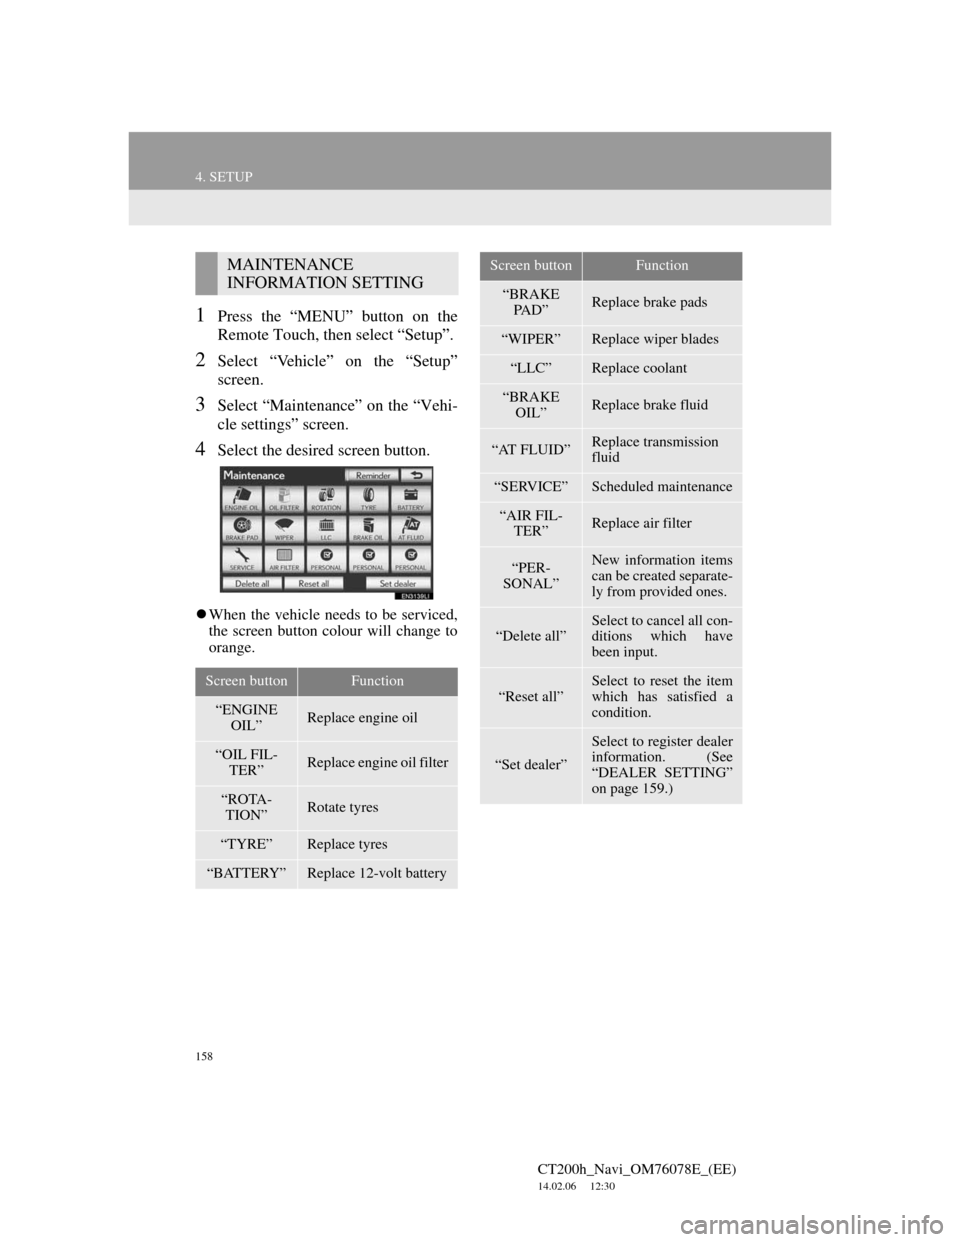
1Press the “MENU” button on the
Remote Touch, then select “Setup”.
2Select “Vehicle” on the “Setup”
screen.
3Select “Maintenance” on the “Vehi-
cle settings” screen.
4Select the desired screen button.
When the vehicle needs to be serviced,
the screen button colour will change to
orange.
MAINTENANCE
INFORMATION SETTING
Screen buttonFunction
“ENGINE
OIL”Replace engine oil
“OIL FIL-
TER”Replace engine oil filter
“ROTA-
TION”Rotate tyres
“TYRE”Replace tyres
“BATTERY”Replace 12-volt battery
“BRAKE
PA D ”Replace brake pads
“WIPER”Replace wiper blades
“LLC”Replace coolant
“BRAKE
OIL”Replace brake fluid
“AT FLUID”Replace transmission
fluid
“SERVICE”Scheduled maintenance
“AIR FIL-
TER”Replace air filter
“PER-
SONAL”New information items
can be created separate-
ly from provided ones.
“Delete all”Select to cancel all con-
ditions which have
been input.
“Reset all”
Select to reset the item
which has satisfied a
condition.
“Set dealer”
Select to register dealer
information. (See
“DEALER SETTING”
on page 159.)
Screen buttonFunction
Page 159 of 436

159
4. SETUP
CT200h_Navi_OM76078E_(EE)
14.02.06 12:30
3
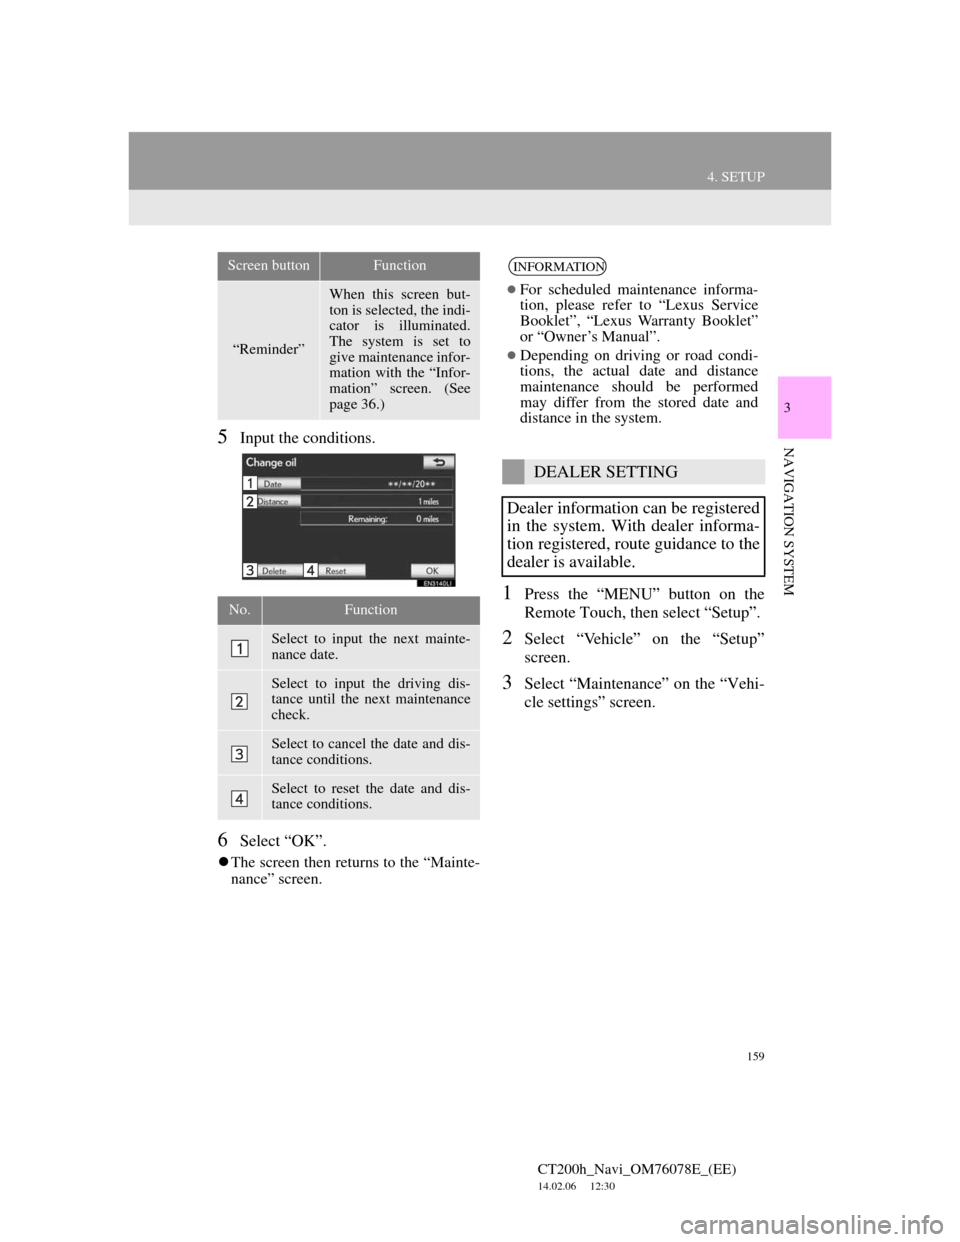
NAVIGATION SYSTEM5Input the conditions.
6Select “OK”.
The screen then returns to the “Mainte-
nance” screen.
1Press the “MENU” button on the
Remote Touch, then select “Setup”.
2Select “Vehicle” on the “Setup”
screen.
3Select “Maintenance” on the “Vehi-
cle settings” screen.
“Reminder”
When this screen but-
ton is selected, the indi-
cator is illuminated.
The system is set to
give maintenance infor-
mation with the “Infor-
mation” screen. (See
page 36.)
No.Function
Select to input the next mainte-
nance date.
Select to input the driving dis-
tance until the next maintenance
check.
Select to cancel the date and dis-
tance conditions.
Select to reset the date and dis-
tance conditions.
Screen buttonFunctionINFORMATION
For scheduled maintenance informa-
tion, please refer to “Lexus Service
Booklet”, “Lexus Warranty Booklet”
or “Owner’s Manual”.
Depending on driving or road condi-
tions, the actual date and distance
maintenance should be performed
may differ from the stored date and
distance in the system.
DEALER SETTING
Dealer information can be registered
in the system. With dealer informa-
tion registered, route guidance to the
dealer is available.