Page 74 of 436
74
2. SETUP
CT200h_Navi_OM76078E_(EE)
14.02.06 12:29
On this screen, the following functions
can be performed:
To reset all setup items, select
“Default”.
1Press the “MENU” button on the
Remote Touch, then select “Setup”.
2Select “Voice” on the “Setup”
screen.
3Select the desired level by selecting
the appropriate number.
If voice guidance is not needed, select
“Off” to disable the feature.
4Select “OK”.
SCREEN FOR VOICE
SETTINGS
No
.Function
The voice guidance volume can be
adjusted or switched off. (See
“VOICE VOLUME” on page 74.)
Voice recognition guidance can be
set to “On” or “Off”. This setting
can also be changed on the “Short-
cuts” screen. (See page 322.)
Voice guidance during audio/vid-
eo and/or air conditioning system
use can be set to “On” or “Off”.
Voice guidance during route guid-
ance can be set to “On” or “Off”.
VOICE VOLUME
The voice guidance volume can be
adjusted or switched off.
Page 152 of 436
152
4. SETUP
CT200h_Navi_OM76078E_(EE)
14.02.06 12:30
To reset all setup items, select
“Default”.
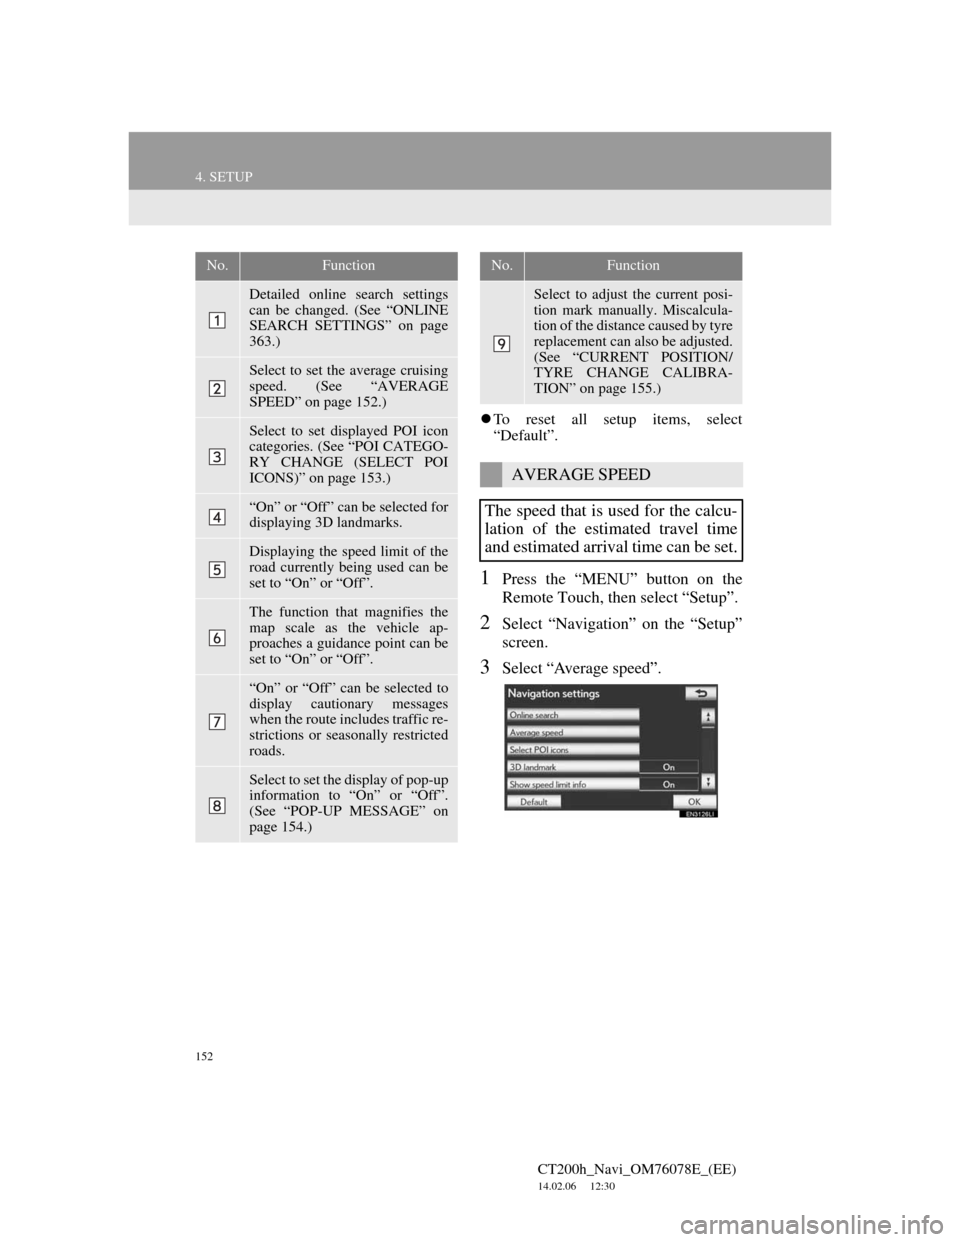
1Press the “MENU” button on the
Remote Touch, then select “Setup”.
2Select “Navigation” on the “Setup”
screen.
3Select “Average speed”.
No.Function
Detailed online search settings
can be changed. (See “ONLINE
SEARCH SETTINGS” on page
363.)
Select to set the average cruising
speed. (See “AVERAGE
SPEED” on page 152.)
Select to set displayed POI icon
categories. (See “POI CATEGO-
RY CHANGE (SELECT POI
ICONS)” on page 153.)
“On” or “Off” can be selected for
displaying 3D landmarks.
Displaying the speed limit of the
road currently being used can be
set to “On” or “Off”.
The function that magnifies the
map scale as the vehicle ap-
proaches a guidance point can be
set to “On” or “Off”.
“On” or “Off” can be selected to
display cautionary messages
when the route includes traffic re-
strictions or seasonally restricted
roads.
Select to set the display of pop-up
information to “On” or “Off”.
(See “POP-UP MESSAGE” on
page 154.)
Select to adjust the current posi-
tion mark manually. Miscalcula-
tion of the distance caused by tyre
replacement can also be adjusted.
(See “CURRENT POSITION/
TYRE CHANGE CALIBRA-
TION” on page 155.)
AVERAGE SPEED
The speed that is used for the calcu-
lation of the estimated travel time
and estimated arrival time can be set.
No.Function
Page 158 of 436
158
4. SETUP
CT200h_Navi_OM76078E_(EE)
14.02.06 12:30
1Press the “MENU” button on the
Remote Touch, then select “Setup”.
2Select “Vehicle” on the “Setup”
screen.
3Select “Maintenance” on the “Vehi-
cle settings” screen.
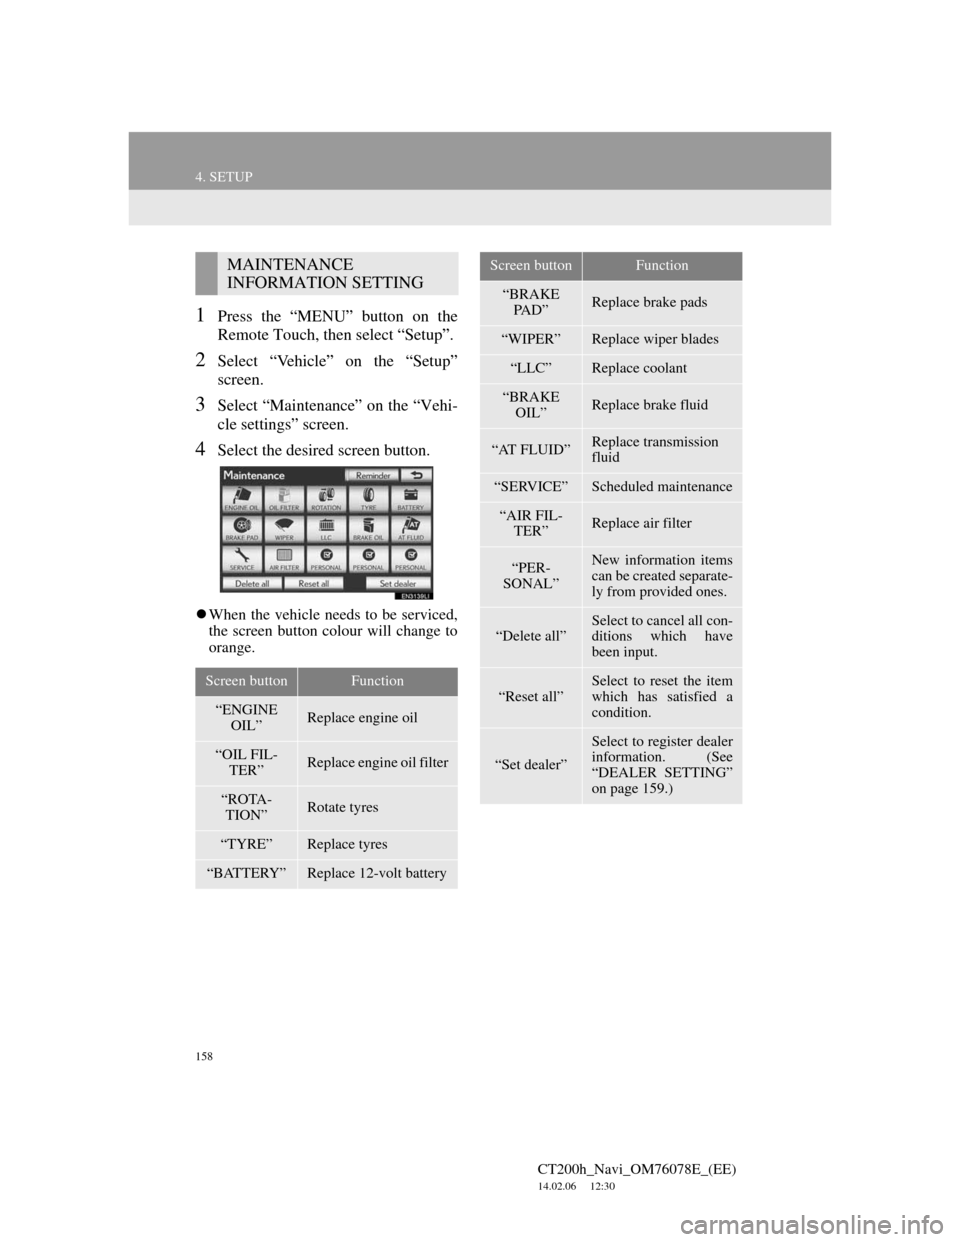
4Select the desired screen button.
When the vehicle needs to be serviced,
the screen button colour will change to
orange.
MAINTENANCE
INFORMATION SETTING
Screen buttonFunction
“ENGINE
OIL”Replace engine oil
“OIL FIL-
TER”Replace engine oil filter
“ROTA-
TION”Rotate tyres
“TYRE”Replace tyres
“BATTERY”Replace 12-volt battery
“BRAKE
PA D ”Replace brake pads
“WIPER”Replace wiper blades
“LLC”Replace coolant
“BRAKE
OIL”Replace brake fluid
“AT FLUID”Replace transmission
fluid
“SERVICE”Scheduled maintenance
“AIR FIL-
TER”Replace air filter
“PER-
SONAL”New information items
can be created separate-
ly from provided ones.
“Delete all”Select to cancel all con-
ditions which have
been input.
“Reset all”
Select to reset the item
which has satisfied a
condition.
“Set dealer”
Select to register dealer
information. (See
“DEALER SETTING”
on page 159.)
Screen buttonFunction
Page 159 of 436
159
4. SETUP
CT200h_Navi_OM76078E_(EE)
14.02.06 12:30
3
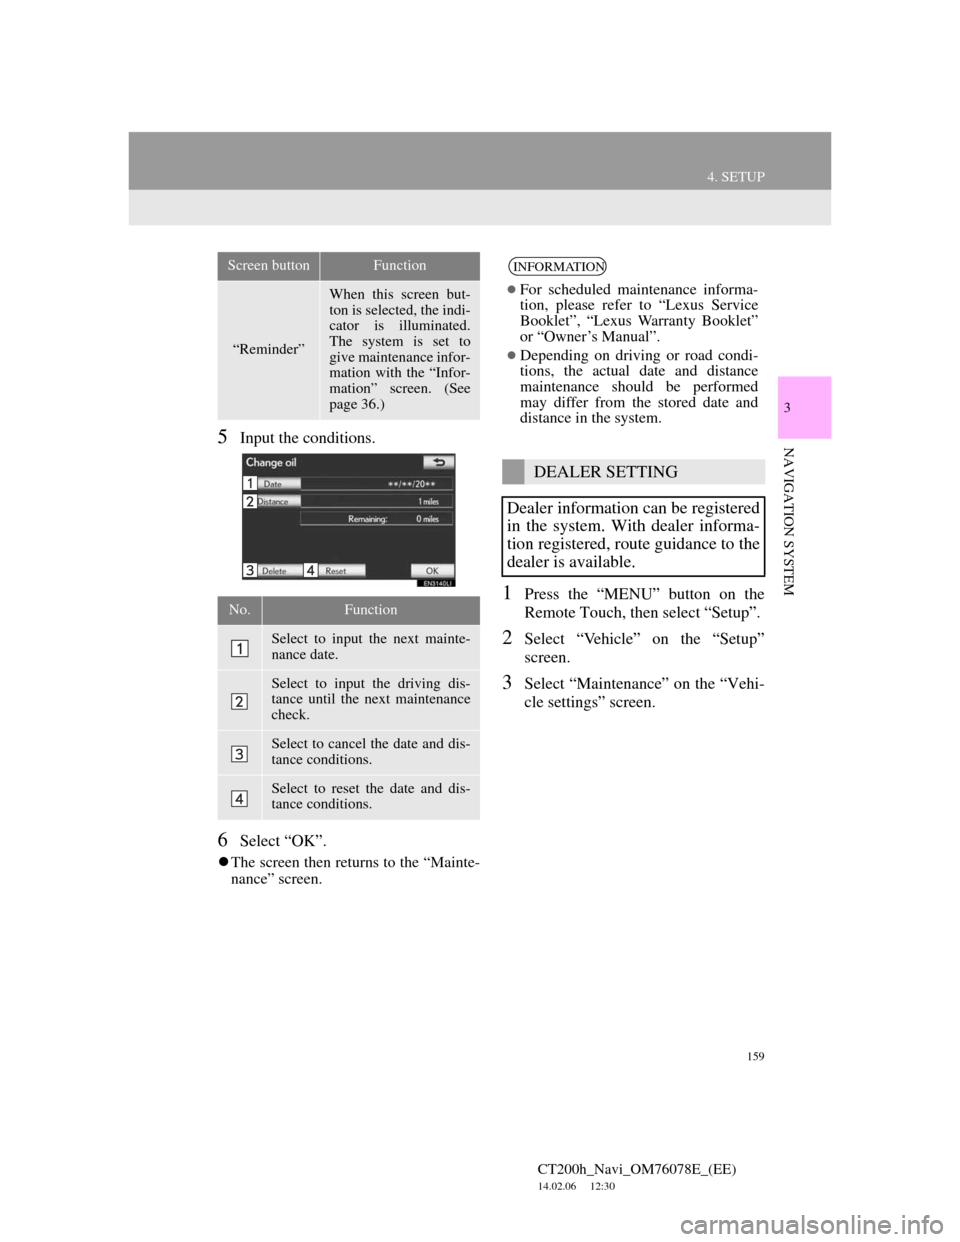
NAVIGATION SYSTEM5Input the conditions.
6Select “OK”.
The screen then returns to the “Mainte-
nance” screen.
1Press the “MENU” button on the
Remote Touch, then select “Setup”.
2Select “Vehicle” on the “Setup”
screen.
3Select “Maintenance” on the “Vehi-
cle settings” screen.
“Reminder”
When this screen but-
ton is selected, the indi-
cator is illuminated.
The system is set to
give maintenance infor-
mation with the “Infor-
mation” screen. (See
page 36.)
No.Function
Select to input the next mainte-
nance date.
Select to input the driving dis-
tance until the next maintenance
check.
Select to cancel the date and dis-
tance conditions.
Select to reset the date and dis-
tance conditions.
Screen buttonFunctionINFORMATION
For scheduled maintenance informa-
tion, please refer to “Lexus Service
Booklet”, “Lexus Warranty Booklet”
or “Owner’s Manual”.
Depending on driving or road condi-
tions, the actual date and distance
maintenance should be performed
may differ from the stored date and
distance in the system.
DEALER SETTING
Dealer information can be registered
in the system. With dealer informa-
tion registered, route guidance to the
dealer is available.
Page 212 of 436
212
2. SETUP
CT200h_Navi_OM76078E_(EE)
14.02.06 12:30
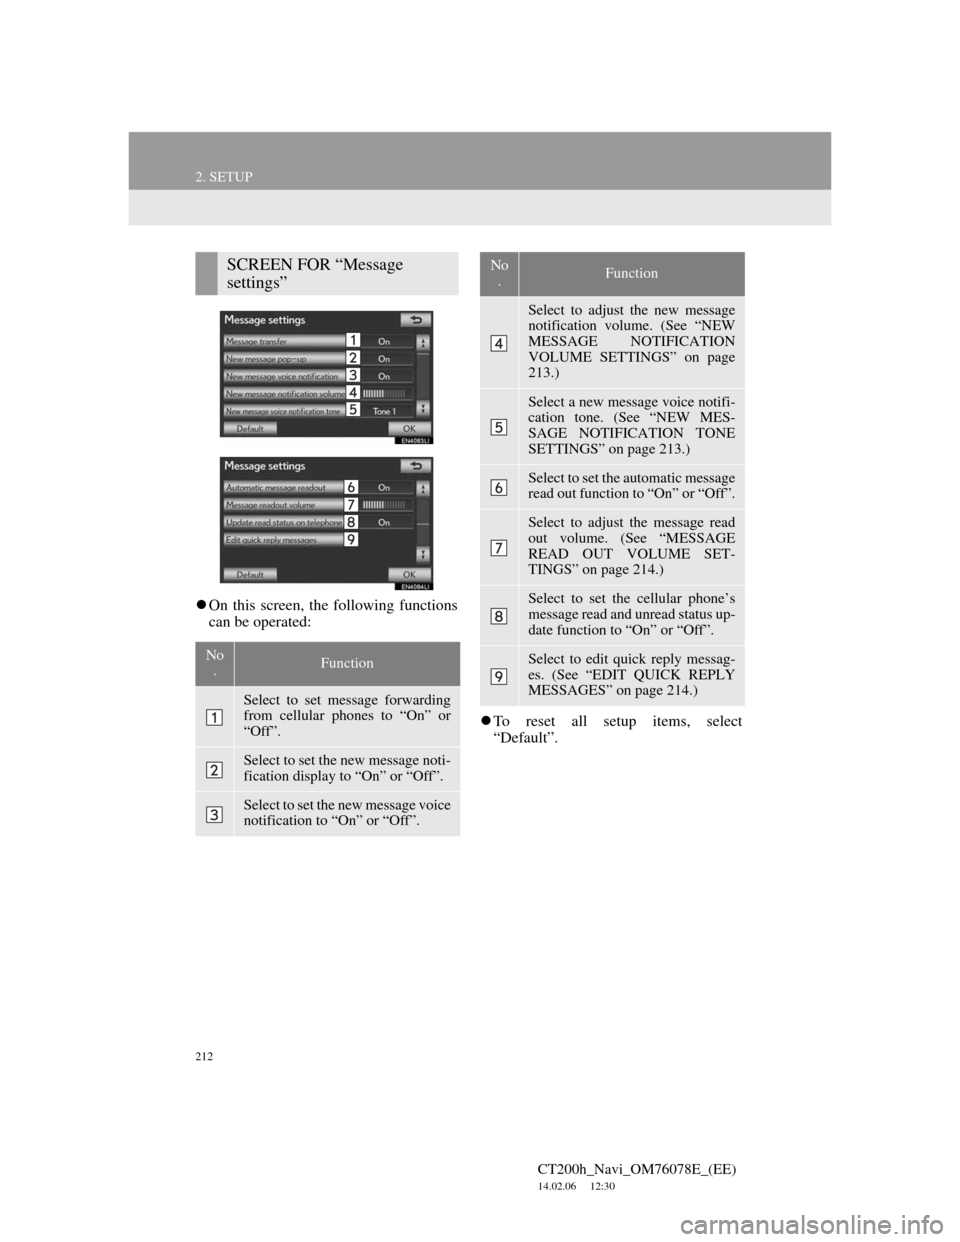
On this screen, the following functions
can be operated:
To reset all setup items, select
“Default”.
SCREEN FOR “Message
settings”
No
.Function
Select to set message forwarding
from cellular phones to “On” or
“Off”.
Select to set the new message noti-
fication display to “On” or “Off”.
Select to set the new message voice
notification to “On” or “Off”.
Select to adjust the new message
notification volume. (See “NEW
MESSAGE NOTIFICATION
VOLUME SETTINGS” on page
213.)
Select a new message voice notifi-
cation tone. (See “NEW MES-
SAGE NOTIFICATION TONE
SETTINGS” on page 213.)
Select to set the automatic message
read out function to “On” or “Off”.
Select to adjust the message read
out volume. (See “MESSAGE
READ OUT VOLUME SET-
TINGS” on page 214.)
Select to set the cellular phone’s
message read and unread status up-
date function to “On” or “Off”.
Select to edit quick reply messag-
es. (See “EDIT QUICK REPLY
MESSAGES” on page 214.)
No
.Function
Page 230 of 436
230
CT200h_Navi_OM76078E_(EE)
14.02.06 12:30
1. QUICK REFERENCE..................... 232
2. SOME BASICS ............................... 234
SPEECH COMMAND SYSTEM .......... 234
TURNING THE SYSTEM
ON AND OFF...................................... 235
SWITCHING BETWEEN
FUNCTIONS ....................................... 235
SELECTING SCREEN SIZE................. 236
DVD PLAYER ....................................... 237
AUX PORT ............................................ 238
USB PORT ............................................. 239
PORTABLE AUDIO DEVICE
HOLDER ............................................. 239
3. RADIO OPERATION ..................... 240
LISTENING TO THE RADIO .............. 240
PRESETTING A STATION .................. 241
SELECTING A STATION .................... 241
RDS (RADIO DATA SYSTEM) ........... 242
LISTENING TO THE DAB................... 243
1AUDIO/VIDEO SYSTEM
OPERATION
Page 232 of 436
232
CT200h_Navi_OM76078E_(EE)
14.02.06 12:30
1. AUDIO/VIDEO SYSTEM OPERATION
1. QUICK REFERENCE
Operations such as selecting a preset station and adjusting the sound balance
are carried out on the screen.
Using the instrument panel
Press the “RADIO” or “MEDIA” button to display the audio/video screen.
Using the Remote Touch
Press the “MENU” button on the Remote Touch, then select “Audio” to dis-
play the audio/video screen.
If a Mark Levinson brand audio system is installed, the “Mark Levinson” logo
is shown on the panel.
Page 233 of 436
233
1. AUDIO/VIDEO SYSTEM OPERATION
5
AUDIO/VIDEO SYSTEM
CT200h_Navi_OM76078E_(EE)
14.02.06 12:30
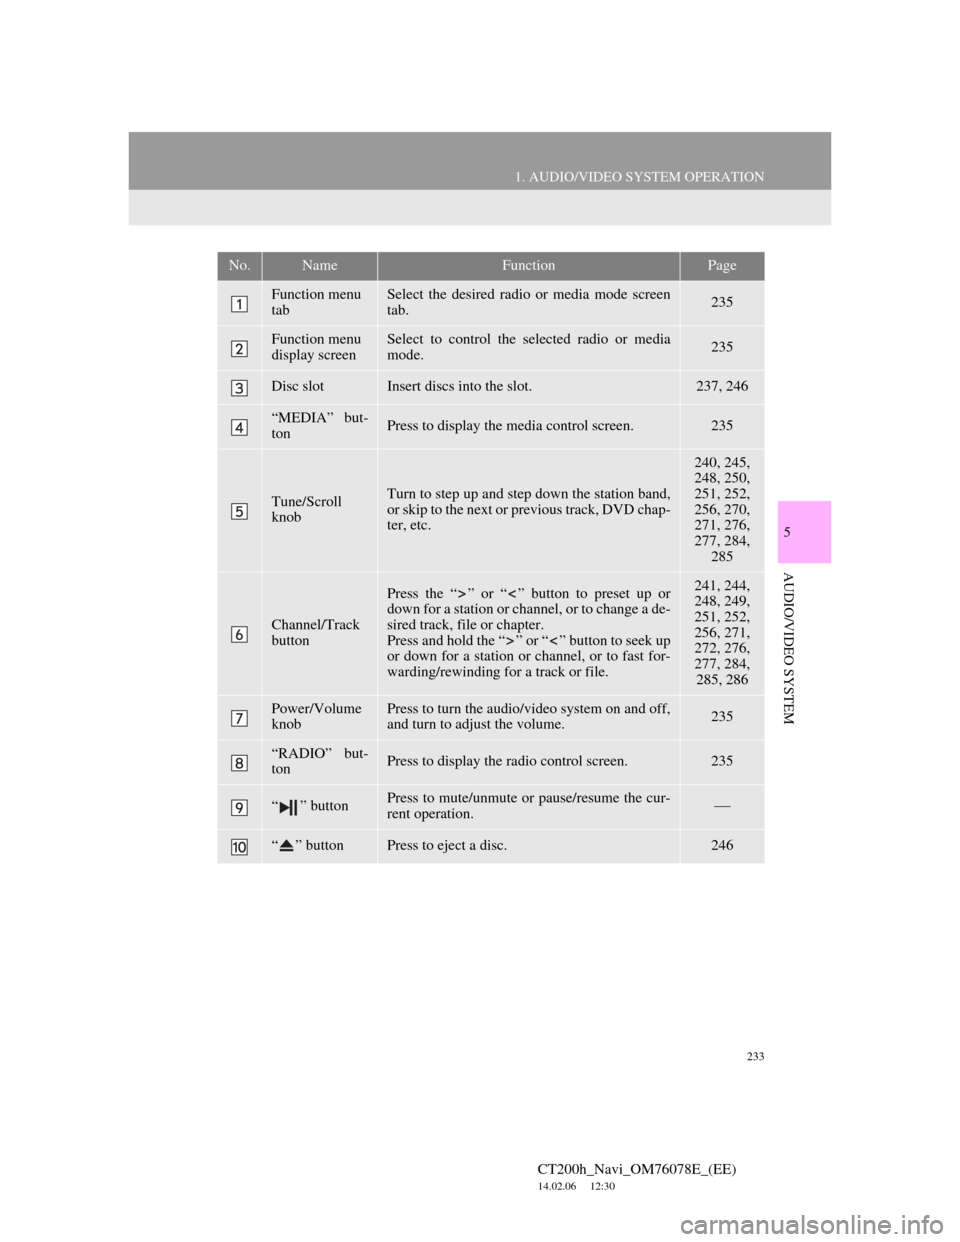
No.NameFunctionPage
Function menu
tabSelect the desired radio or media mode screen
tab.235
Function menu
display screenSelect to control the selected radio or media
mode.235
Disc slotInsert discs into the slot.237, 246
“MEDIA” but-
tonPress to display the media control screen.235
Tune/Scroll
knobTurn to step up and step down the station band,
or skip to the next or previous track, DVD chap-
ter, etc.
240, 245,
248, 250,
251, 252,
256, 270,
271, 276,
277, 284,
285
Channel/Track
button
Press the “ ” or “ ” button to preset up or
down for a station or channel, or to change a de-
sired track, file or chapter.
Press and hold the “ ” or “ ” button to seek up
or down for a station or channel, or to fast for-
warding/rewinding for a track or file.241, 244,
248, 249,
251, 252,
256, 271,
272, 276,
277, 284,
285, 286
Power/Volume
knobPress to turn the audio/video system on and off,
and turn to adjust the volume.235
“RADIO” but-
tonPress to display the radio control screen.235
“ ” buttonPress to mute/unmute or pause/resume the cur-
rent operation.
“ ” buttonPress to eject a disc.246