2012 CITROEN C6 Handbook (in English)
-
 1
1 -
 2
2 -
 3
3 -
 4
4 -
 5
5 -
 6
6 -
 7
7 -
 8
8 -
 9
9 -
 10
10 -
 11
11 -
 12
12 -
 13
13 -
 14
14 -
 15
15 -
 16
16 -
 17
17 -
 18
18 -
 19
19 -
 20
20 -
 21
21 -
 22
22 -
 23
23 -
 24
24 -
 25
25 -
 26
26 -
 27
27 -
 28
28 -
 29
29 -
 30
30 -
 31
31 -
 32
32 -
 33
33 -
 34
34 -
 35
35 -
 36
36 -
 37
37 -
 38
38 -
 39
39 -
 40
40 -
 41
41 -
 42
42 -
 43
43 -
 44
44 -
 45
45 -
 46
46 -
 47
47 -
 48
48 -
 49
49 -
 50
50 -
 51
51 -
 52
52 -
 53
53 -
 54
54 -
 55
55 -
 56
56 -
 57
57 -
 58
58 -
 59
59 -
 60
60 -
 61
61 -
 62
62 -
 63
63 -
 64
64 -
 65
65 -
 66
66 -
 67
67 -
 68
68 -
 69
69 -
 70
70 -
 71
71 -
 72
72 -
 73
73 -
 74
74 -
 75
75 -
 76
76 -
 77
77 -
 78
78 -
 79
79 -
 80
80 -
 81
81 -
 82
82 -
 83
83 -
 84
84 -
 85
85 -
 86
86 -
 87
87 -
 88
88 -
 89
89 -
 90
90 -
 91
91 -
 92
92 -
 93
93 -
 94
94 -
 95
95 -
 96
96 -
 97
97 -
 98
98 -
 99
99 -
 100
100 -
 101
101 -
 102
102 -
 103
103 -
 104
104 -
 105
105 -
 106
106 -
 107
107 -
 108
108 -
 109
109 -
 110
110 -
 111
111 -
 112
112 -
 113
113 -
 114
114 -
 115
115 -
 116
116 -
 117
117 -
 118
118 -
 119
119 -
 120
120 -
 121
121 -
 122
122 -
 123
123 -
 124
124 -
 125
125 -
 126
126 -
 127
127 -
 128
128 -
 129
129 -
 130
130 -
 131
131 -
 132
132 -
 133
133 -
 134
134 -
 135
135 -
 136
136 -
 137
137 -
 138
138 -
 139
139 -
 140
140 -
 141
141 -
 142
142 -
 143
143 -
 144
144 -
 145
145 -
 146
146 -
 147
147 -
 148
148 -
 149
149 -
 150
150 -
 151
151 -
 152
152 -
 153
153 -
 154
154 -
 155
155 -
 156
156 -
 157
157 -
 158
158 -
 159
159 -
 160
160 -
 161
161 -
 162
162 -
 163
163 -
 164
164 -
 165
165 -
 166
166 -
 167
167 -
 168
168 -
 169
169 -
 170
170 -
 171
171 -
 172
172 -
 173
173 -
 174
174 -
 175
175 -
 176
176 -
 177
177 -
 178
178 -
 179
179 -
 180
180 -
 181
181 -
 182
182 -
 183
183 -
 184
184 -
 185
185 -
 186
186 -
 187
187 -
 188
188 -
 189
189 -
 190
190 -
 191
191 -
 192
192 -
 193
193 -
 194
194 -
 195
195 -
 196
196 -
 197
197 -
 198
198 -
 199
199 -
 200
200 -
 201
201 -
 202
202 -
 203
203 -
 204
204 -
 205
205 -
 206
206 -
 207
207 -
 208
208 -
 209
209 -
 210
210 -
 211
211 -
 212
212 -
 213
213 -
 214
214 -
 215
215
 135
V
A
B
holders and change the bulbs.Note: The tool for undoing thescrews is to be found in the toolbox in the spare wheel. See \"Changing a wheel\".
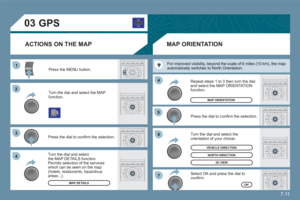
REAR CENTRAL LENSAReversing lampBFoglamp
The bulbs")
 136
V
A
BC
D
CHANGING BULBS
REAR LATERAL LENSA Parking lamp.
Bulb: W 5 W.
B Stoplamp and parking lamp.
Bulb: P21 W/5 W.
C Direction indicator.
Bulb: P21 W cristal.
DLateral lamp.
Bulb: W 5 W.
1. Open")
 137
V
B
C
D
A
CHANGING BULBS
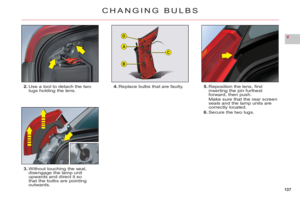
2.Use a tool to detach the twolugs holding the lens.
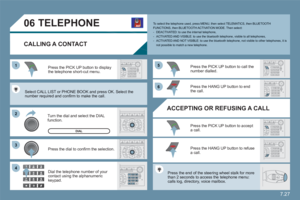
3.Without touching the seal,
disengage the lamp unit
upwards and direct it so
that the bulbs are pointingoutwards.5")
 138
V
A
SAFETY RECOMMENDATIONS
It is recommended that towbar installation and removal bedone by a CITROËN dealer or a qualifi ed workshop.
If you are towing another vehicle, the latter must be free-")
 139
V
ROOF BARS
Do not exceed the maximum permittedload.
For the maximum distributed load on theroof bars: see the chapter \"General\".
Recommendations:Spread the load evenly, avoiding overloading onone")
 14 0
V
COLD WEATHER SHIELD
After fi tting Before fi tting
FITTING/REMOVAL OF THE
SNOW-GUARD
Fitting
Clip the snow-guard onto the ribs
of the bumper.
Removal
To detach the snow-guard, slide
the tool")
 141
V
4
3
8
9
61
2
5
7
CHANGING A WHEEL
ACCESS TO THE SPARE WHEEL
To access the spare wheel1.Lift the boot fl oor by means of the strap.2.Anchor the strap on the roof of the boot.3.To remove the spa")
 142
V
Before positioning the jack, always adjust the vehicles groundclearance to the \"maximum height\" position and retain thisadjustment for as long as the jack is under the vehicle (do notuse the hy")