Page 89 of 216

87
III
1
2a2b1
3a3b4
765
AUTOMATIC AIR CONDITIONING
The system has a differentiated adjustment for the driver's side and passenger's side, in terms of temperature andair distribution. The air fl ow is common to both sides.
Symbols and messages relating to the automatic air conditioning controls will display on the multifunction screen.
2. TEMPERATURE ADJUSTMENT
To adjust the temperature, press on button2ato modifythe temperature on the passenger's side and on but-
ton 2b to modify it on the driver's side.
An ad
justment around 21 will give you the optimumcomfort level. However, depending on your preferences
anywhere between 18 and 24 is quite usual.
Operating the air conditioning system on"AUTO"guarantees good ventilation inside the cabin.Note:there may be a difference between the actual
cabin temperature and the fi gure displayed.
This is the normal operatin
g mode for the system. Depending on the temperature chosen, a press on this
button, confi rmed by the lighting of the warning lamp,
will automatically and simultaneously bring all the fol-lowing functions into play:Air fl ow.
Cabin temperature.
Air distribution.Exterior air intake/Air recirculation.
It is recommended to keep all the air vents open. Just by pressing any of the buttons, except for temperature 2aand 2b, you can change to manual mode. The warning lamp goes off, and the automatic air intake function is deactivated.
•
•
••
1. AUTOMATIC OPERATION
Page 90 of 216

88
III
AUTOMATIC AIR CONDITIONING
Remarks:When starting from cold, in order to prevent
unwanted cold air, the air fl ow will increase onlygradually to its optimum level.
If you enter the vehicle after a fairly prolongedstop and the temperature inside the vehicle is
uncomfortable, it serves no purpose to modify
the temperature that is displayed as an attempt
to go immediately to the desired comfort level.
The system automatically uses all of its power tocompensate the temperature gap as quickly as possible.
Remarks:Water arising from the condensation in the air conditioning drains out through a hole provided for this purpose; a pool of water may thus form
underneath the vehicle when stationary.
Whatever the time of year, even in cool weather the
air conditioning is useful in removing humidity and
misting.
You are advised to have the air conditioning system checked on a regular basis. See
"Maintenance and Warranty Guide".
If you are towing a heavy trailer and outside
temperatures are high, the air conditioning may
be temporarily paused if the engine cooling
requires this.
•
•
•
•
•
•
Manual mode
One or more functions can be adjusted manually, whilestill retaining the other functions in automatic mode.
To return to"AUTO" mode, press button 1.
Stopping the air conditioning
Turn the control4to the left until the air fl ow stops com-pletely. The symbol "OFF"appears on the screen.
The display and the warning lamps go out, indicatingdeactivation of all the functions, except for rear screen
demisting.
The com
fort level (temperature, humidity, odour, misting)is no longer controlled.
To reactivate the air conditioning, press button 1.
Avoid travelling for too long with the air conditioningdeactivated.
Page 91 of 216

89
III
3a3b
4
AUTOMATIC AIR CONDITIONING
3. ADJUSTING THE AIR DISTRIBUTION
Successive or continuous presses on buttons3aand 3b direct the fl ow of air to the passenger' side or to the driver's side.
The s
ymbol (arrows) corresponding to the direction chosen is displayed on the multifunction screen:Windscreen and side windows.
Central, lateral and soft diffusion air conditioning
vents (if open).
Passenger footwells."AUTO"automatic distribution.
•
•
••
Rotate the control to increase or decrease the fl ow of air.
The symbol for air fl ow (helix) is displayed on the multifunction screen and fi lls in as the required fl ow increases.
To prevent misting and poor air quality in the passenger compartment, take care to maintain a suffi cient fl ow of air.
4. ADJUSTING THE AIR FLOW
Soft diffusion system
The soft diffusion air conditioning unit situated at thecentre of the front console guaranteesoptimum diffu-sion of air for the front seat positions.r
This unit eliminates annoying draughts and guarantees
an optimum temperature inside the cabin.
Adjusting the air fl ow with soft diffusion air conditioning
The driver and the passenger can adjust the air fl ow for
the soft diffusion air conditioning unit independently.
To a djust the air fl ow, rotate the control to the desiredposition.
To close off the soft diffusion air conditioning, rotate thecontrol as far down as it will go.
In very hot weather, to improve the central and lateralventilation, closing off the soft diffusion air conditioning
is recommended.
Page 92 of 216

90
III
5
6
7
AUTOMATIC AIR CONDITIONING
5. FRONT DEMISTING - DEICING
Press button 5 for rapidclear windows. The warning lamp comes on. This system controls the air condi-
tioning, the air fl ow and the entry of air from outside. It sends the ventilation towards the windscreen and side
windows.
A press on the 1 button returns you to "AUTO"mode.
6. REAR DEMISTING - DEICING
Press button 6, with the engine running, to start a rapid
deicing or demisting of the rear screen and rear view mirrors. The warning lamp comes on.
This mode stops automatically depending on the out-side temperature. It can be paused by pressing again on button6or by stopping the engine.
In the latter case, demisting will resume when the engine is switched on again.Note:The heated rear screen operates independently of the automatic air conditioning.
7. AIR RECIRCULATION – ENTRY OF AIR
FROM OUTSIDE
Press repeatedly on button7 to select the air entrymode. The corresponding warning lamp lights up:Air intake in automatic pollution control mode (on by default, with automatic comfort regulation).
The automatic mode makes use of an air quality sen-sor. It analyses the air and isolates the cabin from theexterior if the presence of pollutants is detected. In thiscase it automatically activates recirculation of the cabinair.
Please note: this function does not detect and there-fore protect the cabin from unpleasant odours. It is not
active when the ambient temperature is below +5 °C so
as to avoid the risk of misting the vehicle’s windows.
Closing the exterior air intake
Press button 7to close the intake of air from the exterior.
While maintaining the other settings, this position allows
the driver to avoid unpleasant odours and smoke out-
side the vehicle at any time.
It should be cancelled as soon as possible to allowexchange of the cabin air and to avoid misting of
the vehicle’s windows.
Exterior air intake
Press button7once to open the exterior air intake.
•
•
•
Page 93 of 216

91
III
AUTOMATIC AIR CONDITIONING
To activate/deactivate
the air conditioningsystem
Press on the control"CLIM"to go into the "air conditioning" mode. Then press button"OK"or on the control to bring up
the "Air Conditioning menu" on the multifunction screen.
This menu allows you:To deactivate the air conditioning:"Cut aircon (A/C OFF)".
Press button"OK", or on the control, to validate the offer to activate or deactivate the air conditioning.The symbol"A/C OFF"displays on the multifunctionscreen in the case of deactivation.
Note
:Your temperature adjustment value may not bereached and you risk having the windows misted up.You can cancel deactivation of the air conditioning,by pressing the control 1"AUTO".
•
-
-
To activate/deactivate the differentiation of the air conditioning adjustment on the driver's side and on
the passenger's side.
A
fter making your selection using the arrow keys,press on "OK"or on the control, to validate the offer to activate or deactivate the air conditioning.
Activation of this function makes the adjust-
ments on the passenger's side identical to thosechosen by the driver.Note:any manual action on button 2b or 3b returns you to the independent adjustments.
•
A press on the "Menu" button brings up the
"Main menu" for access to choices similar to
those offered by the"CLIM" button. See "Mul-
tifunction displays".
Page 94 of 216

92
III
A
B
C
D
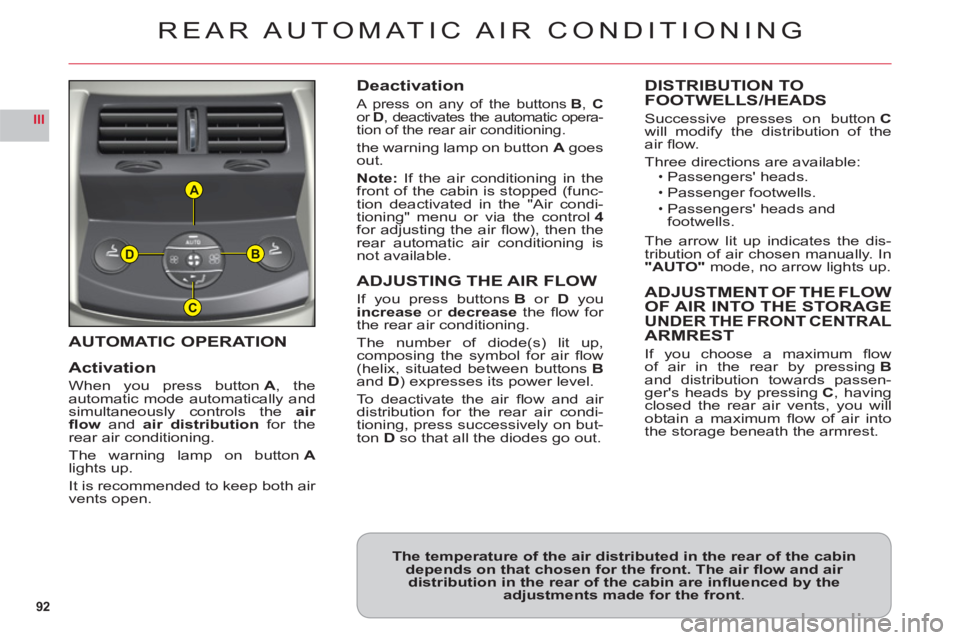
AUTOMATIC OPERATION
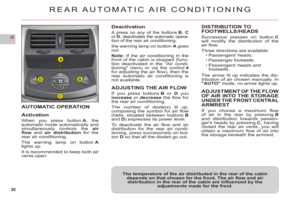
Activation
When you press buttonA, the
automatic mode automatically andsimultaneously controls theair
fl ow andair distribution for therear air conditioning.
The warning lamp on buttonAlights up.
It is recommended to kee
p both air
vents open.
Deactivation
A press on any of the buttons B, Cor D, deactivates the automatic opera-
tion of the rear air conditioning.
the warning lamp on button Agoes out.
Note: If the air conditioning in the front of the cabin is stopped (func-
tion deactivated in the "Air condi-
tioning" menu or via the control4for adjusting the air fl ow), then the
rear automatic air conditioning is
not available.
ADJUSTING THE AIR FLOW
If you press buttons Bor Dyou increase or decrease the fl ow for
the rear air conditioning.
The number of diode
(s) lit up, composing the symbol for air fl ow (helix, situated between buttons Band D) expresses its power level.
To deactivate the air fl ow and air distribution for the rear air condi-
tioning, press successively on but-
ton Dso that all the diodes go out.
DISTRIBUTION TO
FOOTWELLS/HEADS
Successive presses on buttonCwill modify the distribution of theair fl ow.
Three directions are available:Passengers' heads.
Passenger footwells.
Passengers' heads and
footwells.
The arrow lit up indicates the dis-
tribution of air chosen manually. In"AUTO"mode, no arrow lights up.
ADJUSTMENT OF THE FLOW
OF AIR INTO THE STORAGEUNDER THE FRONT CENTRALARMREST
If you choose a maximum fl ow
of air in the rear by pressingBand distribution towards passen-ger's heads by pressingC, havingclosed the rear air vents, you willobtain a maximum fl ow of air intothe storage beneath the armrest.
ï
ï
ï
REAR AUTOMATIC AIR CONDITIONING
The temperature of the air distributed in the rear of the cabindepends on that chosen for the front. The air fl ow and air distribution in the rear of the cabin are infl uenced by the adjustments made for the front.
Page 95 of 216

93
III
The programmable heating sys-
tem operates independently of theengine.
With the engine off, it is used topreheat the engine cooling systemso as to have an optimum engine
operating temperature on starting.
The programmable heating sys-
tem is started using a long-rangeremote control. It can be startedimmediately or programmed tostart later.
In the event of a malfunction of the programmable heating sys-tem, contact a CITROËN dealer pg gy
or a qualifi ed workshop.
Remote control
The remote control for the program-
mable heating system includes the following buttons and display infor-
mation:1. Menu function scroll buttons.
2. Function symbols: clock,
temperature, operating duration, programmed time, heater operation, heater control.3. Digital display of: time,
temperature, operating
duration, programmed time
or heating level.4. Off button.5. On button.
In
formation displayed in the remote control screen
Display of functions
Press buttons1repeatedly to bringup the functions.
The fi rst press of the ri
ght or leftbutton displays the time.
The left button then
gives access
to the programming time, then theheating level (C1 to C5).
The right button gives access to
the cabin temperature, then the
operating duration of the heater
where the system is to be startedimmediately.
In
formation on the cabin tem-perature is only available with theengine off.
PROGRAMMABLE HEATING
Page 96 of 216

94
III
Setting the timeImmediate startAdjusting the operating duration
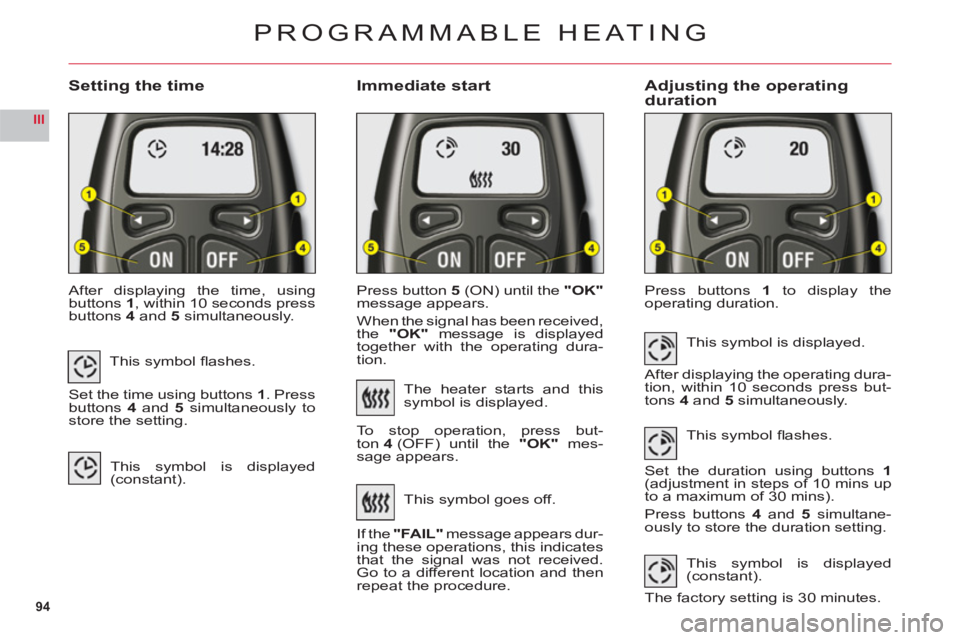
After displaying the time, usingbuttons1, within 10 seconds pressbuttons4and5 simultaneously.Pr
ess button5(ON) until the "OK"
message appears.
When the si
gnal has been received,
the "OK" message is displayed
together with the operating dura-
tion.Pr
ess buttons1 to display the
operating duration.
PROGRAMMABLE HEATING
This symbol fl ashes.
Set the time using buttons 1. Pressbuttons4and 5 simultaneously tostore the setting.
This symbol is displayed(constant).
The heater starts and this
symbol is displayed.
To stop operation, press but-
t
on 4 (OFF) until the"OK" mes-
sage appears.
This s
ymbol goes off.
I
f the "FAIL"message appears dur-
ing these operations, this indicates
that the signal was not received. Go to a different location and then
repeat the procedure.This s
ymbol is displayed.
After displaying the operating dura-
tion, within 10 seconds press but-
tons 4 and 5 simultaneously.
This s
ymbol fl ashes.
Set the duration using buttons1(adjustment in steps of 10 mins up
to a maximum of 30 mins).
Press buttons 4 and 5 simultane-
ously to store the duration setting.
This symbol is displayed(constant).
The factory setting is 30 minutes.