2012 CITROEN C6 Handbook (in English)
-
 1
1 -
 2
2 -
 3
3 -
 4
4 -
 5
5 -
 6
6 -
 7
7 -
 8
8 -
 9
9 -
 10
10 -
 11
11 -
 12
12 -
 13
13 -
 14
14 -
 15
15 -
 16
16 -
 17
17 -
 18
18 -
 19
19 -
 20
20 -
 21
21 -
 22
22 -
 23
23 -
 24
24 -
 25
25 -
 26
26 -
 27
27 -
 28
28 -
 29
29 -
 30
30 -
 31
31 -
 32
32 -
 33
33 -
 34
34 -
 35
35 -
 36
36 -
 37
37 -
 38
38 -
 39
39 -
 40
40 -
 41
41 -
 42
42 -
 43
43 -
 44
44 -
 45
45 -
 46
46 -
 47
47 -
 48
48 -
 49
49 -
 50
50 -
 51
51 -
 52
52 -
 53
53 -
 54
54 -
 55
55 -
 56
56 -
 57
57 -
 58
58 -
 59
59 -
 60
60 -
 61
61 -
 62
62 -
 63
63 -
 64
64 -
 65
65 -
 66
66 -
 67
67 -
 68
68 -
 69
69 -
 70
70 -
 71
71 -
 72
72 -
 73
73 -
 74
74 -
 75
75 -
 76
76 -
 77
77 -
 78
78 -
 79
79 -
 80
80 -
 81
81 -
 82
82 -
 83
83 -
 84
84 -
 85
85 -
 86
86 -
 87
87 -
 88
88 -
 89
89 -
 90
90 -
 91
91 -
 92
92 -
 93
93 -
 94
94 -
 95
95 -
 96
96 -
 97
97 -
 98
98 -
 99
99 -
 100
100 -
 101
101 -
 102
102 -
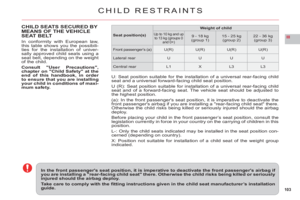
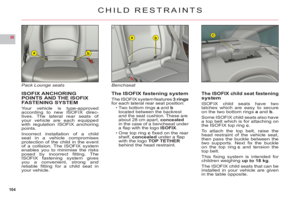
 103
103 -
 104
104 -
 105
105 -
 106
106 -
 107
107 -
 108
108 -
 109
109 -
 110
110 -
 111
111 -
 112
112 -
 113
113 -
 114
114 -
 115
115 -
 116
116 -
 117
117 -
 118
118 -
 119
119 -
 120
120 -
 121
121 -
 122
122 -
 123
123 -
 124
124 -
 125
125 -
 126
126 -
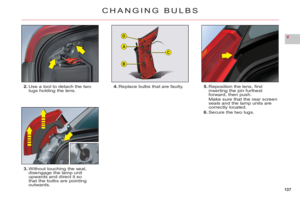
 127
127 -
 128
128 -
 129
129 -
 130
130 -
 131
131 -
 132
132 -
 133
133 -
 134
134 -
 135
135 -
 136
136 -
 137
137 -
 138
138 -
 139
139 -
 140
140 -
 141
141 -
 142
142 -
 143
143 -
 144
144 -
 145
145 -
 146
146 -
 147
147 -
 148
148 -
 149
149 -
 150
150 -
 151
151 -
 152
152 -
 153
153 -
 154
154 -
 155
155 -
 156
156 -
 157
157 -
 158
158 -
 159
159 -
 160
160 -
 161
161 -
 162
162 -
 163
163 -
 164
164 -
 165
165 -
 166
166 -
 167
167 -
 168
168 -
 169
169 -
 170
170 -
 171
171 -
 172
172 -
 173
173 -
 174
174 -
 175
175 -
 176
176 -
 177
177 -
 178
178 -
 179
179 -
 180
180 -
 181
181 -
 182
182 -
 183
183 -
 184
184 -
 185
185 -
 186
186 -
 187
187 -
 188
188 -
 189
189 -
 190
190 -
 191
191 -
 192
192 -
 193
193 -
 194
194 -
 195
195 -
 196
196 -
 197
197 -
 198
198 -
 199
199 -
 200
200 -
 201
201 -
 202
202 -
 203
203 -
 204
204 -
 205
205 -
 206
206 -
 207
207 -
 208
208 -
 209
209 -
 210
210 -
 211
211 -
 212
212 -
 213
213 -
 214
214 -
 215
215
 95
III
Programming the heaterActivation – deactivation Stopping the heater
You should programme your depar-
ture time so that the system can
automatically calculate the opti-mum start time for the")
 96
III
Replacing the battery
The remote control is powered bya 6 V-28L battery cell, which isincluded.
Information appears on the screen
when this battery should be replaced.
Unclip the casing and rep")
 97
IIIC
D
REAR SEATS
REAR HEAD RESTRAINTS
The rear head restraints have twopositions:A stowed position for when theseat is not occupied.
A deployed position for safety
of passengers, locking intoplac")
 98
III
1
2
REAR SEATS
FOLDING BENCHSEAT
The whole or just part of the benchseat can be folded. It is necessary to remove the head restraints.
Seat cushion
Use the strap to lift the seat cushion, then")
 99
III
A
BC
D
REAR SEATS
Seat cushion folded.
Stow the head restraints.
Pr
ess the controlA located at theend of the backrest and fully tilt for-
wards.
The benchseat backrest can befolded in two sect")
 100
III
B
A
PACK LOUNGE SEATS
ANGLE OF THE REAR LATERAL HEADRESTRAINTS
To alter the angle of the rear lateralhead restraints, lift them then tilt
them upwards.
LONGITUDINAL
ADJUSTMENT OF THE
FRONT PA")
 101
IIIA
AIRBAGS
AIRBAG EQUIPMENT
Yo ur vehicle has:A drivers front airbag.
A drivers knees airbag.
A front passengers airbag
which can be deactivated.
Front lateral airba
gs.
Front and rear curta")
 102
III
Passenger’s airbag OFFRefer to the instructions present on
both sides of the passenger’s sun
visor.
In the front passengers seat position, it is imperative to deactivate the fr")