2012 CITROEN C6 Handbook (in English)
-
 1
1 -
 2
2 -
 3
3 -
 4
4 -
 5
5 -
 6
6 -
 7
7 -
 8
8 -
 9
9 -
 10
10 -
 11
11 -
 12
12 -
 13
13 -
 14
14 -
 15
15 -
 16
16 -
 17
17 -
 18
18 -
 19
19 -
 20
20 -
 21
21 -
 22
22 -
 23
23 -
 24
24 -
 25
25 -
 26
26 -
 27
27 -
 28
28 -
 29
29 -
 30
30 -
 31
31 -
 32
32 -
 33
33 -
 34
34 -
 35
35 -
 36
36 -
 37
37 -
 38
38 -
 39
39 -
 40
40 -
 41
41 -
 42
42 -
 43
43 -
 44
44 -
 45
45 -
 46
46 -
 47
47 -
 48
48 -
 49
49 -
 50
50 -
 51
51 -
 52
52 -
 53
53 -
 54
54 -
 55
55 -
 56
56 -
 57
57 -
 58
58 -
 59
59 -
 60
60 -
 61
61 -
 62
62 -
 63
63 -
 64
64 -
 65
65 -
 66
66 -
 67
67 -
 68
68 -
 69
69 -
 70
70 -
 71
71 -
 72
72 -
 73
73 -
 74
74 -
 75
75 -
 76
76 -
 77
77 -
 78
78 -
 79
79 -
 80
80 -
 81
81 -
 82
82 -
 83
83 -
 84
84 -
 85
85 -
 86
86 -
 87
87 -
 88
88 -
 89
89 -
 90
90 -
 91
91 -
 92
92 -
 93
93 -
 94
94 -
 95
95 -
 96
96 -
 97
97 -
 98
98 -
 99
99 -
 100
100 -
 101
101 -
 102
102 -
 103
103 -
 104
104 -
 105
105 -
 106
106 -
 107
107 -
 108
108 -
 109
109 -
 110
110 -
 111
111 -
 112
112 -
 113
113 -
 114
114 -
 115
115 -
 116
116 -
 117
117 -
 118
118 -
 119
119 -
 120
120 -
 121
121 -
 122
122 -
 123
123 -
 124
124 -
 125
125 -
 126
126 -
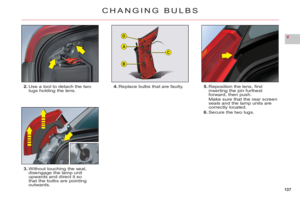
 127
127 -
 128
128 -
 129
129 -
 130
130 -
 131
131 -
 132
132 -
 133
133 -
 134
134 -
 135
135 -
 136
136 -
 137
137 -
 138
138 -
 139
139 -
 140
140 -
 141
141 -
 142
142 -
 143
143 -
 144
144 -
 145
145 -
 146
146 -
 147
147 -
 148
148 -
 149
149 -
 150
150 -
 151
151 -
 152
152 -
 153
153 -
 154
154 -
 155
155 -
 156
156 -
 157
157 -
 158
158 -
 159
159 -
 160
160 -
 161
161 -
 162
162 -
 163
163 -
 164
164 -
 165
165 -
 166
166 -
 167
167 -
 168
168 -
 169
169 -
 170
170 -
 171
171 -
 172
172 -
 173
173 -
 174
174 -
 175
175 -
 176
176 -
 177
177 -
 178
178 -
 179
179 -
 180
180 -
 181
181 -
 182
182 -
 183
183 -
 184
184 -
 185
185 -
 186
186 -
 187
187 -
 188
188 -
 189
189 -
 190
190 -
 191
191 -
 192
192 -
 193
193 -
 194
194 -
 195
195 -
 196
196 -
 197
197 -
 198
198 -
 199
199 -
 200
200 -
 201
201 -
 202
202 -
 203
203 -
 204
204 -
 205
205 -
 206
206 -
 207
207 -
 208
208 -
 209
209 -
 210
210 -
 211
211 -
 212
212 -
 213
213 -
 214
214 -
 215
215
 55
II
WIPERS
CHANGING THE WIPER BLADES
If you have toreplace them, the wiper blades have to be parked in themaintenance position. For this, switch off theignition and then within one minute move the w")
 56
II
A
WINDOWS
After a battery disconnection or if there has been a malfunction, you have to reinitialise the anti-
pinch function for each window:Lower the window fully usingthe control, then close")
 57
II
STEERING COLUMN ADJUSTMENT –
SEAT BELT HEIGHT ADJUSTMENT
MANUAL ADJUSTMENT OFTHE STEERING WHEEL FORHEIGHT AND REACH
While the vehicle is stationary,unlock the steering wheel bypushing the lev")
 58
II
1
3
2
FRONT SEATS
ADJUSTMENT OF THE BACKREST ANGLE
Action the control 1 and adjust the angle of the backrest.
It is possible to tilt the backrest 45° forwards until it locks. To unlock it,
pres")
 59
II
A
B
C
D
DCB
A
FRONT SEATS
Do not drive the vehicle with the head restraints removed; thesemust be in place, correctly adjusted.
ELECTRICAL ADJUSTMENTS
Adjustment of the backrest angle
To adjust")
 60
II
21
M
MEMORISAT ION
DRIVING POSITIONS MEMORISED VIA
BUTTONS 1 AND 2
To memorise a driving position:a. Place the igntion key in \"Drive\"position (second
position).b. Make your adjustments of the")
 61
II
23
1
SEAT BELTS NOT FASTENED/
UNFASTENED WARNING LAMPS
OPERATION
The drivers and the front and rear passengers seats have sensors
that detect non-fastening/unfaste-ning of the seat belts.
The")
 62
II12
REAR VIEW MIRRORS
Operation of the interior
rear-view mirror
Switch on the ignition and press button1.Warning lamp 2on (switch on):automatic mode.Warning lamp 2off: automaticmode off. The mir")