2012 CITROEN C6 Handbook (in English)
-
 1
1 -
 2
2 -
 3
3 -
 4
4 -
 5
5 -
 6
6 -
 7
7 -
 8
8 -
 9
9 -
 10
10 -
 11
11 -
 12
12 -
 13
13 -
 14
14 -
 15
15 -
 16
16 -
 17
17 -
 18
18 -
 19
19 -
 20
20 -
 21
21 -
 22
22 -
 23
23 -
 24
24 -
 25
25 -
 26
26 -
 27
27 -
 28
28 -
 29
29 -
 30
30 -
 31
31 -
 32
32 -
 33
33 -
 34
34 -
 35
35 -
 36
36 -
 37
37 -
 38
38 -
 39
39 -
 40
40 -
 41
41 -
 42
42 -
 43
43 -
 44
44 -
 45
45 -
 46
46 -
 47
47 -
 48
48 -
 49
49 -
 50
50 -
 51
51 -
 52
52 -
 53
53 -
 54
54 -
 55
55 -
 56
56 -
 57
57 -
 58
58 -
 59
59 -
 60
60 -
 61
61 -
 62
62 -
 63
63 -
 64
64 -
 65
65 -
 66
66 -
 67
67 -
 68
68 -
 69
69 -
 70
70 -
 71
71 -
 72
72 -
 73
73 -
 74
74 -
 75
75 -
 76
76 -
 77
77 -
 78
78 -
 79
79 -
 80
80 -
 81
81 -
 82
82 -
 83
83 -
 84
84 -
 85
85 -
 86
86 -
 87
87 -
 88
88 -
 89
89 -
 90
90 -
 91
91 -
 92
92 -
 93
93 -
 94
94 -
 95
95 -
 96
96 -
 97
97 -
 98
98 -
 99
99 -
 100
100 -
 101
101 -
 102
102 -
 103
103 -
 104
104 -
 105
105 -
 106
106 -
 107
107 -
 108
108 -
 109
109 -
 110
110 -
 111
111 -
 112
112 -
 113
113 -
 114
114 -
 115
115 -
 116
116 -
 117
117 -
 118
118 -
 119
119 -
 120
120 -
 121
121 -
 122
122 -
 123
123 -
 124
124 -
 125
125 -
 126
126 -
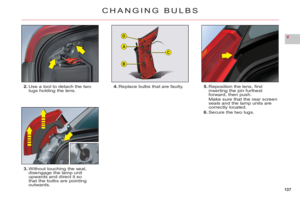
 127
127 -
 128
128 -
 129
129 -
 130
130 -
 131
131 -
 132
132 -
 133
133 -
 134
134 -
 135
135 -
 136
136 -
 137
137 -
 138
138 -
 139
139 -
 140
140 -
 141
141 -
 142
142 -
 143
143 -
 144
144 -
 145
145 -
 146
146 -
 147
147 -
 148
148 -
 149
149 -
 150
150 -
 151
151 -
 152
152 -
 153
153 -
 154
154 -
 155
155 -
 156
156 -
 157
157 -
 158
158 -
 159
159 -
 160
160 -
 161
161 -
 162
162 -
 163
163 -
 164
164 -
 165
165 -
 166
166 -
 167
167 -
 168
168 -
 169
169 -
 170
170 -
 171
171 -
 172
172 -
 173
173 -
 174
174 -
 175
175 -
 176
176 -
 177
177 -
 178
178 -
 179
179 -
 180
180 -
 181
181 -
 182
182 -
 183
183 -
 184
184 -
 185
185 -
 186
186 -
 187
187 -
 188
188 -
 189
189 -
 190
190 -
 191
191 -
 192
192 -
 193
193 -
 194
194 -
 195
195 -
 196
196 -
 197
197 -
 198
198 -
 199
199 -
 200
200 -
 201
201 -
 202
202 -
 203
203 -
 204
204 -
 205
205 -
 206
206 -
 207
207 -
 208
208 -
 209
209 -
 210
210 -
 211
211 -
 212
212 -
 213
213 -
 214
214 -
 215
215
 103
III
CHILD RESTRAINTS
CHILD SEATS SECURED BY MEANS OF THE VEHICLE
SEAT BELT
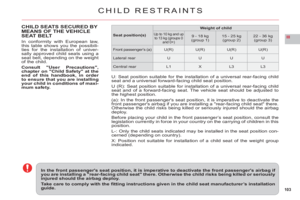
In conformity with European law,
this table shows you the possibili-
ties for the installation of univer-sally approved")
 104
III
ab
ab
Pack Lounge seats
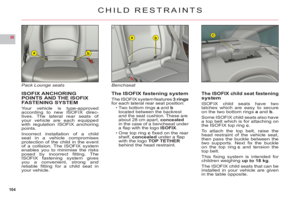
ISOFIX ANCHORINGPOINTS AND THE ISOFIX
FASTENING SYSTEM
Your vehicle is type-approvedaccording to new ISOFIX direc-
tives. The lateral rear seats of your vehicle ar")
 105
III
TABLE SUMMARISING THE INSTALLATION OF ISOFIX CHILD
SEATS
In compliance with European legislation (ECE 16), this table indicates which
of the ISOFIX child seats can be installed in seat posi")
 106
III
A
SUSPENSION WITH ELECTRONICALLY
CONTROLLED SPRINGING AND DAMPING
Active suspension with piloted damp-
ing and fl exibility automatically and
instantaneously adjusts the damp-ers to your dr")
 107
III
GROUND CLEARANCE ADJUSTMENT
Position changes may only bemade when the engine is running.
The ground clearance is adjusted
automatically. You can however modify the vehicle height in certainspe")
 108
III
GROUND CLEARANCE ADJUSTMENT
AUTOMATIC CORRECTION OF GROUND CLEARANCE
Your vehicle has active suspension with variable damping which is electronically controlled. This automatically regu-lates")
 109
III221
2
2
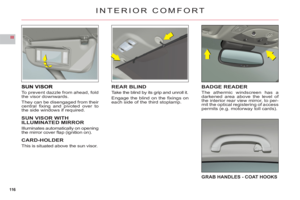
INTERIOR LIGHTING
Front
INTERIOR LAMPS
1. Interior lamps
A press on button 1 of the front
interior lamp, switches the interior lamps on or off.
Switching on and off is progressiveafter")
 110
III
C
D
LATERAL AMBIANCE LIGHTING
This is in the zone designated bythe arrows.
Adjustments
With the vehicle lamps on, presson buttonsC or D to change the
brightness of the lateral ambiancelighting")