2012 CHEVROLET ORLANDO battery
[x] Cancel search: batteryPage 309 of 378
Black plate (75,1)Chevrolet Orlando Owner Manual - 2012
Vehicle Care 10-75
{WARNING
Fans or other moving engine
parts can injure you badly. Keep
your hands away from moving
parts once the engine is running.
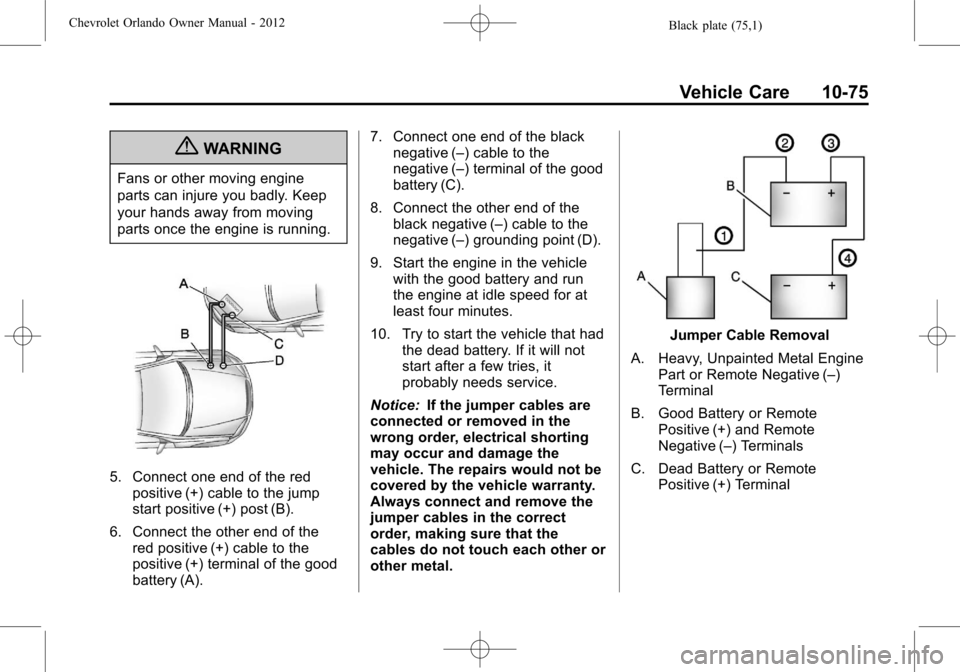
5. Connect one end of the redpositive (+) cable to the jump
start positive (+) post (B).
6. Connect the other end of the red positive (+) cable to the
positive (+) terminal of the good
battery (A). 7. Connect one end of the black
negative (–) cable to the
negative (–) terminal of the good
battery (C).
8. Connect the other end of the black negative (–) cable to the
negative (–) grounding point (D).
9. Start the engine in the vehicle with the good battery and run
the engine at idle speed for at
least four minutes.
10. Try to start the vehicle that had the dead battery. If it will not
start after a few tries, it
probably needs service.
Notice: If the jumper cables are
connected or removed in the
wrong order, electrical shorting
may occur and damage the
vehicle. The repairs would not be
covered by the vehicle warranty.
Always connect and remove the
jumper cables in the correct
order, making sure that the
cables do not touch each other or
other metal.
Jumper Cable Removal
A. Heavy, Unpainted Metal Engine Part or Remote Negative (–)
Terminal
B. Good Battery or Remote Positive (+) and Remote
Negative (–) Terminals
C. Dead Battery or Remote Positive (+) Terminal
Page 310 of 378
Black plate (76,1)Chevrolet Orlando Owner Manual - 2012
10-76 Vehicle Care
To disconnect the jumper cables
from both vehicles:
1. Disconnect the blacknegative (−) cable from the
vehicle that had the dead
battery.
2. Disconnect the black negative (−) cable from the
vehicle with the good battery.
3. Disconnect the red positive (+) cable from the vehicle with the
good battery.
4. Disconnect the red positive (+) cable from the other vehicle.
5. Return the covers over the positive (+) and negative (–)
terminals to their original
positions.Towing
Towing the Vehicle
Notice: To avoid damage, the
disabled vehicle should be towed
with all four wheels off the
ground. Care must be taken with
vehicles that have low ground
clearance and/or special
equipment. Always flatbed on a
car carrier.
Consult your dealer or a
professional towing service if the
disabled vehicle must be towed.
To tow the vehicle behind another
vehicle for recreational purposes,
such as behind a motor home,
see “Recreational Vehicle Towing” in
this section.
Recreational Vehicle
Towing
Recreational vehicle towing refers to
towing the vehicle behind another
vehicle, such as behind a motor
home. The two most common types
of recreational vehicle towing are
known as dinghy towing and dolly
towing. Dinghy towing is towing the
vehicle with all four wheels on the
ground. Dolly towing is towing the
vehicle with two wheels on the
ground and two wheels up on a
device known as a dolly.
Page 312 of 378
Black plate (78,1)Chevrolet Orlando Owner Manual - 2012
10-78 Vehicle Care
3. Turn the ignition to ACC/ACCESSORY.
4. To prevent the battery from draining while the vehicle is
being towed, remove fuses 21,
22, 23, and 24 from the
instrument panel fuse block. See
Instrument Panel Fuse Block on
page 10‑35.
Remember to reinstall the fuses
once the destination has been
reached.
Notice: If 105 km/h (65 mph) is
exceeded while towing the
vehicle, it could be damaged.
Never exceed 105 km/h (65 mph)
while towing the vehicle.
Notice: Towing the vehicle from
the rear could damage it. Also,
repairs would not be covered by
the vehicle warranty. Never have
the vehicle towed from the rear.
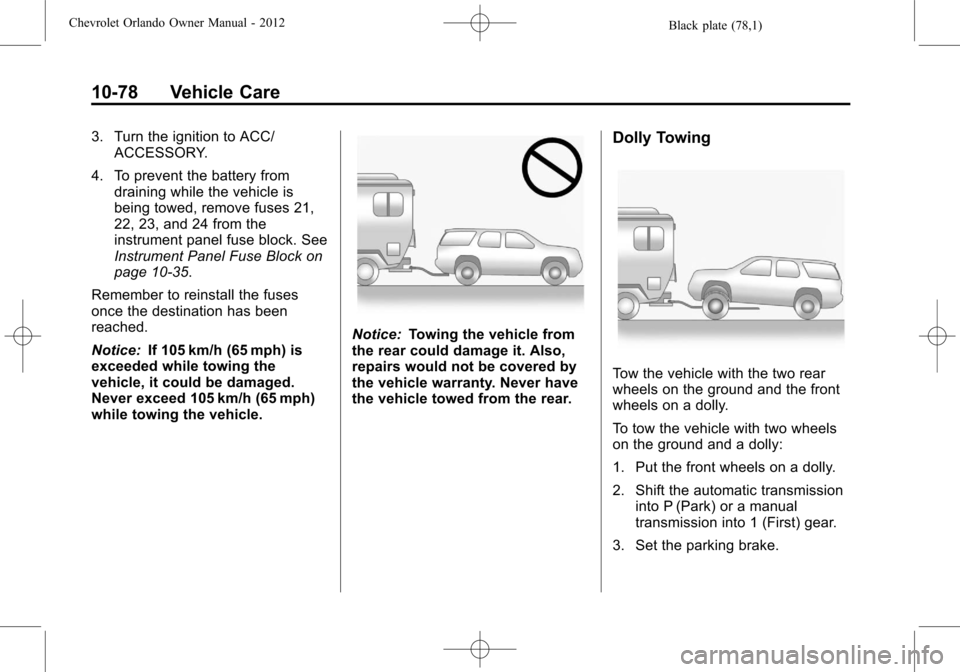
Dolly Towing
Tow the vehicle with the two rear
wheels on the ground and the front
wheels on a dolly.
To tow the vehicle with two wheels
on the ground and a dolly:
1. Put the front wheels on a dolly.
2. Shift the automatic transmission into P (Park) or a manual
transmission into 1 (First) gear.
3. Set the parking brake.
Page 330 of 378
Black plate (10,1)Chevrolet Orlando Owner Manual - 2012
11-10 Service and Maintenance
Battery
The battery supplies power to start
the engine and operate any
additional electrical accessories.
.To avoid break‐down or failure to
start the vehicle, maintain a
battery with full cranking power.
.Trained dealer technicians have
the diagnostic equipment to test
the battery and ensure that the
connections and cables are
corrosion‐free.
Belts
.Belts may need replacing if they
squeak or show signs of
cracking or splitting.
.Trained dealer technicians can
inspect the belts and
recommend replacement when
necessary. Brakes
Brakes stop the vehicle and are
crucial to safe driving.
.Signs of brake wear may include
chirping, grinding, or squealing
noises, or difficulty stopping.
.Trained dealer technicians have
access to tools and equipment
to inspect the brakes and
recommend quality parts
engineered for the vehicle.
Fluids
Proper fluid levels and approved
fluids protect the vehicle’s
systems and components. See
Recommended Fluids and
Lubricants on page 11‑13 for GM
approved fluids.
.Engine oil and windshield
washer fluid levels should be
checked at every fuel fill.
.Instrument cluster lights may
come on to indicate that fluids
may be low and need to be
filled. Hoses
Hoses transport fluids and should
be regularly inspected to ensure
that there are no cracks or leaks.
With a multi‐point inspection, your
dealer can inspect the hoses and
advise if replacement is needed.
Lamps
Properly working headlamps,
taillamps, and brake lamps are
important to see and be seen on
the road.
.Signs that the headlamps need
attention include dimming, failure
to light, cracking, or damage.
The brake lamps need to be
checked periodically to ensure
that they light when braking.
.With a multi‐point inspection,
your dealer can check the lamps
and note any concerns.
Page 348 of 378
Black plate (6,1)Chevrolet Orlando Owner Manual - 2012
13-6 Customer Information
Calling for Assistance
When calling Roadside Assistance,
have the following information
ready:
.Your name, home address, and
home telephone number.
.Telephone number of your
location.
.Location of the vehicle.
.Model, year, color, and license
plate number of the vehicle.
.Odometer reading, Vehicle
Identification Number (VIN), and
delivery date of the vehicle.
.Description of the problem.
Coverage
Services are provided up to 5 years/
160 000 km (100,000 mi), whichever
comes first.
In the U.S., anyone driving the
vehicle is covered. In Canada, a
person driving the vehicle without
permission from the owner is not
covered.Roadside Assistance is not a part of
the New Vehicle Limited Warranty.
Chevrolet and General Motors of
Canada Limited reserve the right to
make any changes or discontinue
the Roadside Assistance program at
any time without notification.
Chevrolet and General Motors of
Canada Limited reserve the right to
limit services or payment to an
owner or driver if they decide the
claims are made too often, or the
same type of claim is made many
times.
Services Provided
.Emergency Fuel Delivery:
Delivery of enough fuel for the
vehicle to get to the nearest
service station.
.Lock‐Out Service:
Service to
unlock the vehicle if you are
locked out. A remote unlock may
be available if you have OnStar.
For security reasons, the driver
must present identification
before this service is given.
.Emergency Tow from a Public
Road or Highway: Tow to the
nearest Chevrolet dealer for
warranty service, or if the vehicle
was in a crash and cannot be
driven. Assistance is also given
when the vehicle is stuck in the
sand, mud, or snow.
.Flat Tire Change: Service to
change a flat tire with the spare
tire. The spare tire, if equipped,
must be in good condition and
properly inflated. It is the owner's
responsibility for the repair or
replacement of the tire if it is not
covered by the warranty.
.Battery Jump Start: Service to
jump start a dead battery.
Services Not Included in
Roadside Assistance
.Impound towing caused by
violation of any laws.
.Legal fines.
.Mounting, dismounting, or changing of snow tires, chains,
or other traction devices.
Page 363 of 378
Black plate (5,1)Chevrolet Orlando Owner Manual - 2012
OnStar 14-5
Diagnostics
OnStar Vehicle Diagnostics will
perform a vehicle check every
month. It will check the engine,
transmission, antilock brakes, and
major vehicle systems. It also
checks the tire pressures, if the
vehicle is equipped with the Tire
Pressure Monitoring System. If a
diagnostics check is needed
between e-mails, push
Q, and an
Advisor can run a check.
OnStar Additional
Information
Transferring Service
PushQto request account transfer
eligibility information. The Advisor
can assist in canceling or removing
account information. If OnStar
receives information that vehicle
ownership has changed, OnStar
may send a voice message to the
vehicle, requesting updated account
information.
Reactivation for Subsequent
Owners
PushQand follow the prompts to
speak to an Advisor as soon as
possible after acquiring the vehicle.
The Advisor will update vehicle
records and will explain the OnStar
service offers and options available.
How OnStar Service Works
Automatic Crash Response,
Emergency Services, Crisis Assist,
Stolen Vehicle Assistance, Vehicle
Diagnostics, Remote Door Unlock,
Roadside Assistance, Turn-by-Turn
Navigation, and Hands-Free Calling
are available on most vehicles. Not
all OnStar services are available
everywhere or on all vehicles. For
more information, a full description
of OnStar services, system
limitations, and OnStar terms and
conditions, see www.onstar.com
(U.S.) or www.onstar.ca (Canada);
contact OnStar at 1-888-4-ONSTAR
(1‐888‐466‐7827) or TTY
1‐877‐248‐2080; or push
Qto
speak with an Advisor. OnStar
services require a vehicle electrical
system, wireless service, and GPS
satellite technologies to be available
and operating for features to
function properly. These systems
may not operate if the battery is
discharged or disconnected.
Page 366 of 378
Black plate (8,1)Chevrolet Orlando Owner Manual - 2012
14-8 OnStar
Vehicle and Power Issues
OnStar services require a vehicle
electrical system, wireless service,
and GPS satellite technologies to be
available and operating for features
to function properly. These systems
may not operate if the battery is
discharged or disconnected.
Add-on Electrical Equipment
The OnStar system is integrated
into the electrical architecture of the
vehicle. Do not add any electrical
equipment. SeeAdd-On Electrical
Equipment on page 9‑46. Added
electrical equipment may interfere
with the operation of the OnStar
system and cause it to not operate.
Privacy
The complete OnStar Privacy
Statement may be found at
www.onstar.com. Privacy-sensitive
users of wireless communications
are cautioned that the privacy of any
information sent via wireless cellular
communications cannot be assured.
Third parties may unlawfully
intercept or access transmissions
and private communications without
consent.
Page 367 of 378

Black plate (1,1)Chevrolet Orlando Owner Manual - 2012
INDEX i-1
A
Accessories andModifications . . . . . . . . . . . . . . . . . 10-2
Accessory Power . . . . . . . . . . . . . . 9-19
Add-On Electrical Equipment . . . . . . . . . . . . . . . . . . . 9-46
Additional Information,
OnStar
®. . . . . . . . . . . . . . . . . . . . . . 14-5
Air Cleaner/Filter, Engine . . . . . 10-11
Air Conditioning . . . . . . . . . . . . . . . . 8-3
Air Vents . . . . . . . . . . . . . . . . . . . . . . . 8-6
Airbag System Check . . . . . . . . . . . . . . . . . . . . . . . . 3-32
How Does an AirbagRestrain? . . . . . . . . . . . . . . . . . . . 3-29
What Makes an Airbag
Inflate? . . . . . . . . . . . . . . . . . . . . . . 3-29
What Will You See after an Airbag Inflates? . . . . . . . . . . . . . 3-30
When Should an Airbag
Inflate? . . . . . . . . . . . . . . . . . . . . . . 3-28
Where Are the Airbags? . . . . . . 3-27 Airbags
Adding Equipment to the
Vehicle . . . . . . . . . . . . . . . . . . . . . . 3-31
Readiness Light . . . . . . . . . . . . . . 5-12
Servicing Airbag-Equipped Vehicles . . . . . . . . . . . . . . . . . . . . . 3-31
System Check . . . . . . . . . . . . . . . . 3-25
Alarm Vehicle Security . . . . . . . . . . . . . . . 2-9
AM-FM Radio . . . . . . . . . . . . . . . . . . 7-10
Antenna Multi-band . . . . . . . . . . . . . . . . . . . . 7-16
Satellite Radio . . . . . . . . . . . . . . . . 7-16
Antilock Brake System (ABS) . . . . . . . . . . . . . . . . 9-27
Warning Light . . . . . . . . . . . . . . . . . 5-16
Appearance Care Exterior . . . . . . . . . . . . . . . . . . . . . 10-79
Interior . . . . . . . . . . . . . . . . . . . . . . 10-82
Armrest Front Seat . . . . . . . . . . . . . . . . . . . . . 3-7
Ashtrays . . . . . . . . . . . . . . . . . . . . . . . . 5-7
Assistance Program, Roadside . . . . . . . . . . . . . . . . . . . . . 13-5 Audio Players . . . . . . . . . . . . . . . . . 7-16
CD . . . . . . . . . . . . . . . . . . . . . . . . . . . 7-16
Audio System Radio Reception . . . . . . . . . . . . . . 7-15
Theft-Deterrent Feature . . . . . . . . 7-2
Automatic Climate Control System . . . . . . . . 8-3
Door Locks . . . . . . . . . . . . . . . . . . . . 2-7
Headlamp System . . . . . . . . . . . . . 6-3
Transmission . . . . . . . . . . . . . . . . . 9-23
Transmission Fluid . . . . . . . . . 10-10
Automatic Transmission Manual Mode . . . . . . . . . . . . . . . . . 9-24
Shift Lock ControlFunction Check . . . . . . . . . . . 10-23
Auxiliary
Devices . . . . . . . . . . . . . . . . . . . . . . . 7-18
B
Battery . . . . . . . . . . . . . . . . . . . . . . . 10-21Jump Starting . . . . . . . . . . . . . . . 10-73
Power Protection . . . . . . . . . . . . . . 6-6
Voltage and ChargingMessages . . . . . . . . . . . . . . . . . . . 5-26