2012 CHEVROLET ORLANDO seats
[x] Cancel search: seatsPage 1 of 378

Black plate (1,1)Chevrolet Orlando Owner Manual - 2012
2012 Chevrolet Orlando Owner ManualM
In Brief. . . . . . . . . . . . . . . . . . . . . . . . 1-1
Instrument Panel . . . . . . . . . . . . . . 1-2
Initial Drive Information . . . . . . . . 1-4
Vehicle Features . . . . . . . . . . . . . 1-15
Performance and Maintenance . . . . . . . . . . . . . . . . 1-19
Keys, Doors, and Windows . . . . . . . . . . . . . . . . . . . . 2-1
Keys and Locks . . . . . . . . . . . . . . . 2-2
Doors . . . . . . . . . . . . . . . . . . . . . . . . . . 2-8
Vehicle Security . . . . . . . . . . . . . . . . 2-9
Exterior Mirrors . . . . . . . . . . . . . . . 2-11
Interior Mirrors . . . . . . . . . . . . . . . . 2-12
Windows . . . . . . . . . . . . . . . . . . . . . 2-14
Roof . . . . . . . . . . . . . . . . . . . . . . . . . . 2-17
Seats and Restraints . . . . . . . . . 3-1
Head Restraints . . . . . . . . . . . . . . . 3-2
Front Seats . . . . . . . . . . . . . . . . . . . . 3-4
Rear Seats . . . . . . . . . . . . . . . . . . . . 3-8
Safety Belts . . . . . . . . . . . . . . . . . . 3-16
Airbag System . . . . . . . . . . . . . . . . 3-25
Child Restraints . . . . . . . . . . . . . . 3-33 Storage
. . . . . . . . . . . . . . . . . . . . . . . 4-1
Storage Compartments . . . . . . . . 4-1
Additional Storage Features . . . 4-2
Roof Rack System . . . . . . . . . . . . . 4-5
Instruments and Controls . . . . 5-1
Controls . . . . . . . . . . . . . . . . . . . . . . . 5-2
Warning Lights, Gauges, and
Indicators . . . . . . . . . . . . . . . . . . . . 5-7
Information Displays . . . . . . . . . . 5-22
Vehicle Messages . . . . . . . . . . . . 5-26
Vehicle Personalization . . . . . . . 5-32
Lighting . . . . . . . . . . . . . . . . . . . . . . . 6-1
Exterior Lighting . . . . . . . . . . . . . . . 6-1
Interior Lighting . . . . . . . . . . . . . . . . 6-5
Lighting Features . . . . . . . . . . . . . . 6-6
Infotainment System . . . . . . . . . 7-1
Introduction . . . . . . . . . . . . . . . . . . . . 7-1
Radio . . . . . . . . . . . . . . . . . . . . . . . . . 7-10
Audio Players . . . . . . . . . . . . . . . . 7-16
Phone . . . . . . . . . . . . . . . . . . . . . . . . 7-21
Trademarks and License Agreements . . . . . . . . . . . . . . . . . 7-32 Climate Controls
. . . . . . . . . . . . . 8-1
Climate Control Systems . . . . . . 8-1
Air Vents . . . . . . . . . . . . . . . . . . . . . . . 8-6
Driving and Operating . . . . . . . . 9-1
Driving Information . . . . . . . . . . . . . 9-2
Starting and Operating . . . . . . . 9-14
Engine Exhaust . . . . . . . . . . . . . . 9-21
Automatic Transmission . . . . . . 9-23
Manual Transmission . . . . . . . . . 9-25
Brakes . . . . . . . . . . . . . . . . . . . . . . . 9-27
Ride Control Systems . . . . . . . . 9-29
Cruise Control . . . . . . . . . . . . . . . . 9-32
Object Detection Systems . . . . 9-35
Fuel . . . . . . . . . . . . . . . . . . . . . . . . . . 9-36
Towing . . . . . . . . . . . . . . . . . . . . . . . 9-40
Conversions and Add-Ons . . . 9-46
Page 7 of 378
Black plate (1,1)Chevrolet Orlando Owner Manual - 2012
In Brief 1-1
In Brief
Instrument Panel
Instrument Panel . . . . . . . . . . . . . . 1-2
Initial Drive Information
Initial Drive Information . . . . . . . . 1-4
Remote Keyless Entry (RKE)System . . . . . . . . . . . . . . . . . . . . . . 1-4
Remote Vehicle Start . . . . . . . . . 1-4
Door Locks . . . . . . . . . . . . . . . . . . . 1-5
Liftgate . . . . . . . . . . . . . . . . . . . . . . . . 1-6
Windows . . . . . . . . . . . . . . . . . . . . . . 1-6
Seat Adjustment . . . . . . . . . . . . . . 1-6
Second Row Seats . . . . . . . . . . . 1-8
Third Row Seats . . . . . . . . . . . . . . 1-8
Heated Seats . . . . . . . . . . . . . . . . . 1-8
Head Restraint Adjustment . . . . 1-8
Safety Belts . . . . . . . . . . . . . . . . . . . 1-9 Mirror Adjustment . . . . . . . . . . . . . 1-9
Steering Wheel
Adjustment . . . . . . . . . . . . . . . . . 1-10
Interior Lighting . . . . . . . . . . . . . . 1-11
Exterior Lighting . . . . . . . . . . . . . 1-11
Windshield Wiper/Washer . . . . 1-12
Climate Controls . . . . . . . . . . . . . 1-13
Transmission . . . . . . . . . . . . . . . . 1-14
Vehicle Features
Radio(s) . . . . . . . . . . . . . . . . . . . . . 1-15
Satellite Radio . . . . . . . . . . . . . . . 1-16
Portable Audio Devices . . . . . . 1-16
Bluetooth
®. . . . . . . . . . . . . . . . . . . 1-16
Steering Wheel Controls . . . . . 1-17
Cruise Control . . . . . . . . . . . . . . . 1-17
Navigation System . . . . . . . . . . . 1-18
Driver Information Center (DIC) . . . . . . . . . . . . . . . 1-18
Ultrasonic Parking Assist . . . . 1-18
Storage Compartments . . . . . . 1-19
Power Outlets . . . . . . . . . . . . . . . 1-19
Performance and Maintenance
Traction Control System (TCS) . . . . . . . . . . . . . . 1-19
StabiliTrak
®System . . . . . . . . . 1-20
Tire Pressure Monitor . . . . . . . . 1-20
Tire Sealant and Compressor Kit . . . . . . . . . . . . . 1-20
Engine Oil Life System . . . . . . 1-21
Driving for Better Fuel Economy . . . . . . . . . . . . . . . . . . . 1-21
Roadside Assistance Program . . . . . . . . . . . . . . . . . . . . 1-21
OnStar
®. . . . . . . . . . . . . . . . . . . . . 1-22
Page 9 of 378

Black plate (3,1)Chevrolet Orlando Owner Manual - 2012
In Brief 1-3
A.Air Vents on page 8‑6.
B. Turn and Lane-Change Lever. See Turn and Lane-Change
Signals on page 6‑4.
Headlamp High/Low-Beam
Changer on page 6‑2.
C. Instrument Cluster on page 5‑9.
D. Windshield Wiper/Washer on
page 5‑3.
Rear Window Wiper/Washer on
page 5‑5.
E. Infotainment on page 7‑1.
F. Infotainment Display.
G. Light Sensor. See Automatic
Headlamp System on page 6‑3.
H. Instrument Panel Storage on
page 4‑1.
USB Port and Auxiliary Input
Jack (Inside Instrument Panel
Storage). See Auxiliary Devices
on page 7‑18. I.
CD Player on page 7‑16.
J. TCS/StabiliTrak Button. See StabiliTrak
®System on
page 9‑31.
K. Exterior Lamp Controls on
page 6‑1.
Instrument Panel Illumination
Control on page 6‑5.
Front Fog Lamps on page 6‑4.
L. Front Storage on page 4‑1.
M. Data Link Connector (DLC) (Out of View). See Malfunction
Indicator Lamp on page 5‑13.
N. Cruise Control on page 9‑32.
O. Steering Wheel Adjustment on
page 5‑2.
P. Horn on page 5‑3.
Q. Steering Wheel Controls on
page 5‑3. R.
Power Door Locks on page 2‑7.
S. Heated Front Seats on page 3‑7
(If Equipped).
T. Climate Control Systems on
page 8‑1.
Automatic Climate Control
System on page 8‑3.
U. Shift Lever. See Automatic
Transmission on page 9‑23 or
Manual Transmission on
page 9‑25.
V. Parking Brake on page 9‑28.
W. Power Outlets on page 5‑6.
X. Hazard Warning Flashers on
page 6‑3.
Y. Passenger Safety Belt Reminder Light. See Safety Belt
Reminders on page 5‑11.
Page 12 of 378
Black plate (6,1)Chevrolet Orlando Owner Manual - 2012
1-6 In Brief
Presso{again to deactivate the
lockout switch.
If the indicator light flashes, the
feature may not be working properly.
See Safety Locks on page 2‑8.
Liftgate
Unlock the vehicle before opening
the liftgate.
Press the touch pad located in the
handle of the liftgate, above the
license plate, and lift up to open.
Do not press the touch pad while
closing the liftgate. This will cause
the liftgate to be unlatched.
Always close the liftgate before
driving.
For more information see Liftgate on
page 2‑8.
Windows
Power Windows
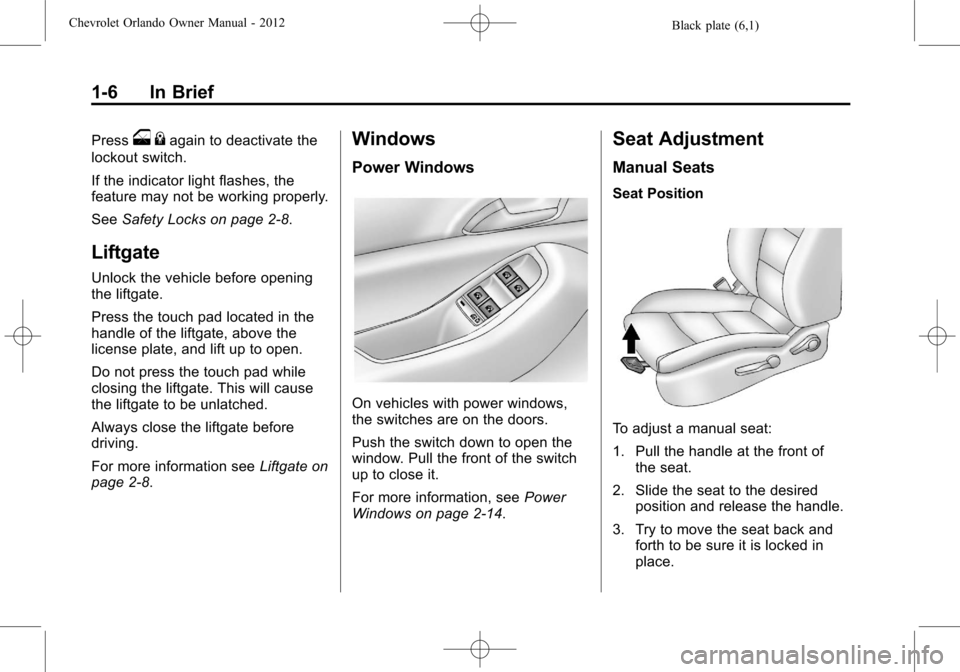
On vehicles with power windows,
the switches are on the doors.
Push the switch down to open the
window. Pull the front of the switch
up to close it.
For more information, see Power
Windows on page 2‑14.
Seat Adjustment
Manual Seats
Seat Position
To adjust a manual seat:
1. Pull the handle at the front of the seat.
2. Slide the seat to the desired position and release the handle.
3. Try to move the seat back and forth to be sure it is locked in
place.
Page 13 of 378
Black plate (7,1)Chevrolet Orlando Owner Manual - 2012
In Brief 1-7
SeeSeat Adjustment on page 3‑4
for more information.
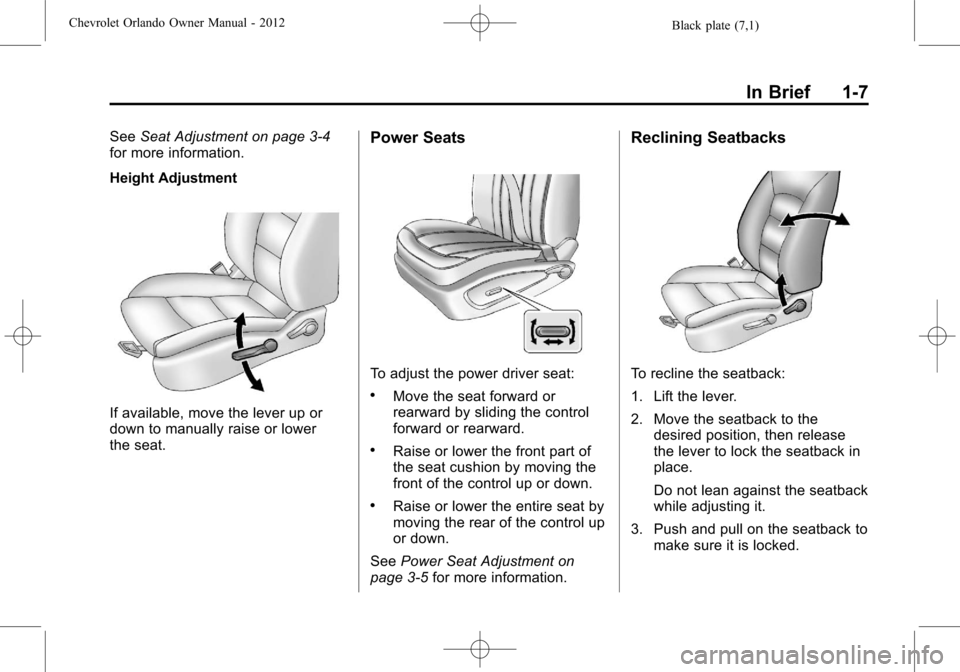
Height Adjustment
If available, move the lever up or
down to manually raise or lower
the seat.
Power Seats
To adjust the power driver seat:
.Move the seat forward or
rearward by sliding the control
forward or rearward.
.Raise or lower the front part of
the seat cushion by moving the
front of the control up or down.
.Raise or lower the entire seat by
moving the rear of the control up
or down.
See Power Seat Adjustment on
page 3‑5 for more information.
Reclining Seatbacks
To recline the seatback:
1. Lift the lever.
2. Move the seatback to the
desired position, then release
the lever to lock the seatback in
place.
Do not lean against the seatback
while adjusting it.
3. Push and pull on the seatback to make sure it is locked.
Page 14 of 378
Black plate (8,1)Chevrolet Orlando Owner Manual - 2012
1-8 In Brief
To return the seatback to an upright
position:
1. Lift the lever fully withoutapplying pressure to the
seatback, and the seatback
returns to the upright position.
2. Push and pull on the seatback to make sure it is locked.
See Reclining Seatbacks on
page 3‑5 for more information.
Second Row Seats
The second row seats can be
tumbled to provide access to the
third row seat, and the seatbacks
can be reclined or folded forward.
SeeSecond Row Seats on
page 3‑8 for more information.
Third Row Seats
The third row seats can be stowed
for more cargo space. See Third
Row Seats on page 3‑12 for more
information.
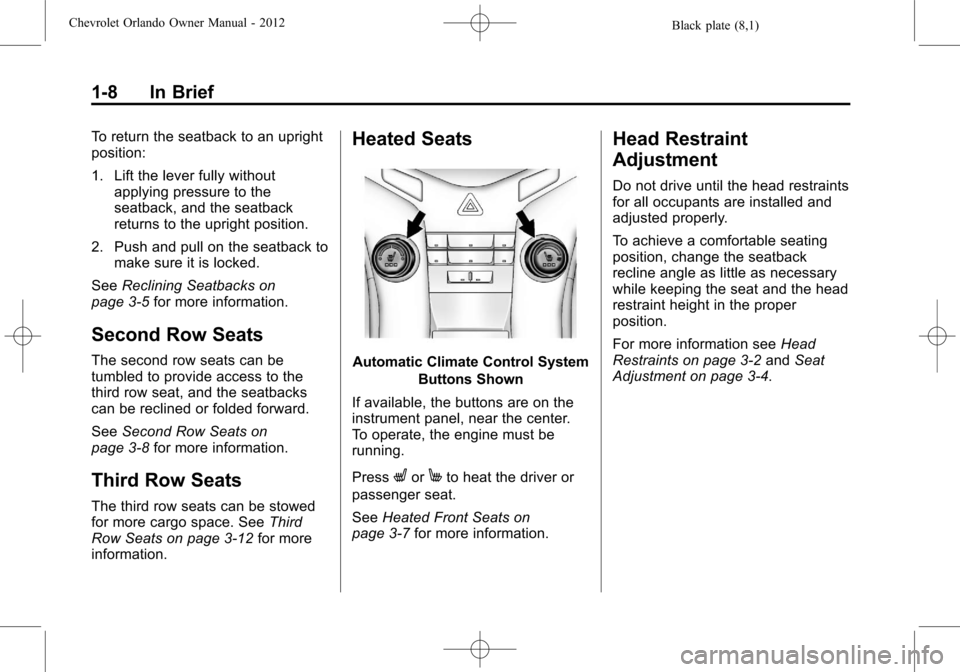
Heated Seats
Automatic Climate Control System
Buttons Shown
If available, the buttons are on the
instrument panel, near the center.
To operate, the engine must be
running.
Press
LorMto heat the driver or
passenger seat.
See Heated Front Seats on
page 3‑7 for more information.
Head Restraint
Adjustment
Do not drive until the head restraints
for all occupants are installed and
adjusted properly.
To achieve a comfortable seating
position, change the seatback
recline angle as little as necessary
while keeping the seat and the head
restraint height in the proper
position.
For more information see Head
Restraints on page 3‑2 andSeat
Adjustment on page 3‑4.
Page 19 of 378
Black plate (13,1)Chevrolet Orlando Owner Manual - 2012
In Brief 1-13
Rear Window Wiper/Washer
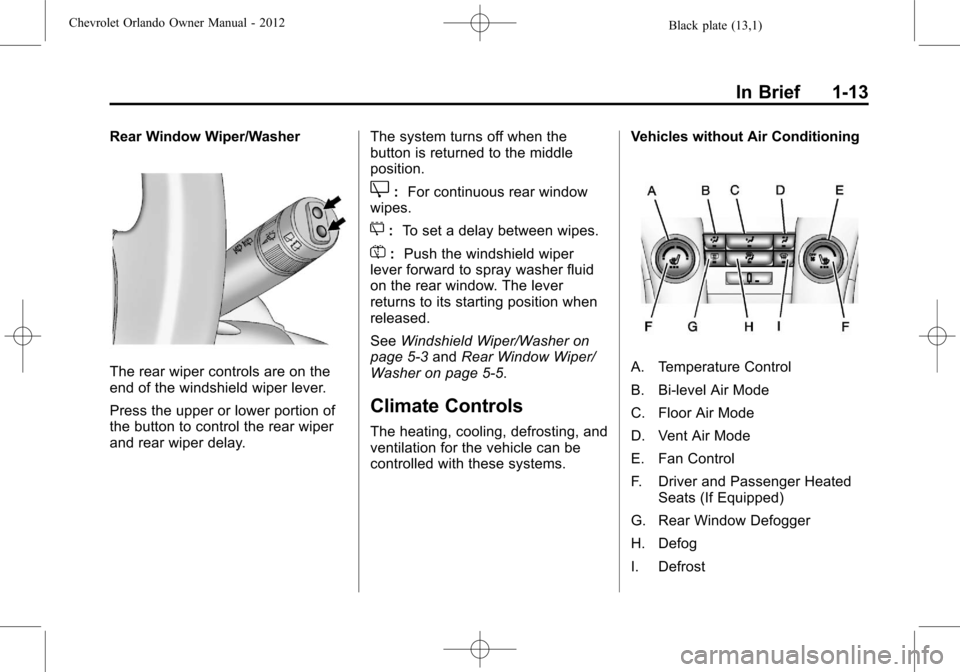
The rear wiper controls are on the
end of the windshield wiper lever.
Press the upper or lower portion of
the button to control the rear wiper
and rear wiper delay.The system turns off when the
button is returned to the middle
position.
Z:
For continuous rear window
wipes.
5: To set a delay between wipes.
=:Push the windshield wiper
lever forward to spray washer fluid
on the rear window. The lever
returns to its starting position when
released.
See Windshield Wiper/Washer on
page 5‑3 andRear Window Wiper/
Washer on page 5‑5.
Climate Controls
The heating, cooling, defrosting, and
ventilation for the vehicle can be
controlled with these systems. Vehicles without Air Conditioning
A. Temperature Control
B. Bi-level Air Mode
C. Floor Air Mode
D. Vent Air Mode
E. Fan Control
F. Driver and Passenger Heated
Seats (If Equipped)
G. Rear Window Defogger
H. Defog
I. Defrost
Page 20 of 378
Black plate (14,1)Chevrolet Orlando Owner Manual - 2012
1-14 In Brief
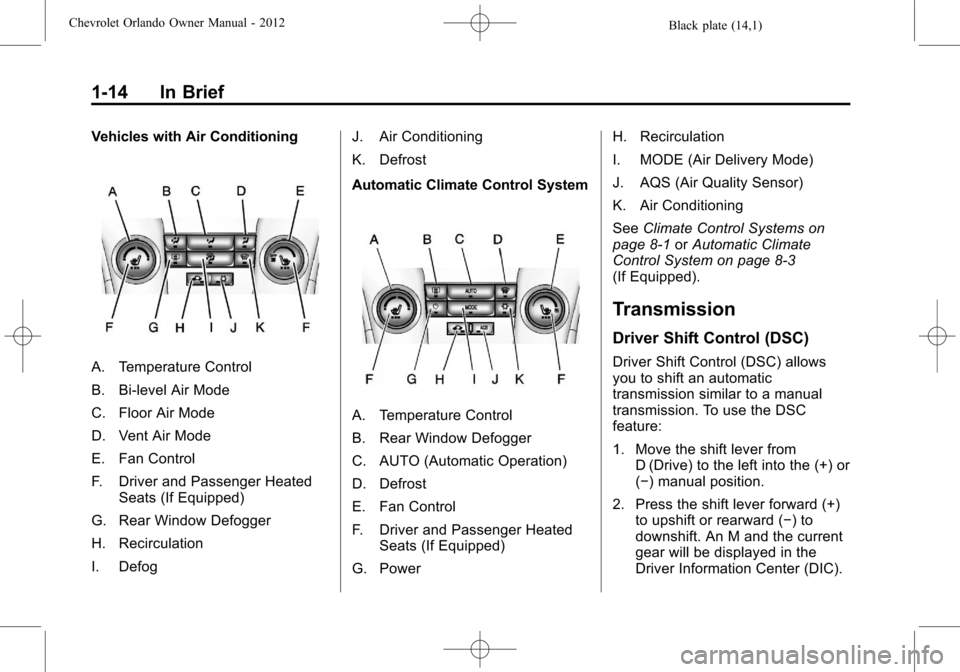
Vehicles with Air Conditioning
A. Temperature Control
B. Bi-level Air Mode
C. Floor Air Mode
D. Vent Air Mode
E. Fan Control
F. Driver and Passenger HeatedSeats (If Equipped)
G. Rear Window Defogger
H. Recirculation
I. Defog J. Air Conditioning
K. Defrost
Automatic Climate Control System
A. Temperature Control
B. Rear Window Defogger
C. AUTO (Automatic Operation)
D. Defrost
E. Fan Control
F. Driver and Passenger Heated
Seats (If Equipped)
G. Power H. Recirculation
I. MODE (Air Delivery Mode)
J. AQS (Air Quality Sensor)
K. Air Conditioning
See
Climate Control Systems on
page 8‑1 orAutomatic Climate
Control System on page 8‑3
(If Equipped).
Transmission
Driver Shift Control (DSC)
Driver Shift Control (DSC) allows
you to shift an automatic
transmission similar to a manual
transmission. To use the DSC
feature:
1. Move the shift lever from D (Drive) to the left into the (+) or
(−) manual position.
2. Press the shift lever forward (+) to upshift or rearward (−) to
downshift. An M and the current
gear will be displayed in the
Driver Information Center (DIC).