Page 255 of 378
Black plate (21,1)Chevrolet Orlando Owner Manual - 2012
Vehicle Care 10-21
When the brake/clutch fluid falls to a
low level, the brake warning light
comes on. SeeBrake System
Warning Light on page 5‑15.
What to Add
Use only new DOT 4 brake fluid
from a sealed container. It is
recommended that the brake/clutch
hydraulic system be flushed and
refilled with new DOT 4 fluid at a
regular maintenance service every
two years. See Special Application
Services on page 11‑9 and
Recommended Fluids and
Lubricants on page 11‑13.
Always clean the brake/clutch fluid
reservoir cap and the area around
the cap before removing it. This
helps keep dirt from entering the
reservoir.{WARNING
With the wrong kind of fluid in the
brake/clutch hydraulic system, the
brakes might not work well. This
could cause a crash. Always use
the proper brake/clutch fluid.
Notice
.Using the wrong fluid can
badly damage brake/clutch
hydraulic system parts. For
example, just a few drops of
mineral-based oil, such as
engine oil, in the brake
hydraulic system can
damage brake hydraulic
system parts so badly that
they will have to be replaced.
Do not let someone put in
the wrong kind of fluid.
.If brake fluid is spilled on the
vehicle's painted surfaces,
the paint finish can be
damaged. Be careful not to
spill brake fluid on the
vehicle. If you do, wash it off
immediately.
Battery
Refer to the replacement number
shown on the original battery label
when a new battery is needed. See
Engine Compartment Overview on
page 10‑6 for battery location.
{WARNING
Battery posts, terminals, and
related accessories contain lead
and lead compounds, chemicals
known to the State of California to
cause cancer and reproductive
harm. Wash hands after handling.
Page 256 of 378
Black plate (22,1)Chevrolet Orlando Owner Manual - 2012
10-22 Vehicle Care
Vehicle Storage
{WARNING
Batteries have acid that can burn
you and gas that can explode.
You can be badly hurt if you are
not careful. SeeJump Starting on
page 10‑73 for tips on working
around a battery without
getting hurt.
Infrequent Usage: Remove the
black, negative (−) cable from the
battery to keep the battery from
running down.
Extended Storage: Remove the
black, negative (−) cable from the
battery or use a battery trickle
charger.
Starter Switch Check
{WARNING
When you are doing this
inspection, the vehicle could
move suddenly. If the vehicle
moves, you or others could be
injured.
1. Before starting this check, be sure there is enough room
around the vehicle.
2. Firmly apply both the parking brake and the regular brake.
See Parking Brake on
page 9‑28.
Do not use the accelerator
pedal, and be ready to turn off
the engine immediately if it
starts. 3. For automatic transmission
vehicles, try to start the engine
in each gear. The vehicle
should start only in P (Park) or
N (Neutral). If the vehicle starts
in any other position, contact
your dealer for service.
For manual transmission
vehicles, put the shift lever in
Neutral, push the clutch pedal
down halfway, and try to start
the engine. The vehicle should
start only when the clutch pedal
is pushed down all the way to
the floor. If the vehicle starts
when the clutch pedal is not
pushed all the way down,
contact your dealer for service.
Page 260 of 378
Black plate (26,1)Chevrolet Orlando Owner Manual - 2012
10-26 Vehicle Care
Headlamps, Front Turn
Signal, Sidemarker, and
Parking Lamps
High‐Beam Headlamp/
Low‐Beam Headlamp
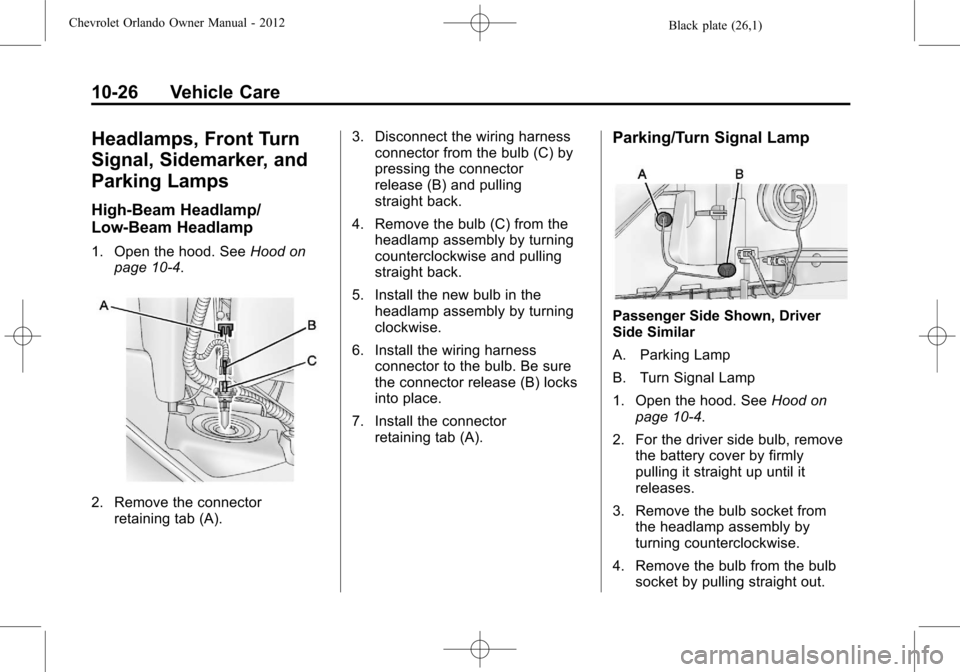
1. Open the hood. SeeHood on
page 10‑4.
2. Remove the connector retaining tab (A). 3. Disconnect the wiring harness
connector from the bulb (C) by
pressing the connector
release (B) and pulling
straight back.
4. Remove the bulb (C) from the headlamp assembly by turning
counterclockwise and pulling
straight back.
5. Install the new bulb in the headlamp assembly by turning
clockwise.
6. Install the wiring harness connector to the bulb. Be sure
the connector release (B) locks
into place.
7. Install the connector retaining tab (A).
Parking/Turn Signal Lamp
Passenger Side Shown, Driver
Side Similar
A. Parking Lamp
B. Turn Signal Lamp
1. Open the hood. See Hood on
page 10‑4.
2. For the driver side bulb, remove the battery cover by firmly
pulling it straight up until it
releases.
3. Remove the bulb socket from the headlamp assembly by
turning counterclockwise.
4. Remove the bulb from the bulb socket by pulling straight out.
Page 261 of 378
Black plate (27,1)Chevrolet Orlando Owner Manual - 2012
Vehicle Care 10-27
5. Install the new bulb in the bulbsocket.
6. Install the bulb socket into the headlamp assembly by turning
clockwise.
7. On the driver side, replace the battery cover.
Sidemarker Lamp
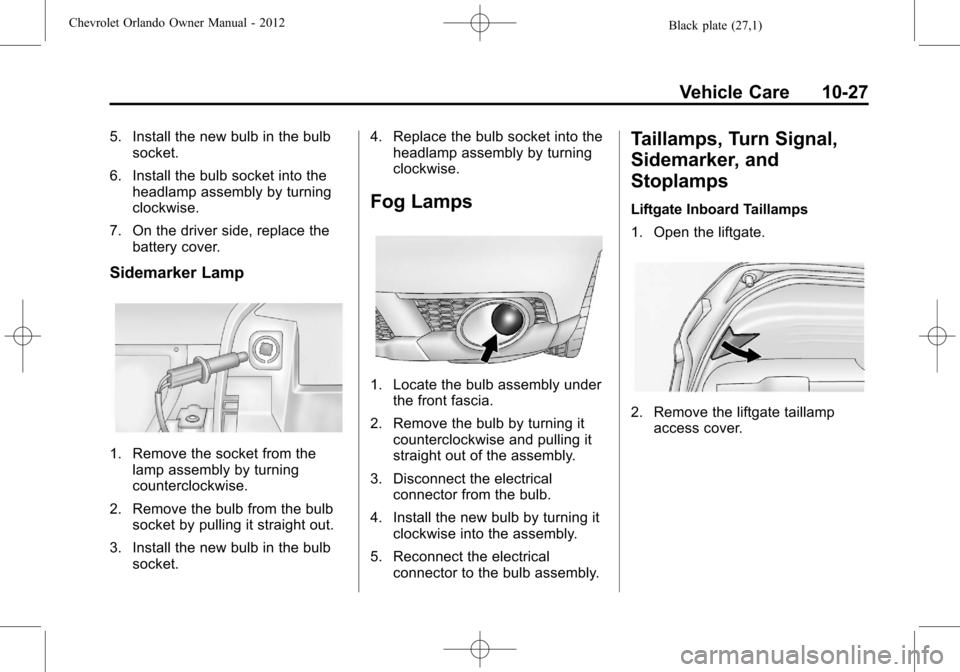
1. Remove the socket from thelamp assembly by turning
counterclockwise.
2. Remove the bulb from the bulb socket by pulling it straight out.
3. Install the new bulb in the bulb socket. 4. Replace the bulb socket into the
headlamp assembly by turning
clockwise.
Fog Lamps
1. Locate the bulb assembly under
the front fascia.
2. Remove the bulb by turning it counterclockwise and pulling it
straight out of the assembly.
3. Disconnect the electrical connector from the bulb.
4. Install the new bulb by turning it clockwise into the assembly.
5. Reconnect the electrical connector to the bulb assembly.
Taillamps, Turn Signal,
Sidemarker, and
Stoplamps
Liftgate Inboard Taillamps
1. Open the liftgate.
2. Remove the liftgate taillampaccess cover.
Page 268 of 378
Black plate (34,1)Chevrolet Orlando Owner Manual - 2012
10-34 Vehicle Care
FusesUsage
46 Cooling Fan
47 Lambda Sensor 1
48 Fog Lamps
49 Not Used
50 Not Used
51 Horn
52 MIL
53 Inside Rearview
Mirror
54 MHL Light Center
55 Folding Mirror
56 Front Washer
57 Steering
Column Lock
58 Not Used
59 Secondary Air Pump
60 Mirror Defogger
61 Mirror Defogger Fuses
Usage
62 Air Conditioning
Compressor Clutch
63 Rear Window
Sensor
64 Automatic Occupant
Sensing System
65 Rear Fog Lamp
66 Rear Washer
67 Fuel System Control
Module
68 Not Used
69 Battery Voltage
Sensor
70 Rain Sensor
71 Not Used
Relays Usage 1 Air Conditioning
Compressor Clutch
2 Starter Solenoid Relays Usage
3 Cooling Fan K7
4 Front Wiper Speed
5 Front Wiper On
6 Not Used
7 Ignition 87 Main
8 Fuel Pump
9 Cooling Fan K2
10 Cooling Fan K3 11 Not Used
12 Cooling Fan K3
13 Cooling Fan K1
14 Not Used
15 Ignition 15
16 Secondary
AIR Pump
17 Window/Mirror
Defogger
Page 271 of 378
Black plate (37,1)Chevrolet Orlando Owner Manual - 2012
Vehicle Care 10-37
Circuit
Number Usage
17 Air Conditioning
System
18 Trailer
19 Battery Sensor
20 Not Used
21 Instrument Cluster
22 Ignition/Electronic
Key System Circuit
Number Usage
23 Body Control
Module 1
24 Body Control
Module 2
25 Steering
Column Lock
26 Rear Power Outlet Relays Usage
K1 Trunk Open
K2 Logistic Mode
K3 Retained Accessory
Power
Page 307 of 378
Black plate (73,1)Chevrolet Orlando Owner Manual - 2012
Vehicle Care 10-73
instructions on how to remove,
install, or store a spare tire, seeTire
Changing on page 10‑66.
After installing the spare tire on the
vehicle, stop as soon as possible
and check that the spare is correctly
inflated. The spare tire is made to
perform well at speeds up to
112 km/h (70 mph) at the
recommended inflation pressure, so
you can finish your trip.
Have the damaged or flat road tire
repaired or replaced and installed
back onto the vehicle as soon as
possible so the spare tire will be
available in case it is needed again.
Do not mix tires and wheels of
different sizes, because they will not
fit. Keep the spare tire and its wheel
together.Jump Starting
For more information about the
vehicle battery, see Battery on
page 10‑21.
If the battery has run down, try to
use another vehicle and some
jumper cables to start your vehicle.
Be sure to use the following steps to
do it safely.
{WARNING
Batteries can hurt you. They can
be dangerous because:
.They contain acid that can
burn you.
.They contain gas that can
explode or ignite.
.They contain enough
electricity to burn you.
If you do not follow these steps
exactly, some or all of these
things can hurt you. Notice:
Ignoring these steps
could result in costly damage to
the vehicle that would not be
covered by the warranty.
Trying to start the vehicle by
pushing or pulling it will not
work, and it could damage the
vehicle.
The jump start positive post is
located in the engine compartment
on the driver side of the vehicle.
See Engine Compartment Overview
on page 10‑6.
The jump start negative grounding
point is the engine block or an
engine mounting bolt. Connect to a
spot as far away from the
discharged battery as possible.
These locations are used instead of
a direct connection to the battery.
Page 308 of 378
Black plate (74,1)Chevrolet Orlando Owner Manual - 2012
10-74 Vehicle Care
The positive jump start connection
is under a trim cover. Open the
cover door to expose the terminal.
1. Check the other vehicle. It musthave a 12-volt battery with a
negative ground system.
Notice: Only use a vehicle that
has a 12-volt system with a
negative ground for jump
starting. If the other vehicle does
not have a 12-volt system with a
negative ground, both vehicles
can be damaged.
2. Position the two vehicles so that they are not touching.
3. Set the parking brake firmly and put the shift lever in P (Park)
with an automatic transmission,
or neutral with a manual
transmission. See Shifting Into
Park (Automatic Transmission)
on page 9‑19 with an automatic
transmission, or Parking on
page 9‑21 with a manual
transmission. Notice:
If any accessories are left
on or plugged in during the jump
starting procedure, they could be
damaged. The repairs would not
be covered by the vehicle
warranty. Whenever possible,
turn off or unplug all accessories
on either vehicle when jump
starting the vehicle.
4. Turn the ignition to LOCK/OFF.
Turn off all lights and
accessories in both vehicles,
except the hazard warning
flashers if needed.
{WARNING
An electric fan can start up even
when the engine is not running
and can injure you. Keep hands,
clothing and tools away from any
underhood electric fan.
{WARNING
Using a match near a battery can
cause battery gas to explode.
People have been hurt doing this,
and some have been blinded.
Use a flashlight if you need more
light.
Be sure the battery has enough
water. You do not need to add
water to the battery installed in
your new vehicle. But if a battery
has filler caps, be sure the right
amount of fluid is there. If it is low,
add water to take care of that
first. If you do not, explosive gas
could be present.
Battery fluid contains acid that
can burn you. Do not get it on
you. If you accidentally get it in
your eyes or on your skin, flush
the place with water and get
medical help immediately.