2011 NISSAN TIIDA brake sensor
[x] Cancel search: brake sensorPage 90 of 3787
TROUBLE DIAGNOSISAT-73
< SERVICE INFORMATION >
DE
F
G H
I
J
K L
M A
B
AT
N
O P
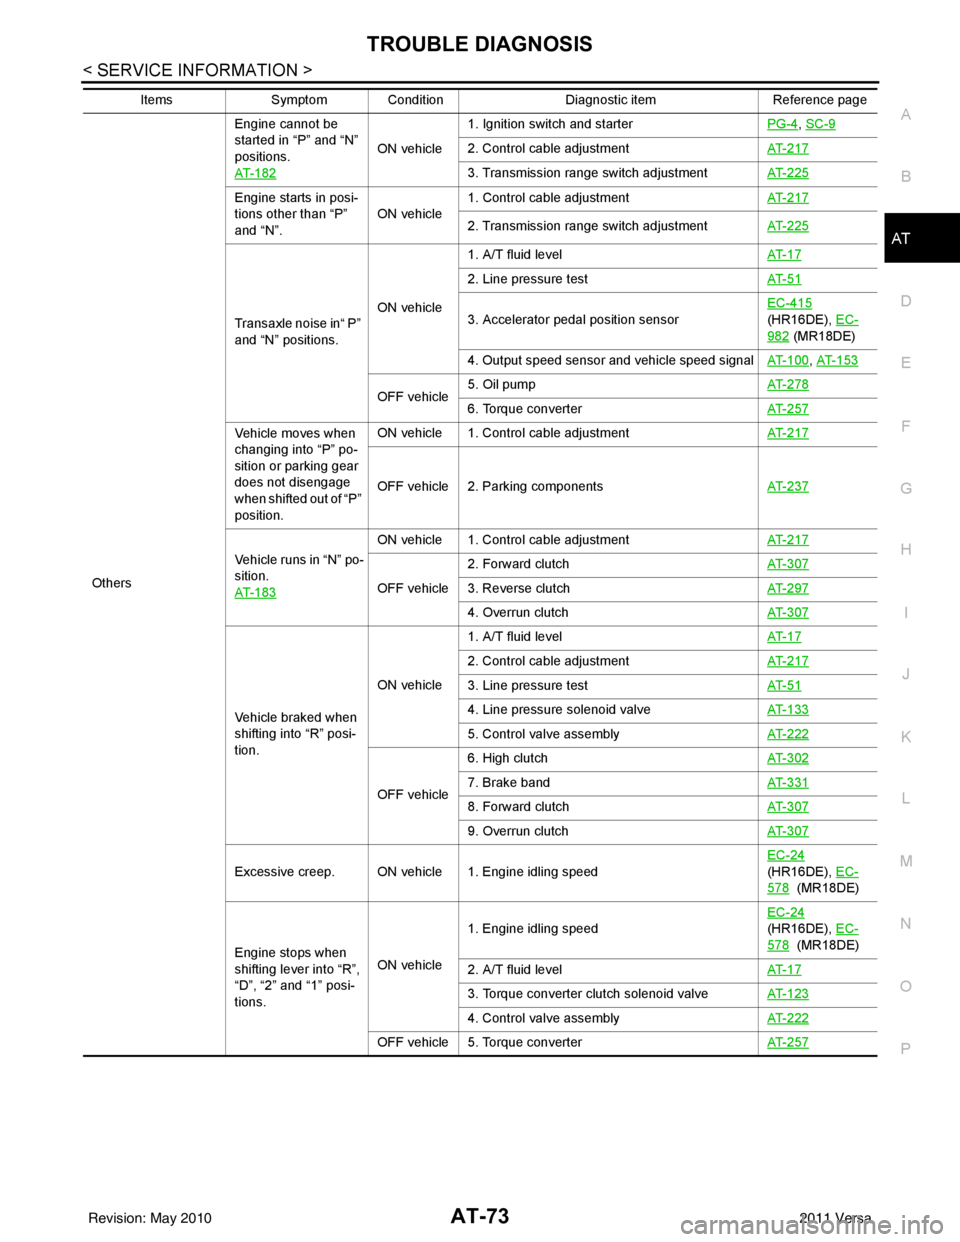
Others Engine cannot be
started in “P” and “N”
positions.
AT- 1 8 2
ON vehicle
1. Ignition switch and starter
PG-4
, SC-9
2. Control cable adjustmentAT- 2 1 7
3. Transmission range switch adjustmentAT- 2 2 5
Engine starts in posi-
tions other than “P”
and “N”.ON vehicle
1. Control cable adjustment
AT- 2 1 7
2. Transmission range switch adjustmentAT- 2 2 5
Transaxle noise in“ P”
and “N” positions.ON vehicle1. A/T fluid level
AT- 1 7
2. Line pressure testAT- 5 1
3. Accelerator pedal position sensorEC-415
(HR16DE), EC-
982 (MR18DE)
4. Output speed sensor and vehicle speed signal AT- 1 0 0
, AT- 1 5 3
OFF vehicle5. Oil pump
AT- 2 7 86. Torque converterAT- 2 5 7
Vehicle moves when
changing into “P” po-
sition or parking gear
does not disengage
when shifted out of “P”
position.ON vehicle 1. Control cable adjustment
AT- 2 1 7
OFF vehicle 2. Parking componentsAT- 2 3 7
Vehicle runs in “N” po-
sition.
AT- 1 8 3
ON vehicle 1. Control cable adjustmentAT- 2 1 7
OFF vehicle2. Forward clutch
AT- 3 0 73. Reverse clutchAT- 2 9 7
4. Overrun clutchAT- 3 0 7
Vehicle braked when
shifting into “R” posi-
tion.ON vehicle
1. A/T fluid level
AT- 1 7
2. Control cable adjustmentAT- 2 1 7
3. Line pressure testAT- 5 1
4. Line pressure solenoid valveAT- 1 3 3
5. Control valve assemblyAT- 2 2 2
OFF vehicle6. High clutch
AT- 3 0 27. Brake band AT- 3 3 1
8. Forward clutchAT- 3 0 7
9. Overrun clutchAT- 3 0 7
Excessive creep. ON vehicle 1. Engine idling speed EC-24
(HR16DE), EC-
578 (MR18DE)
Engine stops when
shifting lever into “R”,
“D”, “2” and “1” posi-
tions. ON vehicle
1. Engine idling speed
EC-24
(HR16DE), EC-
578 (MR18DE)
2. A/T fluid level AT- 1 7
3. Torque converter clutch solenoid valveAT- 1 2 3
4. Control valve assemblyAT- 2 2 2
OFF vehicle 5. Torque converter AT- 2 5 7
ItemsSymptom Condition Diagnostic itemReference page
Revision: May 2010 2011 Versa
Page 91 of 3787

AT-74
< SERVICE INFORMATION >
TROUBLE DIAGNOSIS
OthersVehicle braked by
gear change from D
1
to D
2 . ON vehicle 1. A/T fluid level
AT- 1 7OFF vehicle2. Reverse clutch
AT- 2 9 73. Low & reverse brakeAT- 3 1 4
4. High clutchAT- 3 0 2
5. Low one-way clutchAT- 2 5 7
Vehicle braked by
gear change from D
2
to D
3 . ON vehicle 1. A/T fluid level
AT- 1 7OFF vehicle 2. Brake bandAT- 3 3 1
Vehicle braked by
gear change from D
3
to D
4 . ON vehicle 1. A/T fluid level
AT- 1 7OFF vehicle2. Overrun clutch
AT- 3 0 73. Forward one-way clutchAT- 3 1 8
4. Reverse clutchAT- 2 9 7
Maximum speed not
attained. Poor accel-
eration.ON vehicle1. A/T fluid level
AT- 1 7
2. Transmission range switch adjustmentAT- 2 2 5
3. Overdrive control switchAT- 1 7 1
4. Accelerator pedal position sensorEC-415
(HR16DE), EC-
982 (MR18DE)
5. Output speed sensor and vehicle speed signal AT- 1 0 0
, AT- 1 5 3
6. Shift solenoid valve A AT- 1 3 8
7. Shift solenoid valve BAT- 1 4 3
8. Control valve assemblyAT- 2 2 2
OFF vehicle9. Reverse clutch
AT- 2 9 7
10. High clutchAT- 3 0 2
11. Brake bandAT- 3 3 1
12. Low & reverse brakeAT- 3 1 4
13. Oil pumpAT- 2 7 8
14. Torque converterAT- 2 5 7
Transaxle noise in
“D”, “2”, “1” and “R”
positions.ON vehicle 1. A/T fluid level
AT- 1 7
OFF vehicle 2. Torque converterAT- 2 5 7
Engine brake does
not operate in “1” po-
sition.ON vehicle1. Transmission range switch adjustment
AT- 2 2 5
2. Control cable adjustmentAT- 2 1 7
3. Output speed sensor and vehicle speed signalAT- 1 0 0, AT- 1 5 3
4. Control valve assembly AT- 2 2 2
5. Overrun clutch solenoid valveAT- 1 4 8
OFF vehicle6. Overrun clutch
AT- 3 0 77. Low & reverse brakeAT- 3 1 4
ItemsSymptom Condition Diagnostic itemReference page
Revision: May 2010 2011 Versa
Page 92 of 3787
TROUBLE DIAGNOSISAT-75
< SERVICE INFORMATION >
DE
F
G H
I
J
K L
M A
B
AT
N
O P
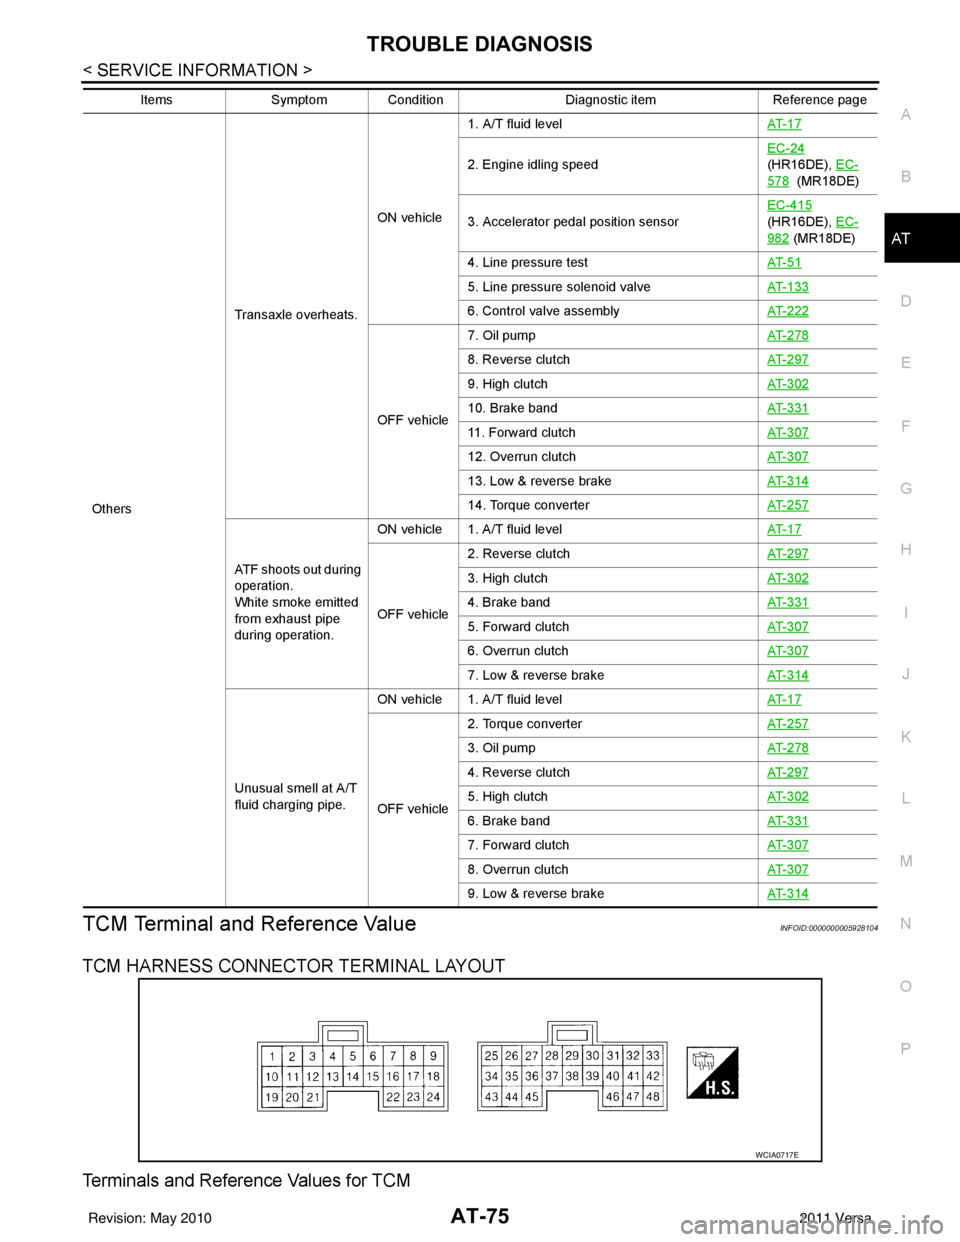
TCM Terminal and Reference ValueINFOID:0000000005928104
TCM HARNESS CONNECTOR TERMINAL LAYOUT
Terminals and Reference Values for TCM
Others Transaxle overheats.
ON vehicle
1. A/T fluid level
AT- 1 7
2. Engine idling speedEC-24
(HR16DE), EC-
578 (MR18DE)
3. Accelerator pedal position sensor EC-415
(HR16DE), EC-
982 (MR18DE)
4. Line pressure test AT- 5 1
5. Line pressure solenoid valveAT- 1 3 3
6. Control valve assemblyAT- 2 2 2
OFF vehicle7. Oil pump
AT- 2 7 8
8. Reverse clutchAT- 2 9 7
9. High clutchAT- 3 0 2
10. Brake bandAT- 3 3 1
11. Forward clutchAT- 3 0 7
12. Overrun clutchAT- 3 0 7
13. Low & reverse brakeAT- 3 1 4
14. Torque converterAT- 2 5 7
ATF shoots out during
operation.
White smoke emitted
from exhaust pipe
during operation.ON vehicle 1. A/T fluid level
AT- 1 7
OFF vehicle2. Reverse clutch
AT- 2 9 7
3. High clutchAT- 3 0 2
4. Brake bandAT- 3 3 1
5. Forward clutchAT- 3 0 7
6. Overrun clutchAT- 3 0 7
7. Low & reverse brakeAT- 3 1 4
Unusual smell at A/T
fluid charging pipe.ON vehicle 1. A/T fluid level
AT- 1 7
OFF vehicle2. Torque converter
AT- 2 5 7
3. Oil pumpAT- 2 7 8
4. Reverse clutchAT- 2 9 7
5. High clutchAT- 3 0 2
6. Brake bandAT- 3 3 1
7. Forward clutchAT- 3 0 7
8. Overrun clutchAT- 3 0 7
9. Low & reverse brakeAT- 3 1 4
ItemsSymptom Condition Diagnostic itemReference page
WCIA0717E
Revision: May 2010 2011 Versa
Page 96 of 3787

TROUBLE DIAGNOSISAT-79
< SERVICE INFORMATION >
DE
F
G H
I
J
K L
M A
B
AT
N
O P
SELF-DIAGNOSTIC RESULT MODE
Display Items List
OVERRUN/C S/V When overrun clutch solenoid valve operates.
(When overrun clutch disengaged. Refer to
AT-22 .) ON
When overrun clutch solenoid valve does not
operate. (When overrun clutch engaged. Refer
to AT- 2 2
.) OFF
BRAKE SW Depressed brake pedal.
ON
Released brake pedal. OFF
GEAR During driving 1, 2, 3, 4
SLCT LVR POSI When setting selector lever to “N” or “P” posi-
tions.
N · P
When setting selector lever to “R” position. R
When setting selector lever to “D” position. D
When setting selector lever to “2” position. 2
When setting selector lever to “1” position. 1
VEHICLE SPEED During driving Approximately matches the speedometer
reading.
LINE PRES DTY Line pressure low ⇔ Line pressure high 0 % ⇔ 94 %
TCC S/V DUTY Lock-up OFF ⇔ Lock-up ON 4 % ⇔ 94 %
Item name
Condition Display value (Approx.)
Items (CONSULT-III
screen terms) Malfunction is detected when... OBD-II (DTC)
Reference page
MIL indicator
lamp*1, “EN-
GINE” with
CONSULT-III
or GST
CAN COMM CIRCUIT • When TCM is not transmitting or receiving CAN communication signal
for 2 seconds or more. U1000
AT- 8 7
T/M RANGE SENSOR A • TCM does not receive the correct voltage signal (based on the gear
position) from the switch. P0705
AT- 9 0
FLUID TEMP SENSOR
A • TCM receives an excessively low or high voltage from the sensor. P0710
AT- 9 5
OUTPUT SPEED SEN-
SOR• TCM does not receive the proper voltage signal from the sensor.
P0720AT- 1 0 0
ENGINE SPEED • TCM does not re ceive the proper voltage signal from the ECM. P0725AT- 1 0 5
1GR INCORRECT RA-
TIO • A/T cannot be shifted to the 1GR position even if electrical circuit is
good. P0731*2AT- 1 0 9
2GR INCORRECT RA-
TIO• A/T cannot be shifted to the 2GR position even if electrical circuit is
good. P0732*2AT- 11 2
3GR INCORRECT RA-
TIO• A/T cannot be shifted to the 3GR position even if electrical circuit is
good. P0733*2AT- 11 5
4GR INCORRECT RA-
TIO• A/T cannot be shifted to the 4GR position even if electrical circuit is
good. P0734*2AT- 11 8
TORQUE CONVERTER• TCM detects an improper voltage drop when it tries to operate the so-
lenoid valve. P0740
AT- 1 2 3
TORQUE CONVERTER • A/T cannot perform lock-up even if electrical circuit is good.
P0744*2AT- 1 2 8
PC SOLENOID A• TCM detects an improper voltage drop when it tries to operate the so-
lenoid valve. P0745
AT- 1 3 3
Revision: May 2010 2011 Versa
Page 132 of 3787

P0733 3GR INCORRECT RATIOAT-115
< SERVICE INFORMATION >
DE
F
G H
I
J
K L
M A
B
AT
N
O P
P0733 3GR INCORRECT RATIO
DescriptionINFOID:0000000005928153
• This malfunction will not be detected while the OD OFF indicator lamp is indicating another self-diagnosis malfunction.
• This malfunction is detected when the A/T does not shif t into third gear position as instructed by the TCM.
This is not caused by electrical malfunction (circuit s open or shorted) but by mechanical malfunction such as
control valve sticking, improper solenoid valve operat ion, malfunctioning servo piston or brake band, etc.
On Board Diagnosis LogicINFOID:0000000005928154
• This is an OBD-II self-diagnostic item.
• Diagnostic trouble code “P0733 3GR INCORRECT RATIO” with CONSULT-III is detected when A/T cannot
be shifted to the 3GR position even if electrical circuit is good.
• This diagnosis monitors actual gear position by checki ng the torque converter slip ratio calculated by TCM
as follows:
Torque converter slip ratio = A x C/B
A: Output shaft revolution signal from output speed sensor
B: Engine speed signal from ECM
C: Gear ratio determined as gear position which TCM supposes
If the actual gear position is higher than the position (3rd) supposed by TCM, the slip ratio will be more than
normal. In case the ratio exceeds the specif ied value, TCM judges this diagnosis malfunction.
This malfunction will be caused when shift solenoid valve A is stuck closed.
• Gear positions supposed by TCM are as follows. In case of gear position with no malfunctions: 1, 2, 3 and 4 positions
In case of gear position with shift solenoid valve A stuck closed: 1, 1, 4* and 4 positions to each gear position
above
*: “P0733 3GR INCORRECT RATIO” is detected.
Possible CauseINFOID:0000000005928155
• Shift solenoid valve A
• Each clutch
• Hydraulic control circuit
DTC Confirmation ProcedureINFOID:0000000005928156
CAUTION:
• Always drive vehicle at a safe speed.
• If performing this “DTC Confirmation Procedure” again, always turn ignition switch OFF and wait at
least 10 seconds before continuing.
After the repair, perform the following procedure to confirm the malfunction is eliminated.
WITH CONSULT-III
1. Start engine and select “DATA MONITOR” m ode for “TRANSMISSION” with CONSULT-III.
2. Touch “START”.
3. Make sure that output voltage of A/T fluid temperature sensor is within the range below. FLUID TEMP SE: 0.4 - 1.5 V
If out of range, drive the vehicle to decrease the vo ltage (warm up the fluid) or stop engine to increase the
voltage (cool down the fluid).
4. Select “3RD GR FNCTN P0733” of “DTC & SR T CONFIRMATION” mode for “TRANSMISSION” with
CONSULT-III and touch “START”.
5. Accelerate vehicle to 60 to 75 km/h (37 to 47 MPH) under the following conditions and release the accel- erator pedal completely.
THROTTLE POSI: Less th an 1.0/8 (at all times during step 4)
SLCT LVR POSI: “D” position
Gear position 123 4
Shift solenoid valve A ON (Closed)OFF (Open)OFF (Open)ON (Closed)
Shift solenoid valve B ON (Closed)ON (Closed) OFF (Open)OFF (Open)
Revision: May 2010 2011 Versa
Page 207 of 3787
AT-190
< SERVICE INFORMATION >
TROUBLE DIAGNOSIS FOR SYMPTOMS
OK or NG
OK >> GO TO 5.
NG >> Repair or replace accelerator pedal position sensor.
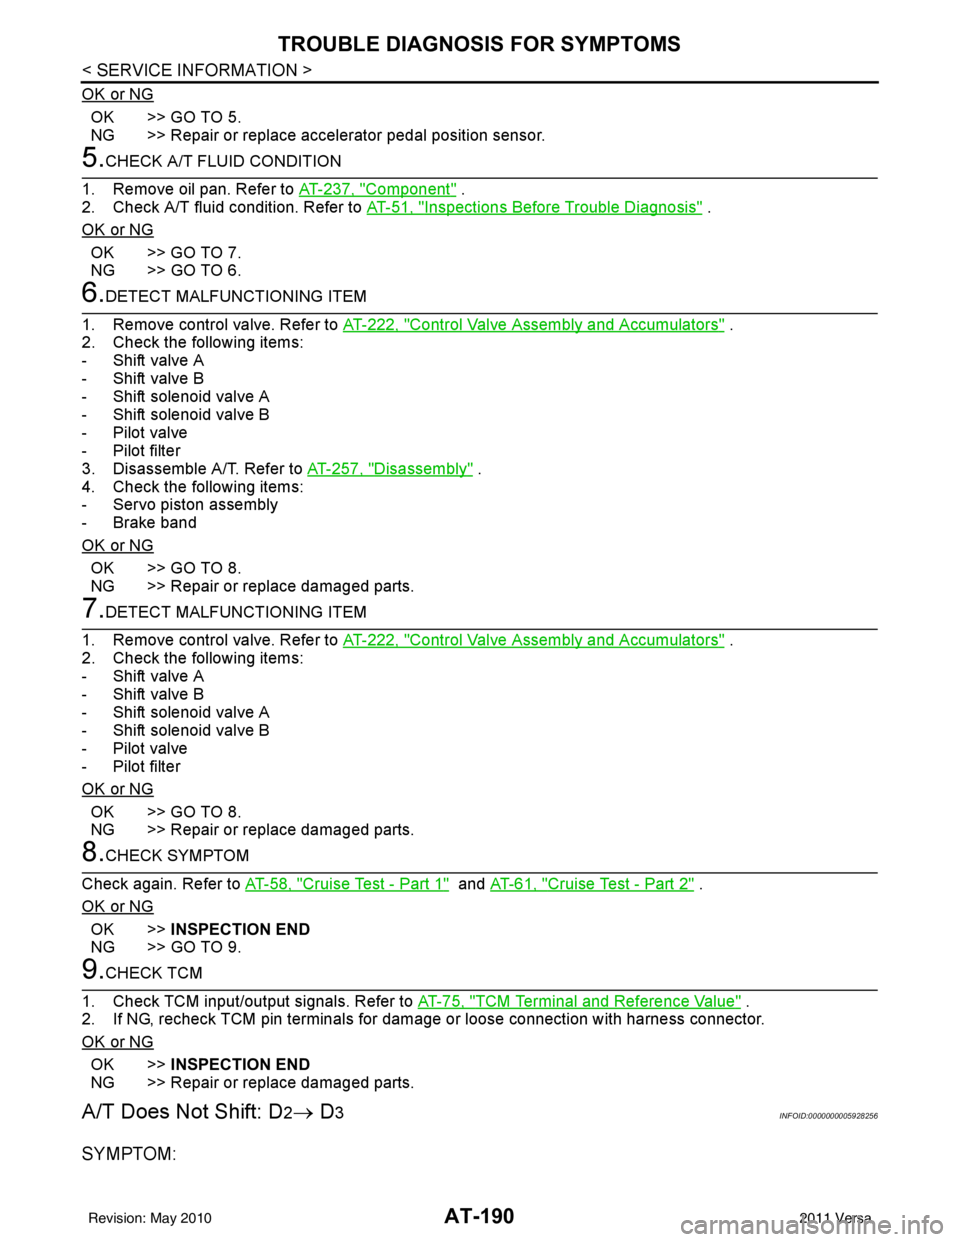
5.CHECK A/T FLUID CONDITION
1. Remove oil pan. Refer to AT-237, "
Component" .
2. Check A/T fluid condition. Refer to AT-51, "
Inspections Before Trouble Diagnosis" .
OK or NG
OK >> GO TO 7.
NG >> GO TO 6.
6.DETECT MALFUNCTIONING ITEM
1. Remove control valve. Refer to AT-222, "
Control Valve Assembly and Accumulators" .
2. Check the following items:
- Shift valve A
- Shift valve B
- Shift solenoid valve A
- Shift solenoid valve B
- Pilot valve
- Pilot filter
3. Disassemble A/T. Refer to AT-257, "
Disassembly" .
4. Check the following items:
- Servo piston assembly
- Brake band
OK or NG
OK >> GO TO 8.
NG >> Repair or replace damaged parts.
7.DETECT MALFUNCTIONING ITEM
1. Remove control valve. Refer to AT-222, "
Control Valve Assembly and Accumulators" .
2. Check the following items:
- Shift valve A
- Shift valve B
- Shift solenoid valve A
- Shift solenoid valve B
- Pilot valve
- Pilot filter
OK or NG
OK >> GO TO 8.
NG >> Repair or replace damaged parts.
8.CHECK SYMPTOM
Check again. Refer to AT-58, "
Cruise Test - Part 1" and AT-61, "Cruise Test - Part 2" .
OK or NG
OK >> INSPECTION END
NG >> GO TO 9.
9.CHECK TCM
1. Check TCM input/output signals. Refer to AT-75, "
TCM Terminal and Reference Value" .
2. If NG, recheck TCM pin terminals for damage or loose connection with harness connector.
OK or NG
OK >> INSPECTION END
NG >> Repair or replace damaged parts.
A/T Does Not Shift: D2→ D3INFOID:0000000005928256
SYMPTOM:
Revision: May 2010 2011 Versa
Page 619 of 3787
INTELLIGENT KEY SYSTEMBL-109
< SERVICE INFORMATION >
C
DE
F
G H
J
K L
M A
B
BL
N
O P
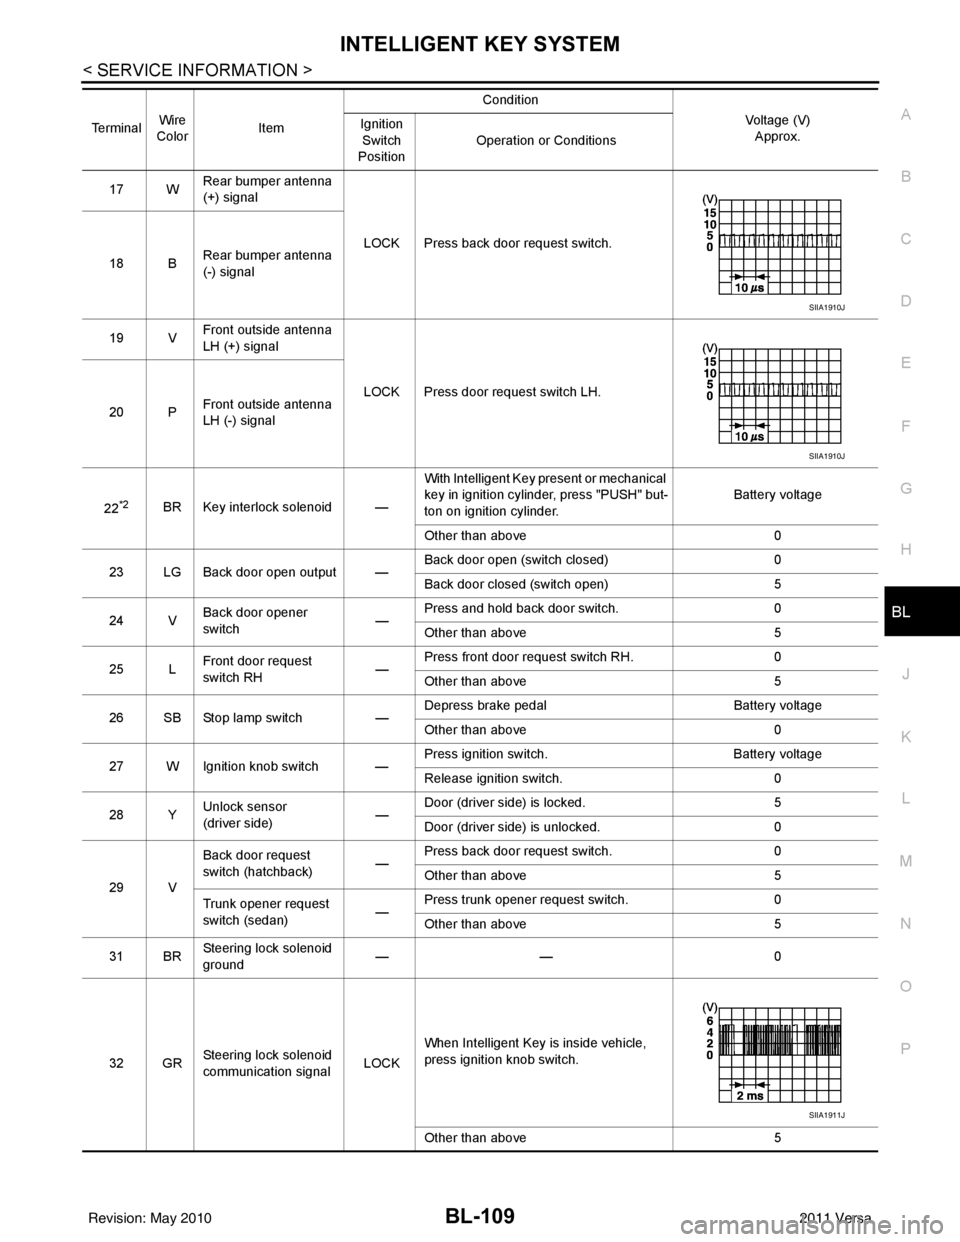
17 W Rear bumper antenna
(+) signal
LOCK Press back door request switch.
18 B Rear bumper antenna
(-) signal
19 V Front outside antenna
LH (+) signal
LOCK Press door request switch LH.
20 P Front outside antenna
LH (-) signal
22
*2BR Key interlock solenoid — With Intelligent Key present or mechanical
key in ignition cylinder, press "PUSH" but-
ton on ignition cylinder.
Battery voltage
Other than above 0
23 LG Back door open output — Back door open (switch closed)
0
Back door closed (switch open) 5
24 V Back door opener
switch —Press and hold back door switch.
0
Other than above 5
25 L Front door request
switch RH —Press front door request switch RH.
0
Other than above 5
26 SB Stop lamp switch —Depress brake pedal
Battery voltage
Other than above 0
27 W Ignition knob switch — Press ignition switch.
Battery voltage
Release ignition switch. 0
28 Y Unlock sensor
(driver side) —Door (driver si
de) is locked. 5
Door (driver side ) is unlocked. 0
29 V Back door request
switch (hatchback)
—Press back door request switch.
0
Other than above 5
Trunk opener request
switch (sedan) —Press trunk opener request switch.
0
Other than above 5
31 BR Steering lock solenoid
ground
——
0
32 GR Steering lock solenoid
communication signal LOCKWhen Intelligent Key is inside vehicle,
press ignition knob switch.
Other than above
5
Terminal
Wire
Color Item Condition
Voltage (V)Approx.
Ignition
Switch
Position Operation or Conditions
SIIA1910J
SIIA1910J
SIIA1911J
Revision: May 2010
2011 Versa
Page 855 of 3787
BR-8
< SERVICE INFORMATION >
BRAKE PEDAL
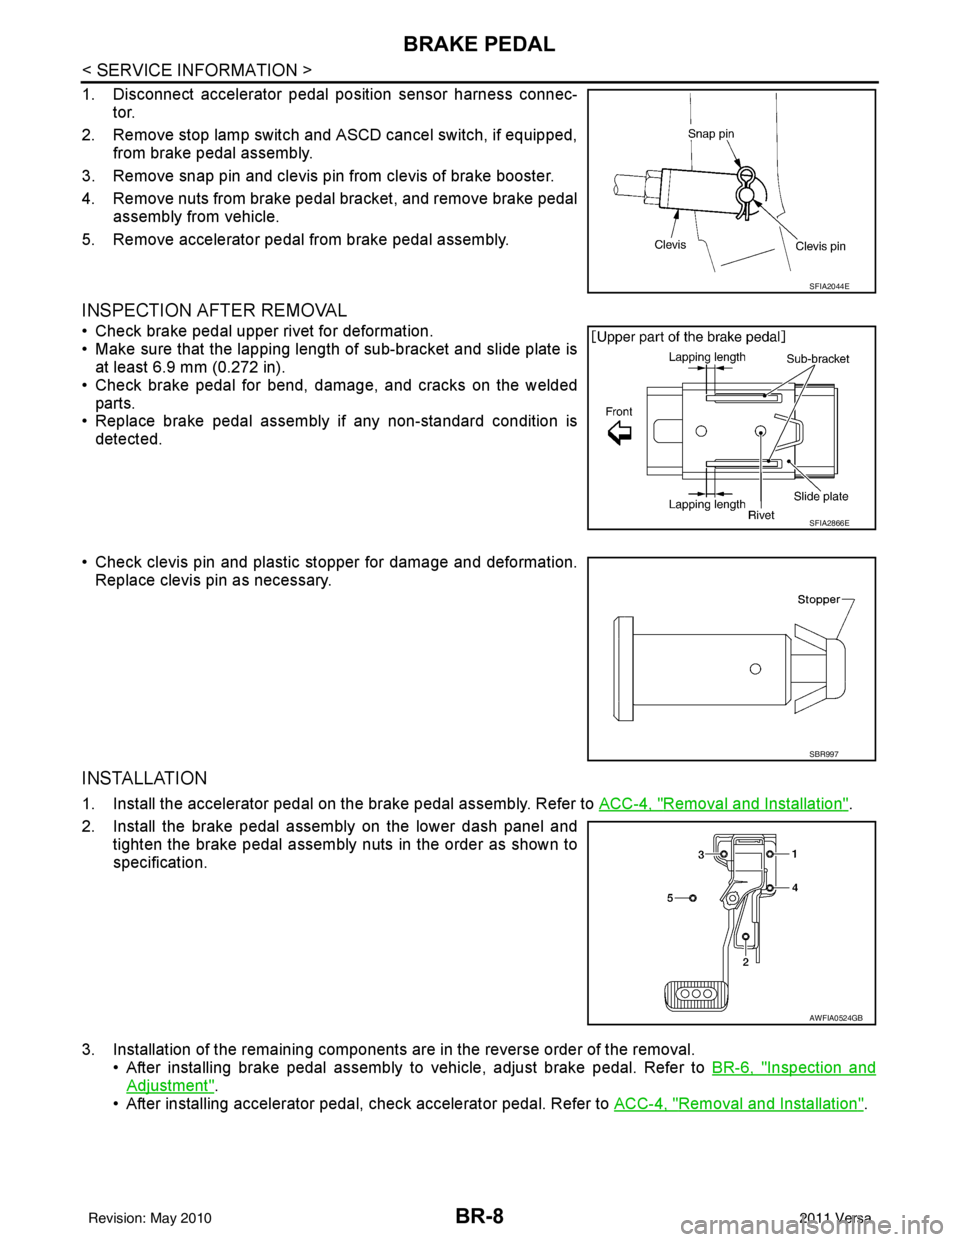
1. Disconnect accelerator pedal position sensor harness connec-tor.
2. Remove stop lamp switch and ASCD cancel switch, if equipped, from brake pedal assembly.
3. Remove snap pin and clevis pin from clevis of brake booster.
4. Remove nuts from brake pedal bracket, and remove brake pedal assembly from vehicle.
5. Remove accelerator pedal from brake pedal assembly.
INSPECTION AFTER REMOVAL
• Check brake pedal upper rivet for deformation.
• Make sure that the lapping length of sub-bracket and slide plate is at least 6.9 mm (0.272 in).
• Check brake pedal for bend, damage, and cracks on the welded parts.
• Replace brake pedal assembly if any non-standard condition is
detected.
• Check clevis pin and plastic stopper for damage and deformation. Replace clevis pin as necessary.
INSTALLATION
1. Install the accelerator pedal on the brake pedal assembly. Refer to ACC-4, "Removal and Installation".
2. Install the brake pedal assembly on the lower dash panel and tighten the brake pedal assembly nuts in the order as shown to
specification.
3. Installation of the remaining components are in the reverse order of the removal. • After installing brake pedal assembly to vehicle, adjust brake pedal. Refer to BR-6, "
Inspection and
Adjustment".
• After installing accelerator pedal, check accelerator pedal. Refer to ACC-4, "
Removal and Installation".
SFIA2044E
SFIA2866E
SBR997
AWFIA0524GB
Revision: May 2010 2011 Versa