Page 444 of 3787
![NISSAN TIIDA 2011 Service Repair Manual TELEPHONEAV-47
< SERVICE INFORMATION > [AUDIO WITHOUT NAVIGATION]
C
D
E
F
G H
I
J
L
M A
B
AV
N
O P
Sedan
Removal
1. For hatchback, remove luggage side lower finish (RH). Refer to EI-56, "Removal and I NISSAN TIIDA 2011 Service Repair Manual TELEPHONEAV-47
< SERVICE INFORMATION > [AUDIO WITHOUT NAVIGATION]
C
D
E
F
G H
I
J
L
M A
B
AV
N
O P
Sedan
Removal
1. For hatchback, remove luggage side lower finish (RH). Refer to EI-56, "Removal and I](/manual-img/5/57396/w960_57396-443.png)
TELEPHONEAV-47
< SERVICE INFORMATION > [AUDIO WITHOUT NAVIGATION]
C
D
E
F
G H
I
J
L
M A
B
AV
N
O P
Sedan
Removal
1. For hatchback, remove luggage side lower finish (RH). Refer to EI-56, "Removal and Installation".
• Disconnect Bluetooth antenna harness clip.
2. For sedan, remove the trunk room side finisher (RH). Refer to EI-59, "
Removal and Installation".
• Disconnect the Bluetooth antenna harness connector.
3. Disconnect the Bluetooth control unit harness connector.
4. Remove the Bluetooth control unit upper and lower bracket bolts.
5. Unhook the Bluetooth control unit upper and lowe r brackets and remove Bluetooth control unit.
6. Remove Bluetooth control unit bracket screws and remove the upper and lower brackets from unit.
Installation
Installation is in the reverse order of removal.
BLUETOOTH ANTENNA
LKIA0936E
1. Bluetooth control unit bracket 2. Bluetooth control unit 3. Bluetooth antenna feeder connector
A. Bluetooth control unit bolts B. Bluetooth control unit connector Front
Revision: May 2010 2011 Versa
Page 445 of 3787
![NISSAN TIIDA 2011 Service Repair Manual AV-48
< SERVICE INFORMATION >[AUDIO WITHOUT NAVIGATION]
TELEPHONE
Hatchback
Sedan
Removal
1. Disconnect the battery negative terminal.
2. For hatchback, remove luggage side lower finisher (RH). Refer NISSAN TIIDA 2011 Service Repair Manual AV-48
< SERVICE INFORMATION >[AUDIO WITHOUT NAVIGATION]
TELEPHONE
Hatchback
Sedan
Removal
1. Disconnect the battery negative terminal.
2. For hatchback, remove luggage side lower finisher (RH). Refer](/manual-img/5/57396/w960_57396-444.png)
AV-48
< SERVICE INFORMATION >[AUDIO WITHOUT NAVIGATION]
TELEPHONE
Hatchback
Sedan
Removal
1. Disconnect the battery negative terminal.
2. For hatchback, remove luggage side lower finisher (RH). Refer to EI-56, "
Removal and Installation".
3. For sedan, fold the rear seat back down, re move the seat back finisher (RH). Refer to EI-59, "
Removal
and Installation".
4. Disconnect the Bluetooth antenna feeder harness clips.
5. Disconnect the Bluetooth ant enna feeder harness connector.
6. Remove the Bluetooth antenna bracket bolt(s) and remove antenna.
7. Remove the Bluetooth antenna screws and remove bracket.
Installation
Installation is in the reverse order of removal.
LKIA0763E
1. Bluetooth antenna bracket 2. Bluetooth antenna A. Bluetooth antenna bracket bolts
B. Bluetooth antenna screws C. Bluetooth antenna feeder harness
clips
LKIA0937E
1. Bluetooth antenna bracket 2. Bluetooth antenna A. Bluetooth antenna bracket bolts
B. Bluetooth antenna screws C. Bluetooth antenna feeder harness
clip Front
Revision: May 2010
2011 Versa
Page 484 of 3787
![NISSAN TIIDA 2011 Service Repair Manual TELEPHONEAV-87
< SERVICE INFORMATION > [AUDIO WITH NAVIGATION]
C
D
E
F
G H
I
J
L
M A
B
AV
N
O P
Sedan
Removal
1. For hatchback, remove luggage side lower finisher (RH). Refer to EI-56, "Removal and I NISSAN TIIDA 2011 Service Repair Manual TELEPHONEAV-87
< SERVICE INFORMATION > [AUDIO WITH NAVIGATION]
C
D
E
F
G H
I
J
L
M A
B
AV
N
O P
Sedan
Removal
1. For hatchback, remove luggage side lower finisher (RH). Refer to EI-56, "Removal and I](/manual-img/5/57396/w960_57396-483.png)
TELEPHONEAV-87
< SERVICE INFORMATION > [AUDIO WITH NAVIGATION]
C
D
E
F
G H
I
J
L
M A
B
AV
N
O P
Sedan
Removal
1. For hatchback, remove luggage side lower finisher (RH). Refer to EI-56, "Removal and Installation".
• Disconnect Bluetooth antenna harness clip.
2. For sedan, remove the trunk room side finisher (RH). Refer to EI-59, "
Removal and Installation".
• Disconnect the Bluetooth antenna harness connector.
3. Disconnect the Bluetooth control unit harness connector.
4. Remove the Bluetooth control unit upper and lower bracket bolts.
5. Unhook the Bluetooth control unit upper and lowe r brackets and remove Bluetooth control unit.
6. Remove Bluetooth control unit bracket screws and remove the upper and lower brackets from unit.
Installation
Installation is in the reverse order of removal.
BLUETOOTH ANTENNA
LKIA0936E
1. Bluetooth control unit bracket 2. Bluetooth control unit 3. Bluetooth antenna feeder connector
A. Bluetooth control unit bolts B. Bluetooth control unit connector Front
Revision: May 2010 2011 Versa
Page 485 of 3787
![NISSAN TIIDA 2011 Service Repair Manual AV-88
< SERVICE INFORMATION >[AUDIO WITH NAVIGATION]
TELEPHONE
Hatchback
Sedan
Removal
1. Disconnect the battery negative terminal.
2. For hatchback, remove luggage side lower finisher (RH). Refer to NISSAN TIIDA 2011 Service Repair Manual AV-88
< SERVICE INFORMATION >[AUDIO WITH NAVIGATION]
TELEPHONE
Hatchback
Sedan
Removal
1. Disconnect the battery negative terminal.
2. For hatchback, remove luggage side lower finisher (RH). Refer to](/manual-img/5/57396/w960_57396-484.png)
AV-88
< SERVICE INFORMATION >[AUDIO WITH NAVIGATION]
TELEPHONE
Hatchback
Sedan
Removal
1. Disconnect the battery negative terminal.
2. For hatchback, remove luggage side lower finisher (RH). Refer to EI-56, "
Removal and Installation".
3. For sedan, fold the rear seat back down, re move the seat back finisher (RH). Refer to EI-59, "
Removal
and Installation".
4. Disconnect the Bluetooth antenna feeder harness clips.
5. Disconnect the Bluetooth ant enna feeder harness connector.
6. Remove the Bluetooth antenna bracket bolt(s) and remove antenna.
7. Remove the Bluetooth antenna screws and remove bracket.
Installation
Installation is in the reverse order of removal.
LKIA0763E
1. Bluetooth antenna bracket 2. Bluetooth antenna A. Bluetooth antenna bracket bolts
B. Bluetooth antenna screws C. Bluetooth antenna feeder harness
clips
LKIA0937E
1. Bluetooth antenna bracket 2. Bluetooth antenna A. Bluetooth antenna bracket bolts
B. Bluetooth antenna screws C. Bluetooth antenna feeder harness
clip Front
Revision: May 2010
2011 Versa
Page 705 of 3787

TRUNK LIDBL-195
< SERVICE INFORMATION >
C
DE
F
G H
J
K L
M A
B
BL
N
O P
TRUNK LID
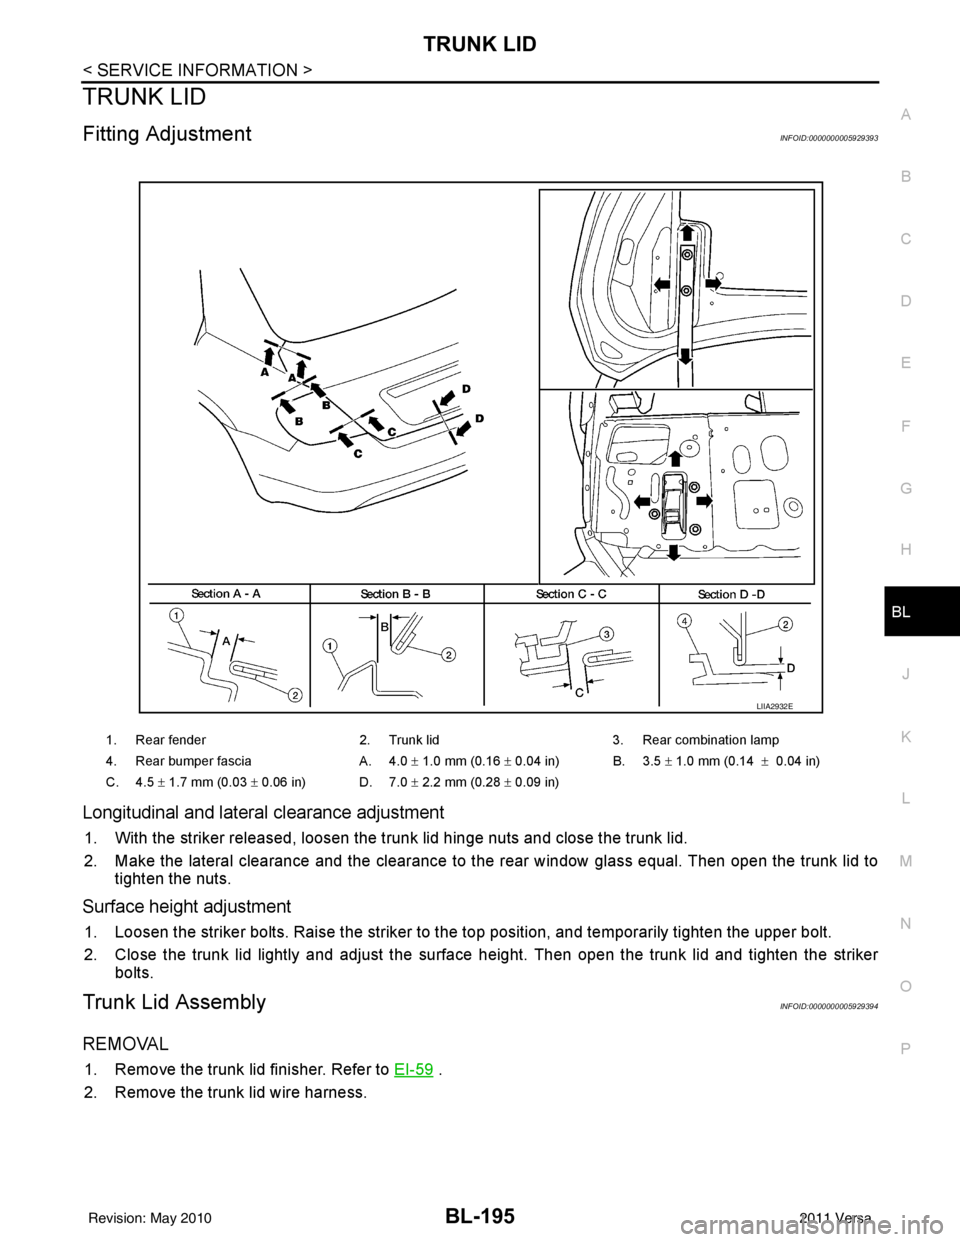
Fitting AdjustmentINFOID:0000000005929393
Longitudinal and latera l clearance adjustment
1. With the striker released, loosen the trunk lid hinge nuts and close the trunk lid.
2. Make the lateral clearance and the clearance to the rear window glass equal. Then open the trunk lid to
tighten the nuts.
Surface height adjustment
1. Loosen the striker bolts. Raise the striker to t he top position, and temporarily tighten the upper bolt.
2. Close the trunk lid lightly and adjust the surface height. Then open the trunk lid and tighten the striker bolts.
Trunk Lid AssemblyINFOID:0000000005929394
REMOVAL
1. Remove the trunk lid finisher. Refer to EI-59 .
2. Remove the trunk lid wire harness.
1. Rear fender 2. Trunk lid3. Rear combination lamp
4. Rear bumper fascia A. 4.0 ± 1.0 mm (0.16 ± 0.04 in) B. 3.5 ± 1.0 mm (0.14 ± 0.04 in)
C. 4.5 ± 1.7 mm (0.03 ± 0.06 in) D. 7.0 ± 2.2 mm (0.28 ± 0.09 in)
LIIA2932E
Revision: May 2010 2011 Versa
Page 706 of 3787
BL-196
< SERVICE INFORMATION >
TRUNK LID
3. Remove the nuts (a) and the trunk lid assembly (1).
INSTALLATION
Installation is in the reverse order of removal.
CAUTION:
After installing, apply touch-up paint (body color) to the head of the hinge nuts.
Trunk Lid LockINFOID:0000000005929395
REMOVAL
1. Remove the trunk lid finisher. Refer to EI-59.
2. If equipped, disconnect the trunk lid lock cylinder rod.
3. Remove the release cable.
4. Disconnect the electrical connector (a), remove the bolts (b) and the trunk lid lock (1).
INSTALLATION
Installation is in the reverse order of removal.
Trunk Lid StrikerINFOID:0000000005929396
REMOVAL
1. Remove the trunk rear plate and trunk rear finisher. Refer to EI-59.
2. Remove the bolts, disconnect the electrical connector and remove the trunk lock actuator.
3. Remove the bolt and disconnect the trunk lid release cable.
LIIA2933E
LIIA2935E
Revision: May 2010 2011 Versa
Page 2363 of 3787
TRUNK LID FINISHEREI-33
< ON-VEHICLE REPAIR >
C
DE
F
G H
J
K L
M A
B
EI
N
O P
TRUNK LID FINISHER
Removal and InstallationINFOID:0000000005929567
REMOVAL
1. Open trunk lid, remove trunk lid finisher inner. Refer to EI-59.
2. Remove trunk lid finisher outer nuts.
3. Release the clips, then pull trunk lid finisher outer away from trunk lid.
4. Disconnect trunk lid opener switch connector and trunk opener request switch connector, then remove trunk lid finisher outer.
INSTALLATION
Installation is in the reverse order of removal.
1. Trunk lid finisher outer 2. Trunk lid opener switch connector 3. Trunk opener request switch connector
A. Clip C101
WIIA1413E
Revision: May 2010 2011 Versa
Page 2365 of 3787

REAR AIR SPOILEREI-35
< ON-VEHICLE REPAIR >
C
DE
F
G H
J
K L
M A
B
EI
N
O P
2. Remove inside trunk lid finisher. Refer to EI-59, "Removal and Installation".
3. Disconnect high mounted stop lamp connector.
4. Release adhesive backed foam tape and clips, then carefully lift the rear air spoiler from trunk lid. CAUTION:
Use care not to damage painted surfaces during removal, or releasing of adhesive backed foam
tapes if equipped.
5. Release the high mounted stop lamp harness grommet from trunk lid, then remove rear air spoiler.
Installation - Sedan
Installation is in the reverse order of removal.
NOTE:
• Before installing rear air spoiler, clean the surface where it will be mounted with isopropyl alcohol or equiva-
lent to degrease the surface.
• Before installing, be sure there are no gaps or wa ves in the foam tape (if equipped) where the surfaces
meet.
• During installation, be sure grommet of high mounted stop lamp harness is fully seated into trunk lid opening prior to final rear air spoiler placement.
Removal - Hatchback
1. Remove back door finisher upper. Refer to EI-40.
2. Disconnect high mounted stop lamp connector.
3. Remove the nuts and carefully lift the rear air spoiler from the back door. CAUTION:
Use care not to damage painted surfaces during removal, or releasing of adhesive backed foam
tapes if equipped.
4. Release the high mounted stop lamp harness grommet from back door, then remove rear air spoiler.
Installation - Hatchback
Installation is in the reverse order of removal.
NOTE:
• Before installing rear air spoiler, clean the surface where it will be mounted with isopropyl alcohol or equiva-
lent to degrease the surface.
• Before installing, be sure there are no gaps or wa ves in the foam tape (if equipped) where the surfaces
meet.
• During installation, be sure grommet of high mount ed stop lamp harness is fully seated into back door open-
ing prior to final rear air spoiler placement.
Revision: May 2010 2011 Versa