Page 57 of 196

Controls overviewControls
55
> Fuel consumption: l/100 km, mpg,
km/l
*
> Distance covered: miles, km
> Temperature: 7, 6
7. Press and hold the butt on until the display
changes.
8. Press the button briefly to change the for-
mat or unit of measure.
9. Press and hold the butt on until the display
changes.
The settings are stored.
Resetting to factory settings
The settings for formats and units of measure
can be reset to the factory settings. The settings
are stored for the remote control currently in
use, refer also to Personal Profile on page 20.
1. Press the button on the turn signal indicator
as often as necessary until "SET/INFO" is dis-
played.
2. Press and hold the butt on until the display
changes.
3. Press the button as of ten as necessary until
the symbol and "SET" are displayed. 4.
Press and hold the butt on until the display
changes.
5. Press the button as of ten as necessary until
RESET" is displayed.
6. Press and hold the butt on until the display
changes to the first setting.
The settings are reset.
Service requirements
The remaining driving dist ance and the date of
the next scheduled service are briefly displayed
immediately after you start the engine or switch
on the ignition.
Page 58 of 196
ControlsControls overview
56
The extent of service work required can be
read out from the remote control by your
MINI dealer. <
Displaying vehicle check
For certain maintenance operations, you can
view the respective distance remaining or due
date individually in the tachometer.
1.Switch on the ignition, refer to page 41.
2. Press the button on the turn signal indicator
as often as necessary until "SET/INFO" is dis-
played.
3. Press and hold the button until the display
changes.
4. Briefly press the button repeatedly until the
corresponding symbol and "SERVICE- INFO"
are displayed.
5. Press and hold the button until the display
changes.
6. Briefly press the button to display the indi-
vidual service items, refer to the following
information.
Possible displays
1Button for selecting information
SymbolFunction
Engine oil*
Front brakes
Rear brakes
Roadworthiness test
Vehicle check
Page 59 of 196

Controls overviewControls
57
More information on the MINI Maintenance Sys-
tem can be found on page 142.
Clock
Setting the time
Radio MINI Boost CD:
1.Press the MENU button.
2. Press the button.
3. Press the button.
4. Select the desired menu item "FORMAT",
"STD" or "MIN" and press the respective but-
ton.
5. Turn the button on the right to set values.
6. Press the button on the right to store values.
7. Press the button to exit setting
values.
Date
Setting date
Radio MINI Boost CD:
1. Press the MENU button.
2. Press the button.
3. Press the button.
4. Select the desired menu item "TT", "MM" or
"JJ".
5. Turn the button on the right to set values.
6. Press the button on the right to store values.
7. Press the button to exit setting
values.
Check Control
The concept
The Check Control monitors vehicle functions
and alerts you to any ma lfunctions in the sys-
tems monitored. Check Control messages
involve indicator or warning lamps in the dis-
plays and, in some circumstances, an acoustic
signal.
Indicator and warning lamps can light up in var-
ious combinations and colors in the indicator
areas 1 and 2.
Brake fluid
Exit display
54
Next setting or item of
information 54
SymbolFunction
Page 60 of 196

ControlsControls overview
58
What to do in case of a malfunction
The meaning of each lamp in the event of a mal-
function and tips on how to respond are listed
starting on page162.
Hiding Check Control messages
Press the button in th e turn signal lever.
> Some Check Control me ssages are displayed
until the malfunctions have been rectified.
They cannot be hidden. If several malfunc-
tions occur at the same time, they are dis-
played in succession.
> Other Check Control messages are automat-
ically hidden after approx. 20 seconds, but
remain stored.
The symbol indicates that Check Control mes-
sages have been stor ed. Check Control mes-
sages can be viewed whenever it is convenient.
Viewing stored Check Control messages
Stored Check Control me ssages can only be dis-
played if the driver's door is closed. 1.
Press the button on the turn signal indicator
as often as necessary until "SET/INFO" is dis-
played.
2. Press and hold the button until the display
changes.
3. Briefly press the button repeatedly until the
corresponding symbol and "CHECK INFO"
appear in the display.
4. Hold the button down.
If there are no Check Control messages, then
"CHECK OK" is displayed.
If a Check Control message has been stored,
the corresponding message is displayed.
5. Press the button to display any other mes-
sages.
Page 61 of 196

Technology for driving comfort and safetyControls
59
Technology for driving comfort and
safety
Park Distance Control
PDC*
The concept
PDC assists you with parking in reverse. Acoustic
signals warn you of the presence of an object
behind the vehicle. The measurement is carried
out by four ultrasonic sensors in the rear
bumper.An acoustic warning sounds when an
object is approx. 24 in/60 cm from the
corner sensors or appr ox. 5 ft/1.50 m from the
center sensors. PDC is a parking aid that can dis-
play objects, which are slowly being
approached, which is the usual case when park-
ing a vehicle. Avoid approaching an object at
high speed; otherwise, physical circumstances
may lead to the system warning being issued
too late. <
Automatic mode
With the engine running or the ignition switched
on, the system is activated automatically after
approx. 1 second when you engage reverse
gear or move the automatic transmission selec-
tor lever to position R. Wait this short period
before driving.
Acoustic signals
As the distance between vehicle and object
decreases, the intervals between the tones
become shorter. If the distance to the nearest
object falls to below roughly 1 ft/30 cm, then a
continuous tone sounds.
If the distance remains co nstant, e.g. when driv-
ing parallel to a wall, th e acoustic signal stops
after approx. 3 seconds.
Adjustments
The volume of the acoustic signals can be set,
refer to page 102.
Malfunction
Indicator lamp lights up. PDC has failed.
Have the system checked.
To avoid this problem, keep the sensors
clean and free of ice or snow in order to ensure
that they will continue to operate effectively.
When using a high-pressure cleaner, do not
direct the jet toward the sensors for lengthy
periods and only spray from a distance of at least
4in/10cm.
System limitations
Even with PDC, final re sponsibility for esti-
mating the distance between the vehicle
and any obstructions always remains with the
driver. Sensors, too, ha ve blind spots in which
objects cannot be detected. Moreover, ultra-
sonic detection can reach its physical limits with
objects such as trailer tow bars and couplings,
thin and wedge-shaped objects, etc. Low
objects already indicated, such as curbs, may
enter the sensors' blind spots before or after a
continuous audible signal is given. Higher, pro-
truding objects, such as wall ledges, may not be
detectable. Therefore, al ways drive cautiously;
otherwise, there is a risk of personal injury or
property damage. Loud sound sources outside
or inside the car can drown out the PDC signal. <
Driving stability control
systems
Your MINI has a number of systems that help to
maintain the vehicle's st ability even in adverse
driving conditions.
Page 62 of 196

ControlsTechnology for driving comfort and safety
60
The laws of physics cannot be repealed,
even with driving stability control systems.
An appropriate driving style always remains the
responsibility of the driver. Therefore do not
reduce the additional safe t y m a r g i n b y e n g a g i n g
in hazardous driving thereby running the risk of
an accident. <
Antilock Brake System ABS
ABS prevents locking of the wheels during brak-
ing. Safe steering response is maintained even
during full braking. Active safety is thus
increased.
Braking safely, refer to page 91.
ABS is operational every time you start the
engine.
Cornering Brake Control CBC
Driving stability and stee ring characteristics are
further enhanced while braking in turns or dur-
ing a lane change.
Electronic brake-force distribution EBV
The system controls the brake pressure in the
rear wheels to ensure stable braking behavior.
Brake Assist
Rapidly depressing the brake causes this system
to automatically develop maximum braking
force. Thus, the system helps keep braking dis-
tance to a minimum. At the same time, all the
benefits provided by ABS are exploited.
Do not reduce the pressure on the brake for the
duration of the full braking application.
Dynamic Stability Control DSC
The concept
DSC prevents the driving wheels from losing
traction when you pull away from rest or accel-
erate.
DSC also detects unstabl e driving conditions
such as when the vehicle's rear end fishtails or
the vehicle is sliding on its front wheels. In these cases, DSC helps the ve
hicle maintain a safe
course within physical limits by reducing engine
output and through braking actions at the indi-
vidual wheels.
Every time that the engine is started, the DSC is
ready to operate.
Deactivating DSC
Press the button until the DSC OFF indicator light
on the speedometer is on and DSC OFF is dis-
played on the tachometer. DSC is deactivated.
Stabilizing and propulsion promoting actions are
no longer executed.
When driving with snow chains or to 'rock free'
in snow, it can be helpfu l to switch off DSC for a
brief period.
To increase vehicle stabil ity, activate DSC again
as soon as possible.
Activating DSC
Press the button again: the DSC indicator lamps
in the display elements go out.
For better control
The indicator light on the tachometer is
flashing:
The DSC controls the driving and brak-
ing forces.
The indicator light DSC OFF on the
speedometer is on and DSC OFF is dis-
played on the tachometer:
DSC is deactivated.
Page 63 of 196

Technology for driving comfort and safetyControls
61
Dynamic Traction Control DTC*
The concept
D TC is a ty pe o f DSC t hat is prop ulsion op timiz ed
for special road conditions such as uncleared
snowy roads. The syst em ensures maximum
propulsion though with restricted driving stabil-
ity. You therefore need to drive with suitable
caution.
In the following exceptional situations, it can be
useful to briefly activate DTC:
> when driving on snow-covered inclines, in
slush, or on uncleared snowy roads
> when rocking the vehicle free, driving out of
deep snow or on loose surfaces
> when driving with snow chains
Activating the DTC*
Press the button; the indicator light DSC OFF on
the speedometer comes on and TRACTION is
displayed on the tachometer.
The Dynamic Stability Co ntrol DSC is deacti-
vated; the Dynamic Tracti on Control DTC is acti-
vated.
For better control
The indicator light on the tachometer is
flashing:
DTC controls the driving and braking
forces.
The indicator light on the speedometer
is on and TRACTION is displayed on the
tachometer:
DTC is activated.
Deactivating the DTC*
Press button again, the indicator light DSC OFF
on the speedometer and TRACTION on the
tachometer go out.
Deactivating the DTC* and DSC together
Press the button for at least 3 seconds; the indi-
cator light DSC OFF on the speedometer comes
on and DSC OFF is displayed on the tachometer.
The Dynamic Traction Control DTC and Dynamic
Stability Control DSC are both deactivated. There
will be no more stab ilizing interventions.
Interventions (differential lock
*) in braking
occur to improve propulsion when drive wheels
are rotating unevenly, even when the DSC is
deactivated.
Page 64 of 196

ControlsTechnology for driving comfort and safety
62
Activating DSC
Press the button again: the indicator lamps go
out.
Hill Assist
Hill Assist aids you in co mfortably driving off on
inclines. It is not necessary to use the parking
brake for this.
1. Hold the MINI with the brake.
2. Release the brake and immediately drive
off.
Hill Assist holds the car in place for approx.
2 seconds after the brake is released.
Depending on the load and gradient, the
vehicle can roll backwa rd slightly during
this period. After you release the brake, immedi-
ately start driving since the Hill Assist only holds
the vehicle for about 2 seconds, and it will start
to roll backward. <
ALL4 all-wheel drive system*
ALL4 is the all-wheel driv e system of your MINI.
The combined effects of ALL4 and DSC further
optimize the traction and dynamic driving char-
acteristics. The ALL4 all- wheel drive system vari-
ably distributes the drive force to the front and
rear axle depending on the driving situation and
prevailing road conditions.
Sport button*
Pressing the button causes your MINI to respond
even more sportily.
> Engine responds more spontaneously to
movements of the accelerator.
> Steering response is more direct.
> Cooper S: the engine sounds more sporty in
coasting mode.
With automatic transmission:
> More rapid gear shifti ng in Sport program.
Activating the system
Press the SPORT button.
The LED lights up.
SPORT is briefly displayed in the tachometer.
Deactivating the system
>Press the SPORT button again.
> Switch off the engine.
Flat Tire Monitor FTM
The concept
The system does not me asure the actual infla-
tion pressure in the tires.
The system detects a pres sure loss in a tire by
comparing the rotational speeds of the individ-
ual wheels while moving.
In the event of a pressure loss, the diameter and
therefore the rotational speed of the corre-
sponding wheel change. This is detected and
reported as a flat tire.
Functional requirement
The system must have be en initialized while the
tire inflation pressure was correct; otherwise,
reliable signaling of a fl at tire is not ensured.
Initialize the system afte r every correction of the
tire inflation pressure and after every tire or
wheel change.
 1
1 2
2 3
3 4
4 5
5 6
6 7
7 8
8 9
9 10
10 11
11 12
12 13
13 14
14 15
15 16
16 17
17 18
18 19
19 20
20 21
21 22
22 23
23 24
24 25
25 26
26 27
27 28
28 29
29 30
30 31
31 32
32 33
33 34
34 35
35 36
36 37
37 38
38 39
39 40
40 41
41 42
42 43
43 44
44 45
45 46
46 47
47 48
48 49
49 50
50 51
51 52
52 53
53 54
54 55
55 56
56 57
57 58
58 59
59 60
60 61
61 62
62 63
63 64
64 65
65 66
66 67
67 68
68 69
69 70
70 71
71 72
72 73
73 74
74 75
75 76
76 77
77 78
78 79
79 80
80 81
81 82
82 83
83 84
84 85
85 86
86 87
87 88
88 89
89 90
90 91
91 92
92 93
93 94
94 95
95 96
96 97
97 98
98 99
99 100
100 101
101 102
102 103
103 104
104 105
105 106
106 107
107 108
108 109
109 110
110 111
111 112
112 113
113 114
114 115
115 116
116 117
117 118
118 119
119 120
120 121
121 122
122 123
123 124
124 125
125 126
126 127
127 128
128 129
129 130
130 131
131 132
132 133
133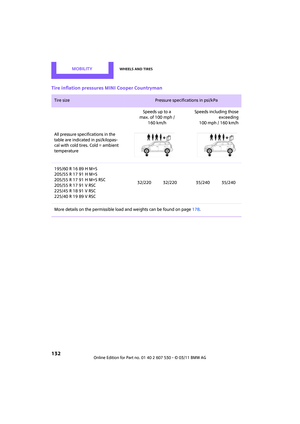 134
134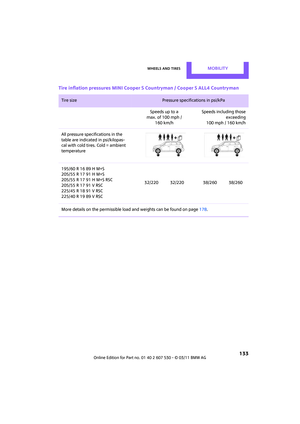 135
135 136
136 137
137 138
138 139
139 140
140 141
141 142
142 143
143 144
144 145
145 146
146 147
147 148
148 149
149 150
150 151
151 152
152 153
153 154
154 155
155 156
156 157
157 158
158 159
159 160
160 161
161 162
162 163
163 164
164 165
165 166
166 167
167 168
168 169
169 170
170 171
171 172
172 173
173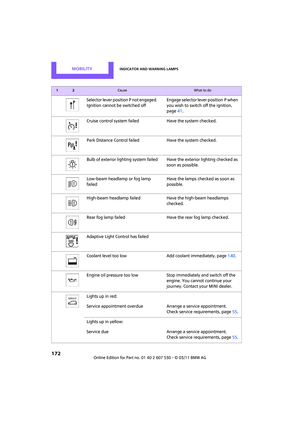 174
174 175
175 176
176 177
177 178
178 179
179 180
180 181
181 182
182 183
183 184
184 185
185 186
186 187
187 188
188 189
189 190
190 191
191 192
192 193
193 194
194 195
195