Page 33 of 196

Opening and closingControls
31
The window can be closed in the same way by
pressing the switch up.
After switching off the ignition
When the ignition is switched off, the windows
can still be operated for approx. 1 minute as
long as no door is opened.
Take the key with you when you leave the
car; otherwise, children could operate the
electric windows and possibly injure them-
selves. <
Pinch protection system
If the closing force rises beyond a predefined
threshold during closing, the system will stop
moving the window prior to lowering it again
slightly.
Even though there is the pinch protection
system, always ensure that the window's
travel path is clear; otherwise, the safety system
might fail to detect certain kinds of obstructions,
such as thin objects, and the window would con-
tinue closing.
Do not install any accessories that might inter-
fere with window movement. Otherwise, the
pinch protection system could be impaired. <
Closing without pinch protection
If there is an external danger, or if ice on the win-
dows, etc., prevents you from closing the win-
dows normally, the window can be closed man-
ually.
1.Press the switch upward and hold it there.
Pinch protection is limited and the window
reopens slightly if the closing force exceeds
a certain value.
2. Press the switch up ward again within
approx. 4 seconds and hold it there. The
window closes without pinch protection.
Safety switch
With the safety switch, you can prevent the rear
windows from being opened or closed via the
switches in the rear passenger area, by children,
for example.
Press the button, arrow.
The LED lights up when this safety feature is acti-
vated.
Always press the safety switch when chil-
dren ride in the rear, otherwise uncon-
trolled closing of the windows could lead to inju-
ries. <
Page 34 of 196

ControlsAdjustments
32
Adjustments
Sitting safely
The ideal sitting position can make a vital contri-
bution to relaxed, fatigu e-free driving. In con-
junction with the safety belts, the head restraints
and the airbags, the seated position has a major
influence on your safety in the event of an acci-
dent. To ensure that th e safety systems operate
with optimal efficiency, we strongly urge you to
observe the instructions contained in the follow-
ing section.
For additional informatio n on transporting chil-
dren safely, refer to page 38.
Airbags
Always maintain an adequate distance
between yourself and the airbags. Always
grip the steering wheel on the rim, with your
hands in the 3 o'clock and 9 o'clock positions, to
minimize the risk of inju ry to the hands or arms
in the event of the airbag being triggered off.
No one and nothing should come between the
airbags and the seat occupant.
Do not use the cover of the front airbag on the
front passenger side as a storage area. Ensure
that the front passenger is correctly seated, e.g.
that no feet or legs are propped against the
dashboard. Otherwise, leg injury could result if
the front airbag suddenly deployed.
Make sure that passeng ers keep their heads
away from the side ai rbag and do not lean
against the cover of the head airbag, otherwise
injuries can occur when the airbags are trig-
gered. <
Even if you follow all the instructions, injuries
resulting from contact with airbags cannot be
fully excluded, depending on the circumstances.
The ignition and inflation noise may provoke a
mild hearing loss in extremely sensitive individ-
uals. This effect is usually only temporary.
For airbag locations and additional information
on airbags, refer to page 68.
Head restraint
A correctly adjusted head restraint reduces the
risk of neck injury in the event of an accident.
Adjust the head restraint in such a way
that its center is at approx. ear level. Oth-
erwise, there is an increased risk of injury in the
event of an accident. <
Head restraints, refer to page 34.
Safety belt
Before every drive, make sure that all occupants
wear their safety belts. Airbags complement the
safety belt as an additional safety device, but
they do not represent a substitute.
Number of safety belts
Never allow more than one person to
wear a single safety belt. Never allow
infants or small children to ride in a passenger's
lap.
Make sure that the belt in the lap area sits low
across the hips and does not press against the
abdomen. The safety belt must not rest against
the throat, run across sh arp edges, pass over
hard or fragile objects or be pinched. Fasten the
safety belt so that it is pulled taut across the lap
and shoulder, fitting the body snugly without
any twists. Otherwise, the belt could slide over
the hips in the event of a frontal collision and
injure the abdomen. Avoid wearing bulky cloth-
ing and regularly pull the belt in the upper-body
area taut; otherwise, its restraining effect could
be impaired. <
Safety belts, refer to page 35.
Page 35 of 196

AdjustmentsControls
33
Seats
Note before adjusting
Never attempt to adjust your seat while
the vehicle is moving. The seat could
respond with unexpected movement, and the
ensuing loss of vehicle control could lead to an
accident.
On the front passenger seat as well, do not
incline the backrest too far to the rear while the
vehicle is being driven; otherwise, there is a dan-
ger in the event of an a ccident of sliding under
the safety belt, eliminat ing the protection nor-
mally provided by the belt. <
Comply with the instruct ions on head restraint
height on page 34 and on damaged safety belts
on page 36.
Seat adjustment, front
Observe the instructions on page 33 to
ensure the best possible personal protec-
tion. <
Longitudinal direction
Pull lever, arrow 1, and move the seat into the
desired position, arrows 2.
After releasing the lever, slightly move the seat
forwards or backwards so that it properly
engages.
Height
Pull up or push down the lever repeatedly,
arrows 1, until the desired height is reached.
Backrest
Pull lever, arrow 1, and apply weight to or
remove weight from the backrest as needed.
Lumbar support*
You can also adjust the contour of the backrest
to obtain additional support in the lumbar
region.
The upper hips and spinal column receive sup-
plementary support to help you maintain a
relaxed, upright sitting position.
Page 36 of 196

ControlsAdjustments
34
Turn the wheel to increase or decrease the cur-
vature.
Seat adjustment, rear
Do not adjust rear seats while the vehicle
is moving; otherwise, passengers could be
injured.
Make sure that the locking devices of the rear
seats engage properly. Otherwise the restrain-
ing effect of the safety belts during an accident
could be reduced. <
Longitudinal adjustment
1.Pull the lever and slide the seat into the
desired position.
2. Release the lever and mo ve the seat slightly
forward or back so that it engages properly.
Backrest
Adjusting backrest an gle, refer to page92.
Head restraints
Correctly adjusted head restraint
A correctly adjusted head restraint reduces the
risk of neck injury in the event of an accident.
Correctly adjust the head restraints of all
occupied seats; othe rwise, there is an
increased risk of injury in an accident. <
Height
Adjust the head restraint so that its center is
approximately at ear level.
Height adjustment
To raise: pull up.
To lower: press the button, arrow 1, and slide
the head restraint down.
Removing
Only remove a head rest raint if no one will be
sitting on the seat in question.
Reinstall the head restraint before trans-
porting passengers, as otherwise the head
restraint cannot provid e its protective func-
tion. <
Page 37 of 196

AdjustmentsControls
35
Front
1.Pull up as far as it will go.
2. Fold the backrest back slightly.
3. Press button 1 and pull the head restraint
out as far as it will go.
4. Also press button 2 with a suitable tool and
completely remove the head restraint.
5. Fold back the backrest.
Rear
1.Pull up as far as it will go.
2. Fold the backrest forward slightly.
3. Press button 1 and pull the head restraint
out completely.
4. Also press button 2 with a suitable tool and
completely remove the head restraint.
5. Fold rear seat backrest back into position.
Seat heating*
Switching on
Press once for each temperature level.
Three LEDs indicate the highest temperature.
If you continue driving within the next
15 minutes, the seat heating is automatically
activated at the previously set temperature.
The temperature is lowered or the heating is
switched off entirely to reduce the drain on the
battery.
The LEDs stay lit.
Switching off
Press button longer.
Safety belts
Observe the instructions on page 33 to
ensure the best possible personal protec-
tion. <
Before every drive, make sure that all occupants
wear their safety belts. Airbags complement the
safety belt as an additi onal safety device, but
they do not represent a substitute.
Front and rear seats
Closing
Make sure you hear the lock engage in the belt
buckle.
The upper belt anchor is suitable for adults of
any stature as long as th e seat is adjusted prop-
erly, page 33.
Opening
1.Grasp the belt firmly.
2. Press the red button in the buckle.
3. Guide the belt into its reel.
Height adjustment for rear seat belt
tongues
When the outer rear seats are unoccupied, the
seat belt tongues can be slid back to the cargo
area trim panel with a clasp to prevent noise.
Page 38 of 196

ControlsAdjustments
36
Safety belt reminder
Front seats
The indicator lamps come on and an
acoustic signal sounds.Check whether
the safety belt has been fastened cor-
rectly. The 'Fasten safety belts'
reminder is issued when the driver's safety belt
has not been fastened. Th e 'Fasten safety belts'
reminder is also activate d at road speeds above
approx. 5 mph or 8 km/h if the front passenger's
safety belt has not been fastened, if objects are
placed on the front passenger seat, or if driver or
front passenger unfasten their safety belts.
Damage to safety belts
If the safety belts ar e damaged or stressed
in an accident: have th e safety belt system
and its seat-belt tensioners replaced and the
belt anchors checked. Have this work carried out
only by a MINI dealer or by a workshop that has
specially trained personnel working in accor-
dance with the specifications of the MINI manu-
facturer; otherwise, correct operation of these
safety systems is not ensured.<
Mirrors
Exterior mirrors
The mirror on the passenger's side is more
curved than the driver's mirror. The
objects seen in the mirro r are closer than they
appear. Do not gauge your distance from traffic
behind you on the basis of what you see in the
mirror; otherwise, there is an increased risk of an
accident. < 1
Adjusting the left or right exterior mirror
2 Folding mirrors in and out
*
Manual adjustment
The mirrors can also be adjusted manually: press
the edge of the glass.
Folding mirrors in and out*
Turn the knob beyond the pressure point in
direction 2. The mirrors can be folded in at road
speeds up to approx. 20 mph/30 km/h.
This can be beneficial in narrow streets, for
example, or for moving mi rrors that were folded
in by hand back out into their correct positions.
Automatic heating*
At external temperatures below a certain limit,
both exterior mirrors are automatically heated
while the engine is running or the ignition
switched on.
Interior rearview mirror
To reduce glare from vehicles behind you when
you are driving at night:
Turn the knob.
Page 39 of 196
AdjustmentsControls
37
Interior and exterior mirrors,
automatic dimming feature*
It is controlled by two photosensors:
>Inside the interior rearview mirror, arrow.
> On the back of the mirror.
For proper function:
> Keep the photosensors clean.
> Do not cover the area between the interior
rearview mirror and the windshield.
> Do not place stickers or decals on the wind-
shield in front of the mirror.
Steering wheel
Adjustments
Do not adjust the steering wheel position
while the car is in motion; otherwise, there
is a risk of accident due to an unexpected move-
ment. <
1. Fold the lever down.
2. Move the steering wheel to the preferred
distance and angle to su it your seated posi-
tion. 3.
Swing the lever back up.
Do not use force to swing the lever
back up; otherwise, the mechanism
will be damaged. <
Page 40 of 196

ControlsTransporting children safely
38
Transporting children safely
The right place for
children
Do not leave children unattended in the
vehicle; otherwise, they could endanger
themselves and/or other persons by opening the
doors, for example. <
Children should always sit in the rear
Accident research has shown that the safest
place for children is on the rear seat.
Only transport children under the age of
13 or smaller than 5 ft/150 cm in the rear
in a child restraint system suitable for their age,
weight and size. Otherwise, there is an
increased risk of injury in the event of an acci-
dent. <
Children 13 years of age or older must be buck-
led in with a safety belt as soon as there no
longer is any child restraint system that is appro-
priate for their age, size and weight.
Exception for front passenger seat
Front passenger airbags
Should it be necessary to use a child
restraint system on the front passenger
seat, the front and side airbags must be deacti-
vated. Otherwise, there is an increased risk of
injury to the child if th e airbags deploy, even if
the child is seated in a child restraint system.<
For more information on automatic deactivation
of the front passenger airbags, refer to page 68.
Child restraint systems,
installation
Before installing a child restraint system on the
rear seats, move the seat as far back as possible. After the child restr
aint system has been
installed on the respecti ve rear seat, move the
backrest forward so that the it rests lightly
against the child restrain t system, refer to Rear
seat backrests on page 92.
Observe the child restraint system manu-
facturer's instructions when selecting,
installing and using child restraint systems. Oth-
erwise, the protective effect may be dimin-
ished. <
On the front passenger seat
After installing a chil d restraint system on
the front passenger se at, make sure that
the front, side, and knee airbags for the front
passenger are deactivated; otherwise, there is
an increased risk of inju ry if the airbags deploy.<
Seat position
Before installing a child restraint system, move
the front passenger seat as far back and up
* as
possible to obtain the be st possible position for
the belt. Do not change the seat position after
this.
Child seat security
All rear safety belts and the safety belt for the
front passenger can be prevented from being
pulled out in order to se cure child restraint sys-
tems.
 1
1 2
2 3
3 4
4 5
5 6
6 7
7 8
8 9
9 10
10 11
11 12
12 13
13 14
14 15
15 16
16 17
17 18
18 19
19 20
20 21
21 22
22 23
23 24
24 25
25 26
26 27
27 28
28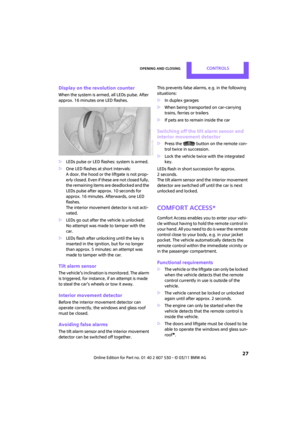 29
29 30
30 31
31 32
32 33
33 34
34 35
35 36
36 37
37 38
38 39
39 40
40 41
41 42
42 43
43 44
44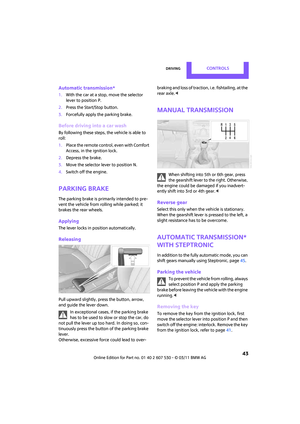 45
45 46
46 47
47 48
48 49
49 50
50 51
51 52
52 53
53 54
54 55
55 56
56 57
57 58
58 59
59 60
60 61
61 62
62 63
63 64
64 65
65 66
66 67
67 68
68 69
69 70
70 71
71 72
72 73
73 74
74 75
75 76
76 77
77 78
78 79
79 80
80 81
81 82
82 83
83 84
84 85
85 86
86 87
87 88
88 89
89 90
90 91
91 92
92 93
93 94
94 95
95 96
96 97
97 98
98 99
99 100
100 101
101 102
102 103
103 104
104 105
105 106
106 107
107 108
108 109
109 110
110 111
111 112
112 113
113 114
114 115
115 116
116 117
117 118
118 119
119 120
120 121
121 122
122 123
123 124
124 125
125 126
126 127
127 128
128 129
129 130
130 131
131 132
132 133
133 134
134 135
135 136
136 137
137 138
138 139
139 140
140 141
141 142
142 143
143 144
144 145
145 146
146 147
147 148
148 149
149 150
150 151
151 152
152 153
153 154
154 155
155 156
156 157
157 158
158 159
159 160
160 161
161 162
162 163
163 164
164 165
165 166
166 167
167 168
168 169
169 170
170 171
171 172
172 173
173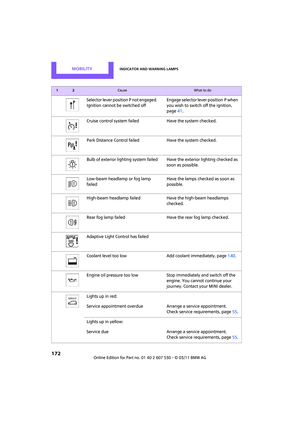 174
174 175
175 176
176 177
177 178
178 179
179 180
180 181
181 182
182 183
183 184
184 185
185 186
186 187
187 188
188 189
189 190
190 191
191 192
192 193
193 194
194 195
195