2011 MERCEDES-BENZ SLS lock
[x] Cancel search: lockPage 302 of 436
Air conditioning
The air conditioning is operational while the
engine is running and cools the interior air to
the temperature set by the operator. In
addition, the air conditioning dehumidifies
the interior air and helps prevent window
fogging.GWarning!
If you deactivate the air conditioning, the
vehicle will not be cooled when weather
conditions are warm. The windows can fog up
more quickly. Window fogging may impair
visibility and endanger you and others.
i Condensated water may drip out from
underneath the vehicle. This is normal and
not an indication of a malfunction.
The air conditioning uses the refrigerant
R134a. This refrigerant is free of CFCs which
are harmful to the ozone layer.
Deactivating
It is possible to deactivate the air
conditioning. The interior air will then no
longer be cooled or dehumidified.
XPress button ¿.
The indicator lamp in the button goes out.
The cooling function switches off after a
short delay.
Activating
Moist air can fog up the windows. You can
dehumidify the interior air with the air
conditioning.
XPress button ¿.
The indicator lamp in the button comes on.
i The evaporator will be vented when the
air conditioning has been in use.
Approximately 1 hour after locking the
vehicle, the blower switches on
automatically. The blower will run for
30 minutes at its lowest level. The blower
noise is normal and not an indication of a
malfunction. When you unlock the vehicle
in the meantime, venting will be
interrupted. If the vehicle battery is low,
automatic evaporator venting will not occur
in order to preserve the battery.
Automatic mode
When operating the climate control system in
automatic mode, the interior air temperature,
air volume and air distribution are adjusted
automatically.
In automatic mode, cooling with
dehumidification is switched on. This function
can be switched off if necessary.
GWarning!
If you deactivate the air conditioning, the
vehicle will not be cooled when weather
conditions are warm. The windows can fog up
more quickly. Window fogging may impair
visibility and endanger you and others.
XSet the desired temperature
( Y page 300).XActivating: Press button Ã.
The indicator lamp in the button comes on.
The air volume and air distribution are
adjusted automatically.XDeactivating: Press button I, K or
_ .
The indicator lamp in button à goes out.
The automatic operation of air volume and
air distribution switches off. The symbols of
air distribution or air volume appear in
display H (Y page 298).XAdjust air distribution ( Y page 302).XAdjust air volume ( Y page 302).
Setting temperature
You can adjust the air temperature on each
side of the passenger compartment. You
should raise or lower the temperature setting
in small increments, preferably starting at
72‡ (22†).
300Climate control systemControls in detail
BA 197 USA, CA Edition A 2011; 1; 27, en-UShereepeVersion: 3.0.3.52010-03-24T15:31:10+01:00 - Seite 300
Page 303 of 436
XIncreasing/decreasing: Turn
temperature controls : and D
(Y page 298) slightly clockwise or
counterclockwise.
Adjusting air vents
GWarning!
When operating the climate control, the air
that enters the passenger compartment
through the air vents can be very hot or very
cold (depending on the set temperature). This
may cause burns or frostbite to unprotected
skin in the immediate area of the air vents.
Always keep sufficient distance between
unprotected parts of the body and the air
vents. If necessary, use the air distribution
adjustment to direct the air to air vents in the
vehicle interior that are not in the immediate
area of unprotected skin.
For best possible performance of the climate
control:
XKeep the air intake grille in front of the
windshield free of snow, leaves, sticks, and
any other debris.
XAlways keep all air vents and grilles in the
passenger compartment free from
obstruction.
iFor draft-free ventilation, move the
adjustable center and side air vents to the
middle position.
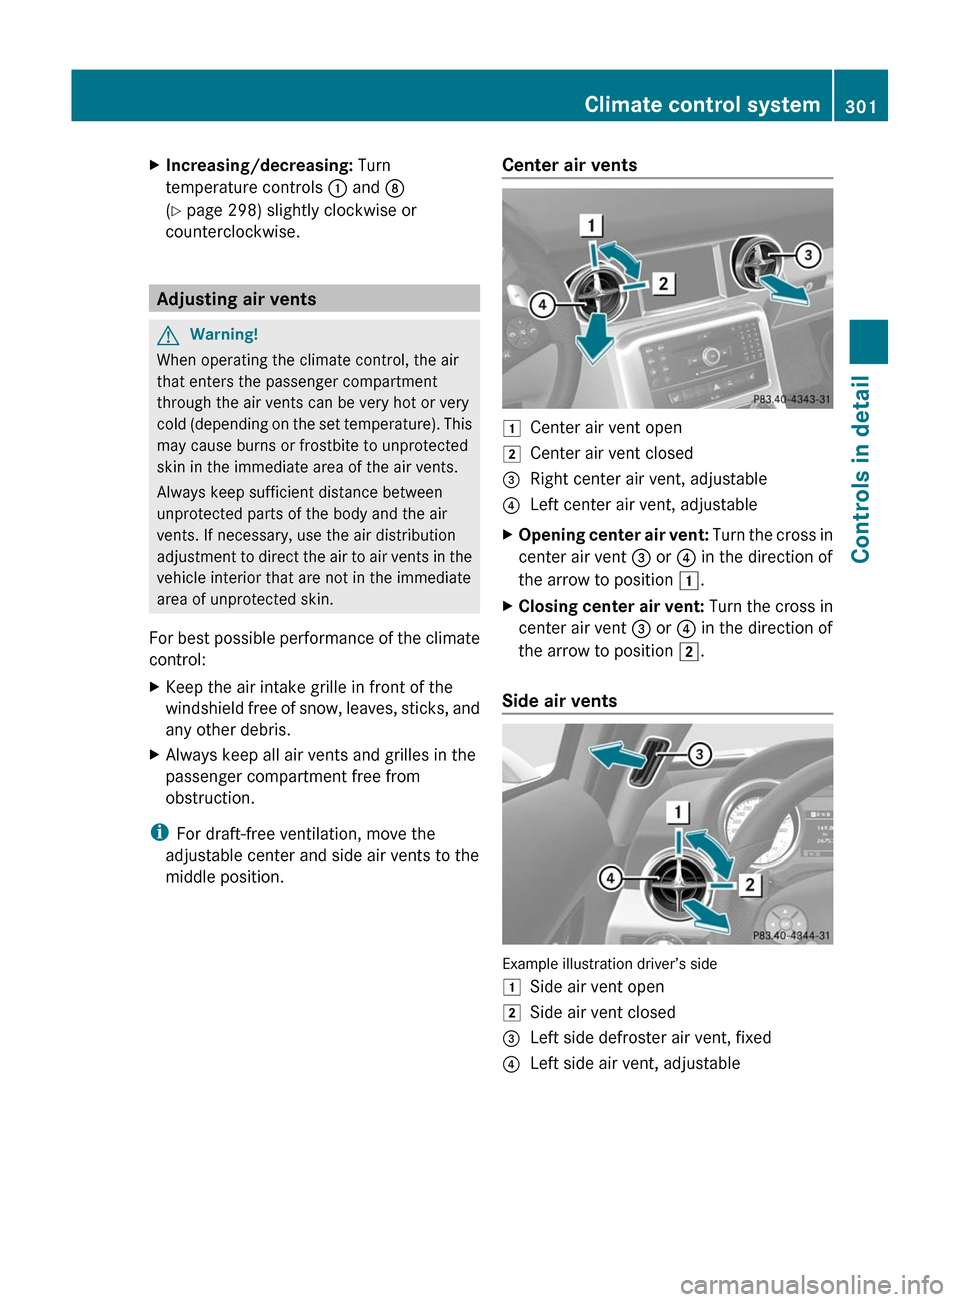
Center air vents1Center air vent open2Center air vent closed=Right center air vent, adjustable?Left center air vent, adjustableXOpening center air vent: Turn the cross in
center air vent = or ? in the direction of
the arrow to position 1.
XClosing center air vent: Turn the cross in
center air vent = or ? in the direction of
the arrow to position 2.
Side air vents
Example illustration driver’s side
1Side air vent open2Side air vent closed=Left side defroster air vent, fixed?Left side air vent, adjustableClimate control system301Controls in detailBA 197 USA, CA Edition A 2011; 1; 27, en-UShereepeVersion: 3.0.3.52010-03-24T15:31:10+01:00 - Seite 301Z
Page 307 of 436
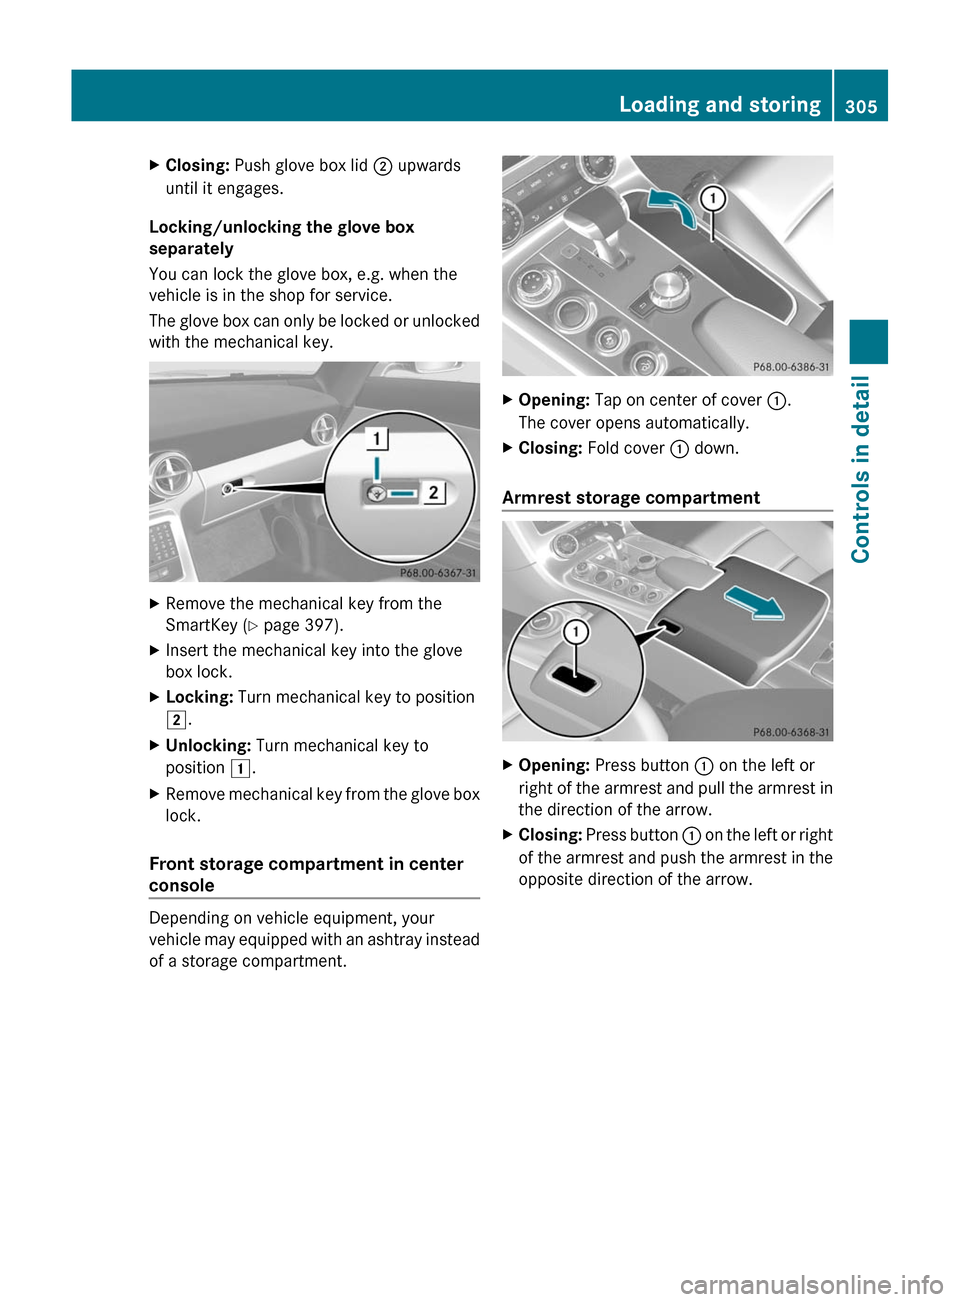
XClosing: Push glove box lid ; upwards
until it engages.
Locking/unlocking the glove box
separately
You can lock the glove box, e.g. when the
vehicle is in the shop for service.
The glove box can only be locked or unlocked
with the mechanical key.
XRemove the mechanical key from the
SmartKey (Y page 397).
XInsert the mechanical key into the glove
box lock.
XLocking: Turn mechanical key to position
2.
XUnlocking: Turn mechanical key to
position 1.
XRemove mechanical key from the glove box
lock.
Front storage compartment in center
console
Depending on vehicle equipment, your
vehicle may equipped with an ashtray instead
of a storage compartment.
XOpening: Tap on center of cover :.
The cover opens automatically.
XClosing: Fold cover : down.
Armrest storage compartment
XOpening: Press button : on the left or
right of the armrest and pull the armrest in
the direction of the arrow.
XClosing: Press button : on the left or right
of the armrest and push the armrest in the
opposite direction of the arrow.
Loading and storing305Controls in detailBA 197 USA, CA Edition A 2011; 1; 27, en-UShereepeVersion: 3.0.3.52010-03-24T15:31:10+01:00 - Seite 305Z
Page 315 of 436
Route Assistance
This service is only available as part of the
PLUS package.
With the Route Assistance service you get
professional, reliable guidance from an
mbrace Customer Specialist without leaving
your vehicle.
Using your current location and intended
destination, a Customer Specialist can find
the best route and provide turn-by-turn
directions, giving you the reassurance of live
assistance in times of need. Route Assistance
is available at the touch of a button, even if
your vehicle is not equipped with a COMAND
navigation system.
Search & Send
“Search & Send” is a navigation destination
address entry service. For more information
on “Search & Send”, see ( Y page 125).
Remote door lock
If you have forgotten to lock your vehicle and
are no longer near it, you can have it locked
remotely through the Response Center.
The vehicle can be remotely locked within
four days after the ignition has been switched
off.
XContact Response Center at
866-990-9007 (USA only) or
1-888-923-8367 (Canada only).
You will be asked to provide your Personal
Identification Number (PIN).
When you are inside your vehicle the next
time and switch on the ignition, the message
Tele Aid Doors Locked Remotely will
appear on the multifunction display.
i The remote door lock feature is available
if the relevant cellular phone network is
available and data connection is possible.
Stolen Vehicle Recovery Services
In the event your vehicle was stolen:
XReport the incident to the police.
The police will issue a numbered incident
report.XPass this number on to the Response
Center along with your Personal
Identification Number (PIN).
The Response Center will then attempt to
covertly contact the vehicle’s mbrace
system. Once the vehicle is located, the
Response Center will contact the local law
enforcement and you. The vehicle’s
location will only be provided to law
enforcement.
i If the anti-theft alarm stays on for more
than 30 seconds, the mbrace system will
notify the Response Center automatically.
Garage door opener
The integrated remote control can operate up
to three separately controlled devices
compatible with HomeLink ®
or some other
systems.
GWarning!
Before programming the integrated remote
control to a garage door opener or gate
operator, make sure people and objects are
out of the way of the device to prevent
potential harm or damage. When
programming a garage door opener, the door
moves up or down. When programming a gate
operator, the gate opens or closes.
Do not use the integrated remote control with
any garage door opener that lacks safety stop
and reverse features as required by U.S.
federal safety standards (this includes any
garage door opener model manufactured
before April 1, 1982). A garage door that
cannot detect an object - signaling the door
to stop and reverse - does not meet current
U.S. federal safety standards.
Useful features313Controls in detailBA 197 USA, CA Edition A 2011; 1; 27, en-UShereepeVersion: 3.0.3.52010-03-24T15:31:10+01:00 - Seite 313Z
Page 323 of 436
! To prevent damage to the catalytic
converters, only use premium unleaded
gasoline in this vehicle.
Any noticeable irregularities in engine
operation should be repaired promptly.
Otherwise, excessive unburned fuel may
reach the catalytic converter, causing it to
overheat and potentially start a fire.
i Only use premium unleaded gasoline with
a minimum Posted Octane Rating of 91
(average of 96 RON/86 MON).
Information on gasoline quality can
normally be found on the fuel pump. Please
contact gas station personnel in case
labels on the pump cannot be found.
For more information on gasoline, see
“Premium unleaded gasoline”
( Y page 425), see “Fuel requirements”
( Y page 427), or contact an authorized
Mercedes-Benz Center, or visit
http://www.MBUSA.com (USA only).
Locking/unlocking the vehicle with the
SmartKey automatically locks/unlocks the
fuel filler flap.
i In case the central locking system does
not release the fuel filler flap, or the
opening mechanism is clamping, contact
Roadside Assistance or an authorized
Mercedes-Benz Center.
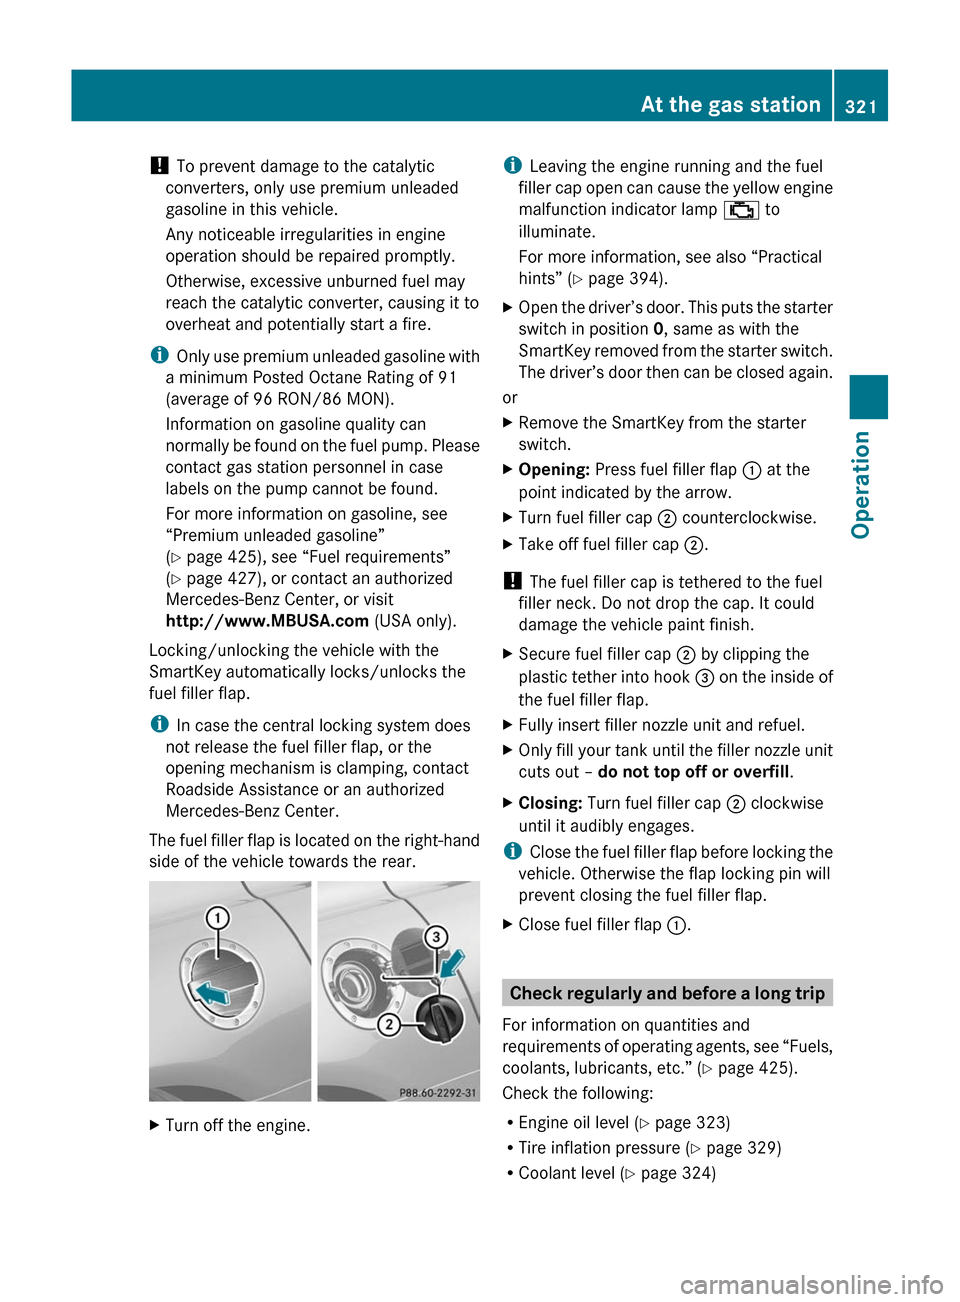
The fuel filler flap is located on the right-hand
side of the vehicle towards the rear. XTurn off the engine.i Leaving the engine running and the fuel
filler cap open can cause the yellow engine
malfunction indicator lamp ; to
illuminate.
For more information, see also “Practical
hints” ( Y page 394).XOpen the driver’s door. This puts the starter
switch in position 0, same as with the
SmartKey removed from the starter switch.
The driver’s door then can be closed again.
or
XRemove the SmartKey from the starter
switch.XOpening: Press fuel filler flap : at the
point indicated by the arrow.XTurn fuel filler cap ; counterclockwise.XTake off fuel filler cap ;.
!
The fuel filler cap is tethered to the fuel
filler neck. Do not drop the cap. It could
damage the vehicle paint finish.
XSecure fuel filler cap ; by clipping the
plastic tether into hook = on the inside of
the fuel filler flap.XFully insert filler nozzle unit and refuel.XOnly fill your tank until the filler nozzle unit
cuts out – do not top off or overfill .XClosing: Turn fuel filler cap ; clockwise
until it audibly engages.
i Close the fuel filler flap before locking the
vehicle. Otherwise the flap locking pin will
prevent closing the fuel filler flap.
XClose fuel filler flap :.
Check regularly and before a long trip
For information on quantities and
requirements of operating agents, see “Fuels,
coolants, lubricants, etc.” ( Y page 425).
Check the following:
R Engine oil level ( Y page 323)
R Tire inflation pressure ( Y page 329)
R Coolant level ( Y page 324)
At the gas station321OperationBA 197 USA, CA Edition A 2011; 1; 27, en-UShereepeVersion: 3.0.3.52010-03-24T15:31:10+01:00 - Seite 321Z
Page 324 of 436
RVehicle lighting (Y page 400)
RWasher system and headlamp cleaning
system (Y page 325)
RBrake fluid level (Y page 325)
Engine compartment
Hood
GWarning!
Do not pull the release lever while the vehicle
is in motion. Otherwise the hood could be
forced open by passing air flow.
This could cause the hood to come loose and
injure you and/or others.
Opening
GWarning!
Do not open the hood when the engine is
overheated. You could be seriously injured.
Observe the coolant temperature display to
determine whether the engine may be
overheated. If you see flames or smoke
coming from the engine compartment, move
away from the vehicle. Wait until the engine
has cooled. If necessary, call the fire
department.
GWarning!
You could be injured when the hood is open –
even when the engine is turned off.
Parts of the engine can become very hot. To
prevent burns, let the engine cool completely
before touching any components on the
vehicle. Comply with all relevant safety
precautions.
GWarning!
To help prevent personal injury, stay clear of
moving parts when the hood is open and the
engine is running.
The radiator fan may continue to run for
approximately 30 seconds or may even
restart after the engine has been turned off.
Stay clear of fan blades.
GWarning!
The engine is equipped with a transistorized
ignition system. Because of the high voltage
it is dangerous to touch any components
(ignition coils, spark plug sockets, diagnostic
socket) of the ignition system
Rwith the engine running
Rwhile starting the engine
Rwhen the ignition is switched on and the
engine is turned manually
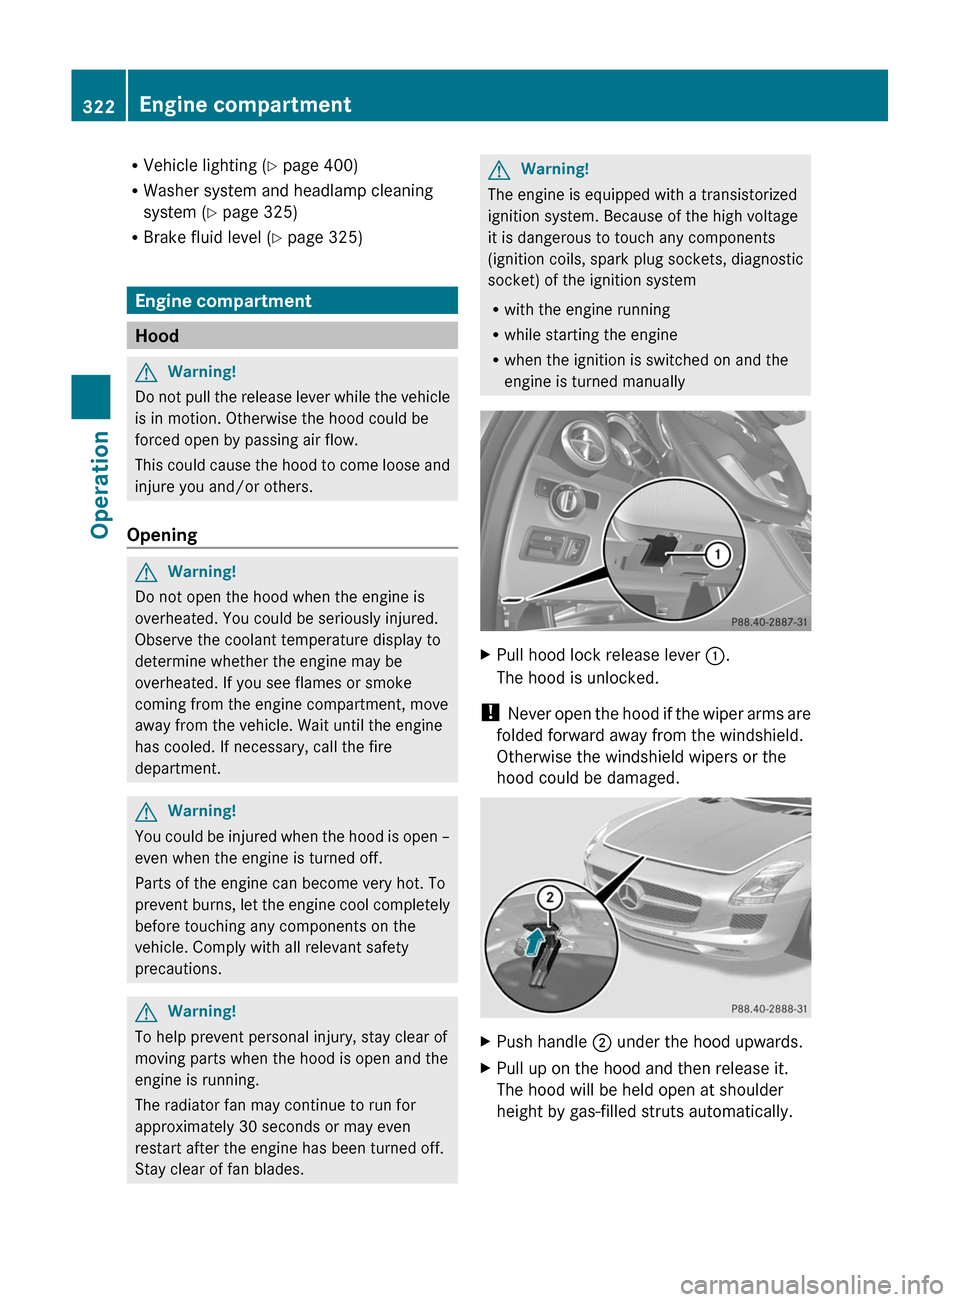
XPull hood lock release lever :.
The hood is unlocked.
! Never open the hood if the wiper arms are
folded forward away from the windshield.
Otherwise the windshield wipers or the
hood could be damaged.
XPush handle ; under the hood upwards.XPull up on the hood and then release it.
The hood will be held open at shoulder
height by gas-filled struts automatically.
322Engine compartmentOperation
BA 197 USA, CA Edition A 2011; 1; 27, en-UShereepeVersion: 3.0.3.52010-03-24T15:31:10+01:00 - Seite 322
Page 326 of 436
The following will result in engine or
emission control system damage not
covered by the Mercedes-Benz Limited
Warranty:
RUsing engine oils and oil filters of
specification other than those expressly
required for the Maintenance System.
RChanging of oil and oil filter at change
intervals longer than those called for by
the Maintenance System.
RUsing any oil additives.
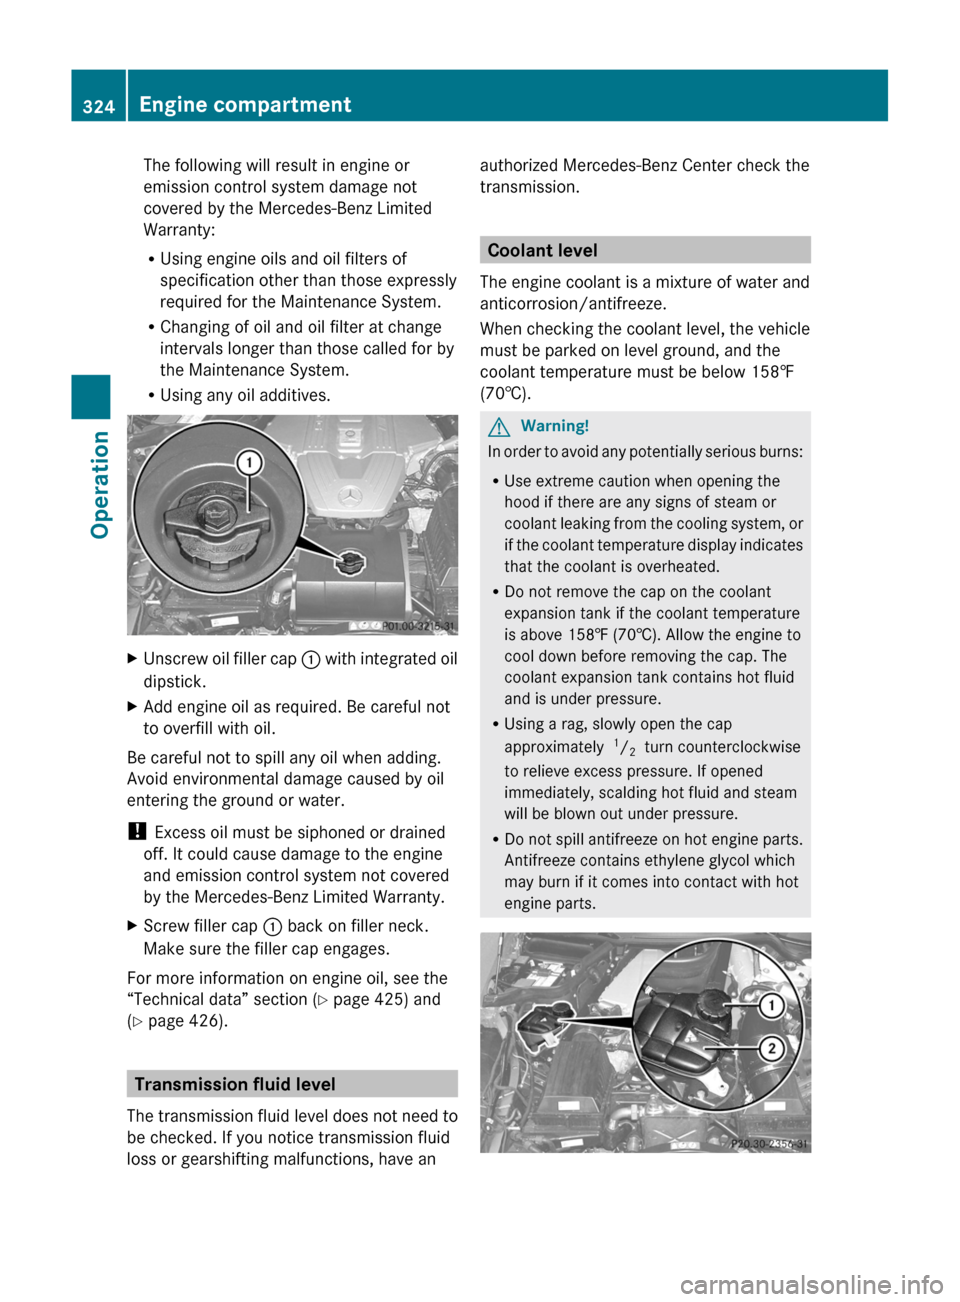
XUnscrew oil filler cap : with integrated oil
dipstick.
XAdd engine oil as required. Be careful not
to overfill with oil.
Be careful not to spill any oil when adding.
Avoid environmental damage caused by oil
entering the ground or water.
! Excess oil must be siphoned or drained
off. It could cause damage to the engine
and emission control system not covered
by the Mercedes-Benz Limited Warranty.
XScrew filler cap : back on filler neck.
Make sure the filler cap engages.
For more information on engine oil, see the
“Technical data” section (Y page 425) and
(Y page 426).
Transmission fluid level
The transmission fluid level does not need to
be checked. If you notice transmission fluid
loss or gearshifting malfunctions, have an
authorized Mercedes-Benz Center check the
transmission.
Coolant level
The engine coolant is a mixture of water and
anticorrosion/antifreeze.
When checking the coolant level, the vehicle
must be parked on level ground, and the
coolant temperature must be below 158‡
(70†).
GWarning!
In order to avoid any potentially serious burns:
RUse extreme caution when opening the
hood if there are any signs of steam or
coolant leaking from the cooling system, or
if the coolant temperature display indicates
that the coolant is overheated.
RDo not remove the cap on the coolant
expansion tank if the coolant temperature
is above 158‡ (70†). Allow the engine to
cool down before removing the cap. The
coolant expansion tank contains hot fluid
and is under pressure.
RUsing a rag, slowly open the cap
approximately 1/2 turn counterclockwise
to relieve excess pressure. If opened
immediately, scalding hot fluid and steam
will be blown out under pressure.
RDo not spill antifreeze on hot engine parts.
Antifreeze contains ethylene glycol which
may burn if it comes into contact with hot
engine parts.
324Engine compartmentOperation
BA 197 USA, CA Edition A 2011; 1; 27, en-UShereepeVersion: 3.0.3.52010-03-24T15:31:10+01:00 - Seite 324
Page 327 of 436

XUsing a rag, slowly open cap :
approximately 1/2 turn counterclockwise
to relieve excess pressure.
XContinue turning cap : counterclockwise
and remove it.
The coolant level is correct if the level
Rfor cold coolant: reaches the top of the
mark (plastic bridge) in coolant
expansion tank ;
Rfor warm coolant: is approximately 0.6 in
(1.5 cm) higher
XAdd coolant as required.XScrew cap : back on and tighten it.
For more information on coolant, see the
“Technical data” section (Y page 425) and
(Y page 428).
Washer system and headlamp
cleaning system
GWarning!
Washer solvent/antifreeze is highly
flammable. Do not spill washer solvent/
antifreeze on hot engine parts, because it may
ignite and burn. You could be seriously
burned.
! Always use washer solvent/antifreeze
where temperatures may fall below
freezing point. Failure to do so could result
in damage to the washer system/fluid
reservoir.
! Only use washer fluid which is suitable for
plastic lenses. Improper washer fluid can
damage the plastic lenses of the
headlamps.
! Do not use distilled or deionized water in
the washer fluid reservoir. Otherwise, the
washer fluid level sensor could be
damaged.
Fluid for the washer system and the headlamp
cleaning system is supplied from the washer
fluid reservoir.
During all seasons, use MB Windshield
Washer Concentrate “MB SummerFit”. Mix it
with water or premixed washer solvent/
antifreeze depending on the ambient
temperature (Y page 425).
XOpening washer fluid reservoir: Pull tab
of cap : upwards.
XRefill the washer fluid reservoir.XClosing washer fluid reservoir: Press
cap : onto filler hole until it engages.
For more information, see “Washer system
and headlamp cleaning system”
(Y page 425).
Brake fluid level
! If you find that the brake fluid in the brake
fluid reservoir has fallen to the minimum
mark or below, have the brake system
checked for brake pad thickness and leaks
immediately. Contact an authorized
Mercedes-Benz Center immediately. Do
not add brake fluid as this will not solve the
problem. For more information, see
“Practical hints”.
When checking the brake fluid level, the
vehicle must be parked on level ground.
Engine compartment325OperationBA 197 USA, CA Edition A 2011; 1; 27, en-UShereepeVersion: 3.0.3.52010-03-24T15:31:10+01:00 - Seite 325Z