2011 MERCEDES-BENZ SLS parking sensors
[x] Cancel search: parking sensorsPage 19 of 436
On-board computersee Control system
One-touch gearshifting ..................... 267
Operating example .............................. 88
Operating safety .................................. 28
Orientation of map ............................ 108
Ornamental moldings, cleaning ....... 357
Outgoing calls see Calling
Overhead control panel ...................... 40
P
Paintwork, cleaning .......................... 355
Paintwork code ................................. 421
Panic alarm .......................................... 60
Parcel net ........................................... 304
Parking ............................................... 261
Parktronic system ..........................294
Parking position
Exterior rear view mirrors ..............247
Transmission position ....................265
Parktronic system
Cleaning system sensors ...............357
Malfunction .................................... 296
Minimum distance .........................295
Sensor range ................................. 294
Switching on/off ........................... 296
System sensors ............................. 294
Warning indicators .........................295
Partitions in USB devices ................. 197
Parts service ...................................... 420
PASS AIR BAG OFF indicator lamp see Passenger front air bag off
indicator lamp
Passcodes for Bluetooth phones ..... 150
Passenger front air bag ...................... 47
Messages in the multifunction
display ........................................... 365
Passenger front air bag off
indicator lamp ............................. 49, 396
Passenger safety see Occupant safety
Pausing playback
main audio ..................................... 186
main video ..................................... 203
PCMCIA memory card
ejecting .......................................... 183
loading ........................................... 181
Pedals ................................................. 349
Phone submenu ........................................ 152
switching to phone mode ..............152
see Telephone
Phone book ........................................ 153
adding entries ................................ 154
deleting from ................................. 155
dialing from ..................... 84, 154, 160
editing entries ................................ 155
selecting entry ............................... 153
voice control with .......................... 211
Phone calls
emergency ..................................... 152
lists of ............................................ 155
making ........................................... 159
see Calling
Phone menu ....................................... 152
Phone number search for POIs ........ 127
Picture format main video ..................................... 203
Picture settings for video
main system .................................. 203
Plastic parts, cleaning ...................... 359
Playback options iPods, MP3 players, and USB
devices .......................................... 197
Music Register ............................... 192
track sequence .............................. 189
Playing audio ..................................... 184
fast forward and reverse ................187
muting ............................................. 89
options for playback ......................189
selecting track ............................... 187
see Muting audio
see Selecting audio track
POI input
choosing a category ....................... 127
local area of destination ................126
vicinity of location .......................... 127
vicinity of specific location ............127
Points of interest (POIs)
adding stopover destination ..........124
selecting as destination .................126
stopover destinations ....................124Index17BA 197 USA, CA Edition A 2011; 1; 27, en-UShereepeVersion: 3.0.3.52010-03-24T15:31:10+01:00 - Seite 17
Page 249 of 436
rear view mirror and glance over your
shoulder before changing lanes.
iYou can store the settings for the exterior
rear view mirror position with the memory
function (Y page 249).
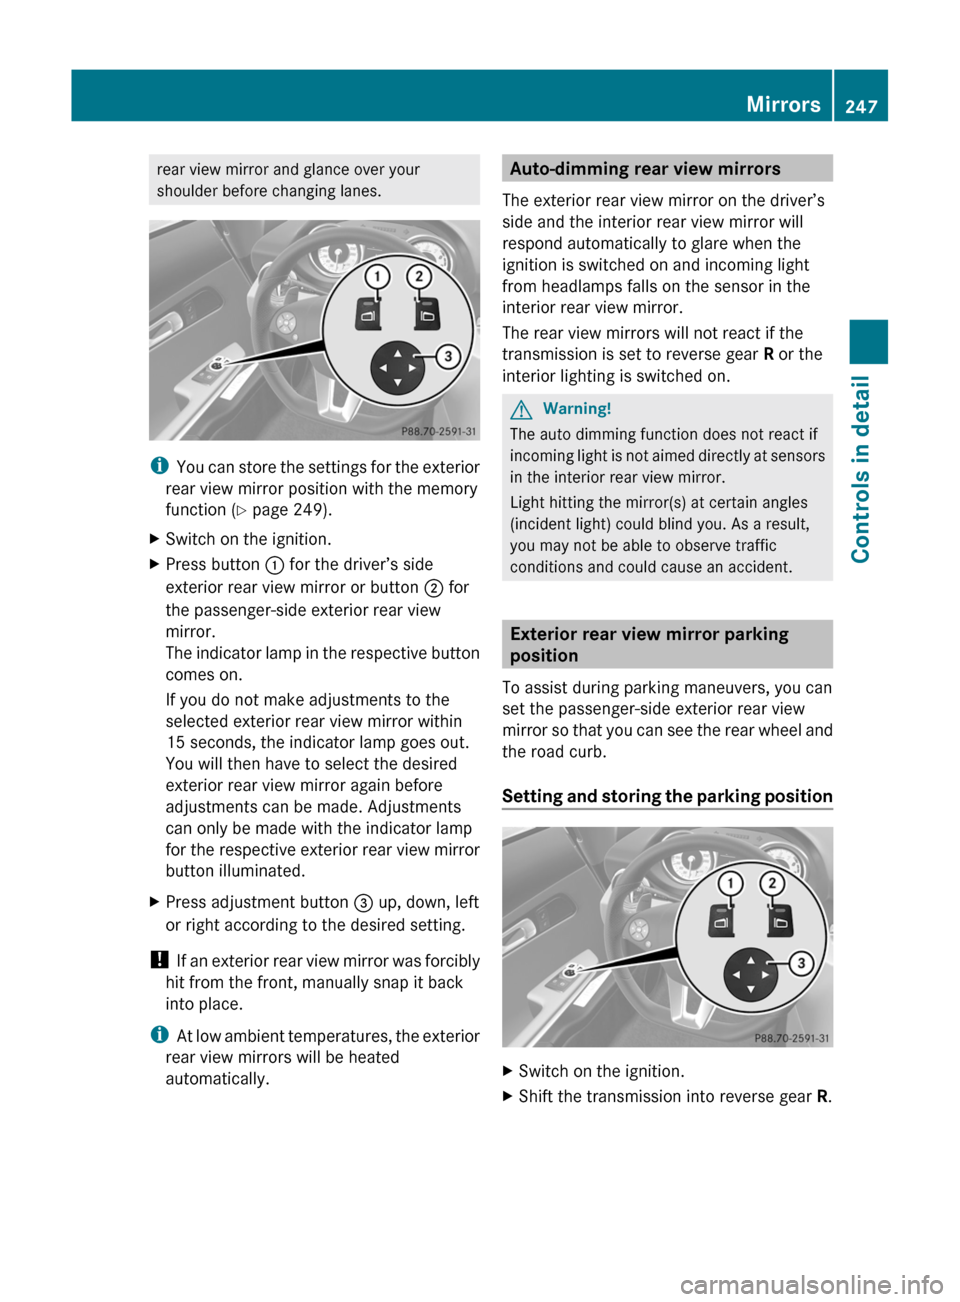
XSwitch on the ignition.XPress button : for the driver’s side
exterior rear view mirror or button ; for
the passenger-side exterior rear view
mirror.
The indicator lamp in the respective button
comes on.
If you do not make adjustments to the
selected exterior rear view mirror within
15 seconds, the indicator lamp goes out.
You will then have to select the desired
exterior rear view mirror again before
adjustments can be made. Adjustments
can only be made with the indicator lamp
for the respective exterior rear view mirror
button illuminated.
XPress adjustment button = up, down, left
or right according to the desired setting.
! If an exterior rear view mirror was forcibly
hit from the front, manually snap it back
into place.
iAt low ambient temperatures, the exterior
rear view mirrors will be heated
automatically.
Auto-dimming rear view mirrors
The exterior rear view mirror on the driver’s
side and the interior rear view mirror will
respond automatically to glare when the
ignition is switched on and incoming light
from headlamps falls on the sensor in the
interior rear view mirror.
The rear view mirrors will not react if the
transmission is set to reverse gear R or the
interior lighting is switched on.
GWarning!
The auto dimming function does not react if
incoming light is not aimed directly at sensors
in the interior rear view mirror.
Light hitting the mirror(s) at certain angles
(incident light) could blind you. As a result,
you may not be able to observe traffic
conditions and could cause an accident.
Exterior rear view mirror parking
position
To assist during parking maneuvers, you can
set the passenger-side exterior rear view
mirror so that you can see the rear wheel and
the road curb.
Setting and storing the parking position
XSwitch on the ignition.XShift the transmission into reverse gear R.Mirrors247Controls in detailBA 197 USA, CA Edition A 2011; 1; 27, en-UShereepeVersion: 3.0.3.52010-03-24T15:31:10+01:00 - Seite 247Z
Page 296 of 436
Parktronic system
The Parktronic system is an electronic
parking aid with ultrasonic sensors designed
to assist the driver during parking maneuvers.
The Parktronic system indicates the relative
distance between the vehicle and an obstacle
visually and audibly.
The Parktronic system is activated
automatically when
Ryou switch on the ignition
and
Ryou release the electronic parking brake
or
Ryou start the engine
and
Rshift the transmission into drive position
D, reverse gear R, or neutral position N
The Parktronic system deactivates at speeds
above approximately 11 mph (18 km/h). At
lower speeds, the Parktronic system
activates again.
The Parktronic system also deactivates when
you shift the transmission into park position
P or engage the electronic parking brake and
turn off the engine.
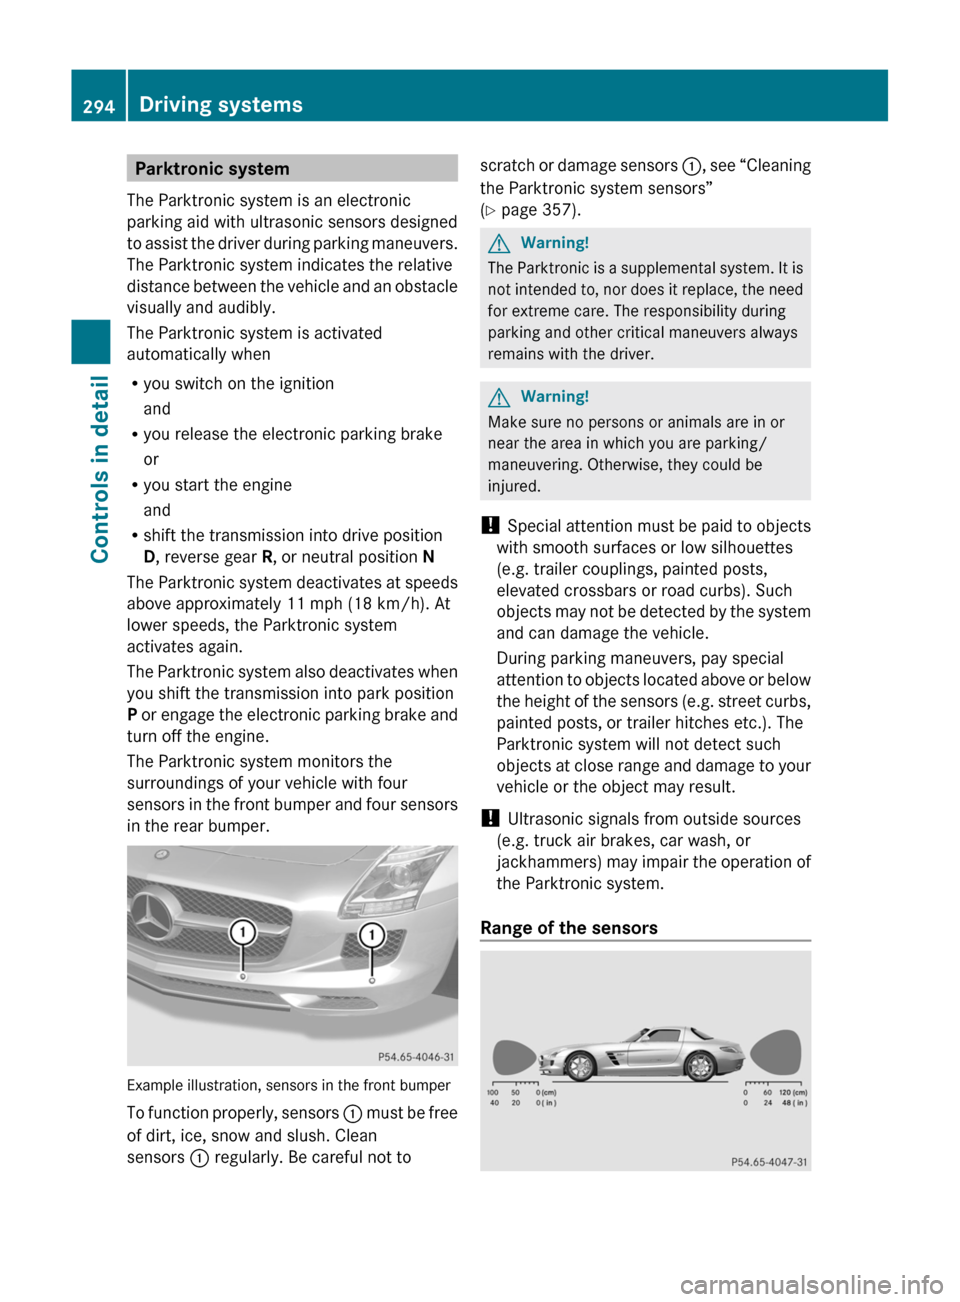
The Parktronic system monitors the
surroundings of your vehicle with four
sensors in the front bumper and four sensors
in the rear bumper.
Example illustration, sensors in the front bumper
To function properly, sensors : must be free
of dirt, ice, snow and slush. Clean
sensors : regularly. Be careful not to
scratch or damage sensors :, see “Cleaning
the Parktronic system sensors”
(Y page 357).
GWarning!
The Parktronic is a supplemental system. It is
not intended to, nor does it replace, the need
for extreme care. The responsibility during
parking and other critical maneuvers always
remains with the driver.
GWarning!
Make sure no persons or animals are in or
near the area in which you are parking/
maneuvering. Otherwise, they could be
injured.
! Special attention must be paid to objects
with smooth surfaces or low silhouettes
(e.g. trailer couplings, painted posts,
elevated crossbars or road curbs). Such
objects may not be detected by the system
and can damage the vehicle.
During parking maneuvers, pay special
attention to objects located above or below
the height of the sensors (e.g. street curbs,
painted posts, or trailer hitches etc.). The
Parktronic system will not detect such
objects at close range and damage to your
vehicle or the object may result.
! Ultrasonic signals from outside sources
(e.g. truck air brakes, car wash, or
jackhammers) may impair the operation of
the Parktronic system.
Range of the sensors
294Driving systemsControls in detail
BA 197 USA, CA Edition A 2011; 1; 27, en-UShereepeVersion: 3.0.3.52010-03-24T15:31:10+01:00 - Seite 294
Page 297 of 436
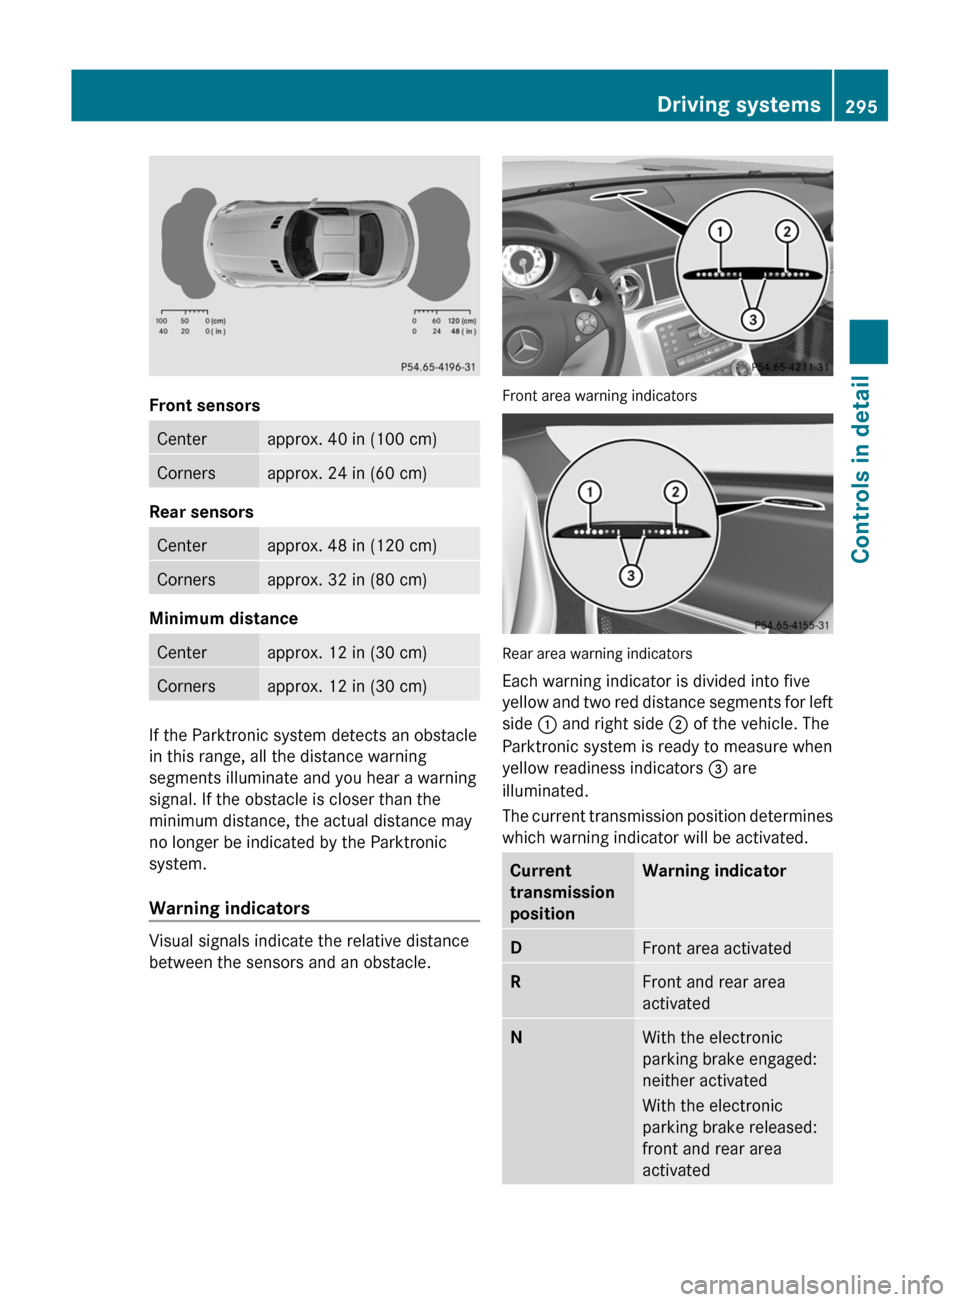
Front sensors
Centerapprox. 40 in (100 cm)Cornersapprox. 24 in (60 cm)
Rear sensors
Centerapprox. 48 in (120 cm)Cornersapprox. 32 in (80 cm)
Minimum distance
Centerapprox. 12 in (30 cm)Cornersapprox. 12 in (30 cm)
If the Parktronic system detects an obstacle
in this range, all the distance warning
segments illuminate and you hear a warning
signal. If the obstacle is closer than the
minimum distance, the actual distance may
no longer be indicated by the Parktronic
system.
Warning indicators
Visual signals indicate the relative distance
between the sensors and an obstacle.
Front area warning indicators
Rear area warning indicators
Each warning indicator is divided into five
yellow and two red distance segments for left
side : and right side ; of the vehicle. The
Parktronic system is ready to measure when
yellow readiness indicators = are
illuminated.
The current transmission position determines
which warning indicator will be activated.
Current
transmission
position
Warning indicatorDFront area activatedRFront and rear area
activated
NWith the electronic
parking brake engaged:
neither activated
With the electronic
parking brake released:
front and rear area
activated
Driving systems295Controls in detailBA 197 USA, CA Edition A 2011; 1; 27, en-UShereepeVersion: 3.0.3.52010-03-24T15:31:10+01:00 - Seite 295Z
Page 298 of 436
As your vehicle approaches an object, one or
more distance segments will illuminate,
depending on the distance. When the seventh
distance segment illuminates, you have
reached the minimum distance.
RFront area: An intermittent acoustic
warning will sound as the first red distance
segment illuminates and a constant
acoustic warning lasting a maximum of
2 seconds will sound for the second red
distance segment. The signal is canceled
when the transmission is shifted into park
position P.
RRear area: An intermittent acoustic
warning will sound as the first red distance
segment illuminates and a constant
acoustic warning lasting a maximum of
2 seconds will sound for the second red
distance segment. The signal is canceled
when the transmission is shifted into drive
position D or park position P.
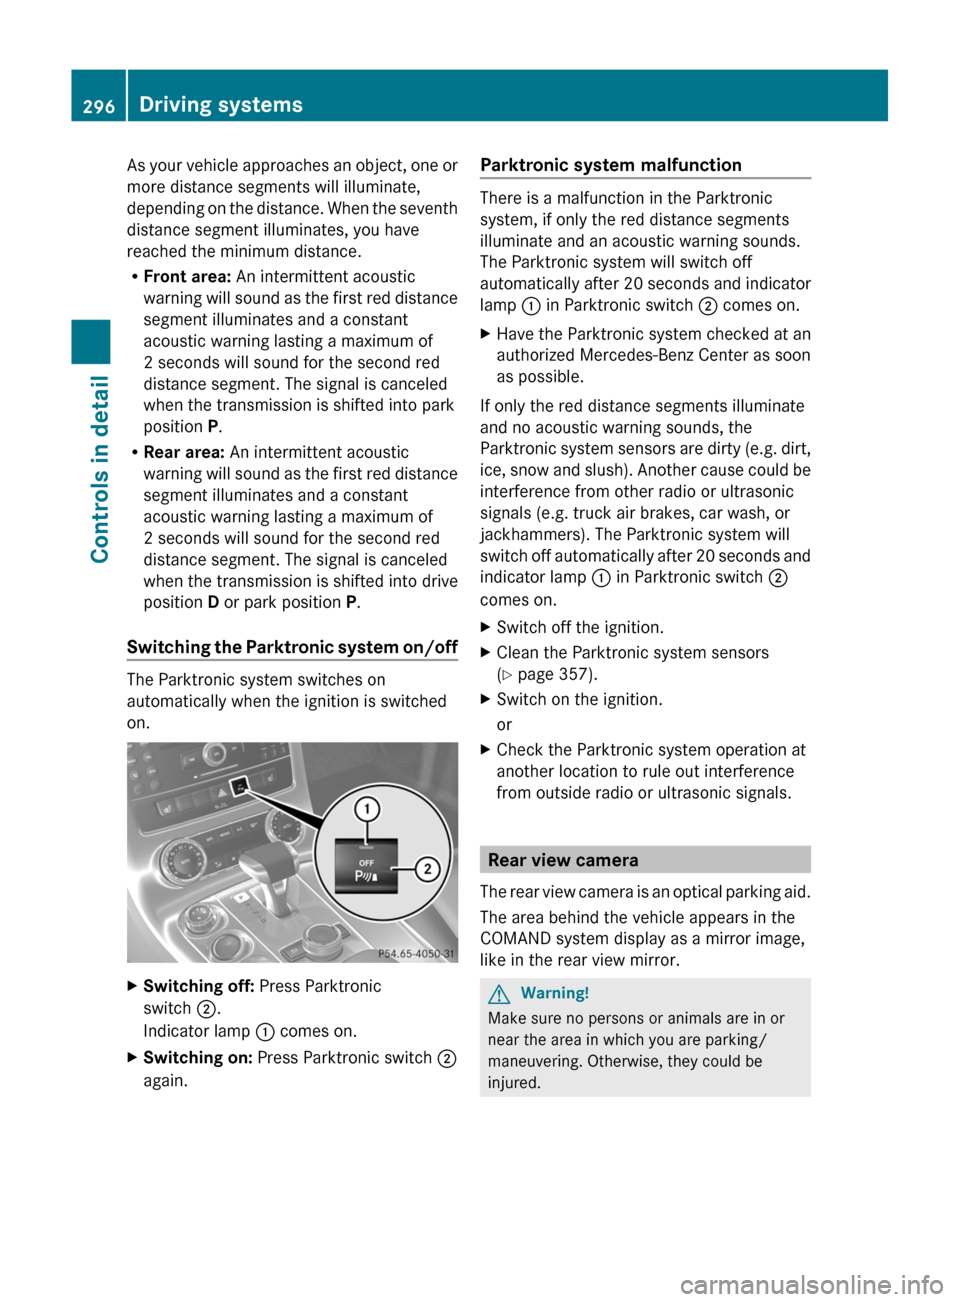
Switching the Parktronic system on/off
The Parktronic system switches on
automatically when the ignition is switched
on.
XSwitching off: Press Parktronic
switch ;.
Indicator lamp : comes on.
XSwitching on: Press Parktronic switch ;
again.
Parktronic system malfunction
There is a malfunction in the Parktronic
system, if only the red distance segments
illuminate and an acoustic warning sounds.
The Parktronic system will switch off
automatically after 20 seconds and indicator
lamp : in Parktronic switch ; comes on.
XHave the Parktronic system checked at an
authorized Mercedes-Benz Center as soon
as possible.
If only the red distance segments illuminate
and no acoustic warning sounds, the
Parktronic system sensors are dirty (e.g. dirt,
ice, snow and slush). Another cause could be
interference from other radio or ultrasonic
signals (e.g. truck air brakes, car wash, or
jackhammers). The Parktronic system will
switch off automatically after 20 seconds and
indicator lamp : in Parktronic switch ;
comes on.
XSwitch off the ignition.XClean the Parktronic system sensors
(Y page 357).
XSwitch on the ignition.
or
XCheck the Parktronic system operation at
another location to rule out interference
from outside radio or ultrasonic signals.
Rear view camera
The rear view camera is an optical parking aid.
The area behind the vehicle appears in the
COMAND system display as a mirror image,
like in the rear view mirror.
GWarning!
Make sure no persons or animals are in or
near the area in which you are parking/
maneuvering. Otherwise, they could be
injured.
296Driving systemsControls in detail
BA 197 USA, CA Edition A 2011; 1; 27, en-UShereepeVersion: 3.0.3.52010-03-24T15:31:10+01:00 - Seite 296
Page 407 of 436
GWarning!
Do not exceed a vehicle speed of 50 mph
( 80 km/h). A TIREFIT repair is not designed to
operate at higher speeds.
The sticker must be attached on the
instrument cluster where it will be easily seen
by the driver.
Vehicle handling characteristics of a TIREFIT
repaired tire may change. Adapt your driving
accordingly.
XAfter driving for approximately 5 miles
(3 km) or 10 minutes, stop the vehicle and
check the tire inflation pressure using the
electric air pump.
i The TIREFIT sealing may impair the
function of the sensors in the tire. Proper
operating sensors are necessary to check
the tire inflation pressure with the
Advanced Tire Pressure Monitoring
System. When the sensors are not
operating properly, the measured tire
inflation pressure may be inaccurate or the
tire inflation pressure may not be displayed
at all. Error messages may appear.
Therefore, check and adjust the tire
inflation pressure with pressure gauge B
on the electric air pump.
GWarning!
If tire inflation pressure has fallen below
130 kPA (1.3 bar, 20 psi) do not continue to
drive the vehicle.
Park your vehicle safely away from the
roadway and contact the nearest authorized
Mercedes-Benz Center or Roadside
Assistance.
Have the damaged tire replaced.
If the tire inflation pressure is at least 130 kPA
(1.3 bar, 20 psi), inflate or deflate the tire to
the correct tire inflation pressure (see Tire
and Loading Information placard on the
driver’s door B-pillar):XTo increase tire inflation pressure:
Switch on the electric air pump.XTo decrease tire inflation pressure:
Open vent screw C on air hose E.XDrive to the nearest qualified workshop,
e.g. an authorized Mercedes-Benz Center,
to have the damaged tire replaced.XContact an authorized Mercedes-Benz
Center as soon as possible to obtain a new
TIREFIT kit.XBring used TIREFIT materials to an
authorized Mercedes-Benz Center for
proper disposal.XReplace your TIREFIT container every
4 years. Replacement containers are
available at any authorized Mercedes-Benz
Center.
Wheel change
Preparing the vehicle
XPark the vehicle on a hard, flat surface.XTurn the steering wheel so that the front
wheels are in a straight-ahead position.XEngage the electronic parking brake.XShift the transmission into park position P.XTurn off the engine.XKEYLESS-GO: Open the driver’s door (this
puts the starter switch in position 0, same
as with the SmartKey removed from the
starter switch). The driver’s door can then
be closed again. Open doors only when
conditions are safe to do so.
or
XRemove the SmartKey from the starter
switch.XTake the following out of the vehicle:Wheel change405Practical hintsBA 197 USA, CA Edition A 2011; 1; 27, en-UShereepeVersion: 3.0.3.52010-03-24T15:31:10+01:00 - Seite 405Z