2011 MERCEDES-BENZ SLS change wheel
[x] Cancel search: change wheelPage 49 of 436
RDo not pass seat belts over sharp edges.
They could tear.
RDo not make any modification that could
change the effectiveness of the seat belts.
RDo not bleach or dye seat belts as this may
severely weaken them. In a crash they may
not be able to provide adequate protection.
RNo modifications of any kind may be made
to any components or wiring of the SRS.
RDo no change or remove any component or
part of the SRS.
RDo not install additional trim material, seat
covers, badges, etc. over the steering
wheel hub, passenger front air bag cover,
outboard sides of the seat backrests, door
trim panels, or door frame trims.
RDo not install additional electrical/
electronic equipment on or near SRS
components and wiring.
RKeep area between air bags and occupants
free of objects (e.g. packages, purses,
umbrellas, etc.).
RAir bag system components will be hot after
an air bag has inflated. Do not touch them.
RNever place your feet on the instrument
panel, dashboard, or on the seat. Always
keep both feet on the floor in front of the
seat.
RImproper repair work on the SRS creates a
risk of rendering the SRS inoperative or
causing unintended air bag deployment.
Work on the SRS must therefore only be
performed by qualified technicians.
Contact an authorized Mercedes-Benz
Center.
RFor your protection and the protection of
others, when scrapping the air bag unit or
ETD, our safety instructions must be
followed. These instructions are available
from any authorized Mercedes-Benz
Center.
RGiven the considerable deployment speed,
required inflation volume, and the material
of the air bags, there is the possibility of
abrasions or other, potentially more serious
injuries resulting from air bag deployment.
If you sell your vehicle, we strongly
recommend that you inform the subsequent
owner that the vehicle is equipped with SRS.
Also refer them to the applicable section in
the Operator’s Manual.
Front air bags
GObserve Safety notes, see page 45.
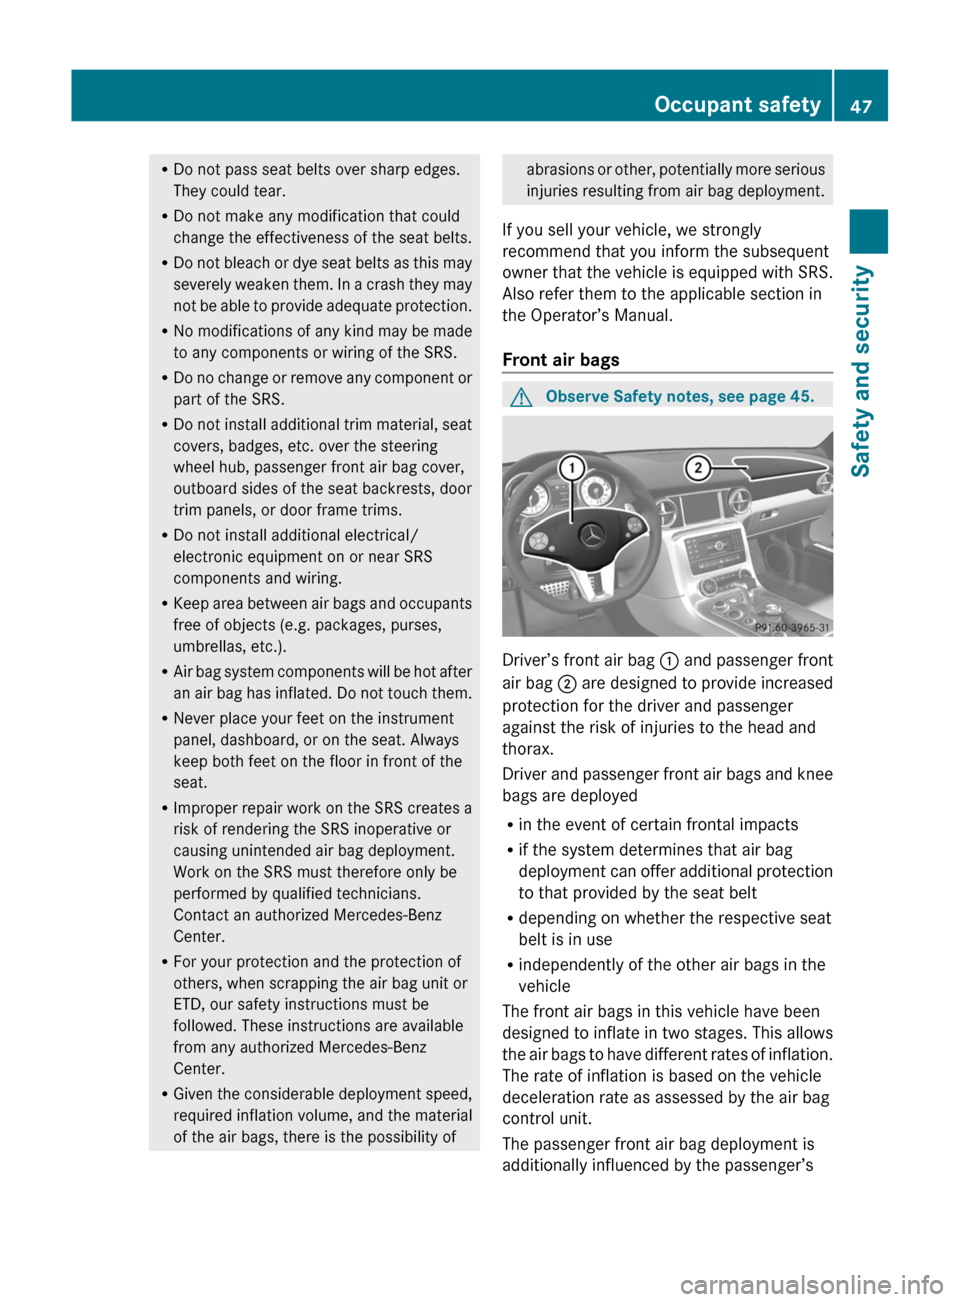
Driver’s front air bag : and passenger front
air bag ; are designed to provide increased
protection for the driver and passenger
against the risk of injuries to the head and
thorax.
Driver and passenger front air bags and knee
bags are deployed
Rin the event of certain frontal impacts
Rif the system determines that air bag
deployment can offer additional protection
to that provided by the seat belt
Rdepending on whether the respective seat
belt is in use
Rindependently of the other air bags in the
vehicle
The front air bags in this vehicle have been
designed to inflate in two stages. This allows
the air bags to have different rates of inflation.
The rate of inflation is based on the vehicle
deceleration rate as assessed by the air bag
control unit.
The passenger front air bag deployment is
additionally influenced by the passenger’s
Occupant safety47Safety and securityBA 197 USA, CA Edition A 2011; 1; 27, en-UShereepeVersion: 3.0.3.52010-03-24T15:31:10+01:00 - Seite 47Z
Page 67 of 436

warning lamp å in the instrument
cluster comes on.
The message ESC-OFF appears in the
multifunction display.
GWarning!
When the ESC OFF warning lamp å is on,
the ESC is switched off.
When the ESC warning lamp ÷ and the
ESC OFF warning lamp å are on
continuously, the ESC is not operational due
to a malfunction.
When the ESC is switched off or not
operational, vehicle stability in standard
driving maneuvers is reduced.
Adapt your speed and driving to the prevailing
road conditions and to the non-operating
status of the ESC.
! Avoid spinning of a drive wheel for an
extended period with the ESC switched off.
This may cause serious damage to the
drivetrain which is not covered by the
Mercedes-Benz Limited Warranty.
XSwitching on: With the engine running,
press ESC switch : briefly.
The ESC OFF warning lamp å in the
instrument cluster goes out. The message
ESC-ON appears in the multifunction
display.
EBP
GObserve Safety notes, see page 61.
The Electronic Brake Proportioning (EBP)
enhances braking effectiveness by allowing
the rear brakes to supply a greater proportion
of the braking effort in straight-line braking
without a loss of vehicle stability.
GWarning!
If the EBD malfunctions, the brake system will
still function with full brake boost. However,
the rear wheels could lock up during
emergency braking situations, for example.
You could lose control of the vehicle and
cause an accident.
Adapt your driving style to the changed
driving characteristics.
Adaptive Brake
Adaptive Brake provides a high level of
braking safety as well as increased braking
comfort. Adaptive Brake takes driver and
vehicle characteristics into consideration,
thus achieving an optimal braking effect.
In addition, Adaptive Brake provides the hill-
start assist system (Y page 293).
For more information on the brake system,
see (Y page 349).
Trunk Wing
GObserve Safety notes, see page 61.
The Trunk Wing enhances the vehicle’s
driving stability. It adapts the aerodynamics
of the vehicle to the driving conditions
according to the speed.
Trunk Wing switch : should be used for
cleaning only, see “Trunk Wing”
(Y page 360). It is not needed for Trunk Wing
operation.
The Trunk Wing extends at a vehicle speed of
above 75 mph (120 km/h) automatically.
Trunk Wing switch : flashes for as long as
the Trunk Wing extends. It remains
illuminated in red when the Trunk Wing is fully
extended.
Driving safety systems65Safety and securityBA 197 USA, CA Edition A 2011; 1; 27, en-UShereepeVersion: 3.0.3.52010-03-24T15:31:10+01:00 - Seite 65Z
Page 82 of 436
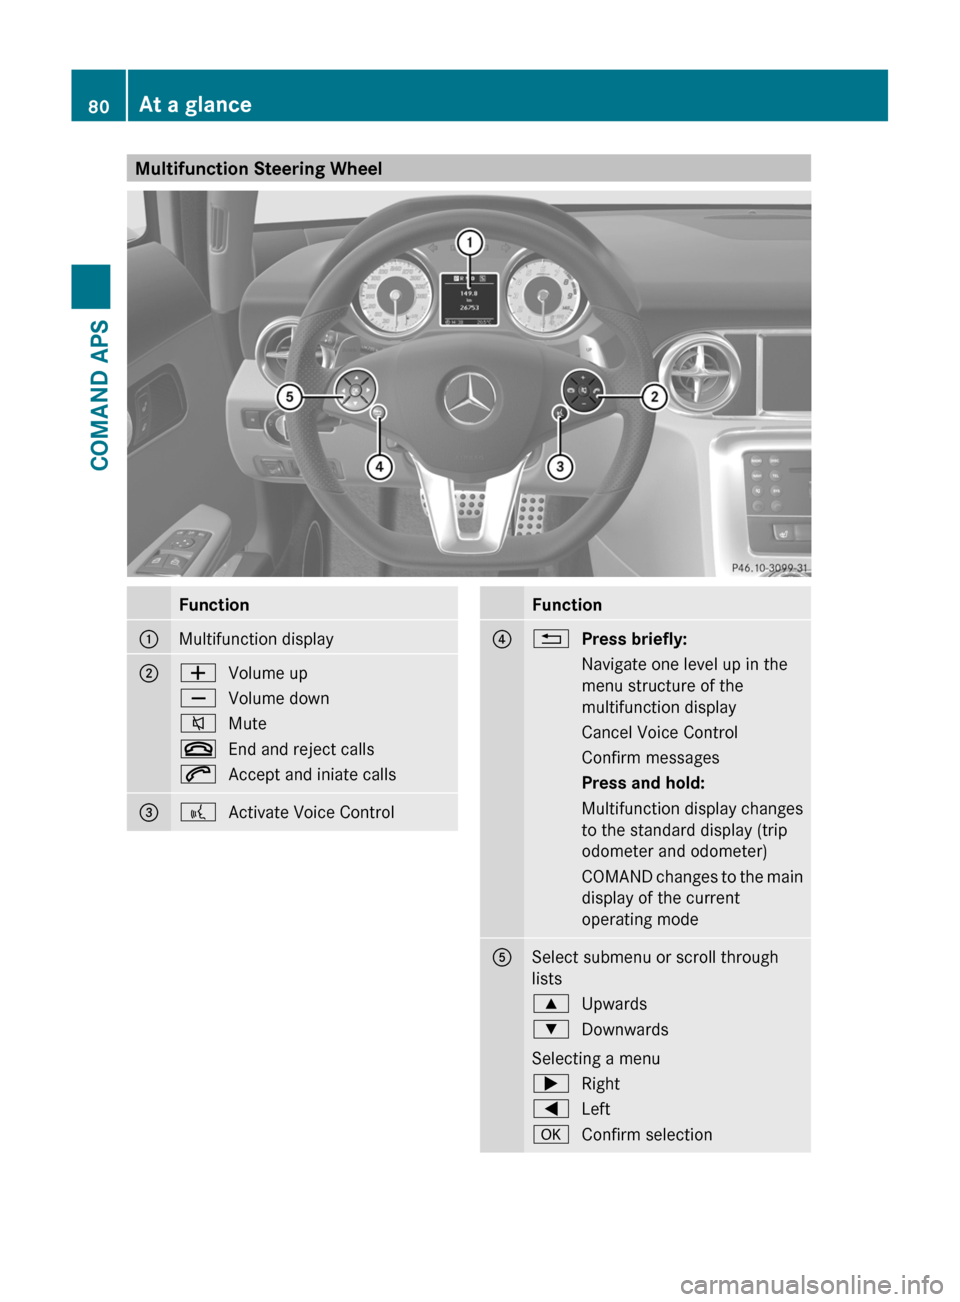
Multifunction Steering WheelFunction1Multifunction display2WVolume upXVolume down8Mute~End and reject calls6Accept and iniate calls3?Activate Voice ControlFunction4%Press briefly:Navigate one level up in the
menu structure of the
multifunction display
Cancel Voice ControlConfirm messagesPress and hold:Multifunction display changes
to the standard display (trip
odometer and odometer)
COMAND changes to the main
display of the current
operating mode
5Select submenu or scroll through
lists
9Upwards:Downwards
Selecting a menu
;Right=LeftaConfirm selection80At a glanceCOMAND APS
BA 197 USA, CA Edition A 2011; 1; 27, en-UShereepeVersion: 3.0.3.52010-03-24T15:31:10+01:00 - Seite 80
Page 83 of 436

Operating the Multifunction DisplayGWarning!
A driver’s attention to the road and traffic
conditions must always be his/her primary
focus when driving.
For your safety and the safety of others,
selecting features through the multifunction
steering wheel should only be done by the
driver when traffic and road conditions permit
it to be done safely.
Bear in mind that at a speed of just 30 mph
(approximately 50 km/h), your vehicle is
covering a distance of 44 feet (approximately
14 m) every second.
XTo select a menu: Press the =
or ; button.
XTo select a submenu or scroll in a list:
Press the 9 or : button.
XTo select the next menu level up: Press
the % button.
XTo select the standard display: Press the
% button repeatedly until the standard
display with the odometer and trip
odometer appears again in the display.
or
XPress and hold the % button until the
standard display with the odometer and trip
odometer appears.
XTo confirm the selection: Press the
a button.
XTo confirm a display message: Press the
a or % button.
Multifunction Display
The description field on the multifunction
display shows you values and settings as well
as any display messages that may have been
generated.
1 Description field2 Line for menus
Text field 1 shows settings, functions,
submenus and any malfunctions that occur.
XTo show the line for menus 2: Press the
= or ; button.
Menus and Submenus
The number of menus shown depends on the
optional equipment in the vehicle.
Multifunction Display Menus
iThe following table only lists the functions
and submenus that are needed in
connection with COMAND. For information
on the vehicle-related submenus please
refer to the vehicle operator's manual.
MenusFunctions and SubmenusNaviNavigation messagesAudioSelecting radio stations
Operating the DVD changer/
Music register/Memory card
TelAccepting a call
Initiating a call
Rejecting a call
Ending a call
Selecting a phone book entry
Calls dialed
Navi Menu
The multifunction display shows navigation
instructions in the Navi menu.
At a glance81COMAND APSBA 197 USA, CA Edition A 2011; 1; 27, en-UShereepeVersion: 3.0.3.52010-03-24T15:31:10+01:00 - Seite 81Z
Page 91 of 436
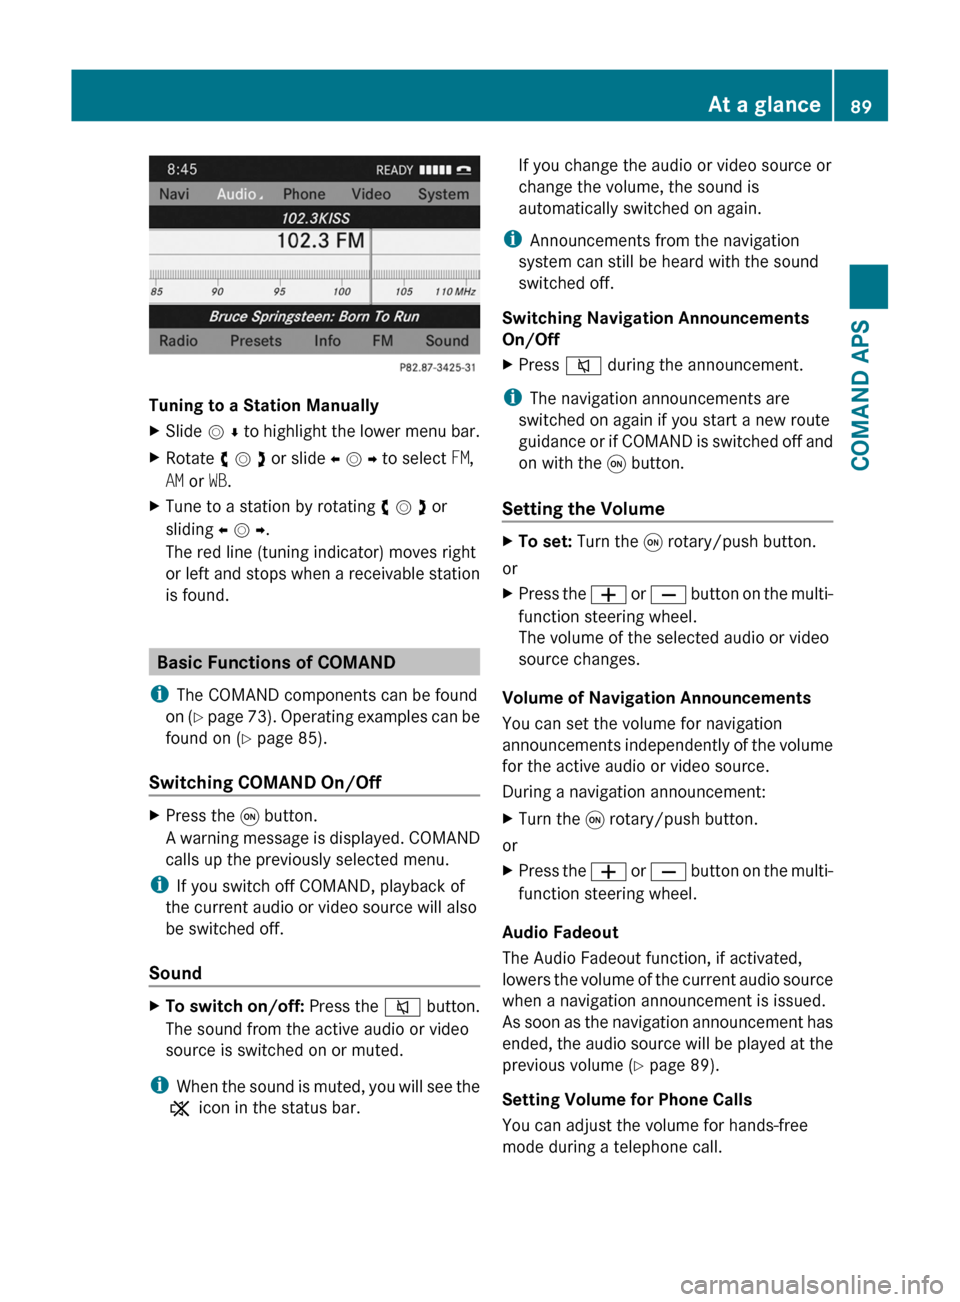
Tuning to a Station Manually
XSlide m r to highlight the lower menu bar.XRotate y m z or slide o m p to select FM,
AM or WB.
XTune to a station by rotating y m z or
sliding o m p.
The red line (tuning indicator) moves right
or left and stops when a receivable station
is found.
Basic Functions of COMAND
iThe COMAND components can be found
on (Y page 73). Operating examples can be
found on (Y page 85).
Switching COMAND On/Off
XPress the q button.
A warning message is displayed. COMAND
calls up the previously selected menu.
iIf you switch off COMAND, playback of
the current audio or video source will also
be switched off.
Sound
XTo switch on/off: Press the 8 button.
The sound from the active audio or video
source is switched on or muted.
iWhen the sound is muted, you will see the
X icon in the status bar.
If you change the audio or video source or
change the volume, the sound is
automatically switched on again.
iAnnouncements from the navigation
system can still be heard with the sound
switched off.
Switching Navigation Announcements
On/Off
XPress 8 during the announcement.
iThe navigation announcements are
switched on again if you start a new route
guidance or if COMAND is switched off and
on with the q button.
Setting the Volume
XTo set: Turn the q rotary/push button.
or
XPress the W or X button on the multi-
function steering wheel.
The volume of the selected audio or video
source changes.
Volume of Navigation Announcements
You can set the volume for navigation
announcements independently of the volume
for the active audio or video source.
During a navigation announcement:
XTurn the q rotary/push button.
or
XPress the W or X button on the multi-
function steering wheel.
Audio Fadeout
The Audio Fadeout function, if activated,
lowers the volume of the current audio source
when a navigation announcement is issued.
As soon as the navigation announcement has
ended, the audio source will be played at the
previous volume (Y page 89).
Setting Volume for Phone Calls
You can adjust the volume for hands-free
mode during a telephone call.
At a glance89COMAND APSBA 197 USA, CA Edition A 2011; 1; 27, en-UShereepeVersion: 3.0.3.52010-03-24T15:31:10+01:00 - Seite 89Z
Page 92 of 436
During a telephone call:XTurn the q rotary/push button.
or
XPress the W or X button on the multi-
function steering wheel.
Sound Settings
You can select different sound settings for
each audio and video source. The sound
menu can be opened from the submenu of the
desired operating mode.
Examples:
RAudio £ FM/AM Radio £ Sound
RAudio £ Disc £ Sound
Setting Bass and Treble
XSelect Sound £ Treble or Bass.
The previously selected setting is indicated
by an empty bar.
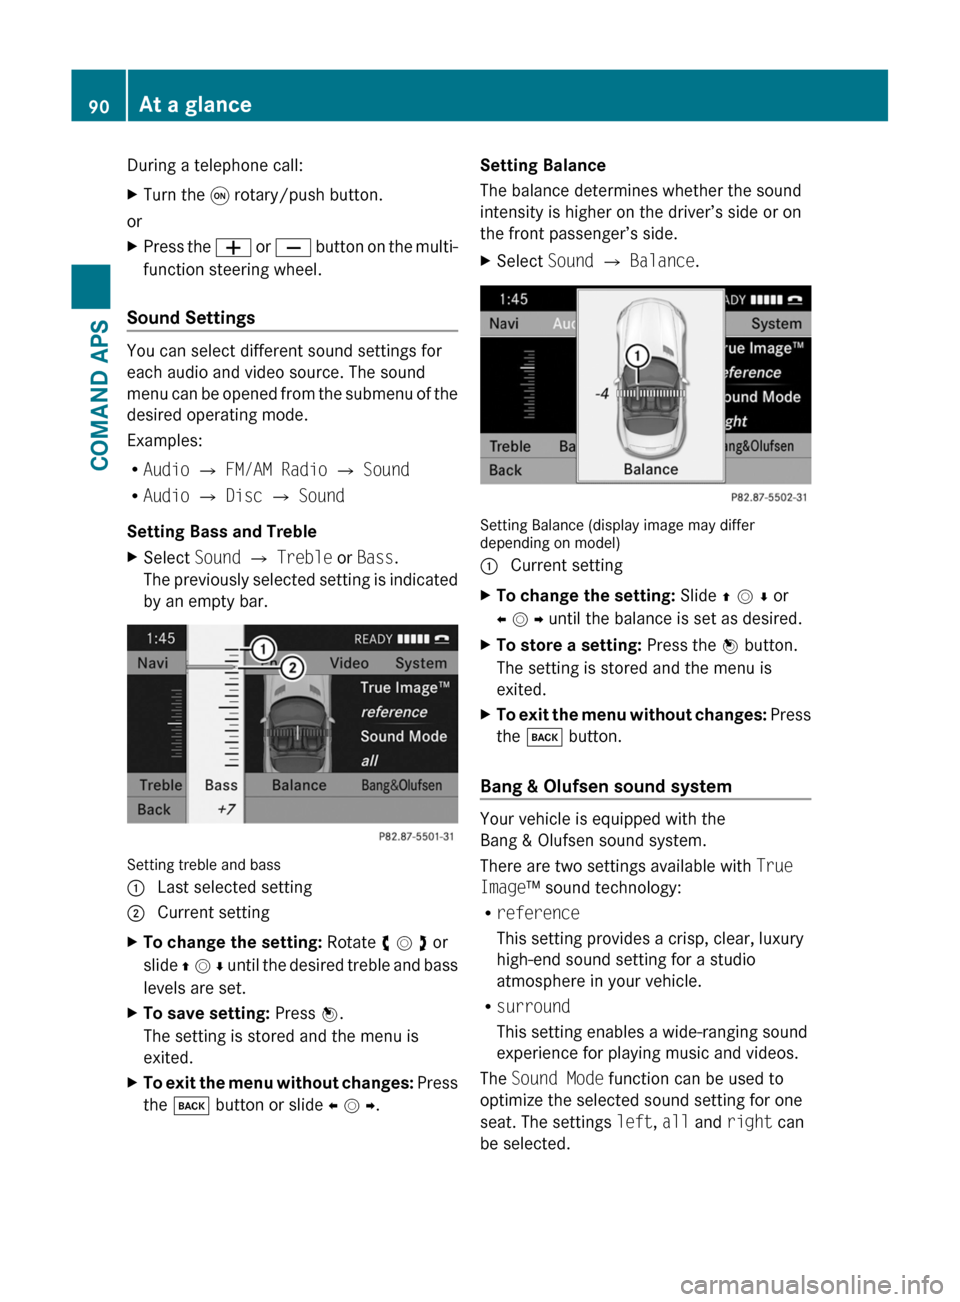
Setting treble and bass
1 Last selected setting2 Current settingXTo change the setting: Rotate y m z or
slide q m r until the desired treble and bass
levels are set.
XTo save setting: Press n.
The setting is stored and the menu is
exited.
XTo exit the menu without changes: Press
the k button or slide o m p.
Setting Balance
The balance determines whether the sound
intensity is higher on the driver’s side or on
the front passenger’s side.
XSelect Sound £ Balance.
Setting Balance (display image may differdepending on model)
1 Current settingXTo change the setting: Slide q m r or
o m p until the balance is set as desired.
XTo store a setting: Press the n button.
The setting is stored and the menu is
exited.
XTo exit the menu without changes: Press
the k button.
Bang & Olufsen sound system
Your vehicle is equipped with the
Bang & Olufsen sound system.
There are two settings available with True
Image™ sound technology:
Rreference
This setting provides a crisp, clear, luxury
high-end sound setting for a studio
atmosphere in your vehicle.
Rsurround
This setting enables a wide-ranging sound
experience for playing music and videos.
The Sound Mode function can be used to
optimize the selected sound setting for one
seat. The settings left, all and right can
be selected.
90At a glanceCOMAND APS
BA 197 USA, CA Edition A 2011; 1; 27, en-UShereepeVersion: 3.0.3.52010-03-24T15:31:10+01:00 - Seite 90
Page 155 of 436
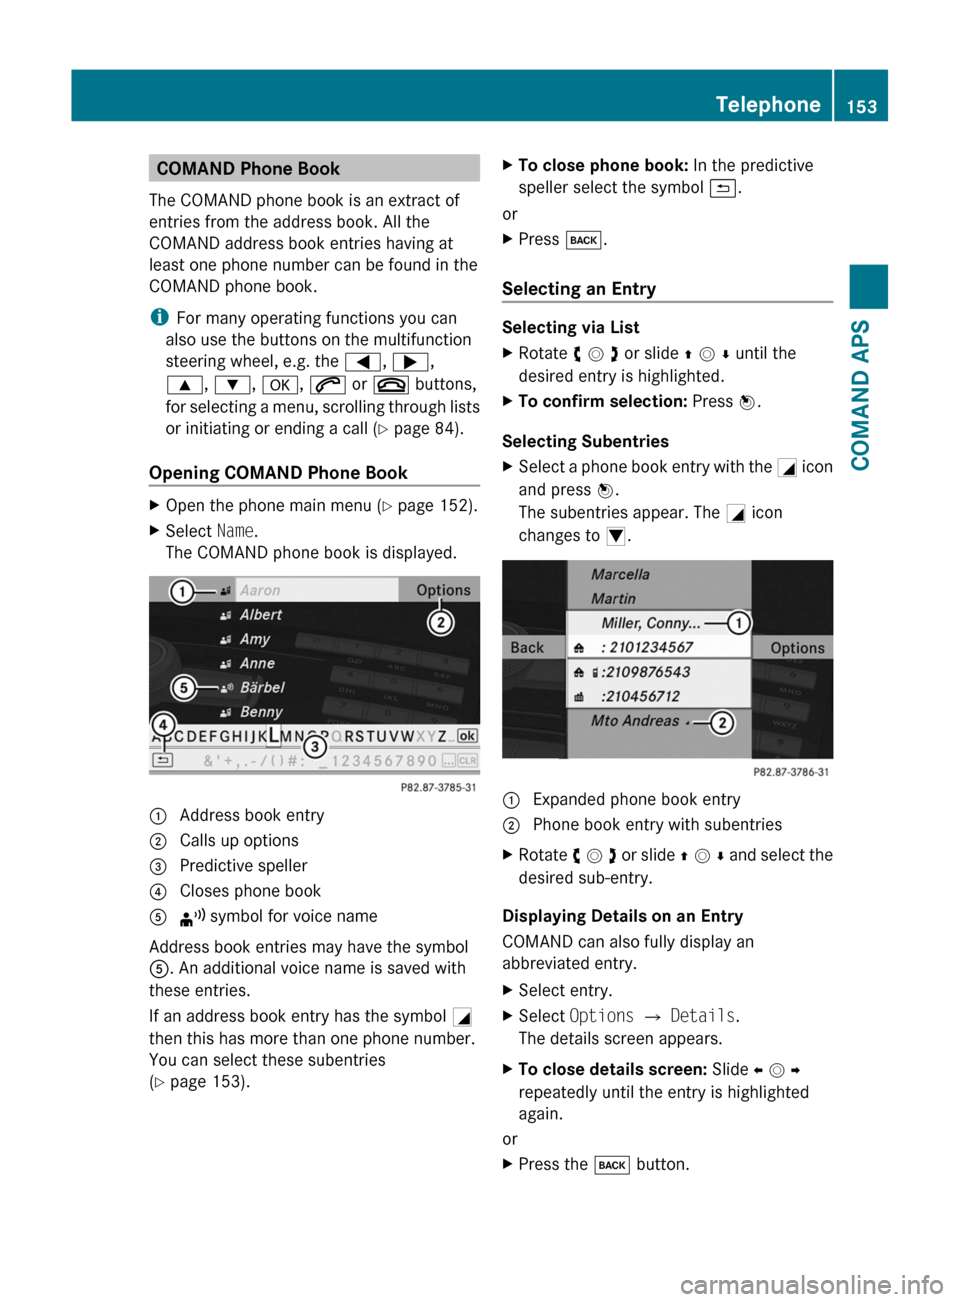
COMAND Phone Book
The COMAND phone book is an extract of
entries from the address book. All the
COMAND address book entries having at
least one phone number can be found in the
COMAND phone book.
iFor many operating functions you can
also use the buttons on the multifunction
steering wheel, e.g. the =, ;,
9, :, a, 6 or ~ buttons,
for selecting a menu, scrolling through lists
or initiating or ending a call (Y page 84).
Opening COMAND Phone Book
XOpen the phone main menu (Y page 152).XSelect Name.
The COMAND phone book is displayed.1 Address book entry2 Calls up options3 Predictive speller4 Closes phone book5 ¦ symbol for voice name
Address book entries may have the symbol
5. An additional voice name is saved with
these entries.
If an address book entry has the symbol +
then this has more than one phone number.
You can select these subentries
(Y page 153).
XTo close phone book: In the predictive
speller select the symbol á.
or
XPress k.
Selecting an Entry
Selecting via List
XRotate y m z or slide q m r until the
desired entry is highlighted.
XTo confirm selection: Press n.
Selecting Subentries
XSelect a phone book entry with the + icon
and press n.
The subentries appear. The + icon
changes to /.
1 Expanded phone book entry2 Phone book entry with subentriesXRotate y m z or slide q m r and select the
desired sub-entry.
Displaying Details on an Entry
COMAND can also fully display an
abbreviated entry.
XSelect entry.XSelect Options £ Details.
The details screen appears.
XTo close details screen: Slide o m p
repeatedly until the entry is highlighted
again.
or
XPress the k button.Telephone153COMAND APSBA 197 USA, CA Edition A 2011; 1; 27, en-UShereepeVersion: 3.0.3.52010-03-24T15:31:10+01:00 - Seite 153Z
Page 189 of 436
Selecting a Track
iFor many operating functions you can
also use the buttons on the multifunction
steering wheel, e.g. the 9, :
buttons, for selecting a track, a menu or
scrolling through lists (Y page 81).
Selection via Track Skip
XTo skip forwards or backwards to a
track: Rotate y m z when the main area is
highlighted.
or
XPress the E or F button.
i“Forward track skip” skips to the next
track. “Backward track skip” skips to the
beginning of the current track, if the track
has been playing for more than 8 seconds.
If the track has been playing for less than
8 seconds, it will skip to the beginning of
the previous track. If the playback option
Random Tracks is switched on, the track
sequence is random.
Selecting via Track List
XIn CD Audio and DVD Audio mode: Select
Track List.
or
XIn MP3 mode: Press n when the main
area window is highlighted.
The track list appears. The R dot indicates
the current track.
XTo select a track: Rotate y m z or slide
q m r.
XPress n.
iIn MP3 mode, the list shows all the tracks
in alphabetical order.
Fast Forward/Reverse XWhen the main area is highlighted: Slide
and hold o m p until the desired position is
reached.
or
XPress and hold the E or F button
until the desired position has been
reached.
Selecting Folders
iThis function is only available in MP3
mode.
XSwitch to MP3 mode (Y page 184).XSelect Folder.
or
XPress n when the main area is highlighted.
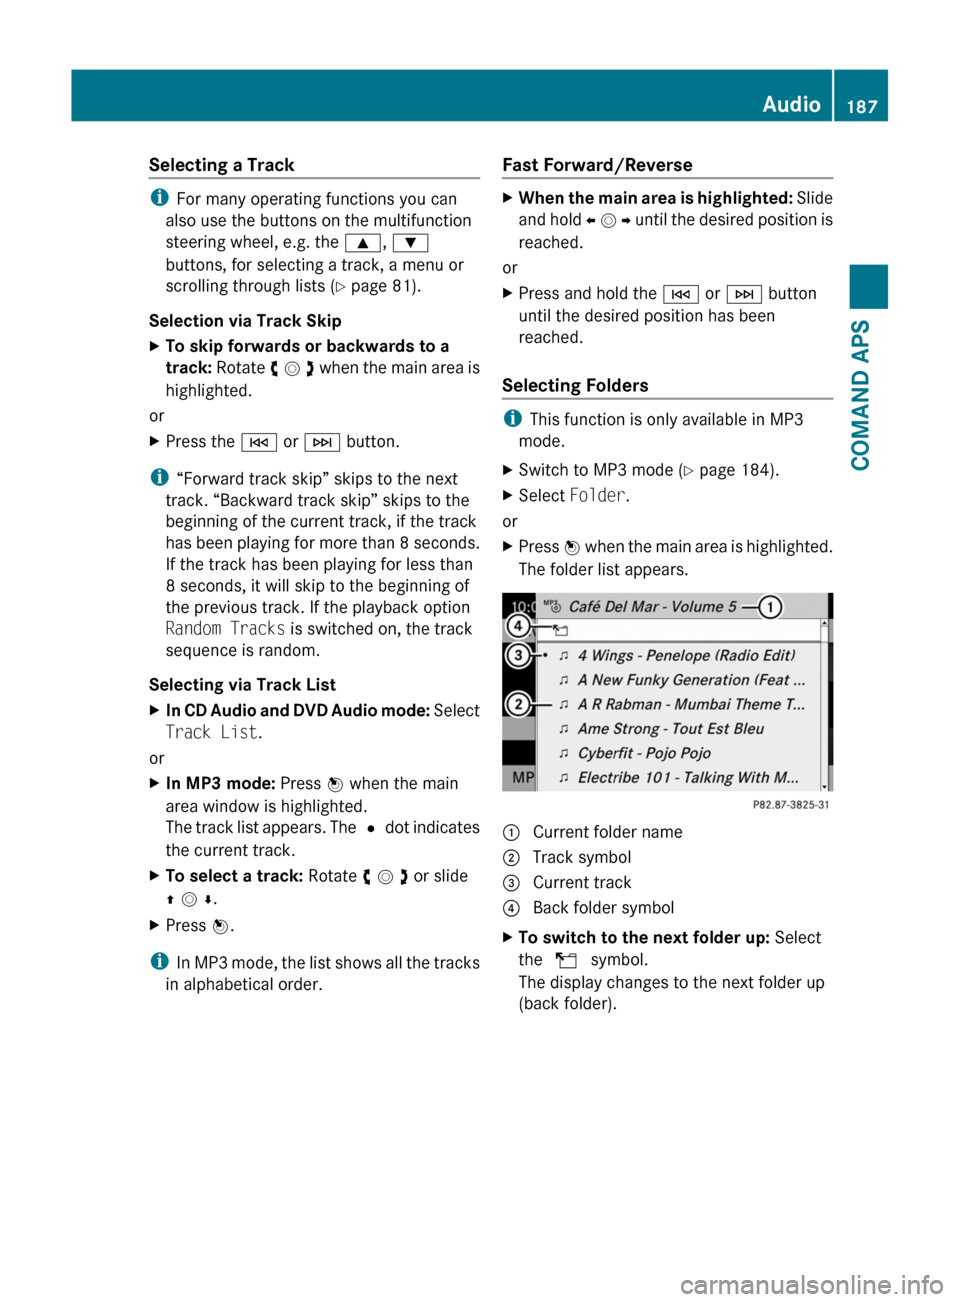
The folder list appears.
1 Current folder name2 Track symbol3 Current track4 Back folder symbolXTo switch to the next folder up: Select
the Q symbol.
The display changes to the next folder up
(back folder).
Audio187COMAND APSBA 197 USA, CA Edition A 2011; 1; 27, en-UShereepeVersion: 3.0.3.52010-03-24T15:31:10+01:00 - Seite 187Z