2011 MERCEDES-BENZ SLS clock
[x] Cancel search: clockPage 80 of 436

COMAND controller operation
You can operate the COMAND controller in the following ways:
Rpress briefly or press and hold n
Rrotate clockwise or counter-clockwise y m z
Rslide to the left or right o m p
or
Rslide up or down q m r
or
Rslide diagonally w m x
In the instructions, operating directions are described as follows:
XSelect Station list.
which is a short form for
XTurn y m z or slide q m r the COMAND controller.
This moves the selection bar to the Station list menu item.
XPress the n COMAND controller.
This confirms your selection. The station list appears.
SymbolCOMAND controller
operation
Function (example)nPress brieflyRSelect menu item or list entry
RShow/hide the menu system (e.g. when
using navigation or video functions)
Press and hold until the selected
action has been carried out
RAccept destination for navigationy m zRotateRMove through vertical or horizontal menus
or lists
RMove through text
RProgram settings
q m rSlideRMove through vertical menus
RExit horizontal menus
78At a glanceCOMAND APS
BA 197 USA, CA Edition A 2011; 1; 27, en-UShereepeVersion: 3.0.3.52010-03-24T15:31:10+01:00 - Seite 78
Page 96 of 436

1 Sets the time2 Current dateXTo set value: Rotate y m z or slide
q m r.
XTo save setting: Press n.
iIf you adjust the time in 30-minute
increments, the previously selected time
zone and automatic time-zone switching
between daylight saving time and standard
time settings are lost (Y page 94).
iThe increment value for setting the
minutes depends on the equipment
installed. They are 30-minute increments in
vehicles equipped with a navigation
system. They are minute increments in
vehicles without a navigation system. The
following operational steps depend on
whether the navigation system has GPS
reception.
Setting the Date/Time Format
XSelect System £ System settings £
Time £ Format.
The format list appears. The R dots show
the current settings.
iThe abbreviations mean:
Date format: DD - Day, MM - Month, YY/
YYYY - Year
Time format: HH - Hour, MM - Minute for
either 24-hour clock or AM/PM format
XTo change the format: Rotate y m z or
slide q m r.
XTo confirm the change: Press n.XTo store the setting and exit the menu:
Slide o m p.
Setting the Time Zone and Switching
Between Daylight Saving Time and
Standard Time
iThe correct time zone and daylight
saving/standard time must be set for the
following navigation system functions to
operate correctly:
RCalculation of expected time of arrival
RTime stamps for calls received and calls
dialed
XTo set the time zone: Select System £
Settings £ Time £ Time Zone.
A time zone list appears. The R dot
indicates the current setting.
XSelect the appropriate time zone.XTo switch between Daylight Saving and
standard time: Select Daylight Saving
Time (Summer) or Standard Time
(Winter).
The R dot indicates the current setting.
XTo store setting and exit menu:
Slide o m p.
Read-Out
Setting Reading Speed
XSelect System £ Settings £ Text
Reader Speed.
The list of possible settings appears. The
R dot indicates the current setting.
XTo select the setting: Rotate y m z or
slide q m r.
XTo confirm your selection: Press n.94System SettingsCOMAND APS
BA 197 USA, CA Edition A 2011; 1; 27, en-UShereepeVersion: 3.0.3.52010-03-24T15:31:10+01:00 - Seite 94
Page 108 of 436

3 Current vehicle location4 Navigation submenu
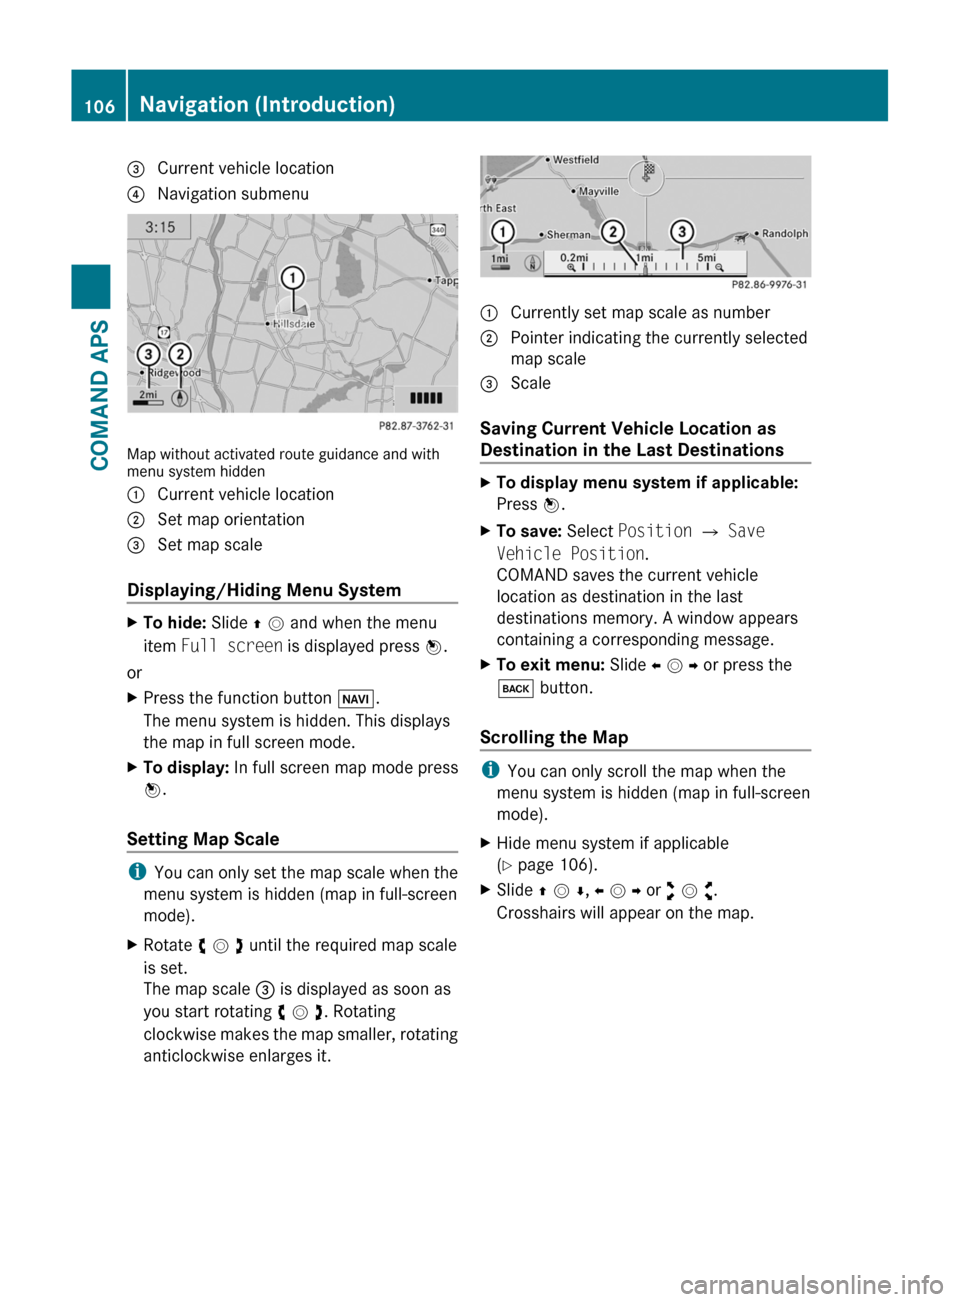
Map without activated route guidance and withmenu system hidden
1 Current vehicle location2 Set map orientation3 Set map scale
Displaying/Hiding Menu System
XTo hide: Slide q m and when the menu
item Full screen is displayed press n.
or
XPress the function button Ø.
The menu system is hidden. This displays
the map in full screen mode.
XTo display: In full screen map mode press
n.
Setting Map Scale
iYou can only set the map scale when the
menu system is hidden (map in full-screen
mode).
XRotate y m z until the required map scale
is set.
The map scale 3 is displayed as soon as
you start rotating y m z. Rotating
clockwise makes the map smaller, rotating
anticlockwise enlarges it.
1 Currently set map scale as number2 Pointer indicating the currently selected
map scale
3 Scale
Saving Current Vehicle Location as
Destination in the Last Destinations
XTo display menu system if applicable:
Press n.
XTo save: Select Position £ Save
Vehicle Position.
COMAND saves the current vehicle
location as destination in the last
destinations memory. A window appears
containing a corresponding message.
XTo exit menu: Slide o m p or press the
k button.
Scrolling the Map
iYou can only scroll the map when the
menu system is hidden (map in full-screen
mode).
XHide menu system if applicable
(Y page 106).
XSlide q m r, o m p or w m x.
Crosshairs will appear on the map.
106Navigation (Introduction)COMAND APS
BA 197 USA, CA Edition A 2011; 1; 27, en-UShereepeVersion: 3.0.3.52010-03-24T15:31:10+01:00 - Seite 106
Page 126 of 436

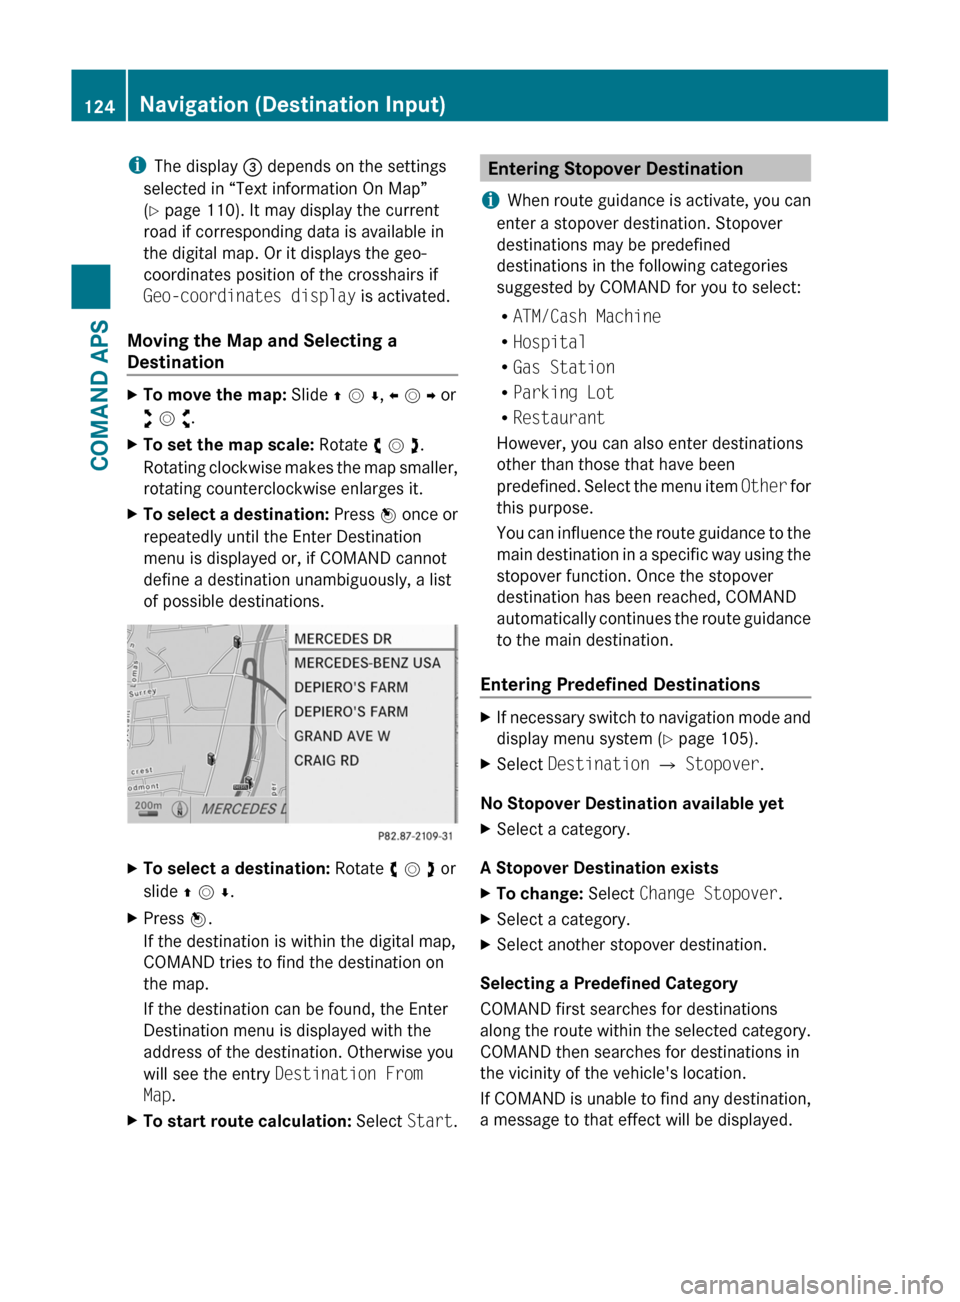
iThe display 3 depends on the settings
selected in “Text information On Map”
(Y page 110). It may display the current
road if corresponding data is available in
the digital map. Or it displays the geo-
coordinates position of the crosshairs if
Geo-coordinates display is activated.
Moving the Map and Selecting a
Destination
XTo move the map: Slide q m r, o m p or
w m x.
XTo set the map scale: Rotate y m z.
Rotating clockwise makes the map smaller,
rotating counterclockwise enlarges it.
XTo select a destination: Press n once or
repeatedly until the Enter Destination
menu is displayed or, if COMAND cannot
define a destination unambiguously, a list
of possible destinations.
XTo select a destination: Rotate y m z or
slide q m r.
XPress n.
If the destination is within the digital map,
COMAND tries to find the destination on
the map.
If the destination can be found, the Enter
Destination menu is displayed with the
address of the destination. Otherwise you
will see the entry Destination From
Map.
XTo start route calculation: Select Start.Entering Stopover Destination
iWhen route guidance is activate, you can
enter a stopover destination. Stopover
destinations may be predefined
destinations in the following categories
suggested by COMAND for you to select:
RATM/Cash Machine
RHospital
RGas Station
RParking Lot
RRestaurant
However, you can also enter destinations
other than those that have been
predefined. Select the menu item Other for
this purpose.
You can influence the route guidance to the
main destination in a specific way using the
stopover function. Once the stopover
destination has been reached, COMAND
automatically continues the route guidance
to the main destination.
Entering Predefined Destinations
XIf necessary switch to navigation mode and
display menu system (Y page 105).
XSelect Destination £ Stopover.
No Stopover Destination available yet
XSelect a category.
A Stopover Destination exists
XTo change: Select Change Stopover.XSelect a category.XSelect another stopover destination.
Selecting a Predefined Category
COMAND first searches for destinations
along the route within the selected category.
COMAND then searches for destinations in
the vicinity of the vehicle's location.
If COMAND is unable to find any destination,
a message to that effect will be displayed.
124Navigation (Destination Input)COMAND APS
BA 197 USA, CA Edition A 2011; 1; 27, en-UShereepeVersion: 3.0.3.52010-03-24T15:31:10+01:00 - Seite 124
Page 243 of 436

XBriefly press emergency release
button :.
The trunk lid unlocks and opens slightly.
XPush up the trunk lid to fully open.
The emergency release button unlocks the
trunk while the vehicle is standing still or in
motion.
Illumination of the emergency release button:
RThe button flashes for 30 minutes after
opening the trunk.
RThe button flashes for 60 minutes after
closing the trunk.
The emergency release button does not
unlock the trunk, if the vehicle battery is
discharged or disconnected.
If the vehicle has previously been locked
centrally with the SmartKey, opening the
trunk from the inside using the emergency
release button will trigger the anti-theft alarm
system.
To cancel the alarm, see (Y page 67).
Valet locking
You can lock the trunk separately with the
mechanical key. This denies unauthorized
access to the trunk, e.g. when you valet park
the vehicle.
XLeave only the SmartKey less its
mechanical key with the vehicle.
XValet locking: Close the trunk
(Y page 240).
XRemove the mechanical key from the
SmartKey (Y page 397).
XOpen the rear storage compartment in the
center console (Y page 304).
XInsert the mechanical key into trunk lid
lock :.
XTurn the mechanical key clockwise as far
as it will go.
XIn this position, pull out the mechanical
key.
XCheck whether the trunk is locked.
The trunk remains locked even when the
vehicle is centrally unlocked.
You can then only open the trunk with the
mechanical key.
XCanceling: Insert the mechanical into
trunk lid lock :.
XTurn the mechanical key counterclockwise
as far as it will go.
XIn this position, pull out the mechanical
key.
You can now open the trunk.
Starter switch positions
KEYLESS-GO
GObserve Safety notes, see page 57.
You can start the engine and turn it off again
using the KEYLESS-GO start/stop button.
The KEYLESS-GO start/stop button is located
in the center console. The KEYLESS-GO
start/stop button is illuminated when the
vehicle is unlocked.
The SmartKey must be located in the vehicle.
It will, however, not be detected in the trunk.
Pressing the KEYLESS-GO start/stop button
without depressing the brake pedal
Starter switch positions241Controls in detailBA 197 USA, CA Edition A 2011; 1; 27, en-UShereepeVersion: 3.0.3.52010-03-24T15:31:10+01:00 - Seite 241Z
Page 276 of 436

?Line for main menusADigital clock/outside temperature
indicator
Settings, functions, submenus as well as any
malfunctions appear in the text field.
For more information on menus displayed in
the multifunction display, see “Menus and
submenus” ( Y page 275).
274Control systemControls in detail
BA 197 USA, CA Edition A 2011; 1; 27, en-UShereepeVersion: 3.0.3.52010-03-24T15:31:10+01:00 - Seite 274
Page 295 of 436

Activating RACE STARTXDepress the brake pedal with your left foot
and keep it depressed.XTurn the program mode selector dial
clockwise ( Y page 267) until the RS lamp
on the dial comes on.
The message RACE START Confirm:
Paddle UP Cancel: Paddle DOWN
appears in the multifunction display.
i When the activation conditions are not
fulfilled anymore, RACE START is canceled.
The message RACE START Canceled
appears in the multifunction display.
XTo cancel: Pull left steering wheel gearshift
control ( Y page 267).
or
XTo confirm: Pull right steering wheel
gearshift control ( Y page 267).
The message RACE START Available
Depress gas pedal. appears in the
multifunction display.
i If you do not depress the accelerator
pedal within a few seconds, RACE START is
canceled. The message RACE START Not
Possible See Operator’s Manual
appears in the multifunction display.
XDepress the accelerator pedal fully.
The engine speed increases.
The message RACE START Release
brake to start appears in the
multifunction display.
i If you do not release the brake pedal
within a few seconds, RACE START is
canceled. The message RACE START
Canceled appears in the multifunction
display.
XTake your foot off the brake pedal while
keeping the accelerator pedal depressed.
The vehicle pulls away at maximum
acceleration.
The message RACE START Active appears
in the multifunction display.
RACE START deactivates at a vehicle speed
of approximately 30 mph
(Canada: 50 km/h). The transmission
switches to program mode S+. ESC SPORT
remains switched on.
RACE START is canceled immediately if you
release the accelerator pedal while RACE
START is active or when the activation
conditions are not fulfilled anymore. The
message RACE START Not Possible See
Operator’s Manual appears in the
multifunction display.
i If RACE START is used repeatedly in a
short period of time, it is only available
again after having driven the vehicle a
certain distance.
Hill-start assist system
On uphill grades, the hill-start assist system
maintains the pressure in the brake system
for approximately 1 second after you have
released the brake pedal. Therefore, you can
start off smoothly without the vehicle moving
immediately after releasing the brake pedal.
GWarning!
The hill-start assist system is not designed to
function as a parking brake. It does not
prevent the vehicle from moving when parked
on an incline.
Always engage the electronic parking brake
in addition to shifting the transmission into
park position P.
XDepress the brake pedal.XShift the transmission into drive position
D or reverse gear R.XRelease the brake pedal.XCarefully depress the accelerator pedal.
The hill-start assist system is inactive
R when starting off on a level road or downhill
grades
R with the transmission in neutral position N
R with the electronic parking brake engaged
R if the ESC has switched off due to a
malfunction
Driving systems293Controls in detailBA 197 USA, CA Edition A 2011; 1; 27, en-UShereepeVersion: 3.0.3.52010-03-24T15:31:10+01:00 - Seite 293Z
Page 303 of 436

XIncreasing/decreasing: Turn
temperature controls : and D
(Y page 298) slightly clockwise or
counterclockwise.
Adjusting air vents
GWarning!
When operating the climate control, the air
that enters the passenger compartment
through the air vents can be very hot or very
cold (depending on the set temperature). This
may cause burns or frostbite to unprotected
skin in the immediate area of the air vents.
Always keep sufficient distance between
unprotected parts of the body and the air
vents. If necessary, use the air distribution
adjustment to direct the air to air vents in the
vehicle interior that are not in the immediate
area of unprotected skin.
For best possible performance of the climate
control:
XKeep the air intake grille in front of the
windshield free of snow, leaves, sticks, and
any other debris.
XAlways keep all air vents and grilles in the
passenger compartment free from
obstruction.
iFor draft-free ventilation, move the
adjustable center and side air vents to the
middle position.
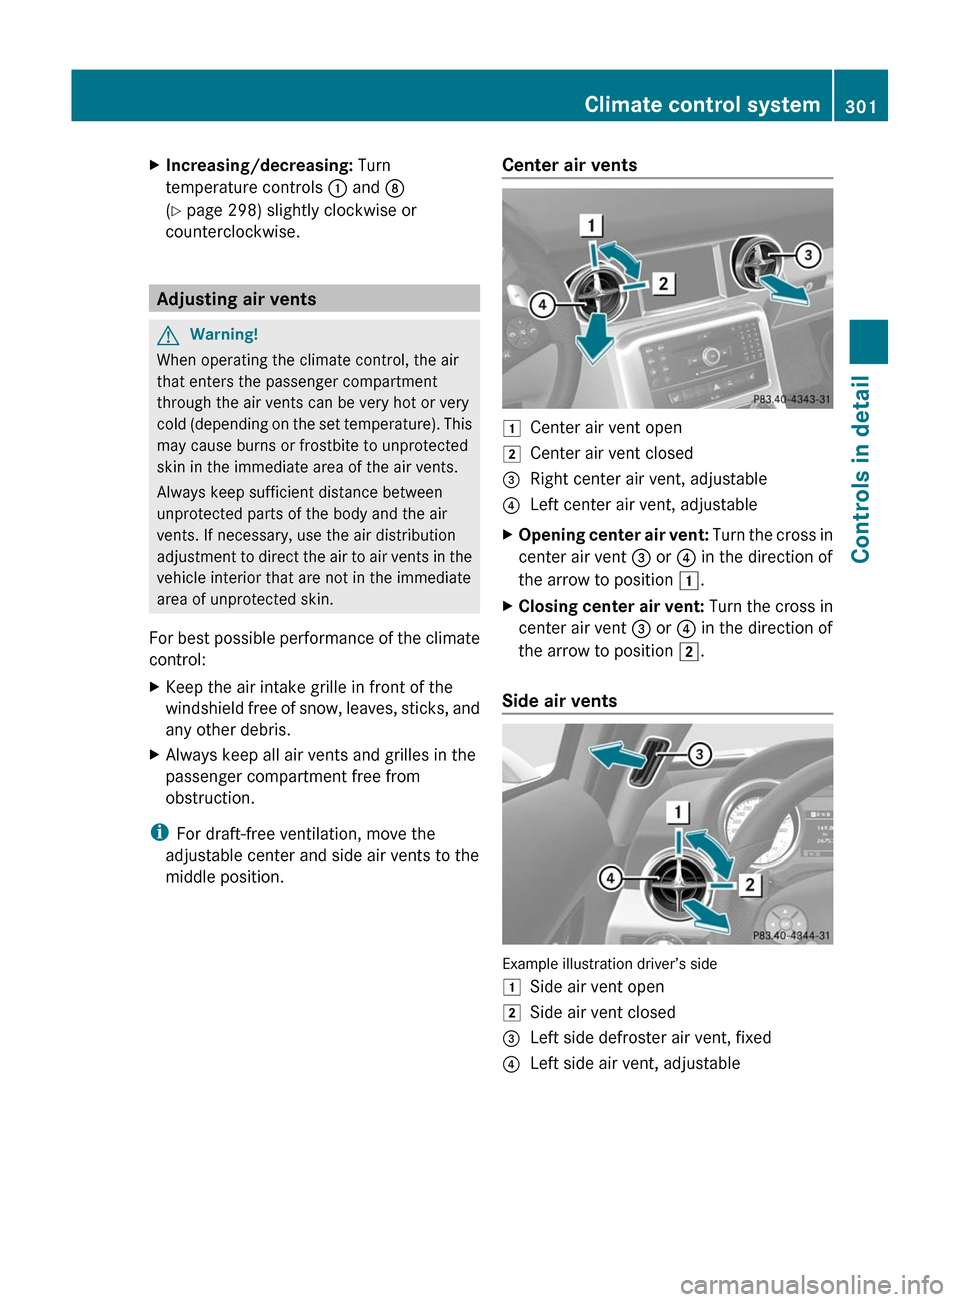
Center air vents1Center air vent open2Center air vent closed=Right center air vent, adjustable?Left center air vent, adjustableXOpening center air vent: Turn the cross in
center air vent = or ? in the direction of
the arrow to position 1.
XClosing center air vent: Turn the cross in
center air vent = or ? in the direction of
the arrow to position 2.
Side air vents
Example illustration driver’s side
1Side air vent open2Side air vent closed=Left side defroster air vent, fixed?Left side air vent, adjustableClimate control system301Controls in detailBA 197 USA, CA Edition A 2011; 1; 27, en-UShereepeVersion: 3.0.3.52010-03-24T15:31:10+01:00 - Seite 301Z