2011 MERCEDES-BENZ SLS manual transmission
[x] Cancel search: manual transmissionPage 7 of 436

Gear selector lever ........................263
Hill-start assist system ..................293
Kickdown ....................................... 266
Kickdown (manual shift program) ..270
Manual shift program ..................... 268
Messages in the multifunction
display ........................................... 388
One-touch gearshifting ..................267
Program mode indicator ................267
Program mode selector dial ... 267, 269
Shifting procedure .........................264
Steering wheel gearshift control ....267
Transmission position indicator .....265
Transmission positions ..................265
Announcement phase (driving
maneuvers) ........................................ 133
Announcements, navigation see Navigation announcements
Announcements, traffic (real-time) . 143
Answering incoming calls .......... 84, 158
Anticorrosion/antifreeze .................. 428
Antilock Brake System see ABS
Anti-theft systems ............................... 66
Anti-theft alarm system ...................66
Canceling the alarm .........................67
Immobilizer ...................................... 66
Aquaplaning
see Hydroplaning
Ashtray ............................................... 307
Aspect ratio (tires) ............................ 345
Audio .................................................. 168
announcements ............................. 137
CD, DVD, and MP3 ........................177
loudness .......................................... 89
phone volume ................................ 151
read-out ........................................... 89
sound settings ................................. 90
steering wheel operation .................83
turning off ........................................ 89
voice control .................................. 206
see Muting audio
see Navigation announcements
see Read-aloud announcements
see Volume Audio Aux (auxiliary)
main system .................................. 197
switching to ................................... 197
voice commands for ......................225
Audio format
audio playback ............................... 189
DVD Video ..................................... 205
Audio menu ............................... 168, 279
Authorizing Bluetooth devices ......... 149
Auto-dimming rear view mirrors ..... 247
Automatic central locking ................ 239
Automatic headlamp mode .............. 250
Automatic interior lighting control .. 253
Automatic picture switch-off ........... 199
Automatic shift program .................. 267
Auxiliary (Aux) operation main audio ..................................... 197
main video ..................................... 205
voice commands for ......................225
voice control with .......................... 230
AUX socket ........................................ 304
Avoid settings for route guidance ... 107
Axle oils .............................................. 425
B
Back button ......................................... 79
Backrest see Seats
Backup lamps
Messages in the multifunction
display ........................................... 384
Backward track skip ......................... 187
Balance (sound), setting ..................... 90
Bang & Olufsen sound system ........... 90
Bar (air pressure unit) ....................... 345
BAS (Brake Assist System) ................. 62
Bass setting main system .................................... 90
Battery, SmartKey
Checking condition ........................237
Replacing ....................................... 399
Battery, Vehicle ................................. 410
Charging ........................................ 412
Jump starting ................................. 413
Messages in the multifunction
display ................................... 368, 383
Bead (tire) .......................................... 345
Index5BA 197 USA, CA Edition A 2011; 1; 27, en-UShereepeVersion: 3.0.3.52010-03-24T15:31:10+01:00 - Seite 5
Page 25 of 436
Maximum permissible tire
inflation pressure ........................... 333
Maximum tire load .........................337
Messages in the multifunction
display ................................... 368, 387
Ply composition and material
used ............................................... 346
Problems under-/overinflation ......328
Retreads ........................................ 326
Rims and tires (technical data) ......422
Rotation ......................................... 340
Service life ..................................... 338
Sizes .............................................. 422
Snow chains .................................. 347
Speed rating .......................... 342, 346
Storing ........................................... 339
Summer tires ................................. 424
Temperature .......................... 328, 340
Terminology ................................... 345
TIREFIT (tire repair kit) ...................402
Tire Identification Number .............346
Tire ply material ............................. 344
TPMS low tire pressure/
malfunction telltale ........................395
Traction ................................. 339, 346
Tread ............................................. 346
Tread depth ........................... 338, 347
Treadwear ...................................... 339
Treadwear indicators .............338, 346
Vehicle maximum load on ..............347
Wear pattern .................................. 340
Winter tires .................... 347, 422, 424
Tire speed rating ....................... 342, 346
Total load limit ................................... 346
Towing Towing eye bolt .............................. 415
Vehicle ........................................... 415
Towing eye bolt ................................. 415
Town, selecting as destination ........ 213
Track names ...................................... 178
Track selection (audio) CD, DVD, or MP3 ........................... 187
iPods and MP3 players ..................196
normal and random options ...........189
steering wheel operation .................83
voice commands for ......................224
Track selection (video) ............. 203, 204
voice commands for ......................224Traction ...................................... 339, 346
Traffic lane recommendations ......... 135
Traffic messages ............................... 139
Traffic symbol information ............... 142
Transmission AMG SPEEDSHIFT DCT 7-SPEED
Transmission ................................. 263
Transmission fluid level .................... 324
Transmission gear selector lever see Gear selector lever
Transmission positions .................... 265
Transmit volume (phone) ................. 151
Traveling abroad ............................... 351
Tread (tires) ....................................... 346
Tread depth (tires) .................... 338, 347
Treadwear .......................................... 339
Treadwear indicators (tires) .... 338, 346
Treble setting main system .................................... 90
Trickle charge socket ....................... 317
Trip menu ........................................... 275
Troubleshooting voice control .................................. 231
True Image™ ........................................ 90
Trunk Closing ........................................... 240
Locking manually ........................... 398
Messages in the multifunction
display ........................................... 379
Opening ......................................... 239
Trunk lid emergency release ..........240
Unlocking manually .......................398
Valet locking .................................. 241
Trunk Wing ........................................... 65
Cleaning ......................................... 360
Turning off the engine ...................... 262
Turn signals ....................................... 251
Cleaning lenses ............................. 357
Indicator lamps ................................ 35
Messages in the multifunction
display ........................................... 387Index23BA 197 USA, CA Edition A 2011; 1; 27, en-UShereepeVersion: 3.0.3.52010-03-24T15:31:10+01:00 - Seite 23
Page 78 of 436
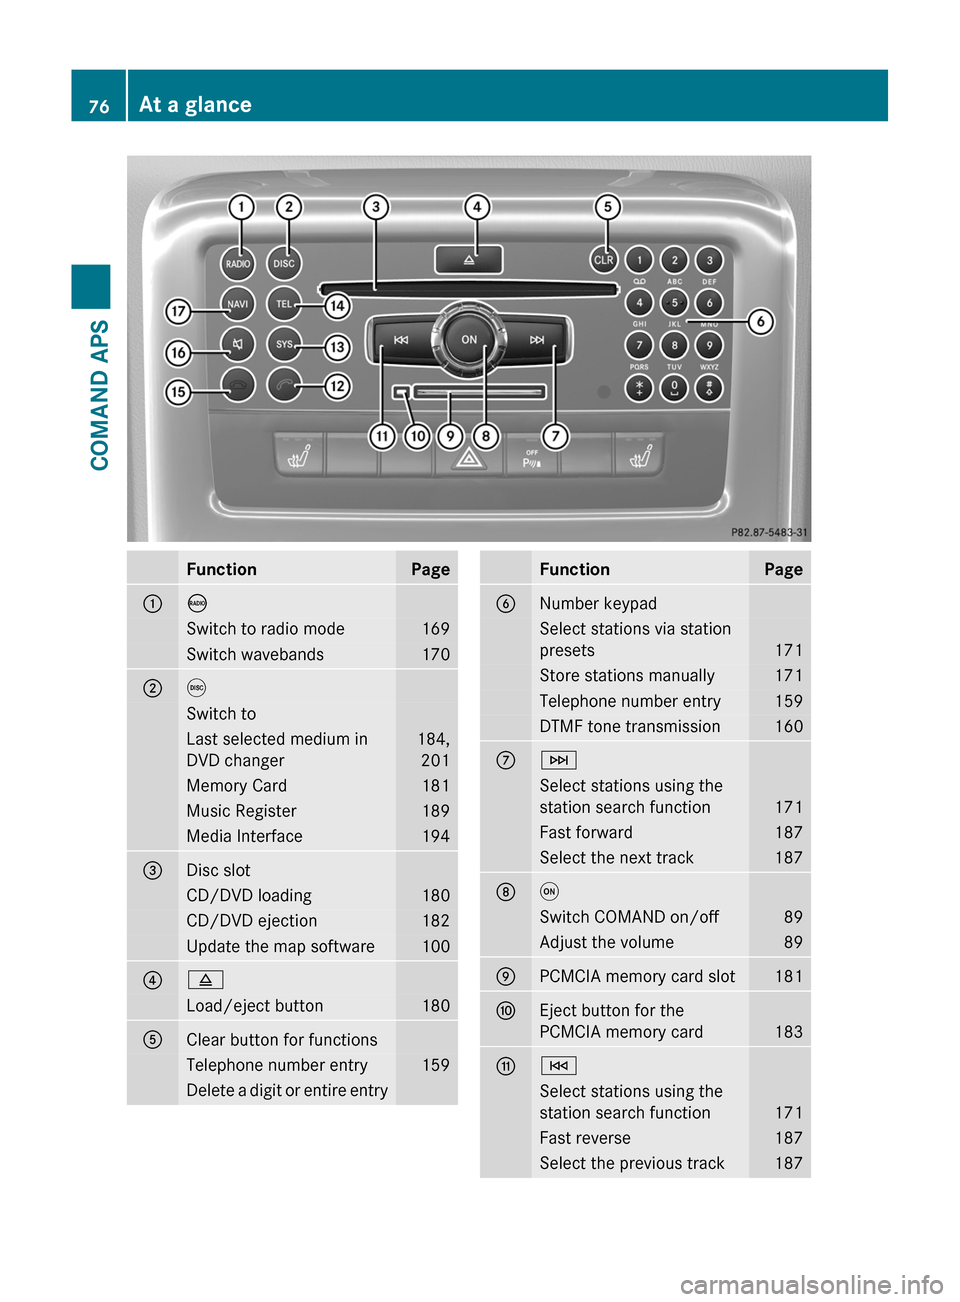
FunctionPage1óSwitch to radio mode169Switch wavebands1702eSwitch toLast selected medium in
DVD changer
184,
201
Memory Card181Music Register189Media Interface1943Disc slotCD/DVD loading180CD/DVD ejection182Update the map software10048Load/eject button1805Clear button for functionsTelephone number entry159Delete a digit or entire entryFunctionPage6Number keypadSelect stations via station
presets171
Store stations manually171Telephone number entry159DTMF tone transmission1607FSelect stations using the
station search function171
Fast forward187Select the next track1878qSwitch COMAND on/off89Adjust the volume899PCMCIA memory card slot181aEject button for the
PCMCIA memory card183
bESelect stations using the
station search function171
Fast reverse187Select the previous track18776At a glanceCOMAND APS
BA 197 USA, CA Edition A 2011; 1; 27, en-UShereepeVersion: 3.0.3.52010-03-24T15:31:10+01:00 - Seite 76
Page 153 of 436
XSelect COMAND (“MB Bluetooth”) on the
mobile phone.
XWhen prompted to do so, enter the
passcode on the mobile phone and on
COMAND.
iAfter you have entered the passkey on
COMAND and on the mobile phone, you
have to trigger a connection to COMAND
manually on some mobile phones.
Displaying Details on a Mobile Phone
XIn the phone submenu select Phone £
Bluetooth Phones.
XSelect the mobile phone from the list.XSelect Options £ Details.
The details screen for the device is
displayed.
XTo close the details screen: Rotate
y m z or slide o m p.
or
XPress the n or the k button.
Deregistering (De-Authorizing) a Mobile
Phone
XIn the phone submenu select Phone £
Bluetooth Phones.
XSelect the authorized mobile phone.XSelect Options £ De-Authorize.
You will be asked whether the device
should really be de-authorized.
XSelect Yes or No.
If you select Yes, the authorization of the
device is withdrawn.
iIf the authorization of a device which had
been authorized in the past has been
withdrawn, the device list no longer
includes this device.
iIf you de-authorize the mobile phone on
COMAND, you should also de-authorize
“MB Bluetooth” on the mobile phone.
Otherwise a future authorization may fail.
Activating Another Mobile Phone
If you have authorized several mobile phones,
you can switch between the individual mobile
phones.
When you authorize a new mobile phone, it is
activated automatically. Only one mobile
phone is active at a time.
XSelect Phone £ Bluetooth Phones.XSelect the mobile phone from the list.XPress n.
The selected mobile phone is activated if
the selected mobile is within reception
range and its Bluetooth® function is
switched on. Any previously activated
phone is deactivated.
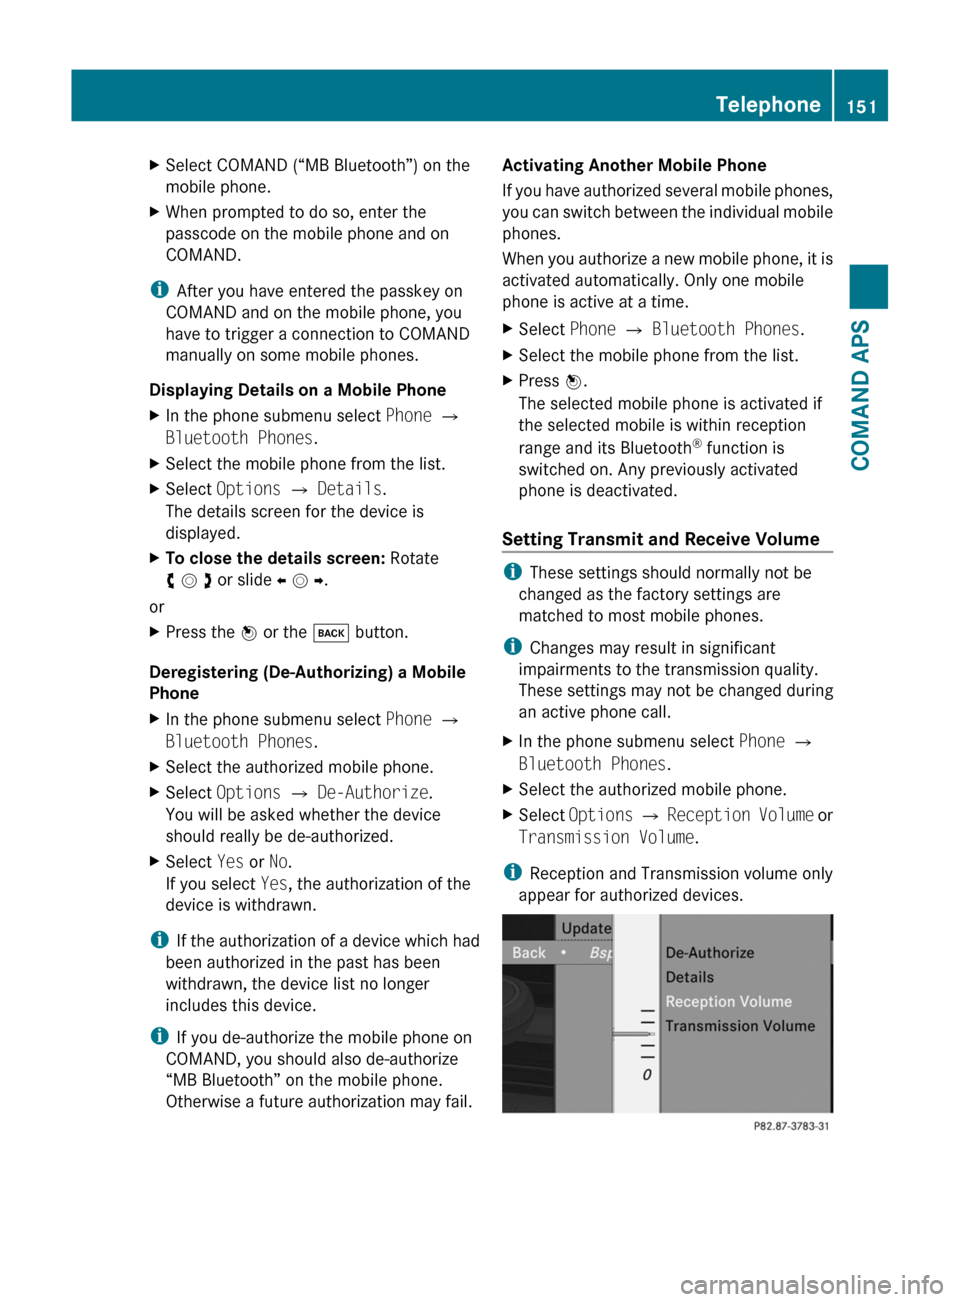
Setting Transmit and Receive Volume
iThese settings should normally not be
changed as the factory settings are
matched to most mobile phones.
iChanges may result in significant
impairments to the transmission quality.
These settings may not be changed during
an active phone call.
XIn the phone submenu select Phone £
Bluetooth Phones.
XSelect the authorized mobile phone.XSelect Options £ Reception Volume or
Transmission Volume.
iReception and Transmission volume only
appear for authorized devices.
Telephone151COMAND APSBA 197 USA, CA Edition A 2011; 1; 27, en-UShereepeVersion: 3.0.3.52010-03-24T15:31:10+01:00 - Seite 151Z
Page 249 of 436
rear view mirror and glance over your
shoulder before changing lanes.
iYou can store the settings for the exterior
rear view mirror position with the memory
function (Y page 249).
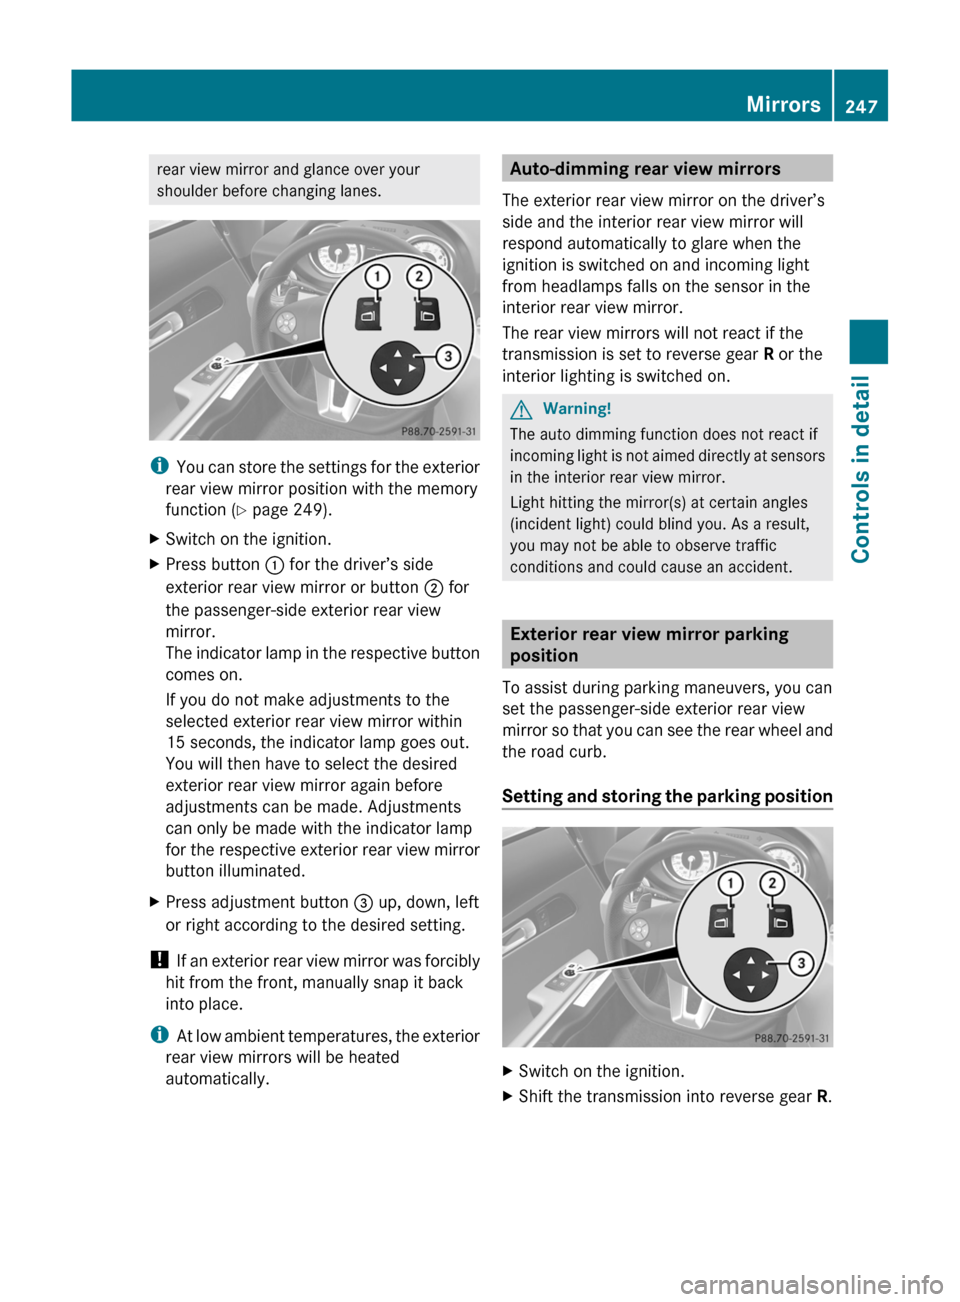
XSwitch on the ignition.XPress button : for the driver’s side
exterior rear view mirror or button ; for
the passenger-side exterior rear view
mirror.
The indicator lamp in the respective button
comes on.
If you do not make adjustments to the
selected exterior rear view mirror within
15 seconds, the indicator lamp goes out.
You will then have to select the desired
exterior rear view mirror again before
adjustments can be made. Adjustments
can only be made with the indicator lamp
for the respective exterior rear view mirror
button illuminated.
XPress adjustment button = up, down, left
or right according to the desired setting.
! If an exterior rear view mirror was forcibly
hit from the front, manually snap it back
into place.
iAt low ambient temperatures, the exterior
rear view mirrors will be heated
automatically.
Auto-dimming rear view mirrors
The exterior rear view mirror on the driver’s
side and the interior rear view mirror will
respond automatically to glare when the
ignition is switched on and incoming light
from headlamps falls on the sensor in the
interior rear view mirror.
The rear view mirrors will not react if the
transmission is set to reverse gear R or the
interior lighting is switched on.
GWarning!
The auto dimming function does not react if
incoming light is not aimed directly at sensors
in the interior rear view mirror.
Light hitting the mirror(s) at certain angles
(incident light) could blind you. As a result,
you may not be able to observe traffic
conditions and could cause an accident.
Exterior rear view mirror parking
position
To assist during parking maneuvers, you can
set the passenger-side exterior rear view
mirror so that you can see the rear wheel and
the road curb.
Setting and storing the parking position
XSwitch on the ignition.XShift the transmission into reverse gear R.Mirrors247Controls in detailBA 197 USA, CA Edition A 2011; 1; 27, en-UShereepeVersion: 3.0.3.52010-03-24T15:31:10+01:00 - Seite 247Z
Page 250 of 436

XPress button ;, to select the passenger-
side exterior rear view mirror.
XAdjust the passenger-side exterior rear
view mirror with adjustment button = so
that you see the rear wheel and the road
curb.
The exterior rear view mirror parking
position is stored.
iIf the exterior rear view mirror does move,
repeat the above steps. After the setting is
stored, you can move the exterior rear view
mirror again.
Calling up the parking position
XSwitch on the ignition.XShift the transmission into reverse gear R.
The passenger-side exterior rear view
mirror moves to the stored parking
position.
The passenger-side exterior rear view mirror
returns to its previously stored driving
position
R10 seconds after you have shift the
transmission out of reverse gear R
Rimmediately once your vehicle exceeds a
speed of approximately 6 mph (10 km/h)
Rimmediately when you press button : to
select the driver’s side exterior rear view
mirror
Power-folding exterior rear view
mirrors
! Before you drive the vehicle through an
automatic car wash, fold in the exterior rear
view mirrors. Otherwise they may get
damaged.
Folding in and out manually
iThe mirrors do not fold out if they have
been folded in manually. Please make sure
both mirrors are folded out before driving
off.
The exterior rear view mirrors can vibrate if
they are not folded out completely.
XSwitch on the ignition.XFolding in: Briefly press button :.
Both exterior rear view mirrors fold in.
iAt speeds above approximately 30 mph
(47 km/h), you will not be able to fold the
exterior mirrors in.
XFolding out: Briefly press button :.
Both exterior rear view mirrors fold out.
Synchronizing
The power-folding rear view mirrors may have
to be synchronized after the vehicle battery
has been disconnected or discharged. If the
exterior rear view mirrors do not fold properly
upon locking or unlocking the vehicle, do the
following:
XMake sure the power-folding function in the
control system is activated (Y page 286).
XSwitch on the ignition.XBriefly press button :.
When the exterior rear view mirrors fold
properly upon locking the vehicle, the exterior
mirrors are synchronized. Otherwise repeat
the above steps.
Folding in and out automatically
The function must be activated in the
Convenience submenu (Y page 287).
The exterior rear view mirrors fold in
automatically as soon as the vehicle is locked
from the outside.
248MirrorsControls in detail
BA 197 USA, CA Edition A 2011; 1; 27, en-UShereepeVersion: 3.0.3.52010-03-24T15:31:10+01:00 - Seite 248
Page 263 of 436

If the extent of the damage cannot be
determined:
XContact an authorized Mercedes-Benz
Center or call Roadside Assistance.
If no damage on major assemblies, fuel
system, and engine mount can be
determined:
XStart the engine in the usual manner.
Parking
GWarning!
Do not park in areas where the hot exhaust
system could come into contact with
combustible materials. Combustible
materials such as grass, hay or leaves could
be ignited and cause a vehicle fire.
Unintended vehicle movement could cause
serious personal injury or damage to the
vehicle or the vehicle drivetrain. To reduce
such risks, always do the following before
turning off the engine and leaving the vehicle:
RKeep right foot on the brake pedal.
REngage the electronic parking brake.
RShift the transmission into park position P.
RSlowly release the brake pedal.
RWhen parked on an incline, always turn the
front wheels towards the road curb.
RPress the KEYLESS-GO start/stop button,
or turn the SmartKey in the starter switch
to position 0 and remove the SmartKey
from the starter switch.
RTake the SmartKey with you and lock the
vehicle when leaving.
Electronic parking brake
GWarning!
When leaving the vehicle, always remove the
SmartKey from the starter switch, take it with
you, and lock the vehicle. Do not leave
children unattended in the vehicle, or with
access to an unlocked vehicle. Children could
release the electronic parking brake and/or
shift the transmission out of park position P,
either of which could result in an accident
and/or serious personal injury.
Engaging electronic parking brake
XPress handle :.
The red indicator lamp F (USA only)
or ! (Canada only) in the instrument
cluster comes on.
iYou can engage the electronic parking
brake even when the SmartKey is removed
from the starter switch.
Releasing electronic parking brake
manually
XSwitch on the ignition.XPull handle :.
The red indicator lamp F (USA only)
or ! (Canada only) in the instrument
cluster goes out.
Releasing electronic parking brake
automatically
The electronic parking brake releases
automatically when all of the following
conditions are fulfilled:
RThe engine is running.
RThe transmission is in drive position D or
reverse gear R. With the transmission in
reverse gear R the trunk lid must be closed.
RThe hood is closed.
RYou have fastened your seat belt.
RYou depress on the accelerator pedal.
Driving and parking261Controls in detailBA 197 USA, CA Edition A 2011; 1; 27, en-UShereepeVersion: 3.0.3.52010-03-24T15:31:10+01:00 - Seite 261Z
Page 266 of 436
Without the brake pedal depressed, the
gear selector lever can be moved up or
down, but the parking pawl remains
engaged, not allowing shifting to occur.
i The gear selector lever always returns to
its original position.
The current transmission position P, R , N ,
or D appears in the multifunction display
( Y page 265).
There are additional indicators on the cover
of the shifting gate showing the current gear
selector lever position.
The indicators come on when you insert the
SmartKey into the starter switch, and go out
when you remove the SmartKey from the
starter switch.
Shifting into park position PXWith the vehicle at a standstill, press
button : on the gearshift pattern
( Y page 263).
KEYLESS-GO: When you turn off the engine
using the KEYLESS-GO start/stop button and
open a door, the transmission will shift into
park position P automatically.
SmartKey: When you turn off the engine using
the SmartKey, and remove the SmartKey
from the starter switch or open a door, the
transmission will shift into park position P
automatically.
i You cancel park position P when you
depress the brake pedal and move the gear
selector lever forward or back past the first
point of resistance. The transmission shifts
into neutral position N.
Shifting into neutral position N
XWith the vehicle at a standstill, depress the
brake pedal.XMove the gear selector lever forward or
back to the first point of resistance.
i The transmission will remain in neutral
position N for approximately 30 minutes
when you have shifted the transmission to
neutral position N before turning off the
engine. The transmission will shift into park
position P automatically when you open a
door or remove the SmartKey from the
starter switch during this period. The
transmission remains in neutral position
N when the SmartKey is in the starter
switch or when you open a door.
Shifting into reverse gear RXWith the vehicle at a standstill, depress the
brake pedal.XMove the gear selector lever forward past
the first point of resistance.
Shifting into drive position D
XWith the vehicle at a standstill, depress the
brake pedal.XMove the gear selector lever back past the
first point of resistance.
Shifting procedure
The transmission selects individual gears
automatically, depending on
R the selected gear range ( Y page 266)
R the selected program mode:
C /S/ S+ /M and RS (Y page 267)
R the position of the accelerator pedal
R the vehicle speed
With drive position D selected, you can
influence transmission shifting by
R limiting the gear range
R extending the gear range
R changing the gears manually
Double-clutching is active when downshifting
in all program modes. Double-clutching
reduces load-alteration effects and supports
sporty driving. The degree to which you
perceive double-clutching acoustically varies
depending on the selected program mode.
264AMG SPEEDSHIFT DCT 7-SPEED TransmissionControls in detail
BA 197 USA, CA Edition A 2011; 1; 27, en-UShereepeVersion: 3.0.3.52010-03-24T15:31:10+01:00 - Seite 264