2011 MERCEDES-BENZ SLS warning light
[x] Cancel search: warning lightPage 362 of 436

Leather upholstery
Please note that leather upholstery is a
natural product and is therefore subject to a
natural aging process. Leather upholstery
may also react to certain ambient influences
such as high humidity or high temperature by
showing wrinkles for example.
XWipe leather upholstery with a damp cloth
and dry thoroughly or clean with Mercedes-
Benz approved Leather Care.
! To avoid damage to leather upholstery:
RWipe with light pressure only.
RDo not clean with abrasive cleaning
agents such as scouring milk or powder.
RDo not soak the leather upholstery.
As leather is a natural product, it could
otherwise harden or become porous.
RExercise particular care when cleaning
perforated leather as its underside
should not become wet.
Chrome-plated exhaust tip
Regular cleaning and care of chrome-plated
exhaust tips will help to maintain their shine
and the classy appearance.
XUse Mercedes-Benz approved Chrome
Polishing Paste each time the vehicle has
been washed, especially during the winter.
! Do not use alkaline cleaners such as
wheel cleaners as they could cause
corrosion.
Trunk Wing
You can extend and retract the Trunk Wing
manually for cleaning.
GWarning!
Make sure that nobody can become trapped
when you retract the Trunk Wing manually. If
there is a risk of entrapment, release the
Trunk Wing switch to stop the retraction
process. The Trunk Wing will then extend
again.
Never leave children unattended in the
vehicle. They could inadvertently retract the
extended Trunk Wing. Somebody could
become trapped and be seriously injured.
! Do not enter an automatic car wash with
the Trunk Wing extended. Otherwise, the
Trunk Wing could be damaged.
Only extend the Trunk Wing in order to
clean it by hand. Retract it again after
cleaning.
XClose the trunk lid (Y page 240).XSwitch on the ignition.XTo extend: Press Trunk Wing switch :.
The Trunk Wing extends.
Trunk Wing switch : flashes for as long as
the Trunk Wing extends. It remains
illuminated in red when the Trunk Wing is
fully extended.
XTo retract: Press and hold Trunk Wing
switch : until the Trunk Wing has
retracted completely.
Trunk Wing switch : flashes for as long as
the Trunk Wing retracts. It goes out when
the Trunk Wing is fully retracted.
The message Rear Spoiler retracts
manually appears in the multifunction
display.
iWhen you release Trunk Wing switch :
during the retraction process, the Trunk
Wing extends again automatically.
360Vehicle careOperation
BA 197 USA, CA Edition A 2011; 1; 27, en-UShereepeVersion: 3.0.3.52010-03-24T15:31:10+01:00 - Seite 360
Page 402 of 436
Replacing bulbs
Safety notes
Safe vehicle operation depends on proper
exterior lighting and signaling to a large
degree.
Correct headlamp adjustment is extremely
important. Have headlamps checked and
readjusted at regular intervals and when a
bulb has been replaced. Contact an
authorized Mercedes-Benz Center for
headlamp adjustment.
GWarning!
Bulbs and bulb sockets can be very hot. Allow
the lamp to cool down before changing a bulb.
Keep bulbs out of reach of children.
Halogen lamps contain pressurized gas. A
bulb can explode if you
R touch or move it when hot
R drop the bulb
R scratch the bulb
Wear eye and hand protection.
Because of high voltage in Xenon lamps, it is
dangerous to replace the bulb or repair the
lamp and its components. We recommend
that you have such work done by a qualified
technician.
i Since replacing bulbs is a technically
highly demanding process, we recommend
to have them replaced at an authorized
Mercedes-Benz Center.
i If the headlamps are fogged up on the
inside as a result of high humidity, driving
the vehicle a distance with the lights on
should clear up the fogging.
Replacing bulbs for front lamps
You cannot replace the bulbs in the front
lamps yourself. Contact an authorized
Mercedes-Benz Center or a qualified
workshop.
Replacing bulbs for rear lamps
Except for the license plate lamp bulbs, you
cannot replace the bulbs in the rear lamps
yourself.
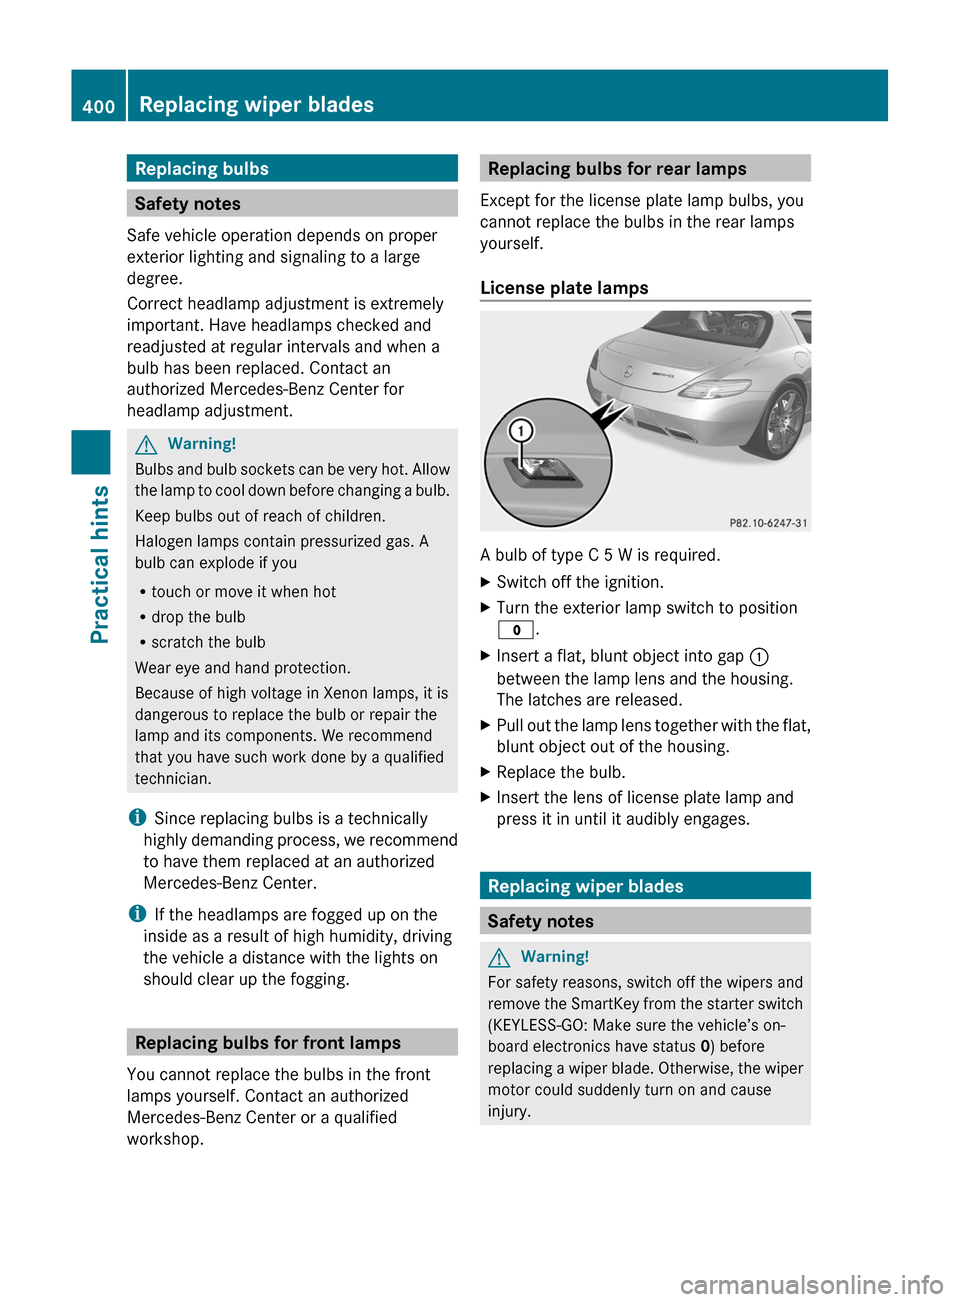
License plate lamps
A bulb of type C 5 W is required.
XSwitch off the ignition.XTurn the exterior lamp switch to position
$ .XInsert a flat, blunt object into gap :
between the lamp lens and the housing.
The latches are released.XPull out the lamp lens together with the flat,
blunt object out of the housing.XReplace the bulb.XInsert the lens of license plate lamp and
press it in until it audibly engages.
Replacing wiper blades
Safety notes
GWarning!
For safety reasons, switch off the wipers and
remove the SmartKey from the starter switch
(KEYLESS-GO: Make sure the vehicle’s on-
board electronics have status 0) before
replacing a wiper blade. Otherwise, the wiper
motor could suddenly turn on and cause
injury.
400Replacing wiper bladesPractical hints
BA 197 USA, CA Edition A 2011; 1; 27, en-UShereepeVersion: 3.0.3.52010-03-24T15:31:10+01:00 - Seite 400
Page 405 of 436
GWarning!
Keep TIREFIT out of reach of children. If
swallowed, rinse mouth immediately with
plenty of water and drink plenty of water.
Do not induce vomiting!
Consult a physician immediately.
iIf sealant has leaked out, let it dry. You
can then peel it off.
If clothing has come in contact with
TIREFIT, have it dry-cleaned with
perchloroethylene as soon as possible.
GWarning!
Observe safety instructions on air pump label.
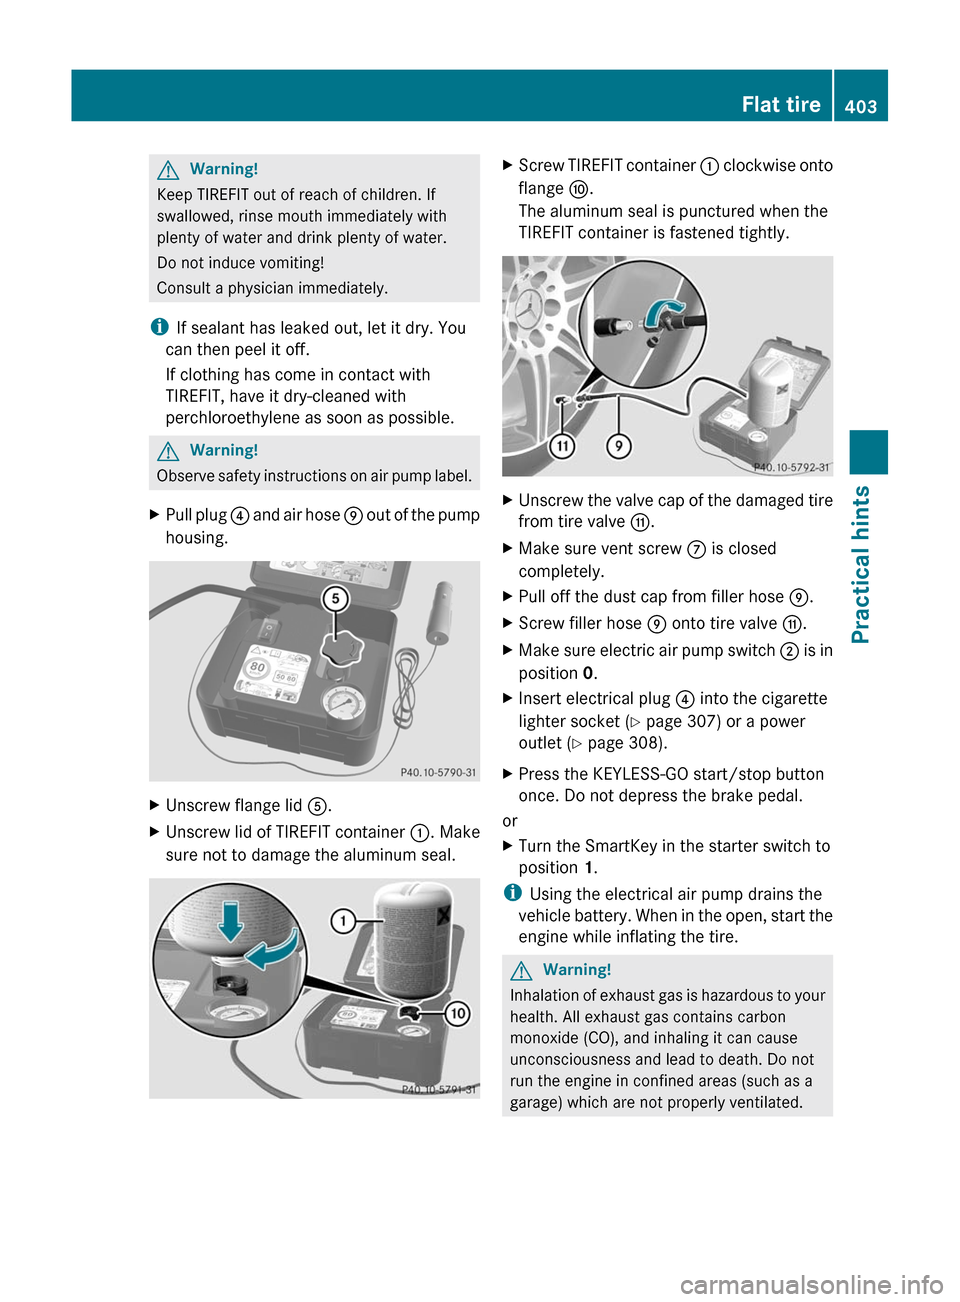
XPull plug ? and air hose E out of the pump
housing.
XUnscrew flange lid A.XUnscrew lid of TIREFIT container :. Make
sure not to damage the aluminum seal.
XScrew TIREFIT container : clockwise onto
flange F.
The aluminum seal is punctured when the
TIREFIT container is fastened tightly.
XUnscrew the valve cap of the damaged tire
from tire valve G.
XMake sure vent screw C is closed
completely.
XPull off the dust cap from filler hose E.XScrew filler hose E onto tire valve G.XMake sure electric air pump switch ; is in
position 0.
XInsert electrical plug ? into the cigarette
lighter socket (Y page 307) or a power
outlet (Y page 308).
XPress the KEYLESS-GO start/stop button
once. Do not depress the brake pedal.
or
XTurn the SmartKey in the starter switch to
position 1.
iUsing the electrical air pump drains the
vehicle battery. When in the open, start the
engine while inflating the tire.
GWarning!
Inhalation of exhaust gas is hazardous to your
health. All exhaust gas contains carbon
monoxide (CO), and inhaling it can cause
unconsciousness and lead to death. Do not
run the engine in confined areas (such as a
garage) which are not properly ventilated.
Flat tire403Practical hintsBA 197 USA, CA Edition A 2011; 1; 27, en-UShereepeVersion: 3.0.3.52010-03-24T15:31:10+01:00 - Seite 403Z
Page 406 of 436
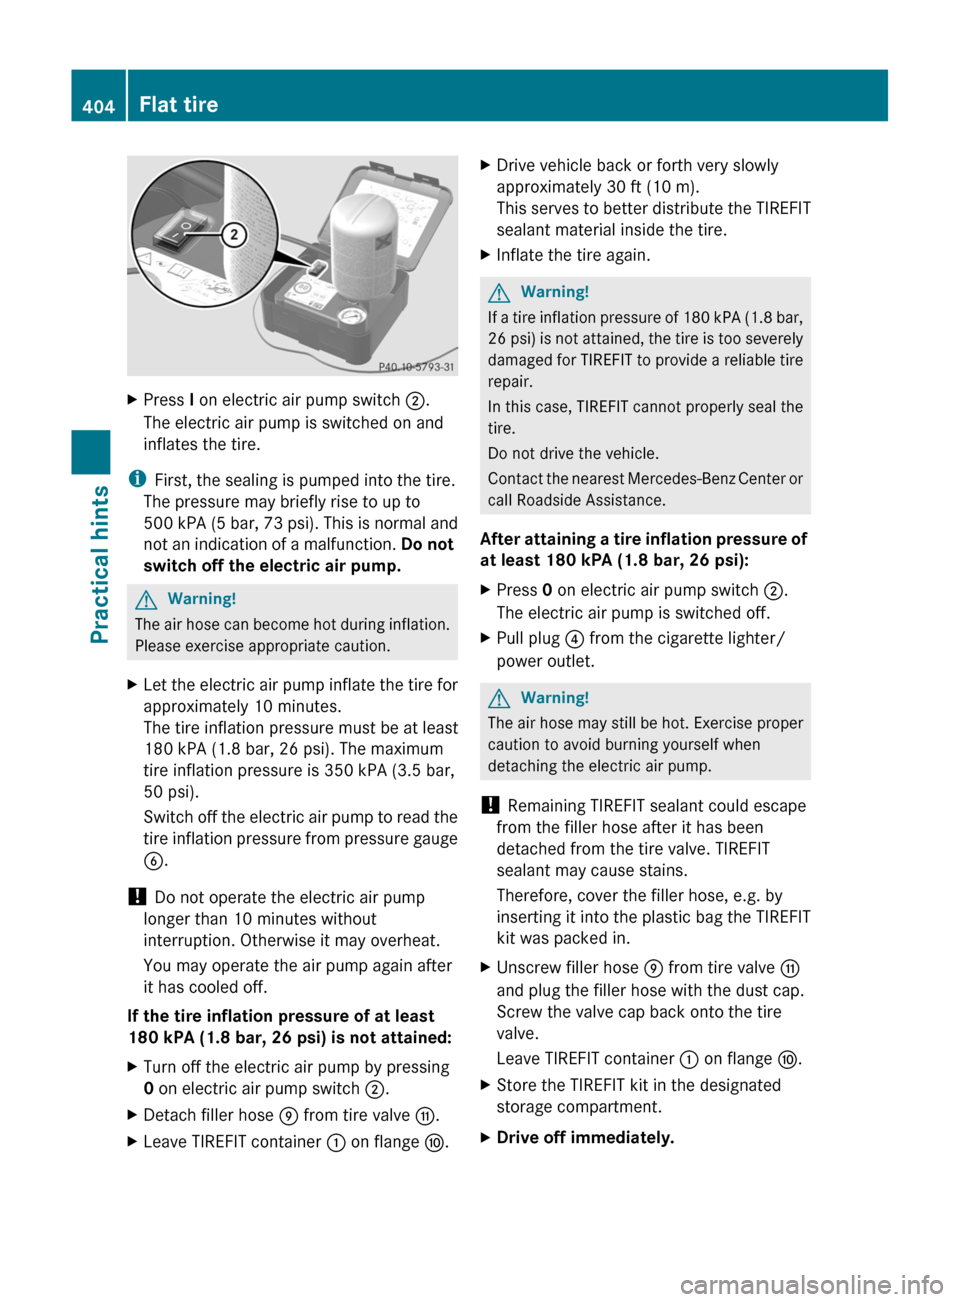
XPress I on electric air pump switch ;.
The electric air pump is switched on and
inflates the tire.
iFirst, the sealing is pumped into the tire.
The pressure may briefly rise to up to
500 kPA (5 bar, 73 psi). This is normal and
not an indication of a malfunction. Do not
switch off the electric air pump.
GWarning!
The air hose can become hot during inflation.
Please exercise appropriate caution.
XLet the electric air pump inflate the tire for
approximately 10 minutes.
The tire inflation pressure must be at least
180 kPA (1.8 bar, 26 psi). The maximum
tire inflation pressure is 350 kPA (3.5 bar,
50 psi).
Switch off the electric air pump to read the
tire inflation pressure from pressure gauge
B.
! Do not operate the electric air pump
longer than 10 minutes without
interruption. Otherwise it may overheat.
You may operate the air pump again after
it has cooled off.
If the tire inflation pressure of at least
180 kPA (1.8 bar, 26 psi) is not attained:
XTurn off the electric air pump by pressing
0 on electric air pump switch ;.
XDetach filler hose E from tire valve G.XLeave TIREFIT container : on flange F.XDrive vehicle back or forth very slowly
approximately 30 ft (10 m).
This serves to better distribute the TIREFIT
sealant material inside the tire.
XInflate the tire again.GWarning!
If a tire inflation pressure of 180 kPA (1.8 bar,
26 psi) is not attained, the tire is too severely
damaged for TIREFIT to provide a reliable tire
repair.
In this case, TIREFIT cannot properly seal the
tire.
Do not drive the vehicle.
Contact the nearest Mercedes-Benz Center or
call Roadside Assistance.
After attaining a tire inflation pressure of
at least 180 kPA (1.8 bar, 26 psi):
XPress 0 on electric air pump switch ;.
The electric air pump is switched off.
XPull plug ? from the cigarette lighter/
power outlet.
GWarning!
The air hose may still be hot. Exercise proper
caution to avoid burning yourself when
detaching the electric air pump.
! Remaining TIREFIT sealant could escape
from the filler hose after it has been
detached from the tire valve. TIREFIT
sealant may cause stains.
Therefore, cover the filler hose, e.g. by
inserting it into the plastic bag the TIREFIT
kit was packed in.
XUnscrew filler hose E from tire valve G
and plug the filler hose with the dust cap.
Screw the valve cap back onto the tire
valve.
Leave TIREFIT container : on flange F.
XStore the TIREFIT kit in the designated
storage compartment.
XDrive off immediately.404Flat tirePractical hints
BA 197 USA, CA Edition A 2011; 1; 27, en-UShereepeVersion: 3.0.3.52010-03-24T15:31:10+01:00 - Seite 404
Page 408 of 436

Rcollapsible wheel chock
Rjack
Rwheel wrench
Ralignment bolt
For information on where to find the
respective items, see “Where will I find ...?”
(Y page 362).
XPrevent the vehicle from rolling away by
blocking wheels with wheel chocks or other
sizeable objects.
One wheel chock is included with the
vehicle tool kit (Y page 362). For
information on setting up a collapsible
wheel chock, see (Y page 363).
GWarning!
Only jack up the vehicle on level ground or on
slight inclines/declines. Otherwise, the
vehicle could fall off the jack and injure you or
others.
Changing a wheel on a level surface
Changing rear wheel on passenger side (exampleillustration)
XPlace a wheel chock or other sizeable
object in front of and another wheel chock
or other sizeable object behind the wheel
that is diagonally opposite to the wheel
being changed.
Changing a wheel on a slight decline
Always try lifting the vehicle using the jack on
a level surface. However, should
circumstances require you to do so on a slight
decline:
Changing wheel on passenger side (exampleillustration)
XPlace wheel chocks or other sizeable
objects on the downhill side in front of both
wheels on the side opposite to the side on
which the wheel is to be changed.
Changing a wheel on a slight incline
Always try lifting the vehicle using the jack on
a level surface. However, should
circumstances require you to do so on a slight
incline:
Changing wheel on passenger side (exampleillustration)
XPlace wheel chocks or other sizeable
objects on the downhill side in front of both
wheels on the side opposite to the side on
which the wheel is to be changed.
406Wheel changePractical hints
BA 197 USA, CA Edition A 2011; 1; 27, en-UShereepeVersion: 3.0.3.52010-03-24T15:31:10+01:00 - Seite 406
Page 411 of 436
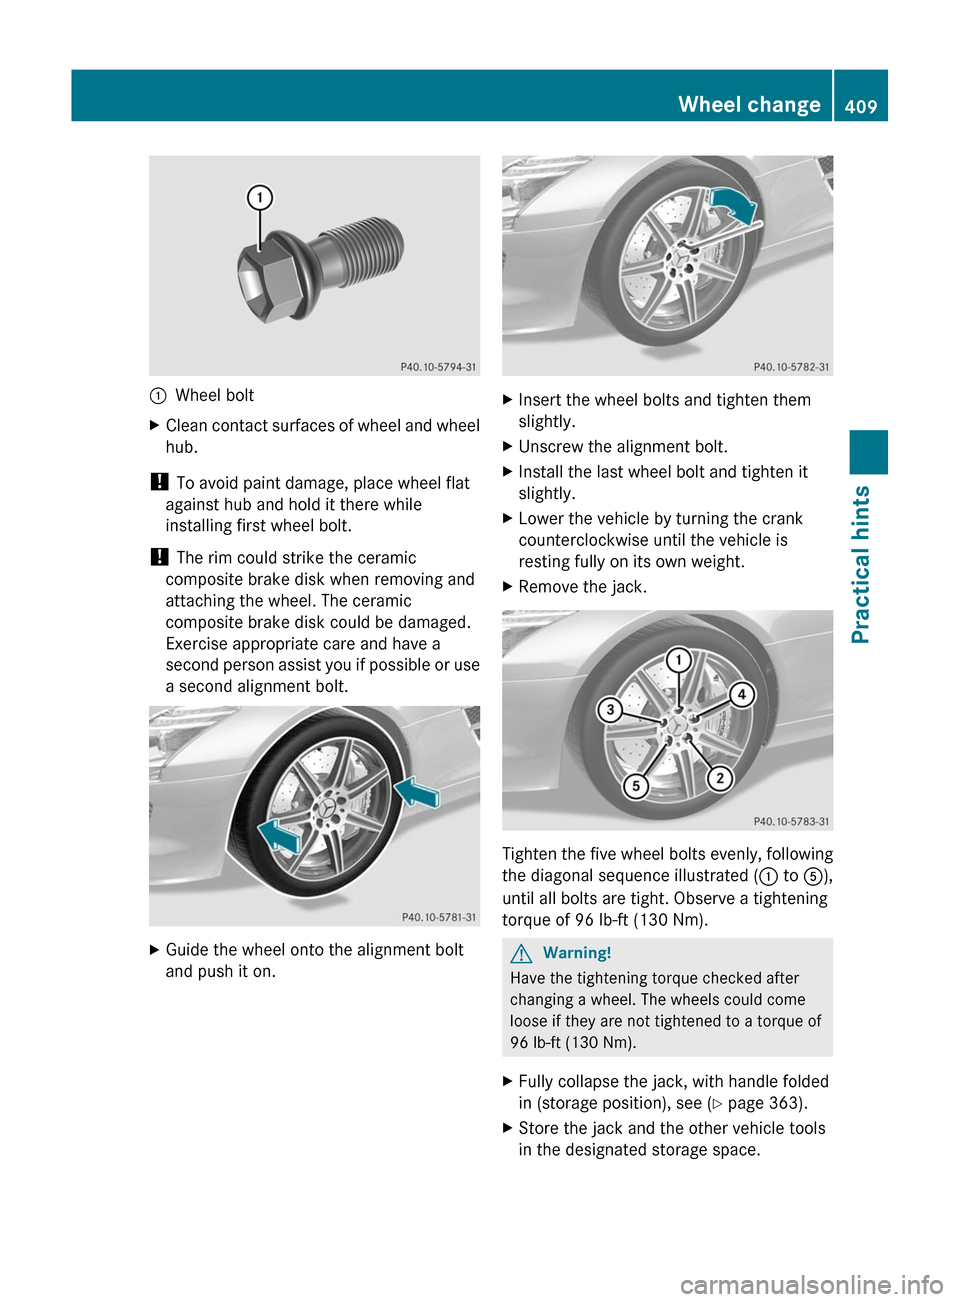
:Wheel boltXClean contact surfaces of wheel and wheel
hub.
! To avoid paint damage, place wheel flat
against hub and hold it there while
installing first wheel bolt.
! The rim could strike the ceramic
composite brake disk when removing and
attaching the wheel. The ceramic
composite brake disk could be damaged.
Exercise appropriate care and have a
second person assist you if possible or use
a second alignment bolt.
XGuide the wheel onto the alignment bolt
and push it on.
XInsert the wheel bolts and tighten them
slightly.
XUnscrew the alignment bolt.XInstall the last wheel bolt and tighten it
slightly.
XLower the vehicle by turning the crank
counterclockwise until the vehicle is
resting fully on its own weight.
XRemove the jack.
Tighten the five wheel bolts evenly, following
the diagonal sequence illustrated (: to A),
until all bolts are tight. Observe a tightening
torque of 96 lb-ft (130 Nm).
GWarning!
Have the tightening torque checked after
changing a wheel. The wheels could come
loose if they are not tightened to a torque of
96 lb-ft (130 Nm).
XFully collapse the jack, with handle folded
in (storage position), see (Y page 363).
XStore the jack and the other vehicle tools
in the designated storage space.
Wheel change409Practical hintsBA 197 USA, CA Edition A 2011; 1; 27, en-UShereepeVersion: 3.0.3.52010-03-24T15:31:10+01:00 - Seite 409Z
Page 429 of 436
Only brake fluid approved by Mercedes-Benz
is recommended. Any authorized Mercedes-
Benz Center will provide you with additional
information.
Premium unleaded gasoline
GWarning!
Gasoline is highly flammable and poisonous.
It burns violently and can cause serious
personal injury.
Never allow sparks, flames or smoking
materials near gasoline!
Turn off the engine before refueling.
Whenever you are around gasoline, avoid
inhaling fumes and any skin or clothing
contact. Extinguish all smoking materials.
Direct skin contact with fuels and the
inhalation of fuel vapors are damaging your
health.
! To maintain the engine’s durability and
performance, premium unleaded gasoline
must be used.
If premium unleaded gasoline is not
available and low octane gasoline is used,
follow these precautions:
R Have the fuel tank only partially filled
with unleaded regular gasoline and fill up
with premium unleaded gasoline as soon
as possible.
R Avoid full throttle driving and abrupt
acceleration.
R Do not exceed an engine speed of
3 000 rpm if the vehicle is loaded with a
light load such as two persons and no
luggage.
R Do not exceed 2
/ 3 of maximum
accelerator pedal position if the vehicle
is fully loaded or operating in
mountainous terrain.
Fuel requirements
Only use premium unleaded gasoline. The
octane number (posted at the pump) must be
91 min. It is an average of both the Research
Octane Number (RON) and the Motor Octane
Number (MON): (RON+MON)/2. This is also
known as the ANTI-KNOCK INDEX.
Reformulated gasolines (RFG) and/or
unleaded gasoline containing oxygenates
such as ethanol, TAME, ETBE, IPA, IBA, and
TBA can be used provided the ratio of any one
of these oxygenates to gasoline does not
exceed 10%; MTBE must not exceed 15%.
The ratio of methanol to gasoline must not
exceed 3% plus additional cosolvents.
Using mixtures of ethanol and methanol is not
allowed. Gasohol, which contains 10%
ethanol and 90% unleaded gasoline, can be
used.
These blends must also meet all other fuel
requirements, such as resistance to spark
knock, boiling range, vapor pressure, etc.
Gasoline additives
A major concern among engine
manufacturers is carbon build-up caused by
gasoline. Mercedes-Benz recommends only
the use of quality gasoline containing
additives that prevent the build-up of carbon
deposits.
After an extended period of using fuels
without such additives carbon deposits can
build up, especially on the intake valves and
in the combustion area, leading to engine
performance problems such as:
R Warm-up hesitation
R Unstable idle
R Knocking/pinging
R Misfire
R Power loss
In areas where carbon deposits may be
encountered due to lack of availability of
gasoline which contains these additives, the
Fuels, coolants, lubricants, etc.427Technical dataBA 197 USA, CA Edition A 2011; 1; 27, en-UShereepeVersion: 3.0.3.52010-03-24T15:31:10+01:00 - Seite 427Z