2011 MERCEDES-BENZ SLS warning light
[x] Cancel search: warning lightPage 255 of 436
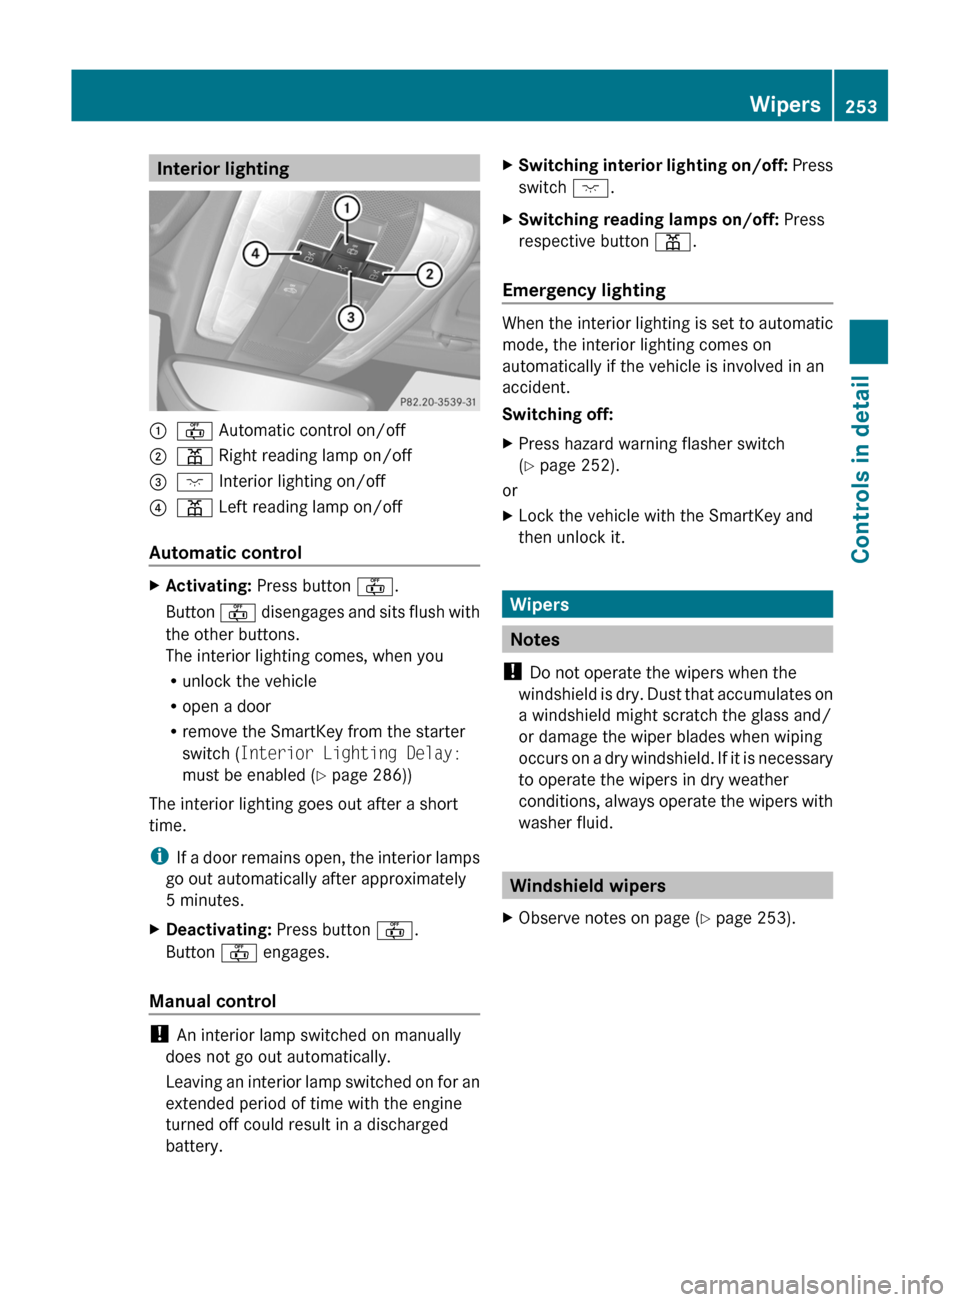
Interior lighting:~ Automatic control on/off;p Right reading lamp on/off=c Interior lighting on/off?p Left reading lamp on/off
Automatic control
XActivating: Press button ~.
Button ~ disengages and sits flush with
the other buttons.
The interior lighting comes, when you
Runlock the vehicle
Ropen a door
Rremove the SmartKey from the starter
switch (Interior Lighting Delay:
must be enabled (Y page 286))
The interior lighting goes out after a short
time.
iIf a door remains open, the interior lamps
go out automatically after approximately
5 minutes.
XDeactivating: Press button ~.
Button ~ engages.
Manual control
! An interior lamp switched on manually
does not go out automatically.
Leaving an interior lamp switched on for an
extended period of time with the engine
turned off could result in a discharged
battery.
XSwitching interior lighting on/off: Press
switch c.
XSwitching reading lamps on/off: Press
respective button p.
Emergency lighting
When the interior lighting is set to automatic
mode, the interior lighting comes on
automatically if the vehicle is involved in an
accident.
Switching off:
XPress hazard warning flasher switch
(Y page 252).
or
XLock the vehicle with the SmartKey and
then unlock it.
Wipers
Notes
! Do not operate the wipers when the
windshield is dry. Dust that accumulates on
a windshield might scratch the glass and/
or damage the wiper blades when wiping
occurs on a dry windshield. If it is necessary
to operate the wipers in dry weather
conditions, always operate the wipers with
washer fluid.
Windshield wipers
XObserve notes on page (Y page 253).Wipers253Controls in detailBA 197 USA, CA Edition A 2011; 1; 27, en-UShereepeVersion: 3.0.3.52010-03-24T15:31:10+01:00 - Seite 253Z
Page 257 of 436
For information on filling up the washer
reservoir, see “Washer system and headlamp
cleaning system” ( Y page 325).
For information on cleaning the headlamps
with washer fluid, see “Headlamp cleaning
system” ( Y page 252).
Problems with wipers
! If anything blocks the windshield wipers
(leaves, snow, etc.), switch them off
immediately.
For safety reasons, do the following before
attempting to remove any blockage:
R Stop the vehicle in a safe location.
R Turn off the engine by pressing the
KEYLESS-GO start/stop button and
open the driver’s door (with the driver’s
door open, starter switch is in position
0 , same as with SmartKey removed from
starter switch).
or
R Remove the SmartKey from the starter
switch.
R Engage the electronic parking brake.
R Remove blockage.
R Turn the windshield wipers on again.
If the windshield wipers fail to function at
all with the combination switch in position
Ä or Å ,
R set the combination switch to the next
higher wiper speed
R have the windshield wipers checked at
the nearest authorized Mercedes-Benz
Center
Power windows
Opening and closing
The door windows are opened and closed
electrically. The switches for all windows are
located on the driver’s door. The switch for
operating the passenger-side windows is
located on the passenger door.GObserve Safety notes, see page 57.GWarning!
When opening or closing the door windows,
make sure there is no danger of anyone being
harmed by the opening/closing procedure.
The door windows are equipped with the
express operation and automatic reversal
function. If in express operation mode a door
window encounters an obstruction that
blocks its path, the automatic reversal
function will stop the door window and open
it slightly.
The door windows operate differently when
the switch is pulled and held. See the “Closing
when a door window is blocked” section in
this chapter for details.
The closing of the door windows can be
immediately halted by releasing the switch or,
if the switch was pulled past the resistance
point and released, by either pressing or
pulling the respective switch.
If a door window encounters an obstruction
that blocks its path in a circumstance where
you are closing the door windows by pressing
and holding button & on the SmartKey the
automatic reversal function will not operate.
i You can also open or close the door
windows using the SmartKey, see
“Summer opening feature” ( Y page 256)
and “Convenience closing feature”
( Y page 257).
i After switching off the ignition or
removing the SmartKey from the starter
switch, you can operate the door windows
until you open a door. If no door was
opened you can operate the door windows
for up to 5 minutes.
Power windows255Controls in detailBA 197 USA, CA Edition A 2011; 1; 27, en-UShereepeVersion: 3.0.3.52010-03-24T15:31:10+01:00 - Seite 255Z
Page 258 of 436
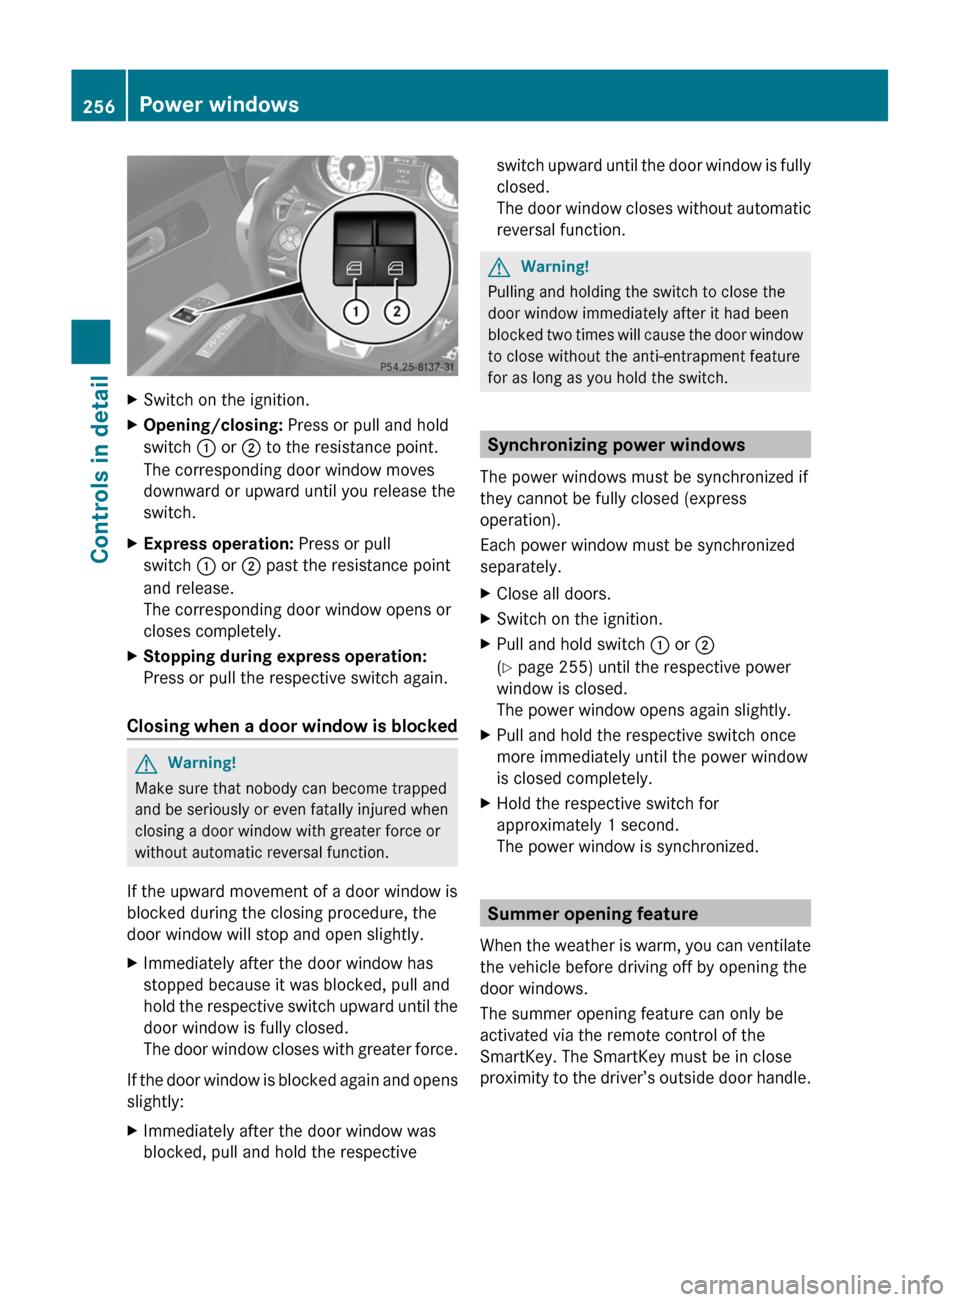
XSwitch on the ignition.XOpening/closing: Press or pull and hold
switch : or ; to the resistance point.
The corresponding door window moves
downward or upward until you release the
switch.
XExpress operation: Press or pull
switch : or ; past the resistance point
and release.
The corresponding door window opens or
closes completely.
XStopping during express operation:
Press or pull the respective switch again.
Closing when a door window is blocked
GWarning!
Make sure that nobody can become trapped
and be seriously or even fatally injured when
closing a door window with greater force or
without automatic reversal function.
If the upward movement of a door window is
blocked during the closing procedure, the
door window will stop and open slightly.
XImmediately after the door window has
stopped because it was blocked, pull and
hold the respective switch upward until the
door window is fully closed.
The door window closes with greater force.
If the door window is blocked again and opens
slightly:
XImmediately after the door window was
blocked, pull and hold the respective
switch upward until the door window is fully
closed.
The door window closes without automatic
reversal function.
GWarning!
Pulling and holding the switch to close the
door window immediately after it had been
blocked two times will cause the door window
to close without the anti-entrapment feature
for as long as you hold the switch.
Synchronizing power windows
The power windows must be synchronized if
they cannot be fully closed (express
operation).
Each power window must be synchronized
separately.
XClose all doors.XSwitch on the ignition.XPull and hold switch : or ;
(Y page 255) until the respective power
window is closed.
The power window opens again slightly.
XPull and hold the respective switch once
more immediately until the power window
is closed completely.
XHold the respective switch for
approximately 1 second.
The power window is synchronized.
Summer opening feature
When the weather is warm, you can ventilate
the vehicle before driving off by opening the
door windows.
The summer opening feature can only be
activated via the remote control of the
SmartKey. The SmartKey must be in close
proximity to the driver’s outside door handle.
256Power windowsControls in detail
BA 197 USA, CA Edition A 2011; 1; 27, en-UShereepeVersion: 3.0.3.52010-03-24T15:31:10+01:00 - Seite 256
Page 284 of 436

RVehicle status message memory
( Y page 282)
R Checking tire inflation pressure
electronically with the Advanced TPMS
( Y page 329)
R Calling up the maintenance service
indicator display ( Y page 353)
Vehicle status message memory
Use the vehicle status message memory
function to scan malfunction and warning
messages that may be stored in the system.
Such messages appear in the multifunction
display and are based on conditions or
system status the vehicle’s system has
recorded.
GWarning!
Malfunction and warning messages are only
indicated for certain systems and are
intentionally not very detailed. The
malfunction and warning messages are
simply a reminder with respect to the
operation of certain systems. They do not
replace the owner’s and/or driver’s
responsibility to maintain the vehicle’s
operating safety. Have all required
maintenance and safety checks performed on
the vehicle. Bring the vehicle to an authorized
Mercedes-Benz Center to address the
malfunction and warning messages.
XPress button = or ; to select the
Service menu.
If conditions have occurred causing status
messages to be recorded, the number of
messages appears in the multifunction
display:XPress button : or 9 to select the
Messages function.XPress button a to confirm.
The stored messages will now be displayed
in the order in which they have occurred.
For malfunction and warning messages,
see “Vehicle status messages in the
multifunction display” ( Y page 364).XUse button : or 9 to scroll through
the messages.
If you turn off the engine by pressing the
KEYLESS-GO start/stop button and then
open the driver’s door, all messages will be
deleted from the message memory.
Settings menu
Introduction
In the Settings menu there are two
functions: The function Factory Setting
( Y page 282), with which you can reset the
settings to the original factory settings and a
collection of submenus ( Y page 283) with
which you can make individual settings for
your vehicle.
Resetting to factory settings
You can reset most of the settings of the
submenus to the factory settings.
For safety reasons, the function Daytime
Running Lights in the Lights submenu
cannot be reset while driving.
XPress button = or ; to select the
Settings menu.XPress button : or 9 to select the
Factory Setting function.XPress button a.
The function Reset All Settings?
appears in the multifunction display.282Control systemControls in detail
BA 197 USA, CA Edition A 2011; 1; 27, en-UShereepeVersion: 3.0.3.52010-03-24T15:31:10+01:00 - Seite 282
Page 288 of 436
XPress button a to change the current
status.
Depending on the previous status, the
Locator Lighting: function will be
Enabled or Disabled .
You can temporarily deactivate the
headlamps delayed shut-off feature:
XBefore exiting the vehicle, set the starter
switch to position 0 using the KEYLESS-GO
start/stop button.XSet the starter switch to position 2 and
back to position 0 using the KEYLESS-GO
start/stop button.
The headlamps delayed shut-off feature is
deactivated. It will reactivate as soon as
you start the engine.
Switching interior lighting delayed shut-
off on or off
Use this function to set whether you would
like the interior lighting to remain on for
10 seconds during darkness after you have
set the starter switch to position 0 using the
KEYLESS-GO start/stop button.
XPress button = or ; to select the
Settings menu.XPress button : or 9 to select the
Lights submenu.XPress button a.XPress button : or 9 to select the
Interior Lighting Delay: function.
The current setting Enabled or Disabled
is shown.XPress button a to change the current
status.
Depending on the previous status, the
interior lighting delayed shut-off feature
will be Enabled or Disabled .Vehicle submenu
Access the Vehicle submenu via the
Settings menu. Use the Vehicle submenu
to switch the acoustic lock feedback on or off.
Switching acoustic lock feedback on or
off
Use this function to determine whether an
acoustic signal sounds when you lock or
unlock the vehicle.
XPress button = or ; to select the
Settings menu.XPress button : or 9 to select the
Vehicle submenu.XPress button a.XPress button : or 9 to select the
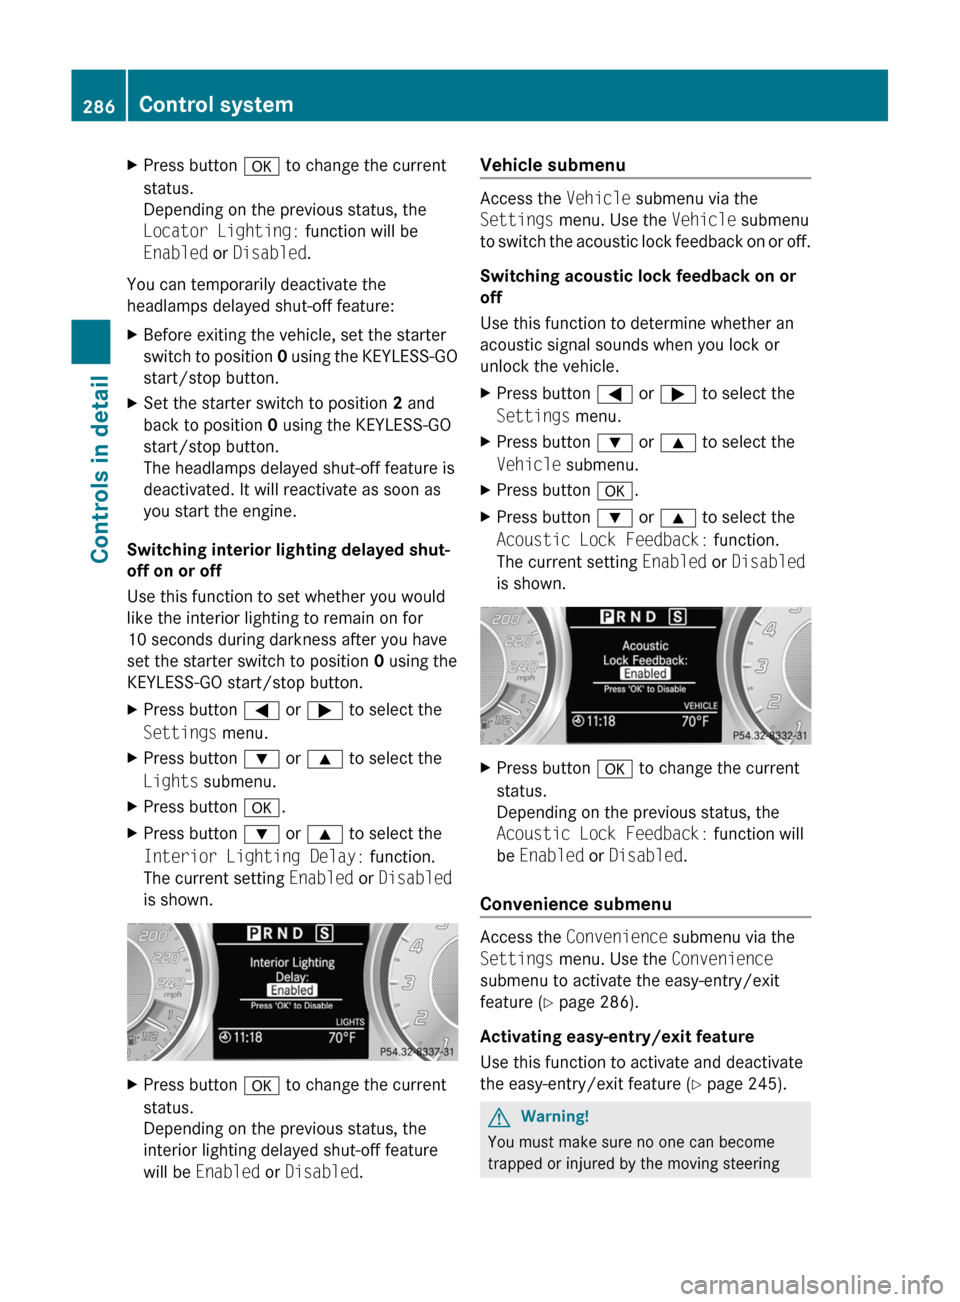
Acoustic Lock Feedback: function.
The current setting Enabled or Disabled
is shown.XPress button a to change the current
status.
Depending on the previous status, the
Acoustic Lock Feedback: function will
be Enabled or Disabled .
Convenience submenu
Access the Convenience submenu via the
Settings menu. Use the Convenience
submenu to activate the easy-entry/exit
feature ( Y page 286).
Activating easy-entry/exit feature
Use this function to activate and deactivate
the easy-entry/exit feature ( Y page 245).
GWarning!
You must make sure no one can become
trapped or injured by the moving steering
286Control systemControls in detail
BA 197 USA, CA Edition A 2011; 1; 27, en-UShereepeVersion: 3.0.3.52010-03-24T15:31:10+01:00 - Seite 286
Page 299 of 436
GWarning!
The rear view camera is only an aid and may
display obstacles
R from a distorted perspective
R inaccurately
R may not display obstacles at all
The rear view camera does not relieve you of
the responsibility to be cautious. Take care
and pay careful attention. The rear view
camera may not show objects which are
R very close to the rear bumper
R under the rear bumper
You are responsible for safety at all times and
must continue to pay attention to the
immediate surroundings when parking and
maneuvering. This includes the area behind,
in front of, and beside the vehicle. Otherwise
you could endanger yourself and/or others.
GWarning!
The rear view camera either will not function
or will not function to its full capability if
R the trunk lid is open
R it is raining very hard, snowing or foggy
R it is night or you are parking/maneuvering
your vehicle in an area where it is very dark
R the camera is exposed to a very bright white
light
R the immediate surroundings are
illuminated with fluorescent light (the
COMAND system display can flicker)
R there is a sudden change in temperature,
e.g. if you drive into a heated garage from
the cold (lens condensation)
R the camera lens is dirty or covered
R the rear of your vehicle is damaged
In this case, have the position and setting
of the camera checked by a qualified
specialist workshop. Mercedes-Benz
recommends that you contact a Mercedes-
Benz Center for this purpose.
Do not use the rear view camera in these
situations. Otherwise you could injure
yourself or others and/or damage property
including your vehicle while parking/
maneuvering.
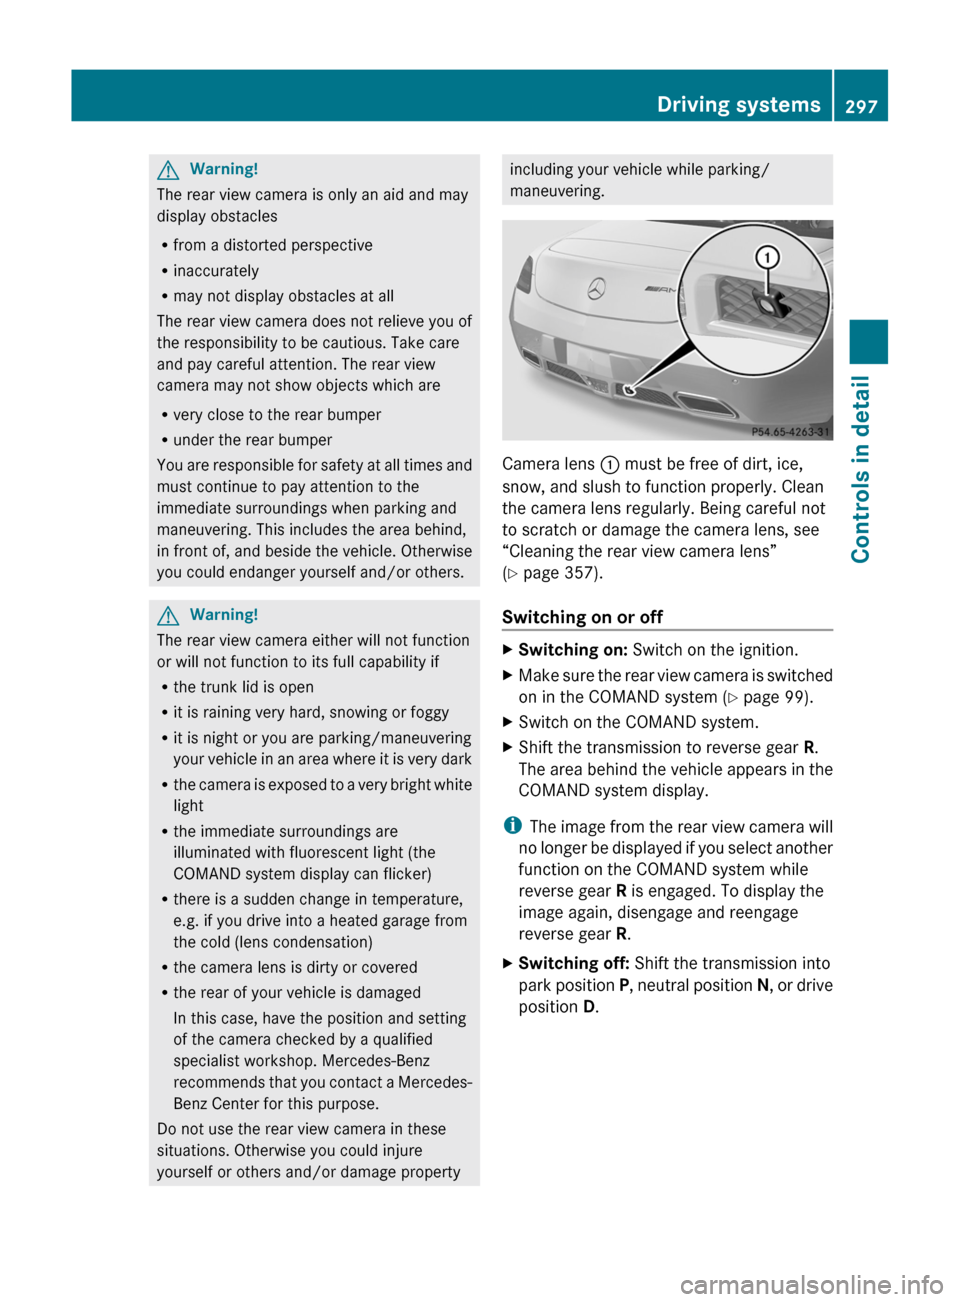
Camera lens : must be free of dirt, ice,
snow, and slush to function properly. Clean
the camera lens regularly. Being careful not
to scratch or damage the camera lens, see
“Cleaning the rear view camera lens”
( Y page 357).
Switching on or off
XSwitching on: Switch on the ignition.XMake sure the rear view camera is switched
on in the COMAND system ( Y page 99).XSwitch on the COMAND system.XShift the transmission to reverse gear R.
The area behind the vehicle appears in the
COMAND system display.
i The image from the rear view camera will
no longer be displayed if you select another
function on the COMAND system while
reverse gear R is engaged. To display the
image again, disengage and reengage
reverse gear R.
XSwitching off: Shift the transmission into
park position P, neutral position N, or drive
position D.Driving systems297Controls in detailBA 197 USA, CA Edition A 2011; 1; 27, en-UShereepeVersion: 3.0.3.52010-03-24T15:31:10+01:00 - Seite 297Z
Page 303 of 436
XIncreasing/decreasing: Turn
temperature controls : and D
(Y page 298) slightly clockwise or
counterclockwise.
Adjusting air vents
GWarning!
When operating the climate control, the air
that enters the passenger compartment
through the air vents can be very hot or very
cold (depending on the set temperature). This
may cause burns or frostbite to unprotected
skin in the immediate area of the air vents.
Always keep sufficient distance between
unprotected parts of the body and the air
vents. If necessary, use the air distribution
adjustment to direct the air to air vents in the
vehicle interior that are not in the immediate
area of unprotected skin.
For best possible performance of the climate
control:
XKeep the air intake grille in front of the
windshield free of snow, leaves, sticks, and
any other debris.
XAlways keep all air vents and grilles in the
passenger compartment free from
obstruction.
iFor draft-free ventilation, move the
adjustable center and side air vents to the
middle position.
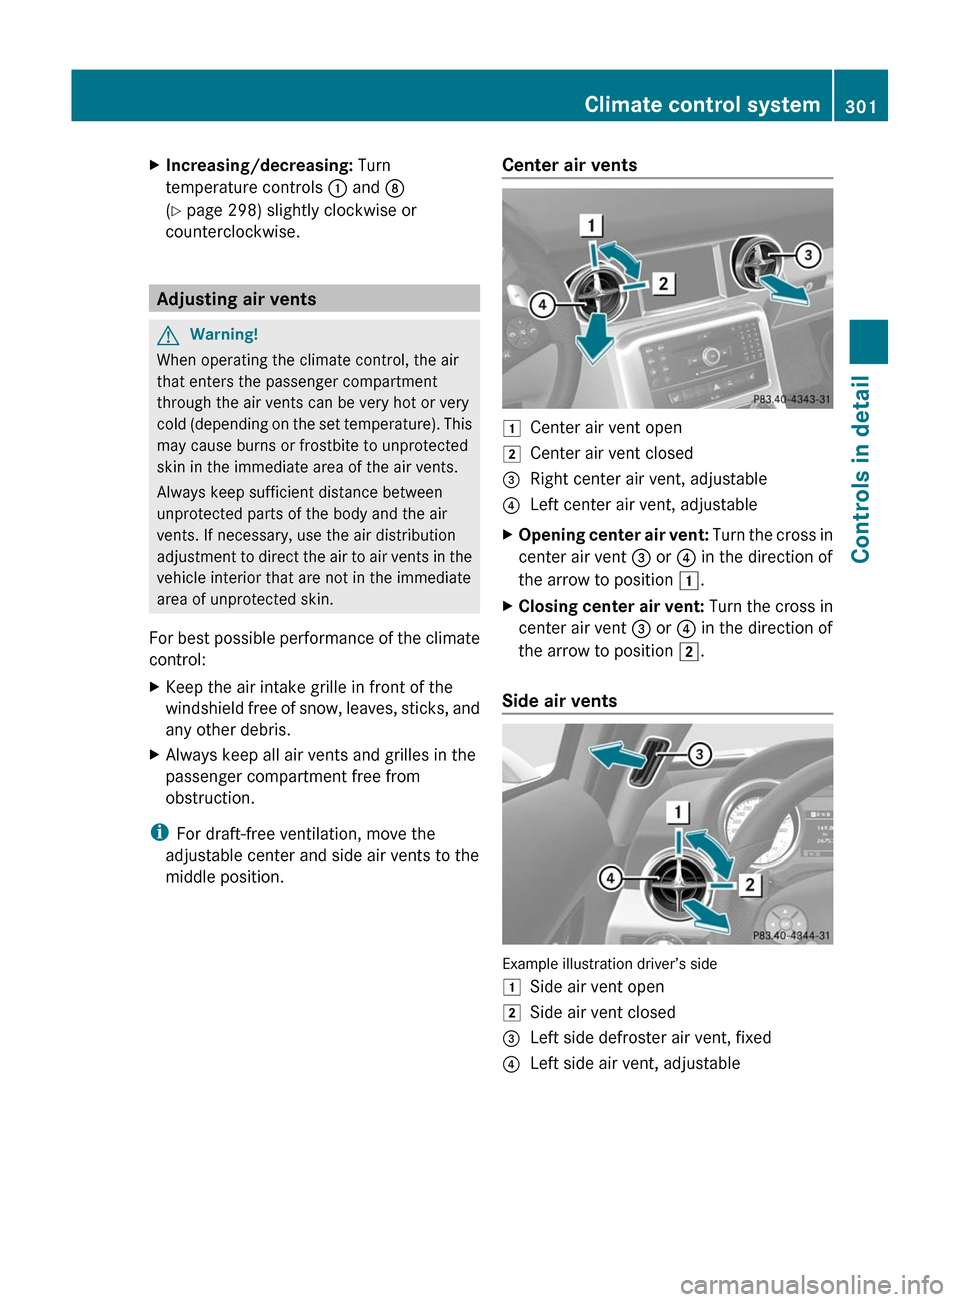
Center air vents1Center air vent open2Center air vent closed=Right center air vent, adjustable?Left center air vent, adjustableXOpening center air vent: Turn the cross in
center air vent = or ? in the direction of
the arrow to position 1.
XClosing center air vent: Turn the cross in
center air vent = or ? in the direction of
the arrow to position 2.
Side air vents
Example illustration driver’s side
1Side air vent open2Side air vent closed=Left side defroster air vent, fixed?Left side air vent, adjustableClimate control system301Controls in detailBA 197 USA, CA Edition A 2011; 1; 27, en-UShereepeVersion: 3.0.3.52010-03-24T15:31:10+01:00 - Seite 301Z
Page 306 of 436
XActivating: Adjust the air temperature, air
volume and air distribution.
XPress button ¸.
The indicator lamp in the button comes on.
The driver-side settings are used for the
passenger side.
XDeactivating: Press button ¸ again.
The indicator lamp in the button goes out.
Rear window defroster
GWarning!
Any accumulation of snow and ice should be
removed from the rear window before driving.
Visibility could otherwise be impaired,
endangering you and others.
The rear window defroster uses a large
amount of power. To keep the battery drain
to a minimum, switch off the defroster as
soon as the rear window is clear. The
defroster is switched off automatically after
some time of operation depending on the
outside temperature.
XSwitch on the ignition.XSwitching on: Press button ¤.
The indicator lamp in the button comes on.
XSwitching off: Press button ¤ again.
The rear window defroster switches off when
the battery voltage is too low. Too many
electrical consumers may be operating
simultaneously.
XSwitch off consumers that are currently not
needed if required.
Loading and storing
Parcel net
GWarning!
The parcel net is intended for storing light-
weight items only, such as road maps, mail,
etc.
Heavy objects, objects with sharp edges, or
fragile objects may not be transported in the
parcel net. In an accident, during hard
braking, or sudden maneuvers, they could be
thrown around inside the vehicle and cause
injury to vehicle occupants.
The parcel net cannot protect transported
goods in the event of an accident.
A parcel net is located in the passenger
footwell.
Storage compartments
GWarning!
To help avoid personal injury during a collision
or sudden maneuver, exercise care when
storing objects in the vehicle. Put luggage or
cargo in the trunk if possible.
Keep compartment lids closed. This will help
to prevent stored objects from being thrown
about and injuring vehicle occupants during
Rbraking
Rvehicle maneuvers
Ran accident
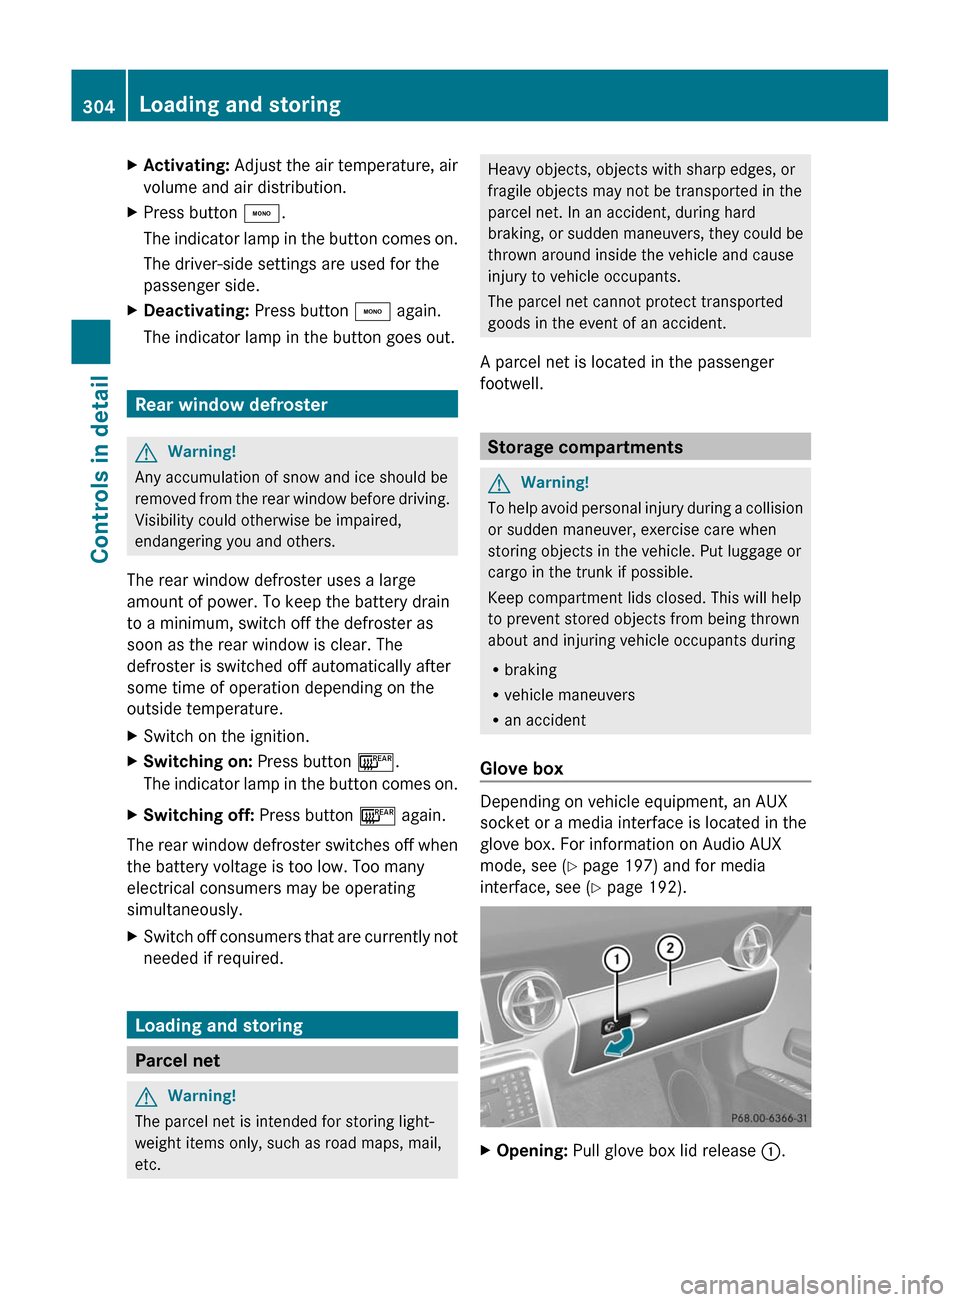
Glove box
Depending on vehicle equipment, an AUX
socket or a media interface is located in the
glove box. For information on Audio AUX
mode, see (Y page 197) and for media
interface, see (Y page 192).
XOpening: Pull glove box lid release :.304Loading and storingControls in detail
BA 197 USA, CA Edition A 2011; 1; 27, en-UShereepeVersion: 3.0.3.52010-03-24T15:31:10+01:00 - Seite 304