2011 MERCEDES-BENZ SLS service
[x] Cancel search: servicePage 113 of 436
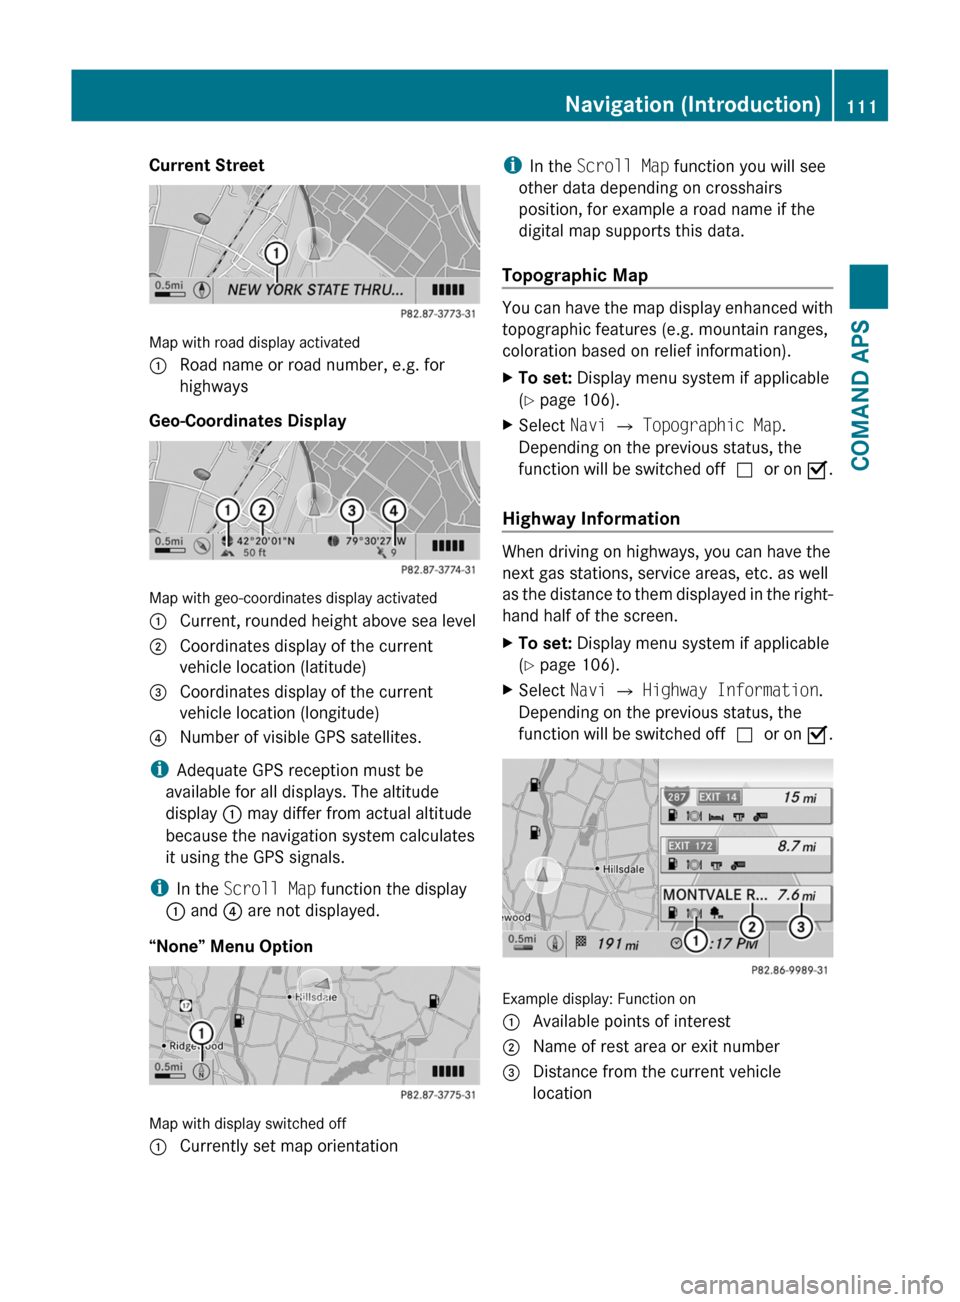
Current Street
Map with road display activated
1 Road name or road number, e.g. for
highways
Geo-Coordinates Display
Map with geo-coordinates display activated
1 Current, rounded height above sea level2 Coordinates display of the current
vehicle location (latitude)
3 Coordinates display of the current
vehicle location (longitude)
4 Number of visible GPS satellites.
iAdequate GPS reception must be
available for all displays. The altitude
display 1 may differ from actual altitude
because the navigation system calculates
it using the GPS signals.
iIn the Scroll Map function the display
1 and 4 are not displayed.
“None” Menu Option
Map with display switched off
1 Currently set map orientationiIn the Scroll Map function you will see
other data depending on crosshairs
position, for example a road name if the
digital map supports this data.
Topographic Map
You can have the map display enhanced with
topographic features (e.g. mountain ranges,
coloration based on relief information).
XTo set: Display menu system if applicable
(Y page 106).
XSelect Navi £ Topographic Map.
Depending on the previous status, the
function will be switched offcor on Ç.
Highway Information
When driving on highways, you can have the
next gas stations, service areas, etc. as well
as the distance to them displayed in the right-
hand half of the screen.
XTo set: Display menu system if applicable
(Y page 106).
XSelect Navi £ Highway Information.
Depending on the previous status, the
function will be switched offcor on Ç.
Example display: Function on
1 Available points of interest2 Name of rest area or exit number3 Distance from the current vehicle
location
Navigation (Introduction)111COMAND APSBA 197 USA, CA Edition A 2011; 1; 27, en-UShereepeVersion: 3.0.3.52010-03-24T15:31:10+01:00 - Seite 111Z
Page 115 of 436
Displaying and Changing an Existing
Block Area
XTo select the area you want to display
or change: Slide q m r.
XSelect Options £ Display/Change.
The map display appears with the block
area marked red.
XTo set the map scale: Rotate y m z.X To scroll the map: Slide q m r, o m p or
w m x.
XTo define the center of the block area:
Press n.
XTo set the desired size of the block area:
Rotate y m z.
XTo confirm the area and exit map
display: Press n.
XHide menu system if applicable
(Y page 106).
Defining a New Block Area
XSelect Options £ Avoid New Area
The map is displayed.
XTo set the map scale: Rotate y m z.XRotate y m z until the desired size of the
new block area is set.
XSlide q m r, o m p or w m x to shift the
new block area to the desired region.
XTo confirm the area and exit map
display: Press n.
XHide menu system if applicable
(Y page 106).
Deleting a Block Area
XTo select the area you want to delete:
Slide q m r.
XSelect Options £ Delete.
You will be prompted to confirm that you
wish to delete the block area.
XSelect Yes or No.
If you select Yes COMAND deletes the
entry.
SIRIUS XM Traffic Service
You can display the SIRIUS XM Service
information.
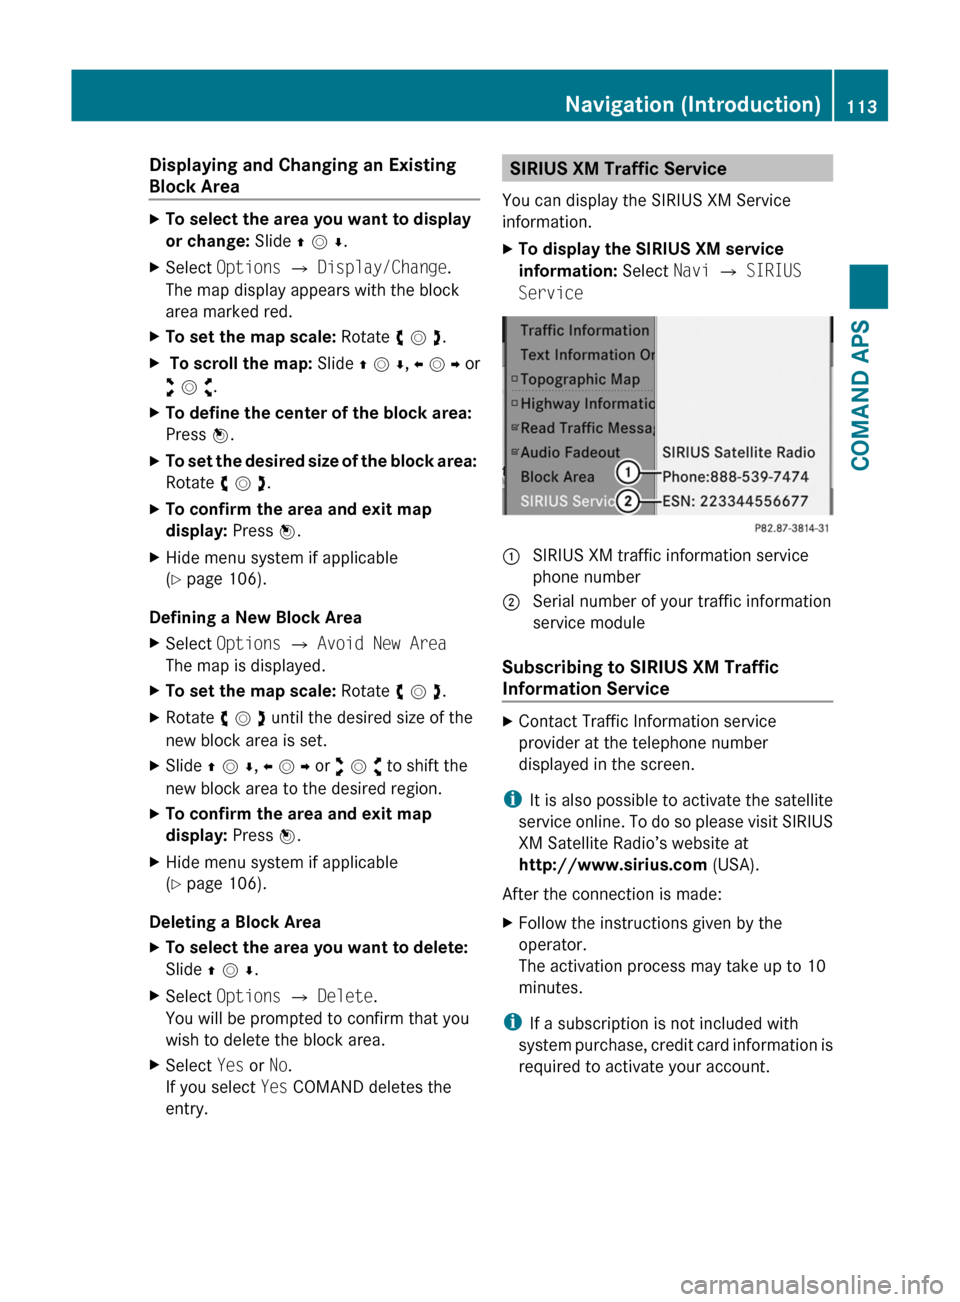
XTo display the SIRIUS XM service
information: Select Navi £ SIRIUS
Service
: SIRIUS XM traffic information service
phone number
; Serial number of your traffic information
service module
Subscribing to SIRIUS XM Traffic
Information Service
XContact Traffic Information service
provider at the telephone number
displayed in the screen.
iIt is also possible to activate the satellite
service online. To do so please visit SIRIUS
XM Satellite Radio’s website at
http://www.sirius.com (USA).
After the connection is made:
XFollow the instructions given by the
operator.
The activation process may take up to 10
minutes.
iIf a subscription is not included with
system purchase, credit card information is
required to activate your account.
Navigation (Introduction)113COMAND APSBA 197 USA, CA Edition A 2011; 1; 27, en-UShereepeVersion: 3.0.3.52010-03-24T15:31:10+01:00 - Seite 113Z
Page 127 of 436

XSelect OK.XIf necessary, select another category.
If COMAND finds destinations, a list is
displayed in the right-hand part of the
screen. Here you will find the stopover
destinations in the selected category.
The list shows
R Name
R Information on the location of the stopover
destination in relation to the direction of
travel and the
R Current distance to the stopover
destination.
XTo choose a destination: Rotate y m z or
slide q m r .XTo select a destination: Press n.
The Enter Destination menu appears and
displays the address of the destination.XTo cancel a selection: Select Back.XTo start route calculation: Select Start.
Entering Another Destination as
Stopover Destination
XIf necessary, switch to navigation mode
and display menu system ( Y page 105).XSelect Destination £ Stopover .XTo enter: Select OTHER.
Choose from:
R Address Entry
R From Memory
R From Last Destination
R From POIsXSelect a menu item.
The rest of the destination entry will vary
depending on the selection made:
For the Address Entry option see:
Entering a destination via address
( Y page 114).
For the From Memory option see:
Entering a destination from the destination
memory ( Y page 122).
For the From Last Destination option see:
Entering a destination from the last
destinations ( Y page 123).
For the From POIs option see:
Entering a POI ( Y page 126).XTo start route calculation: Select Start.
Deleting Stopover Destination
An existing stopover destination can be
deleted.
XSwitch to navigation mode if necessary.XSelect Destination £ Stopover £
Delete Stopover .
COMAND deletes the stopover destination
and recalculates the route to the main
destination.
Mbrace
i The mbrace system is called Tele Aid in
Canada.
Search & Send
i In order to utilize Search & Send your
vehicle must be equipped with mbrace,
navigation, and an active mbrace
subscription.
“Search & Send” is a navigation destination
address entry service. A destination address
located using Google Maps ®
can be delivered
via mbrace directly to the navigation system
in your vehicle.
Specify and Send a Destination Address
i Please refer to any specific instructions
provided on Google's website regarding
entering or sending an address. The
websites function differently and are
subject to change.
XGo to http://maps.google.com and enter
a destination address in the address entry
field.XLocate and click on "Send". A dialog box
appears.Navigation (Destination Input)125COMAND APSBA 197 USA, CA Edition A 2011; 1; 27, en-UShereepeVersion: 3.0.3.52010-03-24T15:31:10+01:00 - Seite 125Z
Page 133 of 436
iIn the predictive speller 3 you can only
select characters that are currently
available. The set of characters that is
available depends on those already entered
and the data included in the digital map.
For the steps of
REntering characters
RDeleting an entry
RAccepting first list entry
RCanceling an entry
proceed as described under “Main category
list with predictive speller” (Y page 128).
Selecting a POI
To accept first list entry:
XPress and hold n until the list appears
without speller.
or
If COMAND can match the characters
entered definitively to one entry, the list is
displayed without predictive speller with the
matching entry highlighted.(Y page 130).
You can switch to the list at any point while
entering characters.
XSlide q m repeatedly until the list appears
without the speller.
or
XSelect d and press n.XTo display the full address of the POI:
Select ? and press n.
XTo cancel selection: Press the k
button.
or
XSelect Back.
The POI list appears.
XTo start route calculation: Select Start.
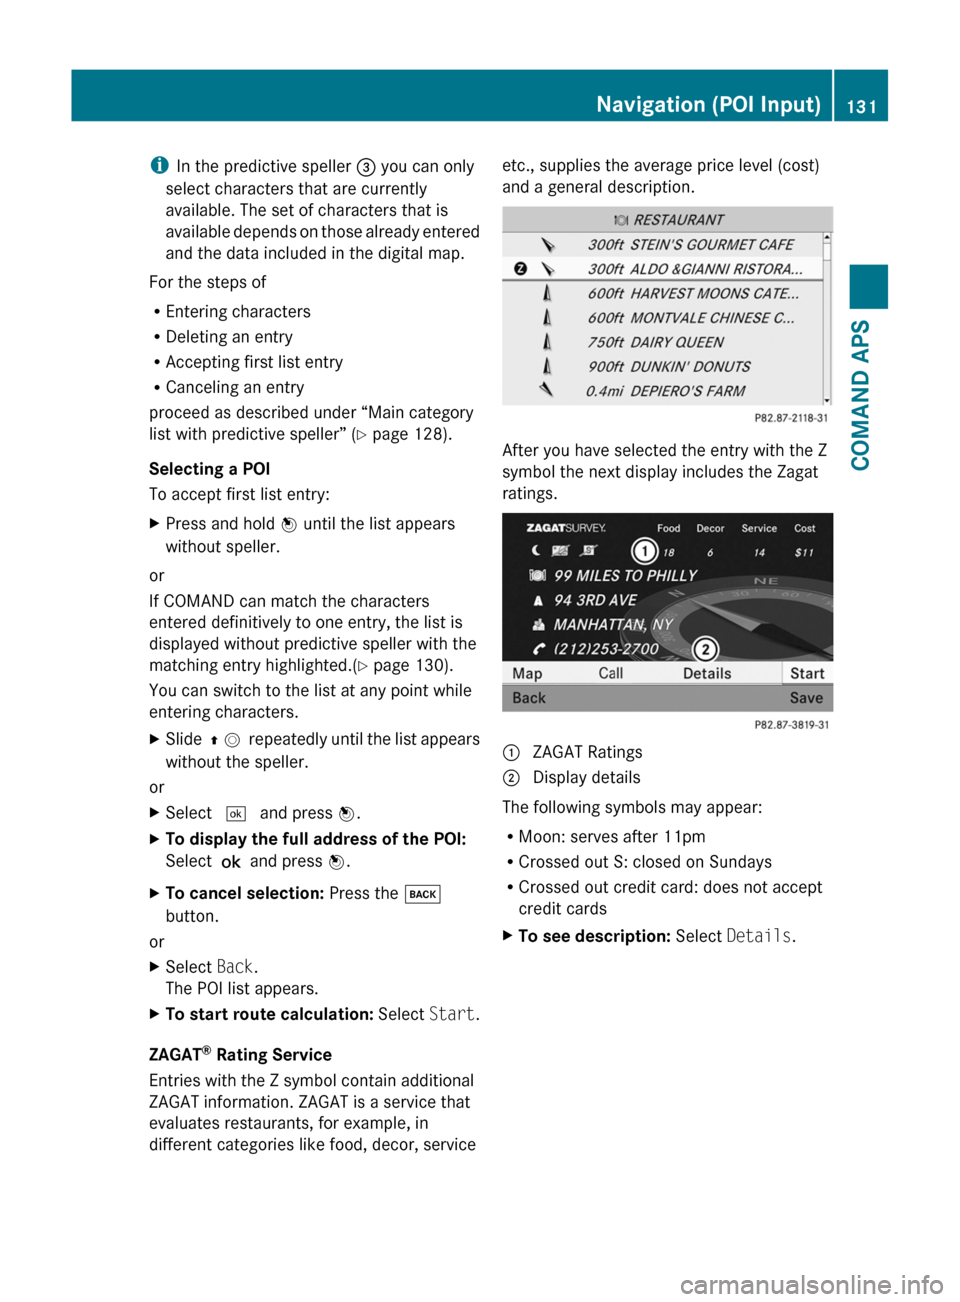
ZAGAT® Rating Service
Entries with the Z symbol contain additional
ZAGAT information. ZAGAT is a service that
evaluates restaurants, for example, in
different categories like food, decor, service
etc., supplies the average price level (cost)
and a general description.
After you have selected the entry with the Z
symbol the next display includes the Zagat
ratings.
1 ZAGAT Ratings2 Display details
The following symbols may appear:
RMoon: serves after 11pm
RCrossed out S: closed on Sundays
RCrossed out credit card: does not accept
credit cards
XTo see description: Select Details.Navigation (POI Input)131COMAND APSBA 197 USA, CA Edition A 2011; 1; 27, en-UShereepeVersion: 3.0.3.52010-03-24T15:31:10+01:00 - Seite 131Z
Page 141 of 436
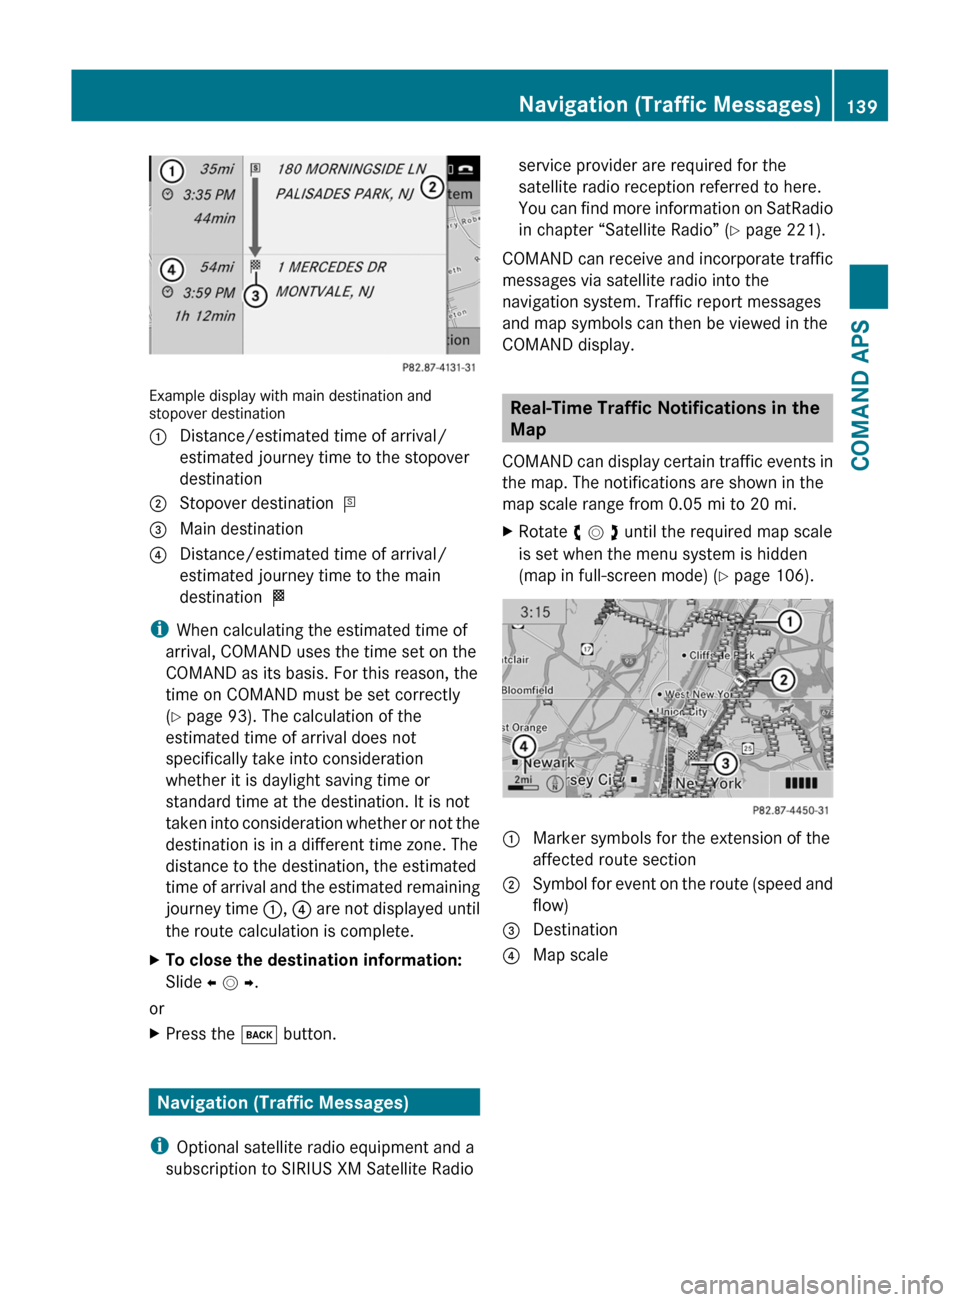
Example display with main destination andstopover destination
1 Distance/estimated time of arrival/
estimated journey time to the stopover
destination
2 Stopover destination =3 Main destination4 Distance/estimated time of arrival/
estimated journey time to the main
destination <
iWhen calculating the estimated time of
arrival, COMAND uses the time set on the
COMAND as its basis. For this reason, the
time on COMAND must be set correctly
(Y page 93). The calculation of the
estimated time of arrival does not
specifically take into consideration
whether it is daylight saving time or
standard time at the destination. It is not
taken into consideration whether or not the
destination is in a different time zone. The
distance to the destination, the estimated
time of arrival and the estimated remaining
journey time 1, 4 are not displayed until
the route calculation is complete.
XTo close the destination information:
Slide o m p.
or
XPress the k button.
Navigation (Traffic Messages)
iOptional satellite radio equipment and a
subscription to SIRIUS XM Satellite Radio
service provider are required for the
satellite radio reception referred to here.
You can find more information on SatRadio
in chapter “Satellite Radio” (Y page 221).
COMAND can receive and incorporate traffic
messages via satellite radio into the
navigation system. Traffic report messages
and map symbols can then be viewed in the
COMAND display.
Real-Time Traffic Notifications in the
Map
COMAND can display certain traffic events in
the map. The notifications are shown in the
map scale range from 0.05 mi to 20 mi.
XRotate y m z until the required map scale
is set when the menu system is hidden
(map in full-screen mode) (Y page 106).
1 Marker symbols for the extension of the
affected route section
2 Symbol for event on the route (speed and
flow)
3 Destination4 Map scaleNavigation (Traffic Messages)139COMAND APSBA 197 USA, CA Edition A 2011; 1; 27, en-UShereepeVersion: 3.0.3.52010-03-24T15:31:10+01:00 - Seite 139Z
Page 151 of 436
Under the following circumstances, the
phone may not yet be useable:
R If it is not yet logged into a network. The
phone will try independently to log into a
network. If no network is available, you will
not be able to make “911” emergency calls.
If you try to make an outgoing call, the
message No Service appears briefly.
Activating the Mobile
Mobile Phone With Bluetooth ®
Interface
Prerequisites for the Mobile Phone
For making calls using COMAND via the
Bluetooth ®
interface, you will need a
Bluetooth-enabled mobile phone.
i Not all mobile phones available on the
market are comparably suitable. Further
information on suitable mobile phones and
connecting Bluetooth-enabled mobile
phones to COMAND is available via the
Internet at
http://www.mbusa-mobile.com . Or call
the Mercedes-Benz Customer Assistance
Center at 1-800-FOR-MERCedes
(1-800-367-6372) (US), or Customer
Relations at 1-800-387-0100 (Canada).
Activating Bluetooth ®
Before you begin activation of your mobile
phone connection via the Bluetooth ®
interface please ensure it is compatible with
Bluetooth ®
handsfree profile 1.0 or higher
(see mobile phone operating guide):
XSwitch on the mobile phone and enter the
PIN, if applicable (see mobile phone
operating guide).XActivate Bluetooth ®
connection on the
mobile phone (see mobile phone operating
guide).
i On certain mobile phones, not only do you
have to activate the Bluetooth ®
function
but the device must also be made “visible”
for other devices.
Each Bluetooth ®
device has a Bluetooth ®
device name. It is recommended to give the
device a personal name, by which you can
clearly recognize your mobile phone.
i If the Bluetooth ®
function on the
COMAND is switched off, the message
Bluetooth not activated in system
settings . appears.XActivate Bluetooth ®
connection on
COMAND ( Y page 96).
Registering a Mobile Phone (Authorizing)
When you use your mobile phone in
conjunction with COMAND for the first time,
you must register (authorize) it.
It is possible to register several mobile
phones. The connection is always established
to the mobile phone that was activated last.
When you authorize a new mobile phone, it is
activated automatically. You can switch
between the authorized mobile phones
( Y page 151).
Searching for a Mobile Phone
XIn the phone submenu select Phone £
Bluetooth Phones £ Update .
COMAND searches for suitable
Bluetooth ®
phones within range and enters
them in the phone list.
i The duration of the search procedure
depends on the number and type of
Bluetooth ®
phones. The search may take a
few minutes.
When first entering the device list and before
running an update, the black dot R indicates
the active phone (found and authorized).
After running an update:
Telephone149COMAND APSBA 197 USA, CA Edition A 2011; 1; 27, en-UShereepeVersion: 3.0.3.52010-03-24T15:31:10+01:00 - Seite 149Z
Page 154 of 436
XTo set the volume: Slide q m r.
The red bar moves up or down.
XTo confirm selection: Press n.
“911” Emergency Call
GWarning
The 911 emergency call system is a public
service. Using it without due cause is a
criminal offense.
The following conditions must be met for a
“911” emergency call:
RPhone switched on
RMobile phone network available
RValid SIM card in the phone (not required
on all mobile phone networks)
RMobile phone connected with COMAND via
Bluetooth®
If you are unable to make an emergency call,
you will have to initiate rescue measures
yourself.
The “911” emergency number is a public
service. Any abuse is punishable by law.
XEnter the digits on the COMAND control
unit (Y page 159).
XPress the 6 button.
The phone establishes the connection.
XWait until the emergency call center
answers, then describe the emergency.
Submenu Overview
PhoneCall lists or Mic
On/Off
Bluetooth PhonesDisplays or deletes
call lists
Download ContactsSwitches hands-free
microphone on/off
(during a call)
Delete ContactsPhone Main Menu
Switching to Phone Mode
XPress the function button ÷ on the
COMAND control unit.
iIf you press the ÷ button with the phone
main menu already open, the call list “Calls
Dialed” appears (Y page 156).
or
From another Main Function
XSelect Phone £ Phone £ Phone.
iIf phone mode was active last, you only
need to select “Phone”.
Within the Phone Function
XSelect Phone £ Phone.
or
XIn the phone mode press the k button
repeatedly until the phone main menu
appears.
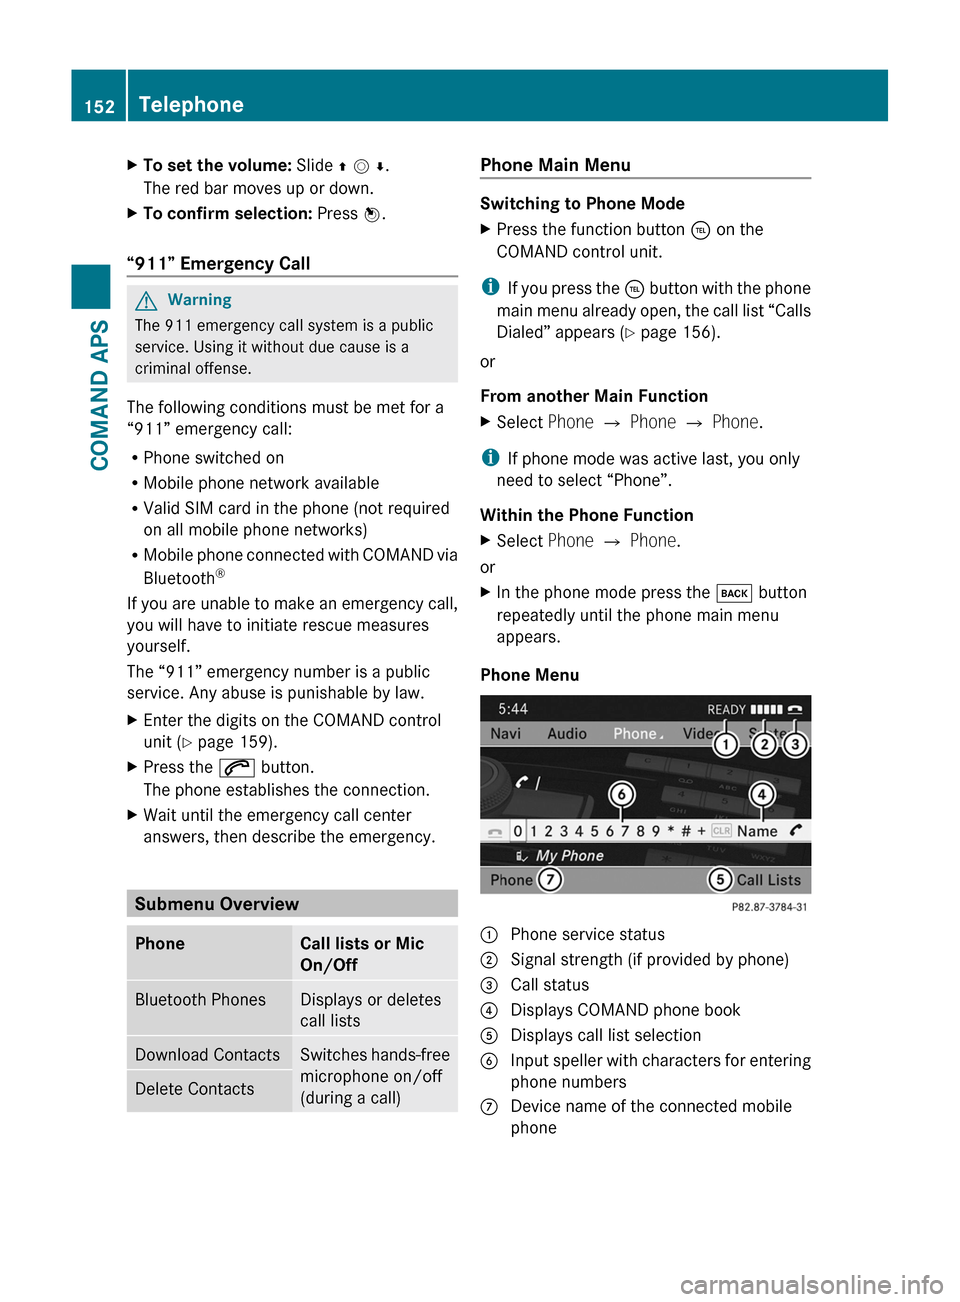
Phone Menu
1 Phone service status2 Signal strength (if provided by phone)3 Call status4 Displays COMAND phone book5 Displays call list selection6 Input speller with characters for entering
phone numbers
7 Device name of the connected mobile
phone
152TelephoneCOMAND APS
BA 197 USA, CA Edition A 2011; 1; 27, en-UShereepeVersion: 3.0.3.52010-03-24T15:31:10+01:00 - Seite 152
Page 175 of 436

Program Information
iThis feature is only available for analog
FM and programs.
Information on the current program is
normally displayed above the submenu line.
XTo display the program information in
the main area: Select Info in the radio
display submenu.
Information on the program currently tuned
to is now displayed in the main area. The
content and scope of the information
depends on the radio station.
Satellite Radio
Important Notes
In this chapter, you will find detailed
information regarding
Rselecting a channel and a program category
Rmemory functions
Rsound adjustments
If you have not done so already, please
familiarize yourself with these functions by
reading chapter “At a glance”.
iOptional satellite radio equipment and a
subscription to satellite radio service
provider are required for the satellite radio
operation described here.
iNote that categories and channels shown
in illustrations are dependent on
programming content delivered by the
service provider. Programming content is
subject to change. Therefore, channel and
categories shown in illustrations and
descriptions contained in this manual may
differ from the channels and categories
delivered by the service provider.
Satellite radio service may be unavailable
or interrupted from time to time for a
variety of reasons, such as environmental
or topographic conditions and other things
we cannot control. Service might also not
be available in certain places (e.g., in
tunnels, parking garages, or within or next
to buildings) or near other technologies.
iSIRIUS XM Satellite Radio provides over
130 channels of digital-quality radio,
including 100% commercial-free music,
sports, news and entertainment.
SIRIUS XM Satellite Radio uses a fleet of
high-power satellites to broadcast 24 hours
per day, coast-to-coast, in the contiguous
U.S and Canada.
This diverse, satellite-delivered
programming is available for a monthly
subscription fee. For more information, call
the SIRIUS XM Service Center
(Y page 177) or contact
http://www.sirius.com (USA) or
http://www.siriuscanada.com
(Canada).
Subscribing
Subscribing to Satellite Radio
To switch to satellite radio operation:
XFrom another main function: Select
Audio £ Audio £ SatRadio.
iIf radio mode was active last, you only
need to select Audio.
XWithin the audio function: Select Audio
£ SatRadio.
If the satellite radio service is not activated,
the Satellite radio main menu appears and
Audio173COMAND APSBA 197 USA, CA Edition A 2011; 1; 27, en-UShereepeVersion: 3.0.3.52010-03-24T15:31:10+01:00 - Seite 173Z