2011 MERCEDES-BENZ SLS lock
[x] Cancel search: lockPage 76 of 436

Menu Overview
Having selected a main function, you will find the submenu line at the bottom edge of the
COMAND display.
If one of the main functions such as Navigation, Audio, Video or Phone is currently selected,
additional menus are available from the main function line (Y page 74).
This is indicated by a small triangle behind the main function label.
1 Triangle indicating an additional menuNaviAudioPhoneVideoModeFM/AM RadioPhoneDVD VideoMap OrientationSatRadioAddress bookVideo AuxPOI Symbols On
Map
Disc (CD audio,
DVD audio, MP3
mode)
Traffic Information
On Map
Memory card (MP3
mode)
Text Information
On Map
Music RegisterÇ Topographic
Map
Media InterfaceÇ Highway
information
AUXÇ Read Traffic
Messages
Automatically
Ç Audio FadeoutBlock AreaSIRIUS Service74At a glanceCOMAND APS
BA 197 USA, CA Edition A 2011; 1; 27, en-UShereepeVersion: 3.0.3.52010-03-24T15:31:10+01:00 - Seite 74
Page 80 of 436

COMAND controller operation
You can operate the COMAND controller in the following ways:
Rpress briefly or press and hold n
Rrotate clockwise or counter-clockwise y m z
Rslide to the left or right o m p
or
Rslide up or down q m r
or
Rslide diagonally w m x
In the instructions, operating directions are described as follows:
XSelect Station list.
which is a short form for
XTurn y m z or slide q m r the COMAND controller.
This moves the selection bar to the Station list menu item.
XPress the n COMAND controller.
This confirms your selection. The station list appears.
SymbolCOMAND controller
operation
Function (example)nPress brieflyRSelect menu item or list entry
RShow/hide the menu system (e.g. when
using navigation or video functions)
Press and hold until the selected
action has been carried out
RAccept destination for navigationy m zRotateRMove through vertical or horizontal menus
or lists
RMove through text
RProgram settings
q m rSlideRMove through vertical menus
RExit horizontal menus
78At a glanceCOMAND APS
BA 197 USA, CA Edition A 2011; 1; 27, en-UShereepeVersion: 3.0.3.52010-03-24T15:31:10+01:00 - Seite 78
Page 96 of 436

1 Sets the time2 Current dateXTo set value: Rotate y m z or slide
q m r.
XTo save setting: Press n.
iIf you adjust the time in 30-minute
increments, the previously selected time
zone and automatic time-zone switching
between daylight saving time and standard
time settings are lost (Y page 94).
iThe increment value for setting the
minutes depends on the equipment
installed. They are 30-minute increments in
vehicles equipped with a navigation
system. They are minute increments in
vehicles without a navigation system. The
following operational steps depend on
whether the navigation system has GPS
reception.
Setting the Date/Time Format
XSelect System £ System settings £
Time £ Format.
The format list appears. The R dots show
the current settings.
iThe abbreviations mean:
Date format: DD - Day, MM - Month, YY/
YYYY - Year
Time format: HH - Hour, MM - Minute for
either 24-hour clock or AM/PM format
XTo change the format: Rotate y m z or
slide q m r.
XTo confirm the change: Press n.XTo store the setting and exit the menu:
Slide o m p.
Setting the Time Zone and Switching
Between Daylight Saving Time and
Standard Time
iThe correct time zone and daylight
saving/standard time must be set for the
following navigation system functions to
operate correctly:
RCalculation of expected time of arrival
RTime stamps for calls received and calls
dialed
XTo set the time zone: Select System £
Settings £ Time £ Time Zone.
A time zone list appears. The R dot
indicates the current setting.
XSelect the appropriate time zone.XTo switch between Daylight Saving and
standard time: Select Daylight Saving
Time (Summer) or Standard Time
(Winter).
The R dot indicates the current setting.
XTo store setting and exit menu:
Slide o m p.
Read-Out
Setting Reading Speed
XSelect System £ Settings £ Text
Reader Speed.
The list of possible settings appears. The
R dot indicates the current setting.
XTo select the setting: Rotate y m z or
slide q m r.
XTo confirm your selection: Press n.94System SettingsCOMAND APS
BA 197 USA, CA Edition A 2011; 1; 27, en-UShereepeVersion: 3.0.3.52010-03-24T15:31:10+01:00 - Seite 94
Page 106 of 436
NaviSetting Block AreaSIRIUS Service104Navigation (Introduction)COMAND APS
BA 197 USA, CA Edition A 2011; 1; 27, en-UShereepeVersion: 3.0.3.52010-03-24T15:31:10+01:00 - Seite 104
Page 108 of 436
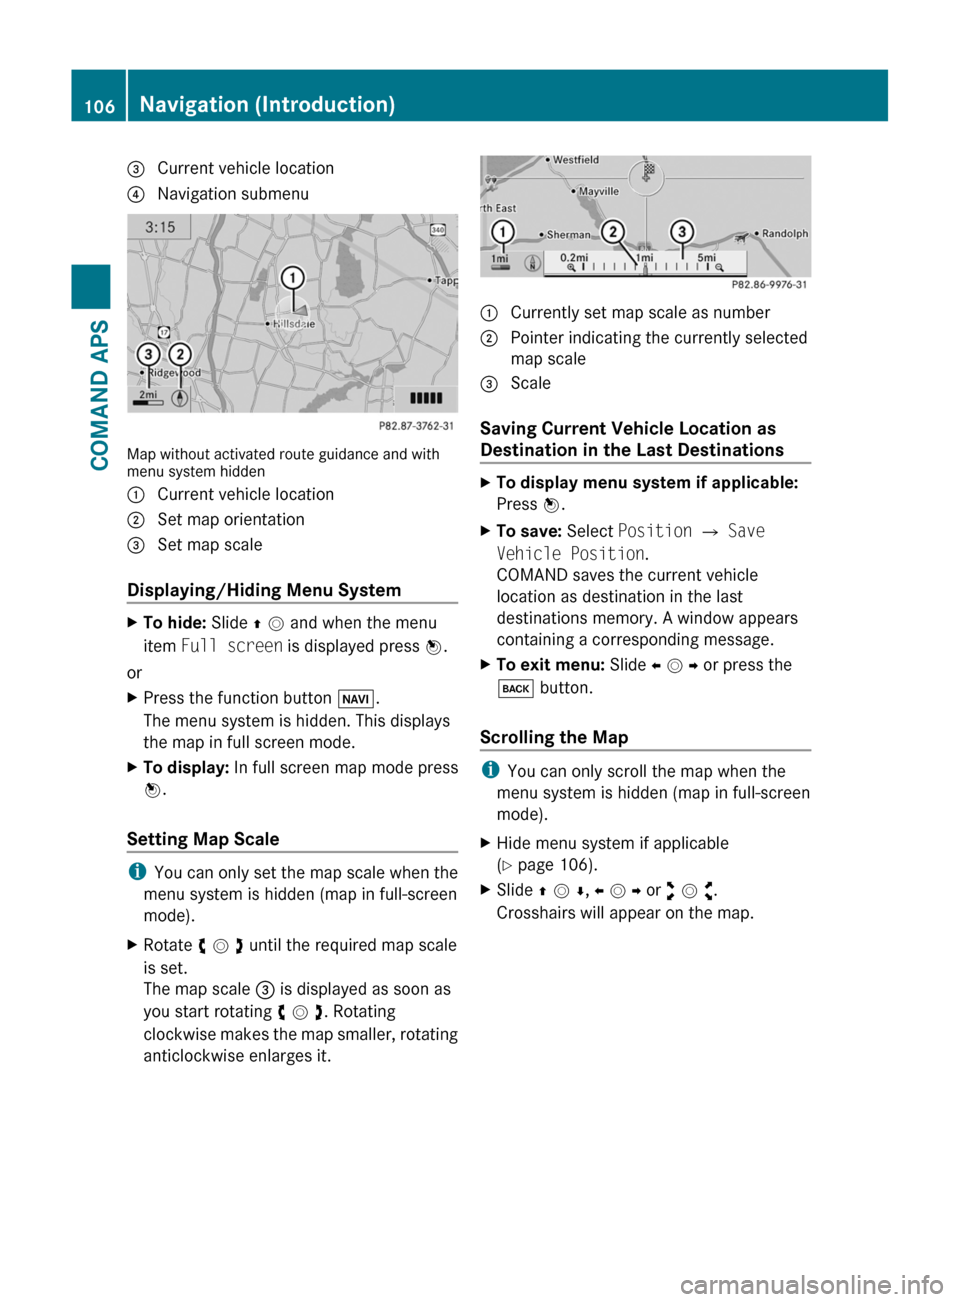
3 Current vehicle location4 Navigation submenu
Map without activated route guidance and withmenu system hidden
1 Current vehicle location2 Set map orientation3 Set map scale
Displaying/Hiding Menu System
XTo hide: Slide q m and when the menu
item Full screen is displayed press n.
or
XPress the function button Ø.
The menu system is hidden. This displays
the map in full screen mode.
XTo display: In full screen map mode press
n.
Setting Map Scale
iYou can only set the map scale when the
menu system is hidden (map in full-screen
mode).
XRotate y m z until the required map scale
is set.
The map scale 3 is displayed as soon as
you start rotating y m z. Rotating
clockwise makes the map smaller, rotating
anticlockwise enlarges it.
1 Currently set map scale as number2 Pointer indicating the currently selected
map scale
3 Scale
Saving Current Vehicle Location as
Destination in the Last Destinations
XTo display menu system if applicable:
Press n.
XTo save: Select Position £ Save
Vehicle Position.
COMAND saves the current vehicle
location as destination in the last
destinations memory. A window appears
containing a corresponding message.
XTo exit menu: Slide o m p or press the
k button.
Scrolling the Map
iYou can only scroll the map when the
menu system is hidden (map in full-screen
mode).
XHide menu system if applicable
(Y page 106).
XSlide q m r, o m p or w m x.
Crosshairs will appear on the map.
106Navigation (Introduction)COMAND APS
BA 197 USA, CA Edition A 2011; 1; 27, en-UShereepeVersion: 3.0.3.52010-03-24T15:31:10+01:00 - Seite 106
Page 114 of 436
Read Traffic Messages Automatically
You can choose whether the traffic messages
relevant for the route are read automatically
or whether you have to start the reading
manually using the Traffic submenu.
XTo set: Display menu system if applicable
(Y page 106).
XSelect Navi £ Read Traffic
Messages Automatically.
Depending on the previous status, the
function will be switched offcor on Ç.
Audio Fadeout
The Audio Fadeout function, if activated,
lowers the volume of the current audio source
when a navigation announcement is issued.
As soon as the navigation announcement has
ended, the audio source will be played with
the previous volume.
XTo activate: Display menu system if
applicable (Y page 106).
XSelect Navi £ Audio Fadeout.
Depending on the previous status, the
function will be switched offcor on Ç.
Block Area
You can define an area within the map display
that is not to be used by the system in
calculating a route, if possible.
iThe calculated route may include a
blocked area if the destination is within a
blocked area or if the destination can only
be reached using roads that lead through a
blocked area. Highways cannot be blocked.
XTo set, change or delete: Display menu
system if applicable (Y page 106).
XSelect Navi £ Block Area.
If no areas were previously set, the map
display appears ready to select an area. If
areas were previously set, the blocked area
list appears.
XTo set the map scale: Rotate y m z.X To scroll the map: Slide q m r, o m p or
w m x.
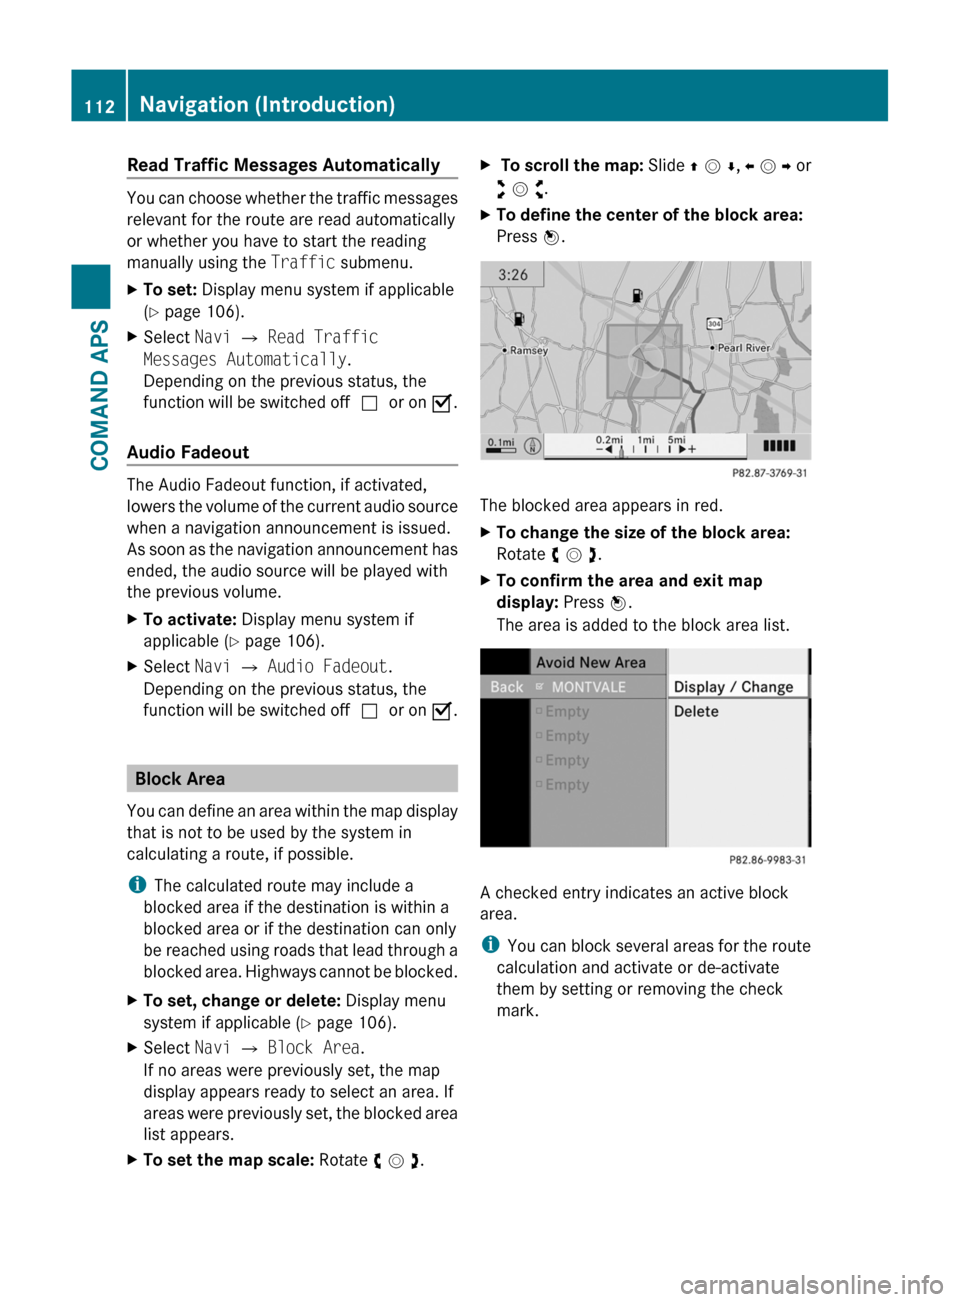
XTo define the center of the block area:
Press n.
The blocked area appears in red.
XTo change the size of the block area:
Rotate y m z.
XTo confirm the area and exit map
display: Press n.
The area is added to the block area list.
A checked entry indicates an active block
area.
iYou can block several areas for the route
calculation and activate or de-activate
them by setting or removing the check
mark.
112Navigation (Introduction)COMAND APS
BA 197 USA, CA Edition A 2011; 1; 27, en-UShereepeVersion: 3.0.3.52010-03-24T15:31:10+01:00 - Seite 112
Page 115 of 436
Displaying and Changing an Existing
Block Area
XTo select the area you want to display
or change: Slide q m r.
XSelect Options £ Display/Change.
The map display appears with the block
area marked red.
XTo set the map scale: Rotate y m z.X To scroll the map: Slide q m r, o m p or
w m x.
XTo define the center of the block area:
Press n.
XTo set the desired size of the block area:
Rotate y m z.
XTo confirm the area and exit map
display: Press n.
XHide menu system if applicable
(Y page 106).
Defining a New Block Area
XSelect Options £ Avoid New Area
The map is displayed.
XTo set the map scale: Rotate y m z.XRotate y m z until the desired size of the
new block area is set.
XSlide q m r, o m p or w m x to shift the
new block area to the desired region.
XTo confirm the area and exit map
display: Press n.
XHide menu system if applicable
(Y page 106).
Deleting a Block Area
XTo select the area you want to delete:
Slide q m r.
XSelect Options £ Delete.
You will be prompted to confirm that you
wish to delete the block area.
XSelect Yes or No.
If you select Yes COMAND deletes the
entry.
SIRIUS XM Traffic Service
You can display the SIRIUS XM Service
information.
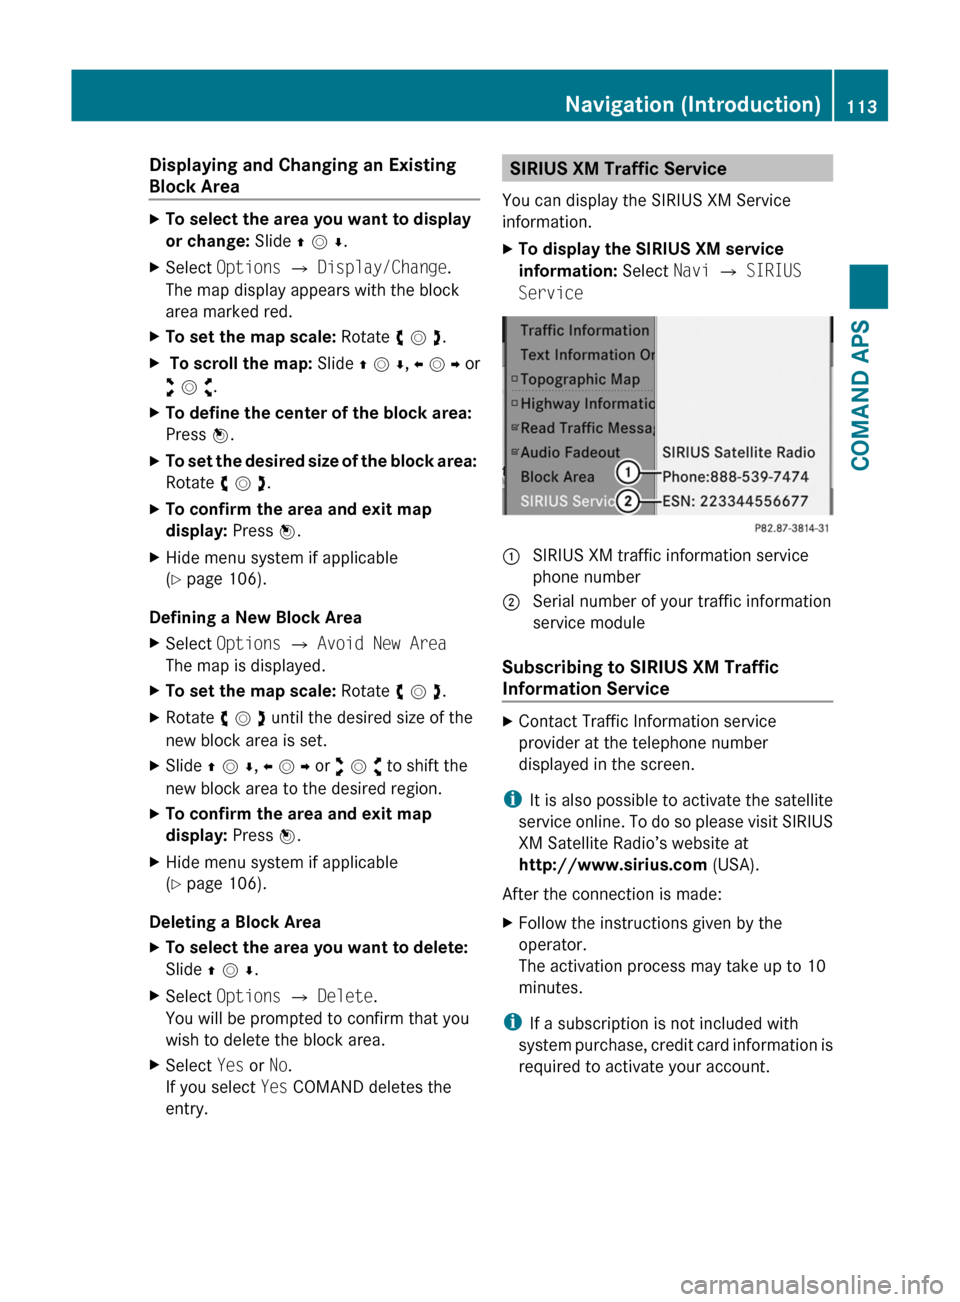
XTo display the SIRIUS XM service
information: Select Navi £ SIRIUS
Service
: SIRIUS XM traffic information service
phone number
; Serial number of your traffic information
service module
Subscribing to SIRIUS XM Traffic
Information Service
XContact Traffic Information service
provider at the telephone number
displayed in the screen.
iIt is also possible to activate the satellite
service online. To do so please visit SIRIUS
XM Satellite Radio’s website at
http://www.sirius.com (USA).
After the connection is made:
XFollow the instructions given by the
operator.
The activation process may take up to 10
minutes.
iIf a subscription is not included with
system purchase, credit card information is
required to activate your account.
Navigation (Introduction)113COMAND APSBA 197 USA, CA Edition A 2011; 1; 27, en-UShereepeVersion: 3.0.3.52010-03-24T15:31:10+01:00 - Seite 113Z
Page 126 of 436
iThe display 3 depends on the settings
selected in “Text information On Map”
(Y page 110). It may display the current
road if corresponding data is available in
the digital map. Or it displays the geo-
coordinates position of the crosshairs if
Geo-coordinates display is activated.
Moving the Map and Selecting a
Destination
XTo move the map: Slide q m r, o m p or
w m x.
XTo set the map scale: Rotate y m z.
Rotating clockwise makes the map smaller,
rotating counterclockwise enlarges it.
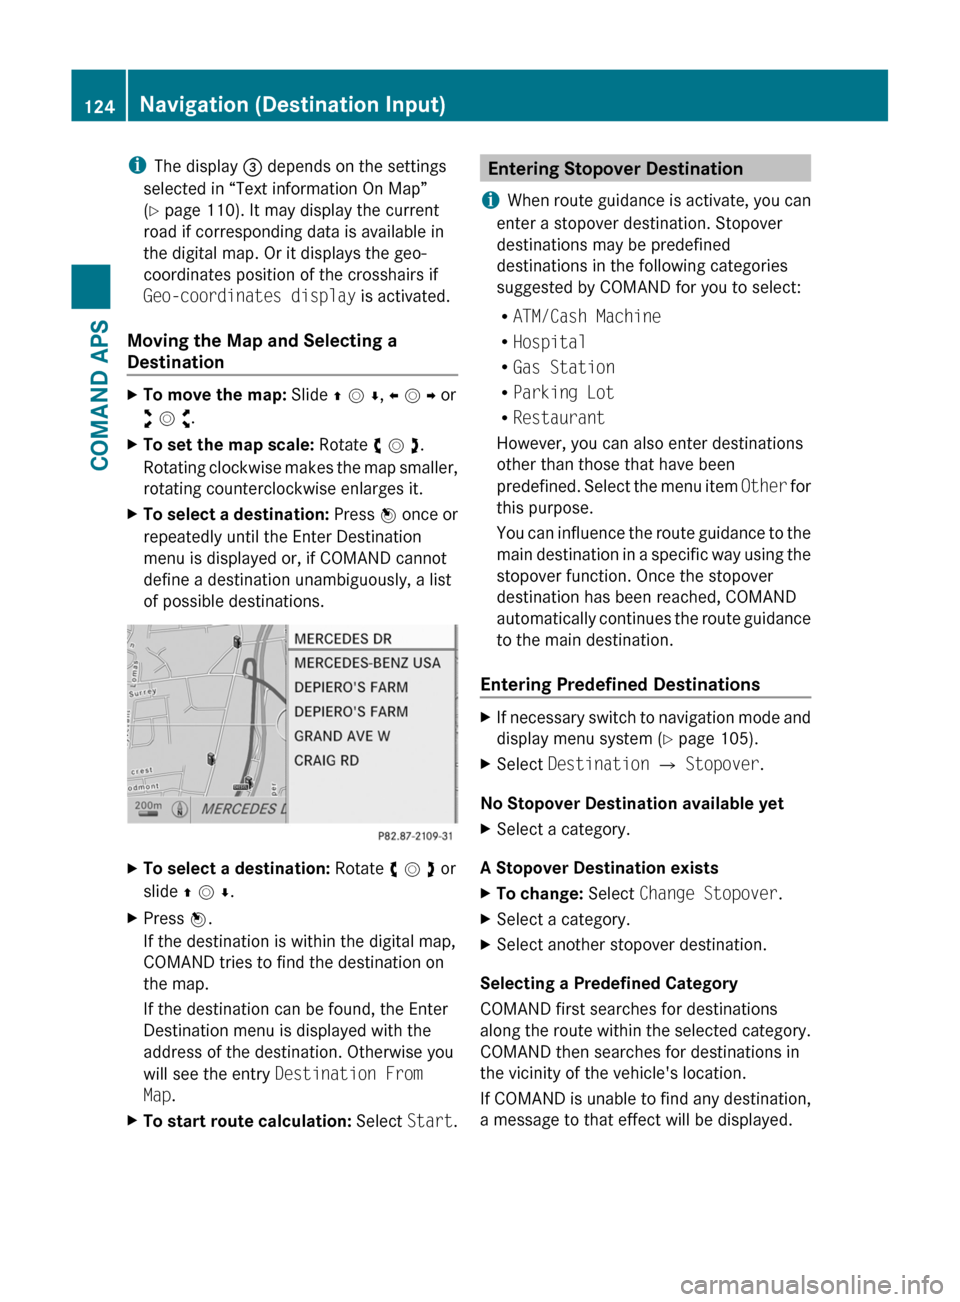
XTo select a destination: Press n once or
repeatedly until the Enter Destination
menu is displayed or, if COMAND cannot
define a destination unambiguously, a list
of possible destinations.
XTo select a destination: Rotate y m z or
slide q m r.
XPress n.
If the destination is within the digital map,
COMAND tries to find the destination on
the map.
If the destination can be found, the Enter
Destination menu is displayed with the
address of the destination. Otherwise you
will see the entry Destination From
Map.
XTo start route calculation: Select Start.Entering Stopover Destination
iWhen route guidance is activate, you can
enter a stopover destination. Stopover
destinations may be predefined
destinations in the following categories
suggested by COMAND for you to select:
RATM/Cash Machine
RHospital
RGas Station
RParking Lot
RRestaurant
However, you can also enter destinations
other than those that have been
predefined. Select the menu item Other for
this purpose.
You can influence the route guidance to the
main destination in a specific way using the
stopover function. Once the stopover
destination has been reached, COMAND
automatically continues the route guidance
to the main destination.
Entering Predefined Destinations
XIf necessary switch to navigation mode and
display menu system (Y page 105).
XSelect Destination £ Stopover.
No Stopover Destination available yet
XSelect a category.
A Stopover Destination exists
XTo change: Select Change Stopover.XSelect a category.XSelect another stopover destination.
Selecting a Predefined Category
COMAND first searches for destinations
along the route within the selected category.
COMAND then searches for destinations in
the vicinity of the vehicle's location.
If COMAND is unable to find any destination,
a message to that effect will be displayed.
124Navigation (Destination Input)COMAND APS
BA 197 USA, CA Edition A 2011; 1; 27, en-UShereepeVersion: 3.0.3.52010-03-24T15:31:10+01:00 - Seite 124