2011 MERCEDES-BENZ SLS fuel fill door release
[x] Cancel search: fuel fill door releasePage 323 of 436

! To prevent damage to the catalytic
converters, only use premium unleaded
gasoline in this vehicle.
Any noticeable irregularities in engine
operation should be repaired promptly.
Otherwise, excessive unburned fuel may
reach the catalytic converter, causing it to
overheat and potentially start a fire.
i Only use premium unleaded gasoline with
a minimum Posted Octane Rating of 91
(average of 96 RON/86 MON).
Information on gasoline quality can
normally be found on the fuel pump. Please
contact gas station personnel in case
labels on the pump cannot be found.
For more information on gasoline, see
“Premium unleaded gasoline”
( Y page 425), see “Fuel requirements”
( Y page 427), or contact an authorized
Mercedes-Benz Center, or visit
http://www.MBUSA.com (USA only).
Locking/unlocking the vehicle with the
SmartKey automatically locks/unlocks the
fuel filler flap.
i In case the central locking system does
not release the fuel filler flap, or the
opening mechanism is clamping, contact
Roadside Assistance or an authorized
Mercedes-Benz Center.
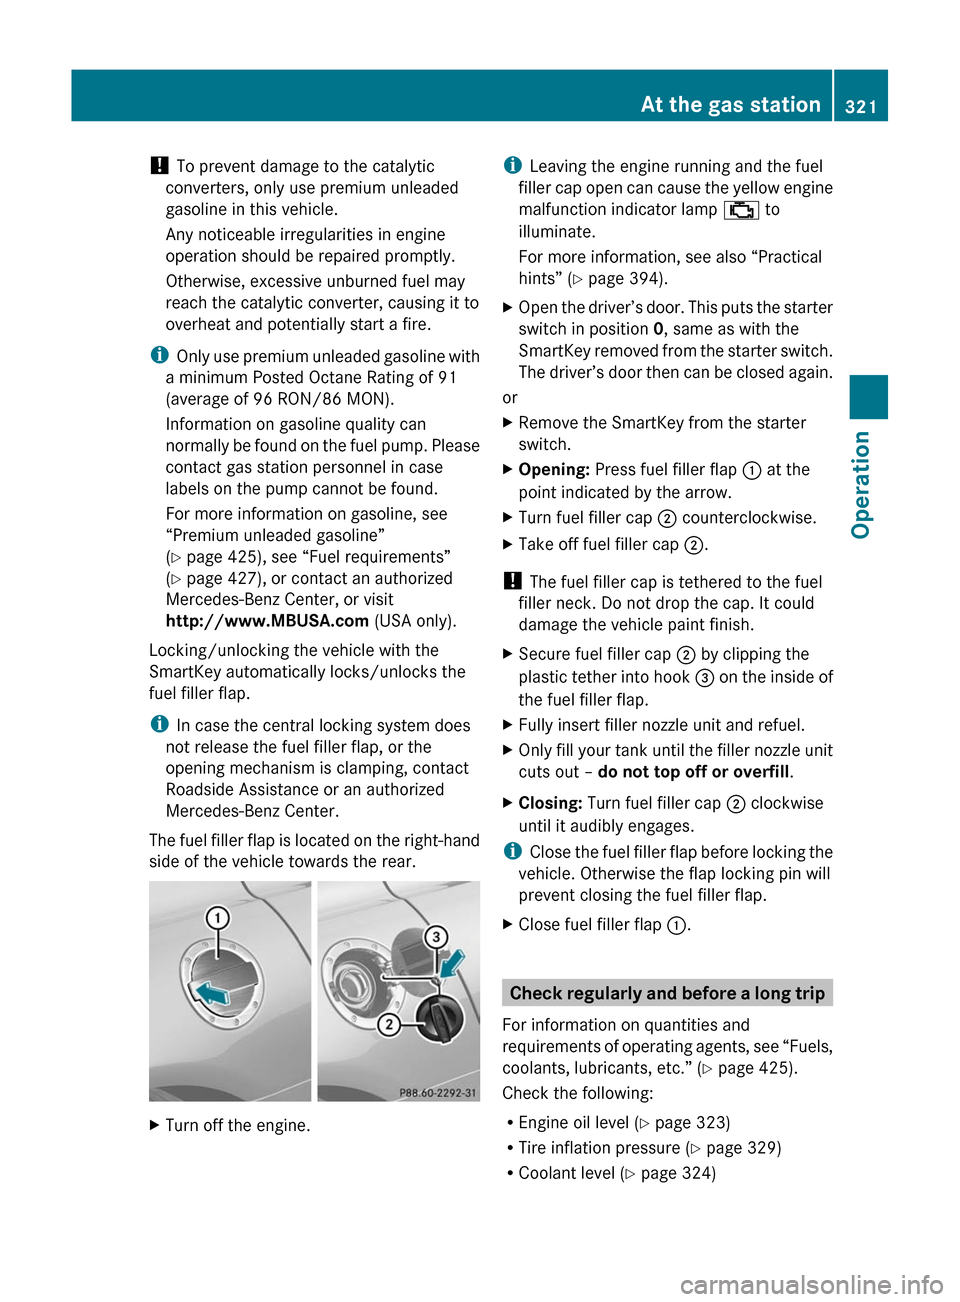
The fuel filler flap is located on the right-hand
side of the vehicle towards the rear. XTurn off the engine.i Leaving the engine running and the fuel
filler cap open can cause the yellow engine
malfunction indicator lamp ; to
illuminate.
For more information, see also “Practical
hints” ( Y page 394).XOpen the driver’s door. This puts the starter
switch in position 0, same as with the
SmartKey removed from the starter switch.
The driver’s door then can be closed again.
or
XRemove the SmartKey from the starter
switch.XOpening: Press fuel filler flap : at the
point indicated by the arrow.XTurn fuel filler cap ; counterclockwise.XTake off fuel filler cap ;.
!
The fuel filler cap is tethered to the fuel
filler neck. Do not drop the cap. It could
damage the vehicle paint finish.
XSecure fuel filler cap ; by clipping the
plastic tether into hook = on the inside of
the fuel filler flap.XFully insert filler nozzle unit and refuel.XOnly fill your tank until the filler nozzle unit
cuts out – do not top off or overfill .XClosing: Turn fuel filler cap ; clockwise
until it audibly engages.
i Close the fuel filler flap before locking the
vehicle. Otherwise the flap locking pin will
prevent closing the fuel filler flap.
XClose fuel filler flap :.
Check regularly and before a long trip
For information on quantities and
requirements of operating agents, see “Fuels,
coolants, lubricants, etc.” ( Y page 425).
Check the following:
R Engine oil level ( Y page 323)
R Tire inflation pressure ( Y page 329)
R Coolant level ( Y page 324)
At the gas station321OperationBA 197 USA, CA Edition A 2011; 1; 27, en-UShereepeVersion: 3.0.3.52010-03-24T15:31:10+01:00 - Seite 321Z
Page 331 of 436

punctured or damaged by road debris,
potholes etc.
Overinflated tires can
R adversely affect handling characteristics
R cause uneven tire wear
R be more prone to damage from road
hazards
R adversely affect ride comfort
R increase stopping distance
Checking tire inflation pressure
Safety notes
GWarning!
Follow recommended tire inflation pressures.
Do not underinflate tires. Underinflated tires
wear excessively and/or unevenly, adversely
affect handling and fuel economy, and are
more likely to fail from being overheated.
Do not overinflate tires. Overinflated tires can
adversely affect handling and ride comfort,
wear unevenly, increase stopping distance,
and result in sudden deflation (blowout)
because they are more likely to become
punctured or damaged by road debris,
potholes etc.
Do not overload the tires by exceeding the
specified load limit as indicated on the Tire
and Loading Information placard on the
driver’s door B-pillar. Overloading the tires
can overheat them, possibly causing a
blowout. Overloading the tires can also result
in handling or steering problems, or brake
failure.
Check the tire inflation pressure at least once
a month.
Check and adjust the tire inflation pressure
when the tires are cold.
Checking tire inflation pressure
manually
Follow the steps below to achieve correct tire
inflation pressure:
XRemove the cap from the valve on one tire.XFirmly press a tire gauge onto the valve.XRead the tire inflation pressure on the tire
gauge and check against the
recommended tire inflation pressure on the
Tire and Loading Information placard on the
driver’s door B-pillar ( Y page 334). If
necessary, add air to achieve the
recommended tire inflation pressure.XIf you have overfilled the tire, release tire
inflation pressure by pushing the metal
stem of the valve with e.g. a tip of a pen.
Then recheck the tire inflation pressure
with the tire gauge.XInstall the valve cap.XRepeat this procedure for each tire.
Advanced Tire Pressure Monitoring
System (Advanced TPMS)
Your vehicle is equipped with the Advanced
Tire Pressure Monitoring System (Advanced
TPMS). It measures the tire inflation pressure
in the vehicle’s tires and issues warnings in
case of pressure loss in one or more of the
tires.
The TPMS is equipped with a combination low
tire pressure/TPMS malfunction telltale
(USA) or a low tire pressure telltale (Canada)
in the instrument cluster. Depending on how
the telltale illuminates, it indicates a low tire
pressure condition or a malfunction in the
TPMS system itself:
R If the telltale illuminates continuously, one
or more of your tires is significantly
underinflated. There is no malfunction in
the TPMS.
R USA only: If the telltale flashes for 60
seconds and then stays illuminated, the
TPMS system itself is not operating
properly.
Tires and wheels329OperationBA 197 USA, CA Edition A 2011; 1; 27, en-UShereepeVersion: 3.0.3.52010-03-24T15:31:10+01:00 - Seite 329Z
Page 400 of 436

Unlocking/locking the vehicle
If you cannot lock or unlock the vehicle
centrally with the SmartKey, use the
mechanical key.
The anti-theft alarm system will be triggered
when you
Runlock the driver’s door with the
mechanical key
and
Ropen the driver’s door
To cancel the alarm, see “Canceling the
alarm” (Y page 67).
XRemove the mechanical key from the
SmartKey (Y page 397).
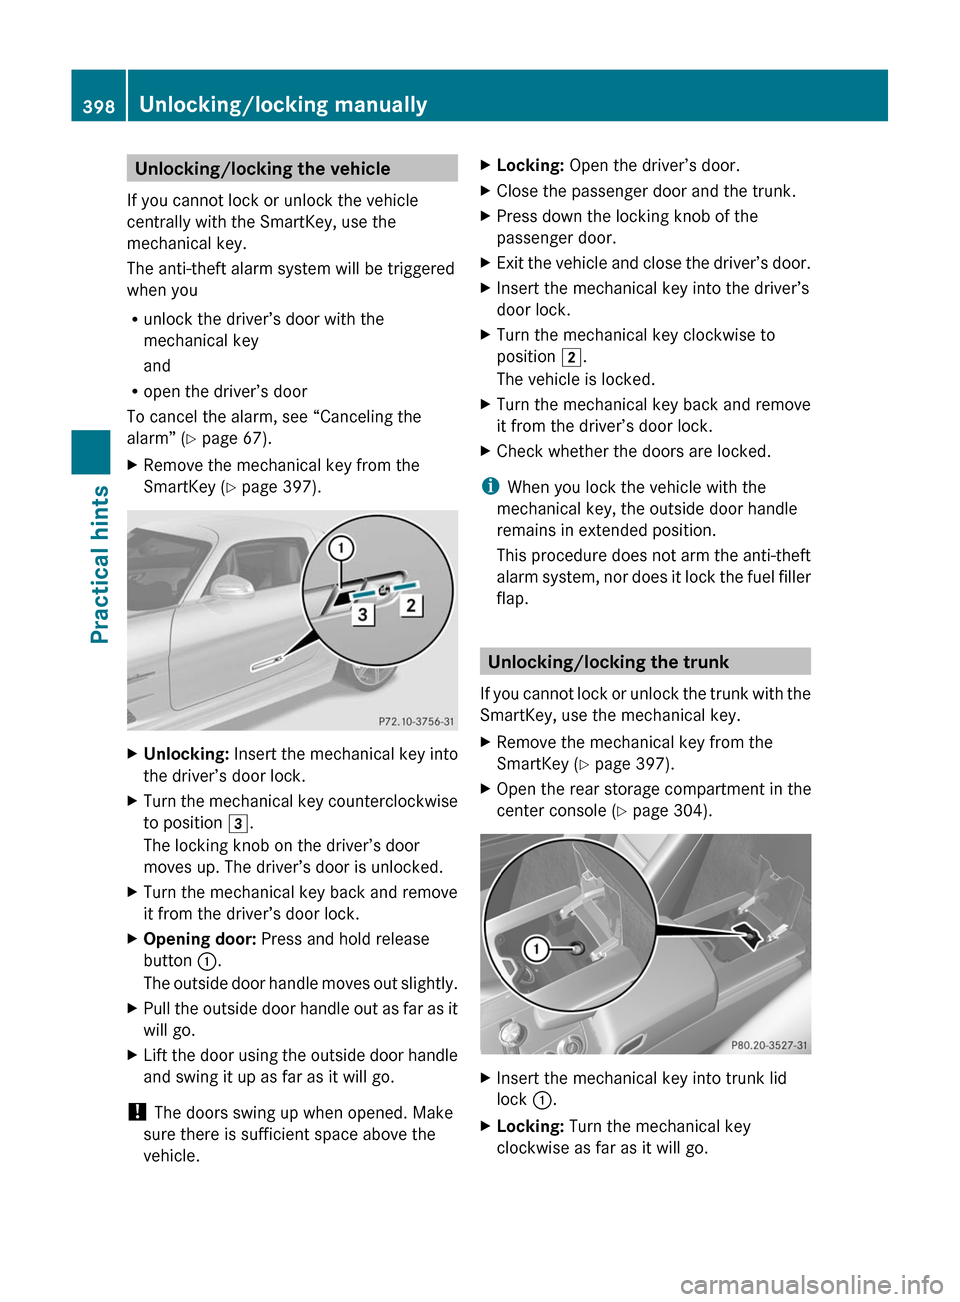
XUnlocking: Insert the mechanical key into
the driver’s door lock.
XTurn the mechanical key counterclockwise
to position 3.
The locking knob on the driver’s door
moves up. The driver’s door is unlocked.
XTurn the mechanical key back and remove
it from the driver’s door lock.
XOpening door: Press and hold release
button :.
The outside door handle moves out slightly.
XPull the outside door handle out as far as it
will go.
XLift the door using the outside door handle
and swing it up as far as it will go.
! The doors swing up when opened. Make
sure there is sufficient space above the
vehicle.
XLocking: Open the driver’s door.XClose the passenger door and the trunk.XPress down the locking knob of the
passenger door.
XExit the vehicle and close the driver’s door.XInsert the mechanical key into the driver’s
door lock.
XTurn the mechanical key clockwise to
position 2.
The vehicle is locked.
XTurn the mechanical key back and remove
it from the driver’s door lock.
XCheck whether the doors are locked.
iWhen you lock the vehicle with the
mechanical key, the outside door handle
remains in extended position.
This procedure does not arm the anti-theft
alarm system, nor does it lock the fuel filler
flap.
Unlocking/locking the trunk
If you cannot lock or unlock the trunk with the
SmartKey, use the mechanical key.
XRemove the mechanical key from the
SmartKey (Y page 397).
XOpen the rear storage compartment in the
center console (Y page 304).
XInsert the mechanical key into trunk lid
lock :.
XLocking: Turn the mechanical key
clockwise as far as it will go.
398Unlocking/locking manuallyPractical hints
BA 197 USA, CA Edition A 2011; 1; 27, en-UShereepeVersion: 3.0.3.52010-03-24T15:31:10+01:00 - Seite 398