2011 MERCEDES-BENZ SLS AMG ignition
[x] Cancel search: ignitionPage 14 of 436
GVW (Gross Vehicle Weight) ............ 345
GVWR (Gross Vehicle Weight
Rating) ................................................ 345
H
Hands-free microphone, switching
on/off ................................................. 160
Hanging up (phone calls) .................. 160
Hard disk drive voice control with ..................225, 229
Hard plastic trim items, cleaning .... 359
Hazard warning flasher .................... 252
Head air bags ....................................... 49
Headlamp cleaning system .............. 252
Headlamps Automatic headlamp mode ............250
Bi-Xenon ........................................ 249
Cleaning lenses ............................. 357
Cleaning system ............................ 252
Daytime running lamp mode ..........251
Delayed shut-off ............................ 285
High-beam flasher .........................252
High-beam headlamps ...................252
Low-beam headlamps ....................250
Replacing bulbs ............................. 400
Switch ............................................ 250
Headliner, cleaning and care of ....... 359
Height adjustment Seats ............................................. 243
Help with voice control, general ...... 232
High-beam flasher ............................. 252
High-beam headlamps ...................... 252
Indicator lamp .................................. 35
High-performance brake system ..... 350
Highway information, displaying ..... 111
Highway junctions, selecting as
destination ......................................... 120
Hill-start assist system ..................... 293
Home address in destination
memory ...................................... 122, 143
deleting .......................................... 146
setting or changing ........................143
Hood ................................................... 322
Messages in the multifunction
display ........................................... 379
Horn ...................................................... 33
House numbers, entering for
destination ................................. 119, 215
Hydroplaning ..................................... 351
I
Identification labels .......................... 420
Identification number, vehicle
(VIN) ................................................... 421
Ignition ............................... 241, 242, 258
Immobilizer .......................................... 66
Incident (traffic notification) ............ 139
Incoming calls answering ...................................... 158
rejecting .................................. 84, 158
Infant and child restraint systems
see Children in the vehicle
Inflation pressure
see Tires, Inflation pressure
Initiating phone calls
see Calling
Input of navigation destination ........ 114
speed restriction on ..............102, 123
Input speller
settings for address book ..............157
Installing map data ........................... 100
Instrument cluster ...................... 34, 271
Lamps ............................................ 388
Multifunction display .....................273
Instrument panel
see Instrument cluster
Instruments and controls
see Cockpit
Interactive content on DVDs ............ 205
Interior lighting ................................. 253
Delayed shut-off ............................ 286
Emergency lighting ........................253
Reading lamps ............................... 253
Interior rear view mirror ................... 246
Auto-dimming rear view mirrors ....247
Interior storage spaces
see Storage compartments
Intermittent wiping ........................... 254
Rain sensor .................................... 254
Interrupting audio playback ............. 186
Interrupting video playback ............. 202
Intersection (selecting) .................... 215
12IndexBA 197 USA, CA Edition A 2011; 1; 27, en-UShereepeVersion: 3.0.3.52010-03-24T15:31:10+01:00 - Seite 12
Page 46 of 436
Vehicle equipment
i This Operator’s Manual describes all
features, standard or optional, potentially
available for your vehicle at the time of
purchase. Please be aware that your
vehicle might not be equipped with all
features described in this manual.
Occupant safety
Introduction
In this section you will learn the most
important facts about the restraint system
components of the vehicle.
The restraint systems are:
R Seat belts
R Child restraints
Additional protection potential is provided by:
R Supplemental Restraint System (SRS) with
- Air bags
- Air bag control unit (with crash sensors)
- Emergency Tensioning Device (ETD) for
seat belts
- Seat belt force limiter
R Air bag system components with
- Passenger front air bag off indicator lamp
- Passenger seat with Occupant
C lassification System (OCS)
Although the systems are independent, their
protective functions work in conjunction with
each other.
GWarning!
Modifications to or work improperly
conducted on restraint system components
or their wiring, as well as tampering with
interconnected electronic systems, can lead
to the restraint systems no longer functioning
as intended.
Air bags or Emergency Tensioning Devices
(ETDs), for example, could deploy
inadvertently or fail to deploy in accidents
although the deceleration threshold for air
bag deployment is exceeded. Therefore,
never modify the restraint systems. Do not
tamper with electronic components or their
software.
i See “Children in the vehicle”
( Y page 57) for information on
R infants and children traveling with you in
the vehicle
R restraint systems for infants and children
SRS indicator lamp
The SRS system conducts a self-test when
the ignition is switched on and in regular
intervals while the engine is running. This
facilitates detection of system malfunctions.
The SRS indicator lamp 0081 in the
instrument cluster comes on when the
ignition is switched on. It goes out no later
than a few seconds after the engine has been
started.
GWarning!
The SRS self-check has detected a
malfunction when the SRS indicator lamp
0081
R does not come on at all
R fails to go out after approximately
4 seconds after the engine was started
R comes on after the engine was started or
while driving
For your safety, we strongly recommend that
you contact an authorized Mercedes-Benz
Center immediately to have the system
checked. Otherwise the SRS may not be
activated when needed in an accident, which
could result in serious or fatal injury. The SRS
might also deploy unexpectedly and
unnecessarily which could also result in injury
as well.
In addition, improper work on the SRS creates
a risk of rendering the SRS inoperative or
causing unintended air bag deployment. Work
44Occupant safetySafety and security
BA 197 USA, CA Edition A 2011; 1; 27, en-UShereepeVersion: 3.0.3.52010-03-24T15:31:10+01:00 - Seite 44
Page 63 of 436
Driving safety systems
Introduction
This section contains information about the
following driving safety systems:
R ABS ( Antilock Brake System)
R Adaptive Brake
R BAS ( Brake Assist System)
R EBP ( Electronic Brake Proportioning)
R ESC ( Electronic Stability Control)
R Trunk Wing
Safety notes
GWarning!
The following factors increase the risk of
accidents:
R Excessive speed, especially in turns
R Wet and slippery road surfaces
R Following another vehicle too closely
The driving safety systems described in this
section cannot reduce these risks or prevent
the natural laws of physics from acting on the
vehicle. They cannot increase braking or
steering efficiency beyond that afforded by
the condition of the vehicle brakes and tires
or the traction afforded.
Only a safe, attentive, and skillful driver can
prevent accidents.
The capabilities of a vehicle equipped with the
driving safety systems described in this
section must never be exploited in a reckless
or dangerous manner which could jeopardize
the user’s safety or the safety of others.
Always adjust your driving style to the
prevailing road and weather conditions and
keep a safe distance from other road users
and objects on the street.
If a driving system malfunctions, other driving
safety systems may also switch off. Observe
indicator and warning lamps that may come
on as well as messages in the multifunction
display that may appear.
i In winter operation, the maximum
effectiveness of most of the driving
systems described in this section is only
achieved with winter tires, or snow chains
as required.
ABS
GObserve Safety notes, see page 61.GWarning!
Do not pump the brake pedal. Use firm, steady
brake pedal pressure instead. Pumping the
brake pedal defeats the purpose of the ABS
and significantly reduces braking
effectiveness.
The Antilock Brake System (ABS) regulates
the brake pressure so that the wheels do not
lock during braking. This allows you to
maintain the ability to steer your vehicle.
The ABS is functional above a speed of
approximately 5 mph (8 km/h) independent
of road surface conditions.
On slippery road surfaces, the ABS will
respond even to light brake pressure.
The ABS indicator lamp 0031 in the
instrument cluster comes on when you switch
on the ignition. It goes out when the engine
is running.
Braking
At the instant one of the wheels is about to
lock up, a slight pulsation can be felt in the
brake pedal. The pulsation indicates that the
ABS is in the regulating mode.
XKeep firm and steady pressure on the brake
pedal while you feel the pulsation.
Continuous, steady brake pedal pressure
yields the advantages provided by the ABS,
namely braking power and the ability to steer
the vehicle.
The pulsating brake pedal can be an
indication of hazardous road conditions and
Driving safety systems61Safety and securityBA 197 USA, CA Edition A 2011; 1; 27, en-UShereepeVersion: 3.0.3.52010-03-24T15:31:10+01:00 - Seite 61Z
Page 64 of 436
functions as a reminder to take extra care
while driving.
Emergency brake maneuverXKeep continuous full pressure on the brake
pedal.GWarning!
If the ABS malfunctions, other driving safety
systems such as the BAS or the ESC are also
switched off. Observe indicator and warning
lamps that may come on as well as messages
in the multifunction display that may appear.
If the ABS malfunctions, the wheels may lock
during hard braking, reducing steering
capability and extending the braking distance.
BAS
GObserve Safety notes, see page 61.
The Brake Assist System (BAS) operates in
emergency situations. If you apply the brakes
very quickly, the BAS provides full brake
boost automatically, thereby potentially
reducing the braking distance.
XApply continuous full braking pressure until
the emergency braking situation is over.
The ABS will prevent the wheels from
locking.
When you release the brake pedal, the brakes
function again as normal. The BAS is then
deactivated.
GWarning!
If the BAS malfunctions, the brake system still
functions, but without the additional brake
boost available that the BAS would normally
provide in an emergency braking maneuver.
Therefore, the braking distance may increase.
ESC
GObserve Safety notes, see page 61.
The Electronic Stability Control (ESC) is
operational as soon as the engine is running.
It monitors the vehicle’s traction (force of
adhesive friction between the tires and the
road surface) and handling.
The ESC recognizes that the vehicle deviates
from the direction of travel as intended by the
driver. By applying brakes to individual
wheels and by limiting the engine output, the
ESC works to stabilize the vehicle. The ESC is
especially useful while driving off and on wet
or slippery road surfaces. The ESC also
stabilizes the vehicle during braking and
steering maneuvers.
The ESC warning lamp 00F2 in the instrument
cluster comes on when you switch on the
ignition. It goes out when the engine is
running.GWarning!
Never switch off the ESC when you see the
ESC warning lamp 00F2 flashing in the
instrument cluster. In this case proceed as
follows:
R When driving off, apply as little throttle as
possible.
R While driving, ease up on the accelerator
pedal.
R Adapt your speed and driving style to the
prevailing road conditions.
Failure to observe these guidelines could
cause the vehicle to skid. The ESC cannot
prevent accidents resulting from excessive
speed.
! Because the ESC operates automatically,
the engine and ignition must be shut off
(KEYLESS-GO start/stop button in position
0 or 1, or SmartKey in starter switch
position 0 or 1) when the electronic parking
brake is being tested on a brake test
dynamometer or when the vehicle is being
towed with the rear axle raised.
Active braking action through the ESC may
otherwise seriously damage the brake
system which is not covered by the
Mercedes-Benz Limited Warranty.
62Driving safety systemsSafety and security
BA 197 USA, CA Edition A 2011; 1; 27, en-UShereepeVersion: 3.0.3.52010-03-24T15:31:10+01:00 - Seite 62
Page 68 of 436
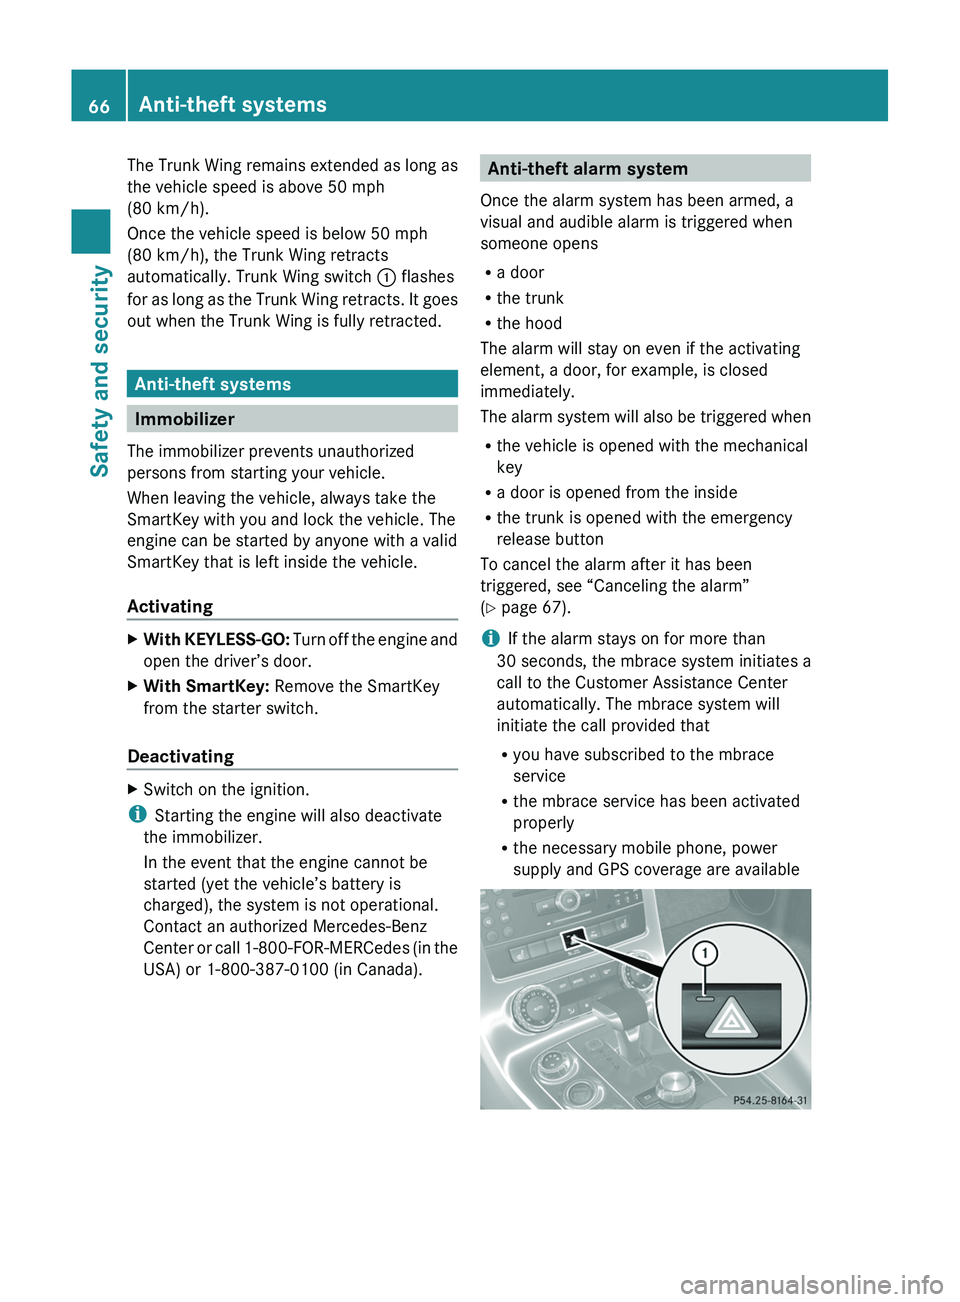
The Trunk Wing remains extended as long as
the vehicle speed is above 50 mph
(80 km/h).
Once the vehicle speed is below 50 mph
(80 km/h), the Trunk Wing retracts
automatically. Trunk Wing switch \000F flashes
for as long as the Trunk Wing retracts. It goes
out when the Trunk Wing is fully retracted.
Anti-theft systems
Immobilizer
The immobilizer prevents unauthorized
persons from starting your vehicle.
When leaving the vehicle, always take the
SmartKey with you and lock the vehicle. The
engine can be started by anyone with a valid
SmartKey that is left inside the vehicle.
Activating
XWith KEYLESS-GO: Turn off the engine and
open the driver’s door.
XWith SmartKey: Remove the SmartKey
from the starter switch.
Deactivating
XSwitch on the ignition.
iStarting the engine will also deactivate
the immobilizer.
In the event that the engine cannot be
started (yet the vehicle’s battery is
charged), the system is not operational.
Contact an authorized Mercedes-Benz
Center or call 1-800-FOR-MERCedes (in the
USA) or 1-800-387-0100 (in Canada).
Anti-theft alarm system
Once the alarm system has been armed, a
visual and audible alarm is triggered when
someone opens
Ra door
Rthe trunk
Rthe hood
The alarm will stay on even if the activating
element, a door, for example, is closed
immediately.
The alarm system will also be triggered when
Rthe vehicle is opened with the mechanical
key
Ra door is opened from the inside
Rthe trunk is opened with the emergency
release button
To cancel the alarm after it has been
triggered, see “Canceling the alarm”
(Y page 67).
iIf the alarm stays on for more than
30 seconds, the mbrace system initiates a
call to the Customer Assistance Center
automatically. The mbrace system will
initiate the call provided that
Ryou have subscribed to the mbrace
service
Rthe mbrace service has been activated
properly
Rthe necessary mobile phone, power
supply and GPS coverage are available
66Anti-theft systemsSafety and security
BA 197 USA, CA Edition A 2011; 1; 27, en-UShereepeVersion: 3.0.3.52010-03-24T15:31:10+01:00 - Seite 66
Page 241 of 436
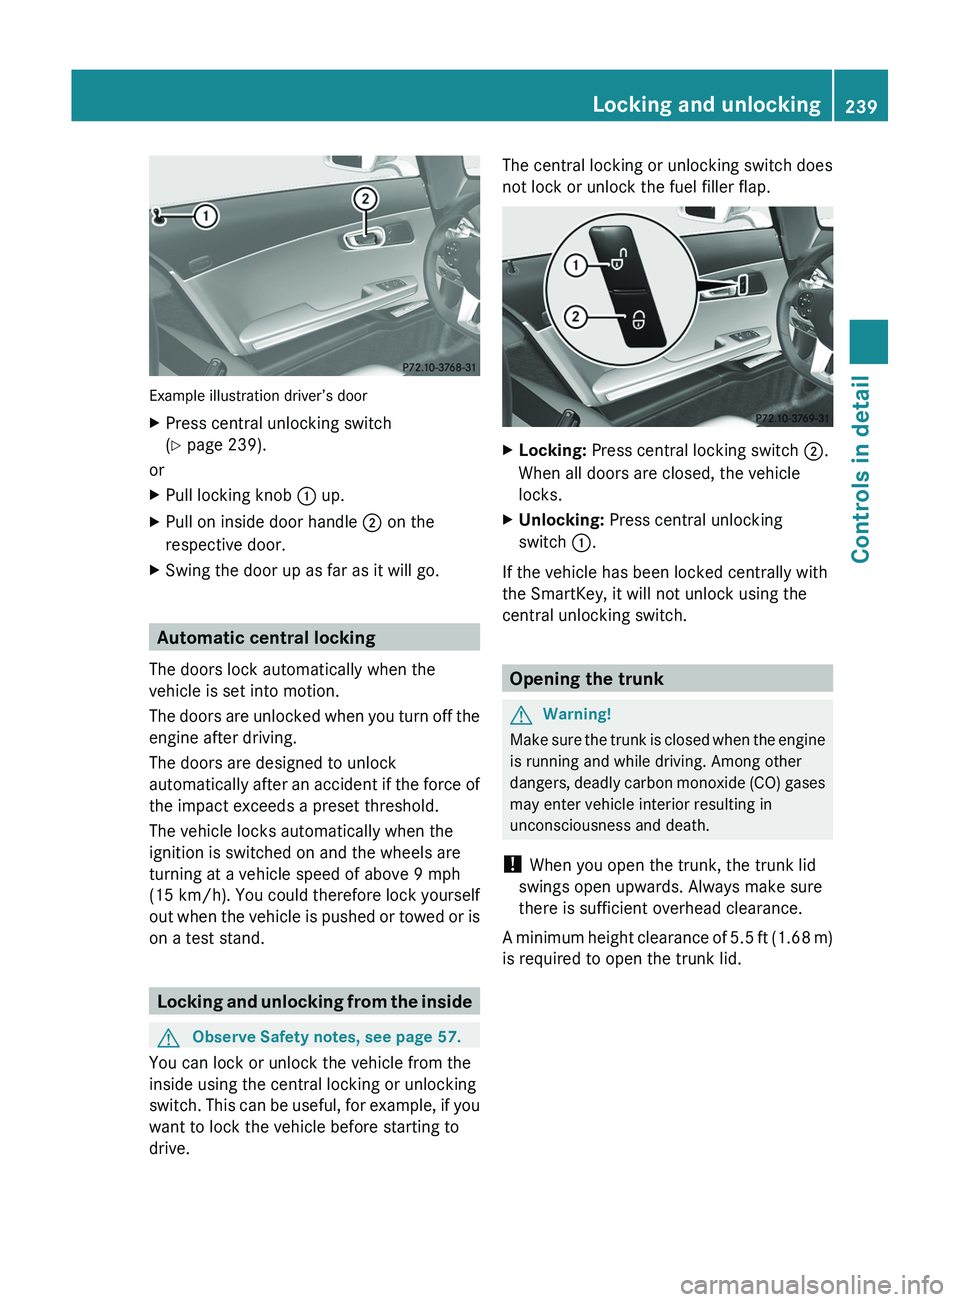
Example illustration driver’s door
XPress central unlocking switch
( Y page 239).
or
XPull locking knob 0046 up.XPull on inside door handle 0047 on the
respective door.XSwing the door up as far as it will go.
Automatic central locking
The doors lock automatically when the
vehicle is set into motion.
The doors are unlocked when you turn off the
engine after driving.
The doors are designed to unlock
automatically after an accident if the force of
the impact exceeds a preset threshold.
The vehicle locks automatically when the
ignition is switched on and the wheels are
turning at a vehicle speed of above 9 mph
(15 km/h) . You could therefore lock yourself
out when the vehicle is pushed or towed or is
on a test stand.
Locking and unlocking from the inside
GObserve Safety notes, see page 57.
You can lock or unlock the vehicle from the
inside using the central locking or unlocking
switch. This can be useful, for example, if you
want to lock the vehicle before starting to
drive.
The central locking or unlocking switch does
not lock or unlock the fuel filler flap.XLocking: Press central locking switch 0047.
When all doors are closed, the vehicle
locks.XUnlocking: Press central unlocking
switch 0046.
If the vehicle has been locked centrally with
the SmartKey, it will not unlock using the
central unlocking switch.
Opening the trunk
GWarning!
Make sure the trunk is closed when the engine
is running and while driving. Among other
dangers, deadly carbon monoxide (CO) gases
may enter vehicle interior resulting in
unconsciousness and death.
! When you open the trunk, the trunk lid
swings open upwards. Always make sure
there is sufficient overhead clearance.
A minimum height clearance of 5.5 ft (1.68 m)
is required to open the trunk lid.
Locking and unlocking239Controls in detailBA 197 USA, CA Edition A 2011; 1; 27, en-UShereepeVersion: 3.0.3.52010-03-24T15:31:10+01:00 - Seite 239Z
Page 244 of 436
corresponds to the various starter switch
positions (Y page 242).
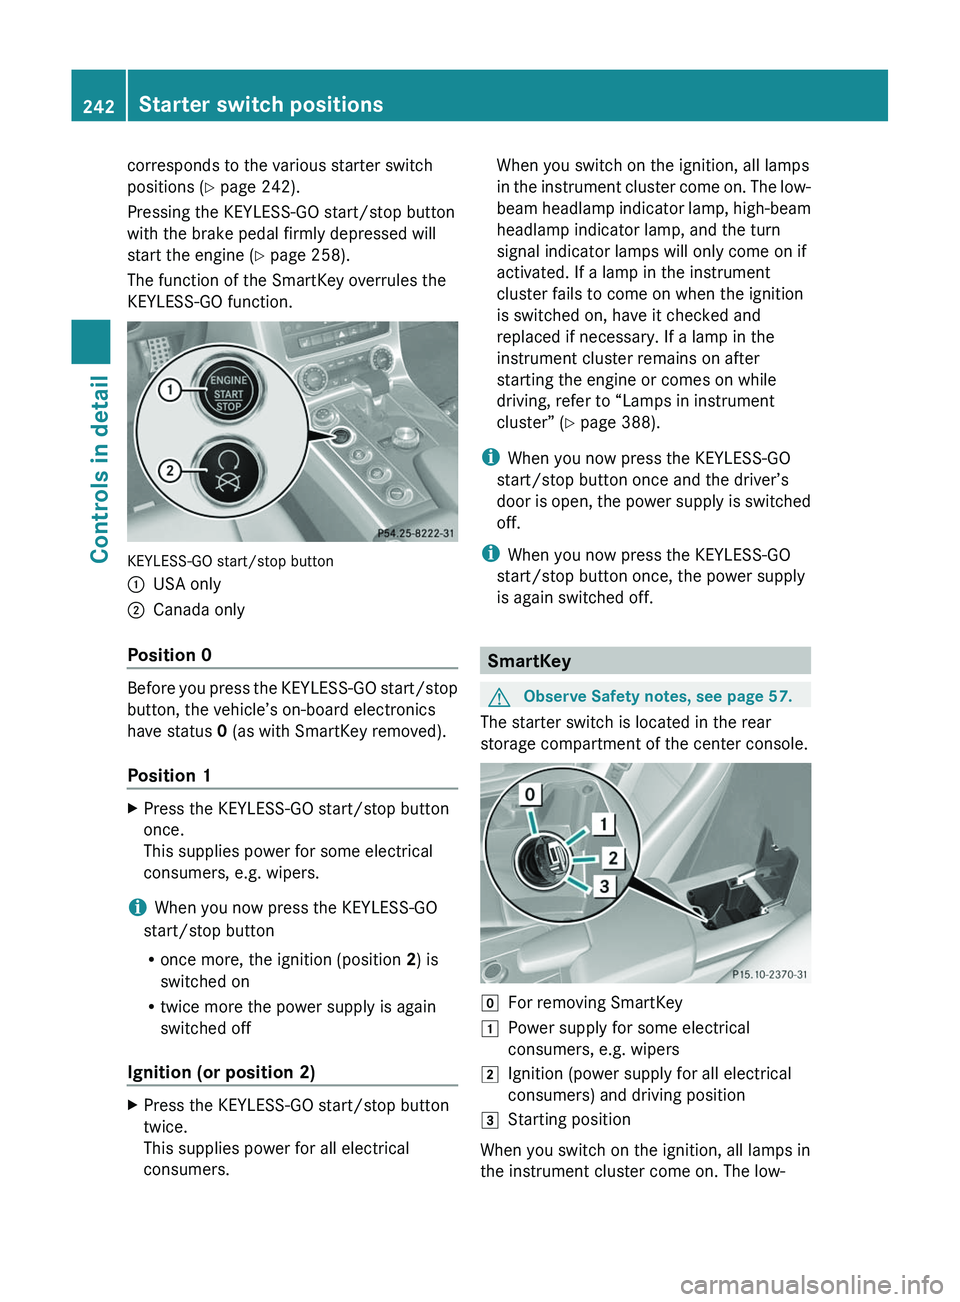
Pressing the KEYLESS-GO start/stop button
with the brake pedal firmly depressed will
start the engine (Y page 258).
The function of the SmartKey overrules the
KEYLESS-GO function.
KEYLESS-GO start/stop button
\000FUSA only\000GCanada only
Position 0
Before you press the KEYLESS-GO start/stop
button, the vehicle’s on-board electronics
have status 0 (as with SmartKey removed).
Position 1
XPress the KEYLESS-GO start/stop button
once.
This supplies power for some electrical
consumers, e.g. wipers.
iWhen you now press the KEYLESS-GO
start/stop button
Ronce more, the ignition (position 2) is
switched on
Rtwice more the power supply is again
switched off
Ignition (or position 2)
XPress the KEYLESS-GO start/stop button
twice.
This supplies power for all electrical
consumers.
When you switch on the ignition, all lamps
in the instrument cluster come on. The low-
beam headlamp indicator lamp, high-beam
headlamp indicator lamp, and the turn
signal indicator lamps will only come on if
activated. If a lamp in the instrument
cluster fails to come on when the ignition
is switched on, have it checked and
replaced if necessary. If a lamp in the
instrument cluster remains on after
starting the engine or comes on while
driving, refer to “Lamps in instrument
cluster” (Y page 388).
iWhen you now press the KEYLESS-GO
start/stop button once and the driver’s
door is open, the power supply is switched
off.
iWhen you now press the KEYLESS-GO
start/stop button once, the power supply
is again switched off.
SmartKey
GObserve Safety notes, see page 57.
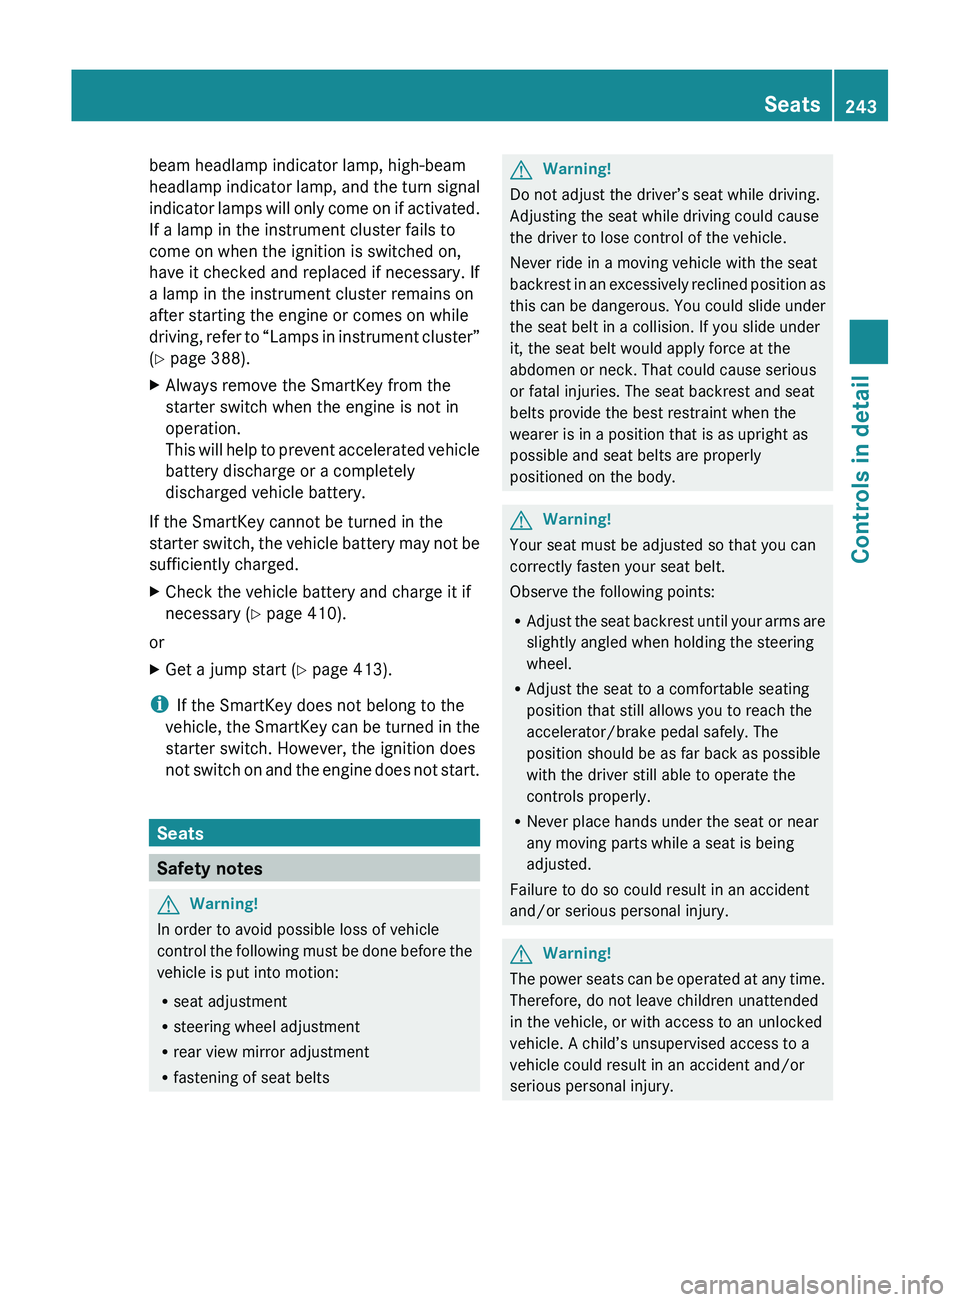
The starter switch is located in the rear
storage compartment of the center console.
\000]For removing SmartKey\000JPower supply for some electrical
consumers, e.g. wipers
\000KIgnition (power supply for all electrical
consumers) and driving position
\000LStarting position
When you switch on the ignition, all lamps in
the instrument cluster come on. The low-
242Starter switch positionsControls in detail
BA 197 USA, CA Edition A 2011; 1; 27, en-UShereepeVersion: 3.0.3.52010-03-24T15:31:10+01:00 - Seite 242
Page 245 of 436
beam headlamp indicator lamp, high-beam
headlamp indicator lamp, and the turn signal
indicator lamps will only come on if activated.
If a lamp in the instrument cluster fails to
come on when the ignition is switched on,
have it checked and replaced if necessary. If
a lamp in the instrument cluster remains on
after starting the engine or comes on while
driving, refer to “Lamps in instrument cluster”
( Y page 388).XAlways remove the SmartKey from the
starter switch when the engine is not in
operation.
This will help to prevent accelerated vehicle
battery discharge or a completely
discharged vehicle battery.
If the SmartKey cannot be turned in the
starter switch, the vehicle battery may not be
sufficiently charged.
XCheck the vehicle battery and charge it if
necessary ( Y page 410).
or
XGet a jump start ( Y page 413).
i
If the SmartKey does not belong to the
vehicle, the SmartKey can be turned in the
starter switch. However, the ignition does
not switch on and the engine does not start.
Seats
Safety notes
GWarning!
In order to avoid possible loss of vehicle
control the following must be done before the
vehicle is put into motion:
R seat adjustment
R steering wheel adjustment
R rear view mirror adjustment
R fastening of seat belts
GWarning!
Do not adjust the driver’s seat while driving.
Adjusting the seat while driving could cause
the driver to lose control of the vehicle.
Never ride in a moving vehicle with the seat
backrest in an excessively reclined position as
this can be dangerous. You could slide under
the seat belt in a collision. If you slide under
it, the seat belt would apply force at the
abdomen or neck. That could cause serious
or fatal injuries. The seat backrest and seat
belts provide the best restraint when the
wearer is in a position that is as upright as
possible and seat belts are properly
positioned on the body.
GWarning!
Your seat must be adjusted so that you can
correctly fasten your seat belt.
Observe the following points:
R Adjust the seat backrest until your arms are
slightly angled when holding the steering
wheel.
R Adjust the seat to a comfortable seating
position that still allows you to reach the
accelerator/brake pedal safely. The
position should be as far back as possible
with the driver still able to operate the
controls properly.
R Never place hands under the seat or near
any moving parts while a seat is being
adjusted.
Failure to do so could result in an accident
and/or serious personal injury.
GWarning!
The power seats can be operated at any time.
Therefore, do not leave children unattended
in the vehicle, or with access to an unlocked
vehicle. A child’s unsupervised access to a
vehicle could result in an accident and/or
serious personal injury.
Seats243Controls in detailBA 197 USA, CA Edition A 2011; 1; 27, en-UShereepeVersion: 3.0.3.52010-03-24T15:31:10+01:00 - Seite 243Z