2011 MERCEDES-BENZ SLS AMG ignition
[x] Cancel search: ignitionPage 278 of 436
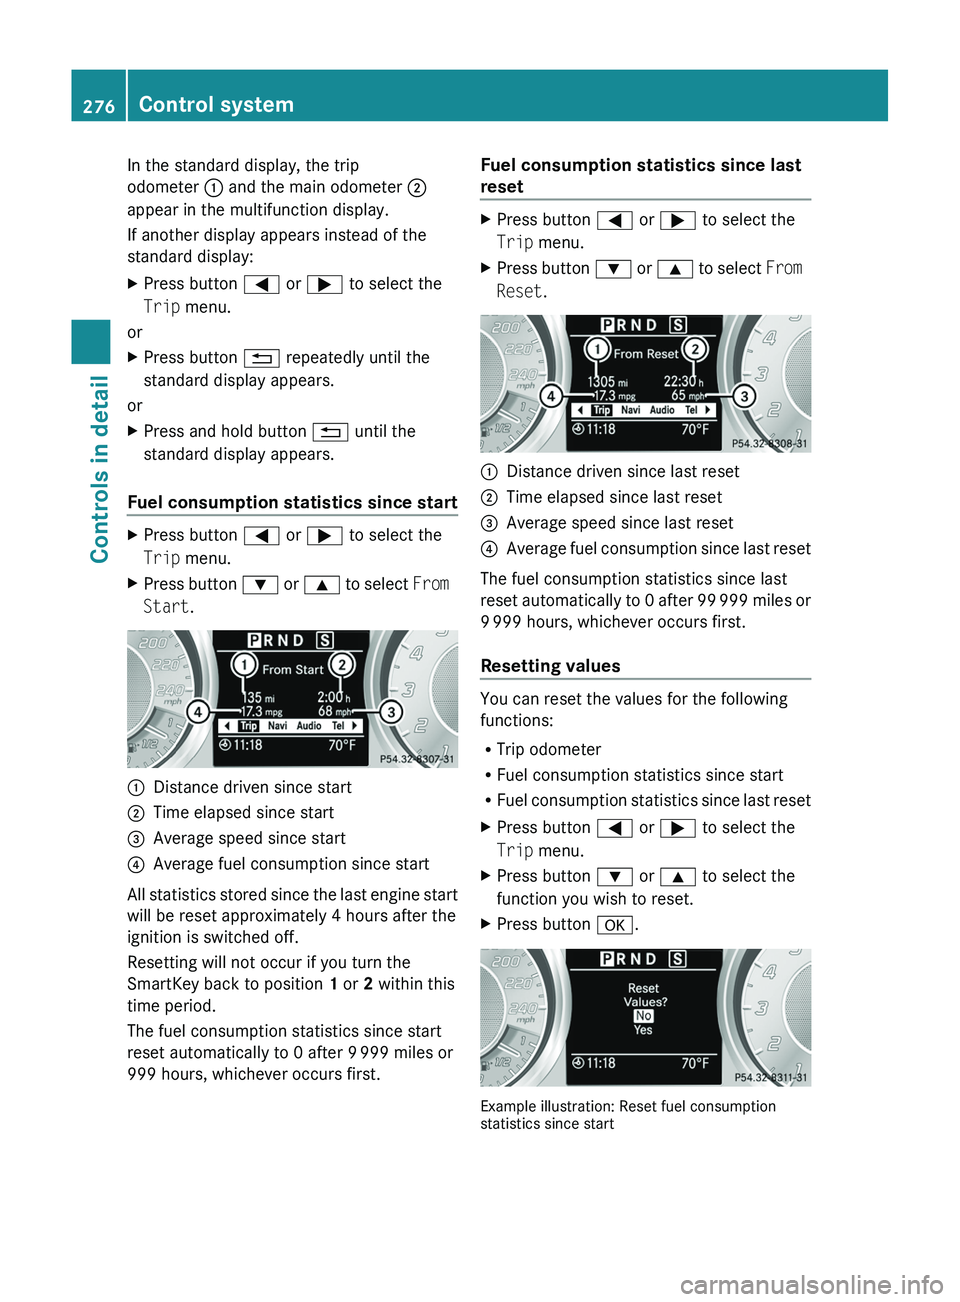
In the standard display, the trip
odometer 0046 and the main odometer 0047
appear in the multifunction display.
If another display appears instead of the
standard display:XPress button 0040 or 003E to select the
Trip menu.
or
XPress button 0041 repeatedly until the
standard display appears.
or
XPress and hold button 0041 until the
standard display appears.
Fuel consumption statistics since start
XPress button 0040 or 003E to select the
Trip menu.XPress button 003D or 003C to select From
Start .0046Distance driven since start0047Time elapsed since start008AAverage speed since start0088Average fuel consumption since start
All statistics stored since the last engine start
will be reset approximately 4 hours after the
ignition is switched off.
Resetting will not occur if you turn the
SmartKey back to position 1 or 2 within this
time period.
The fuel consumption statistics since start
reset automatically to 0 after 9 999 miles or
999 hours, whichever occurs first.
Fuel consumption statistics since last
resetXPress button 0040 or 003E to select the
Trip menu.XPress button 003D or 003C to select From
Reset .0046Distance driven since last reset0047Time elapsed since last reset008AAverage speed since last reset0088Average fuel consumption since last reset
The fuel consumption statistics since last
reset automatically to 0 after 99 999 miles or
9 999 hours, whichever occurs first.
Resetting values
You can reset the values for the following
functions:
R Trip odometer
R Fuel consumption statistics since start
R Fuel consumption statistics since last reset
XPress button 0040 or 003E to select the
Trip menu.XPress button 003D or 003C to select the
function you wish to reset.XPress button 0064.
Example illustration: Reset fuel consumption
statistics since start
276Control systemControls in detail
BA 197 USA, CA Edition A 2011; 1; 27, en-UShereepeVersion: 3.0.3.52010-03-24T15:31:10+01:00 - Seite 276
Page 289 of 436
wheel when the easy-entry/exit feature is
activated.
To stop steering wheel movement, move
steering wheel adjustment stalk or press one
of the memory position buttons.
Do not leave children unattended in the
vehicle, or with access to an unlocked vehicle.
Children could open the driver’s door and
unintentionally activate the easy-entry/exit
feature, which could result in an accident
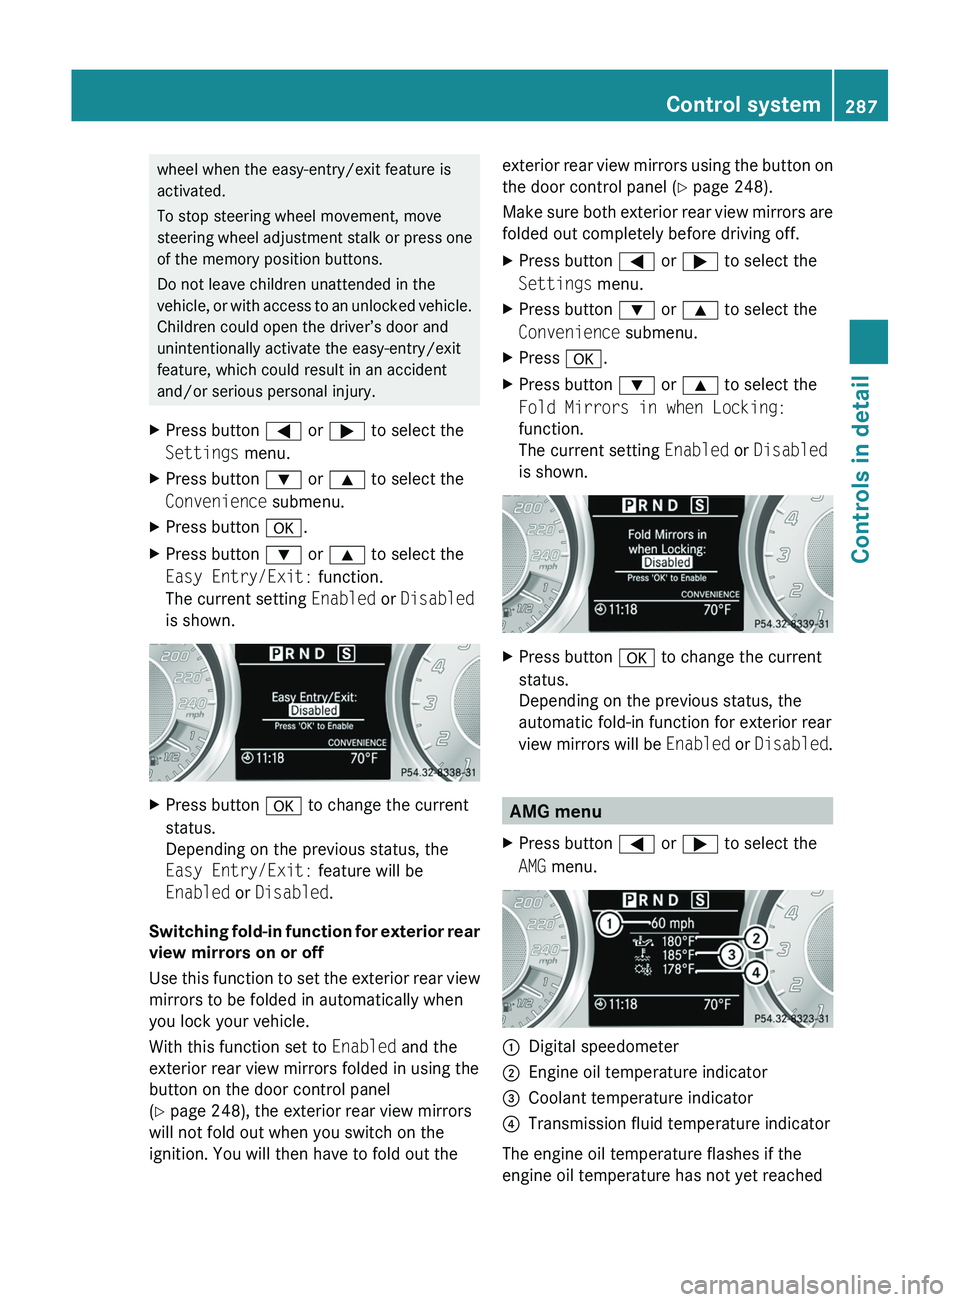
and/or serious personal injury.XPress button 0040 or 003E to select the
Settings menu.XPress button 003D or 003C to select the
Convenience submenu.XPress button 0064.XPress button 003D or 003C to select the
Easy Entry/Exit: function.
The current setting Enabled or Disabled
is shown.XPress button 0064 to change the current
status.
Depending on the previous status, the
Easy Entry/Exit: feature will be
Enabled or Disabled .
Switching fold-in function for exterior rear
view mirrors on or off
Use this function to set the exterior rear view
mirrors to be folded in automatically when
you lock your vehicle.
With this function set to Enabled and the
exterior rear view mirrors folded in using the
button on the door control panel
( Y page 248), the exterior rear view mirrors
will not fold out when you switch on the
ignition. You will then have to fold out the
exterior rear view mirrors using the button on
the door control panel ( Y page 248).
Make sure both exterior rear view mirrors are
folded out completely before driving off.XPress button 0040 or 003E to select the
Settings menu.XPress button 003D or 003C to select the
Convenience submenu.XPress 0064.XPress button 003D or 003C to select the
Fold Mirrors in when Locking:
function.
The current setting Enabled or Disabled
is shown.XPress button 0064 to change the current
status.
Depending on the previous status, the
automatic fold-in function for exterior rear
view mirrors will be Enabled or Disabled .
AMG menu
XPress button 0040 or 003E to select the
AMG menu.0046Digital speedometer0047Engine oil temperature indicator008ACoolant temperature indicator0088Transmission fluid temperature indicator
The engine oil temperature flashes if the
engine oil temperature has not yet reached
Control system287Controls in detailBA 197 USA, CA Edition A 2011; 1; 27, en-UShereepeVersion: 3.0.3.52010-03-24T15:31:10+01:00 - Seite 287Z
Page 290 of 436
176‡ (80†). During this time, avoid driving
at full engine speed.
Use buttons 003D or 003C to select the
following functions in the AMG menu:
R SETUP ( Y page 288)
R RACETIMER ( Y page 288)
R Overall analysis ( Y page 289)
R Lap analysis ( Y page 289)
SETUP
SETUP indicates the current driving program
mode and the ESC mode.
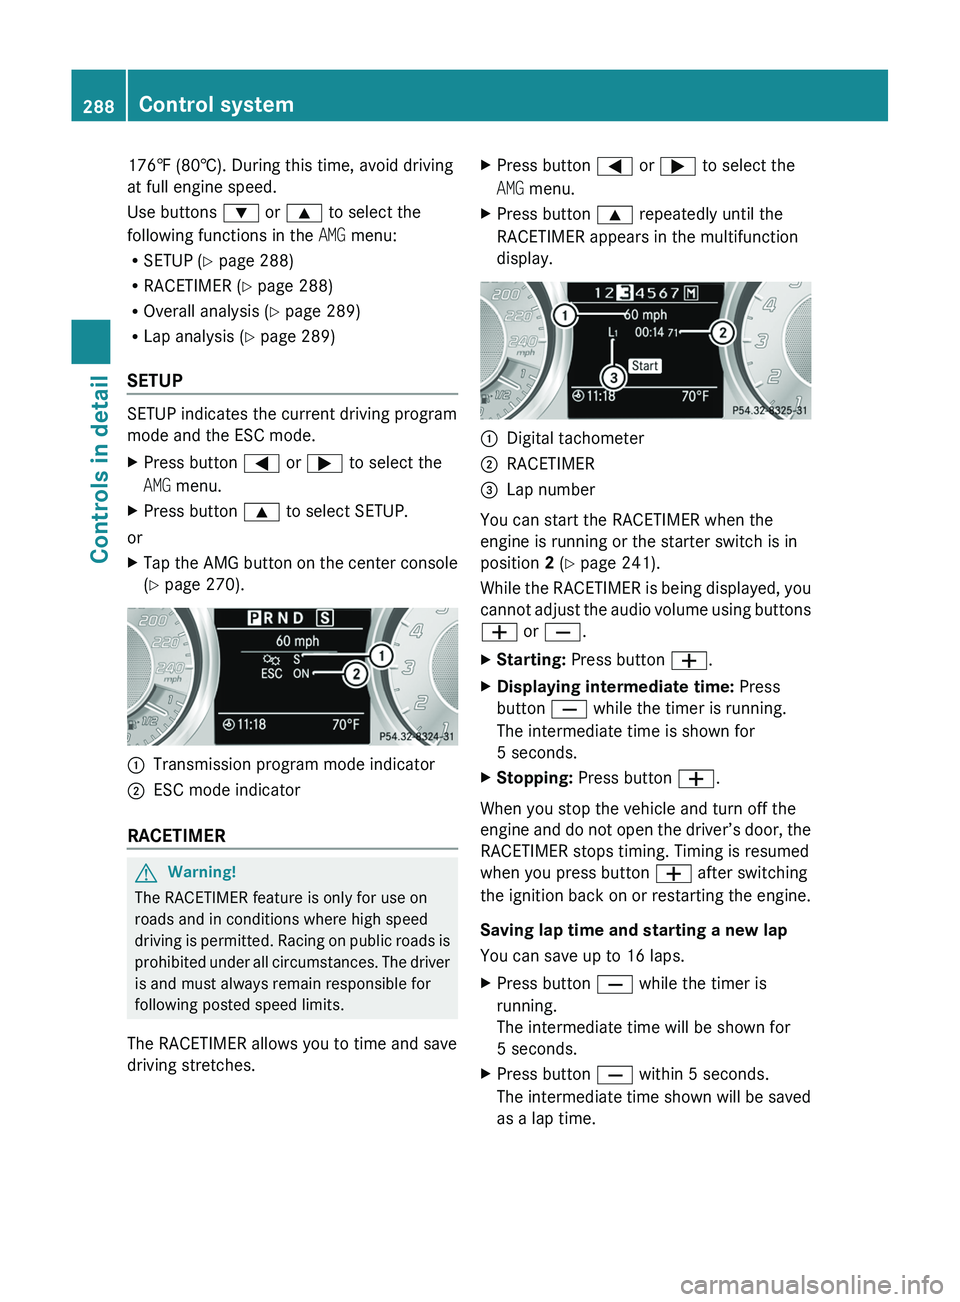
XPress button 0040 or 003E to select the
AMG menu.XPress button 003C to select SETUP.
or
XTap the AMG button on the center console
( Y page 270).0046Transmission program mode indicator0047ESC mode indicator
RACETIMER
GWarning!
The RACETIMER feature is only for use on
roads and in conditions where high speed
driving is permitted. Racing on public roads is
prohibited under all circumstances. The driver
is and must always remain responsible for
following posted speed limits.
The RACETIMER allows you to time and save
driving stretches.
XPress button 0040 or 003E to select the
AMG menu.XPress button 003C repeatedly until the
RACETIMER appears in the multifunction
display.0046Digital tachometer0047RACETIMER008ALap number
You can start the RACETIMER when the
engine is running or the starter switch is in
position 2 (Y page 241).
While the RACETIMER is being displayed, you
cannot adjust the audio volume using buttons
005A or 005B .
XStarting: Press button 005A.XDisplaying intermediate time: Press
button 005B while the timer is running.
The intermediate time is shown for
5 seconds.XStopping: Press button 005A.
When you stop the vehicle and turn off the
engine and do not open the driver’s door, the
RACETIMER stops timing. Timing is resumed
when you press button 005A after switching
the ignition back on or restarting the engine.
Saving lap time and starting a new lap
You can save up to 16 laps.
XPress button 005B while the timer is
running.
The intermediate time will be shown for
5 seconds.XPress button 005B within 5 seconds.
The intermediate time shown will be saved
as a lap time.288Control systemControls in detail
BA 197 USA, CA Edition A 2011; 1; 27, en-UShereepeVersion: 3.0.3.52010-03-24T15:31:10+01:00 - Seite 288
Page 296 of 436
Parktronic system
The Parktronic system is an electronic
parking aid with ultrasonic sensors designed
to assist the driver during parking maneuvers.
The Parktronic system indicates the relative
distance between the vehicle and an obstacle
visually and audibly.
The Parktronic system is activated
automatically when
Ryou switch on the ignition
and
Ryou release the electronic parking brake
or
Ryou start the engine
and
Rshift the transmission into drive position
D, reverse gear R, or neutral position N
The Parktronic system deactivates at speeds
above approximately 11 mph (18 km/h). At
lower speeds, the Parktronic system
activates again.
The Parktronic system also deactivates when
you shift the transmission into park position
P or engage the electronic parking brake and
turn off the engine.
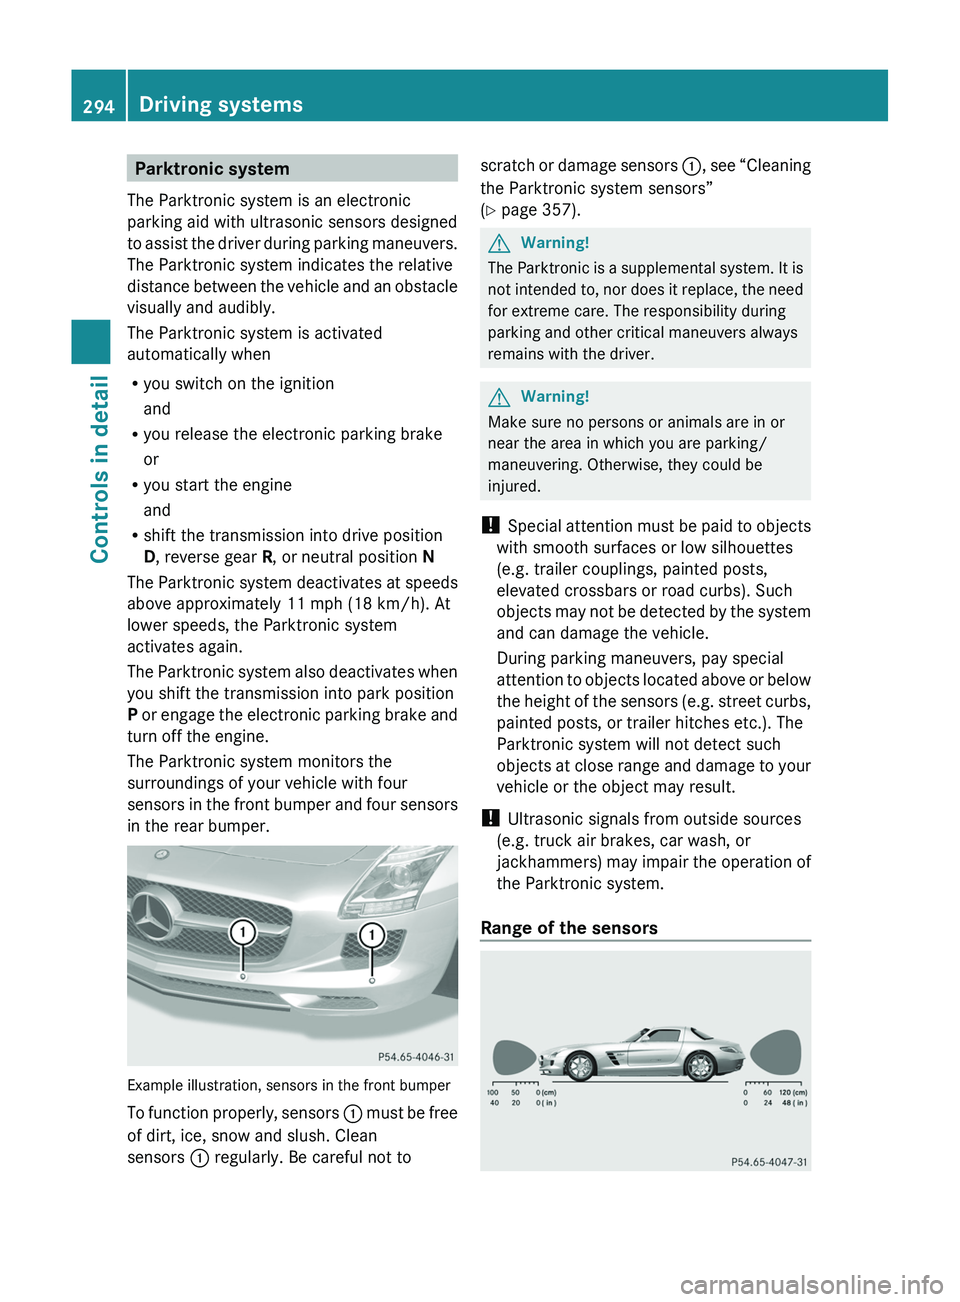
The Parktronic system monitors the
surroundings of your vehicle with four
sensors in the front bumper and four sensors
in the rear bumper.
Example illustration, sensors in the front bumper
To function properly, sensors \000F must be free
of dirt, ice, snow and slush. Clean
sensors \000F regularly. Be careful not to
scratch or damage sensors \000F, see “Cleaning
the Parktronic system sensors”
(Y page 357).
GWarning!
The Parktronic is a supplemental system. It is
not intended to, nor does it replace, the need
for extreme care. The responsibility during
parking and other critical maneuvers always
remains with the driver.
GWarning!
Make sure no persons or animals are in or
near the area in which you are parking/
maneuvering. Otherwise, they could be
injured.
! Special attention must be paid to objects
with smooth surfaces or low silhouettes
(e.g. trailer couplings, painted posts,
elevated crossbars or road curbs). Such
objects may not be detected by the system
and can damage the vehicle.
During parking maneuvers, pay special
attention to objects located above or below
the height of the sensors (e.g. street curbs,
painted posts, or trailer hitches etc.). The
Parktronic system will not detect such
objects at close range and damage to your
vehicle or the object may result.
! Ultrasonic signals from outside sources
(e.g. truck air brakes, car wash, or
jackhammers) may impair the operation of
the Parktronic system.
Range of the sensors
294Driving systemsControls in detail
BA 197 USA, CA Edition A 2011; 1; 27, en-UShereepeVersion: 3.0.3.52010-03-24T15:31:10+01:00 - Seite 294
Page 298 of 436
As your vehicle approaches an object, one or
more distance segments will illuminate,
depending on the distance. When the seventh
distance segment illuminates, you have
reached the minimum distance.
RFront area: An intermittent acoustic
warning will sound as the first red distance
segment illuminates and a constant
acoustic warning lasting a maximum of
2 seconds will sound for the second red
distance segment. The signal is canceled
when the transmission is shifted into park
position P.
RRear area: An intermittent acoustic
warning will sound as the first red distance
segment illuminates and a constant
acoustic warning lasting a maximum of
2 seconds will sound for the second red
distance segment. The signal is canceled
when the transmission is shifted into drive
position D or park position P.
Switching the Parktronic system on/off
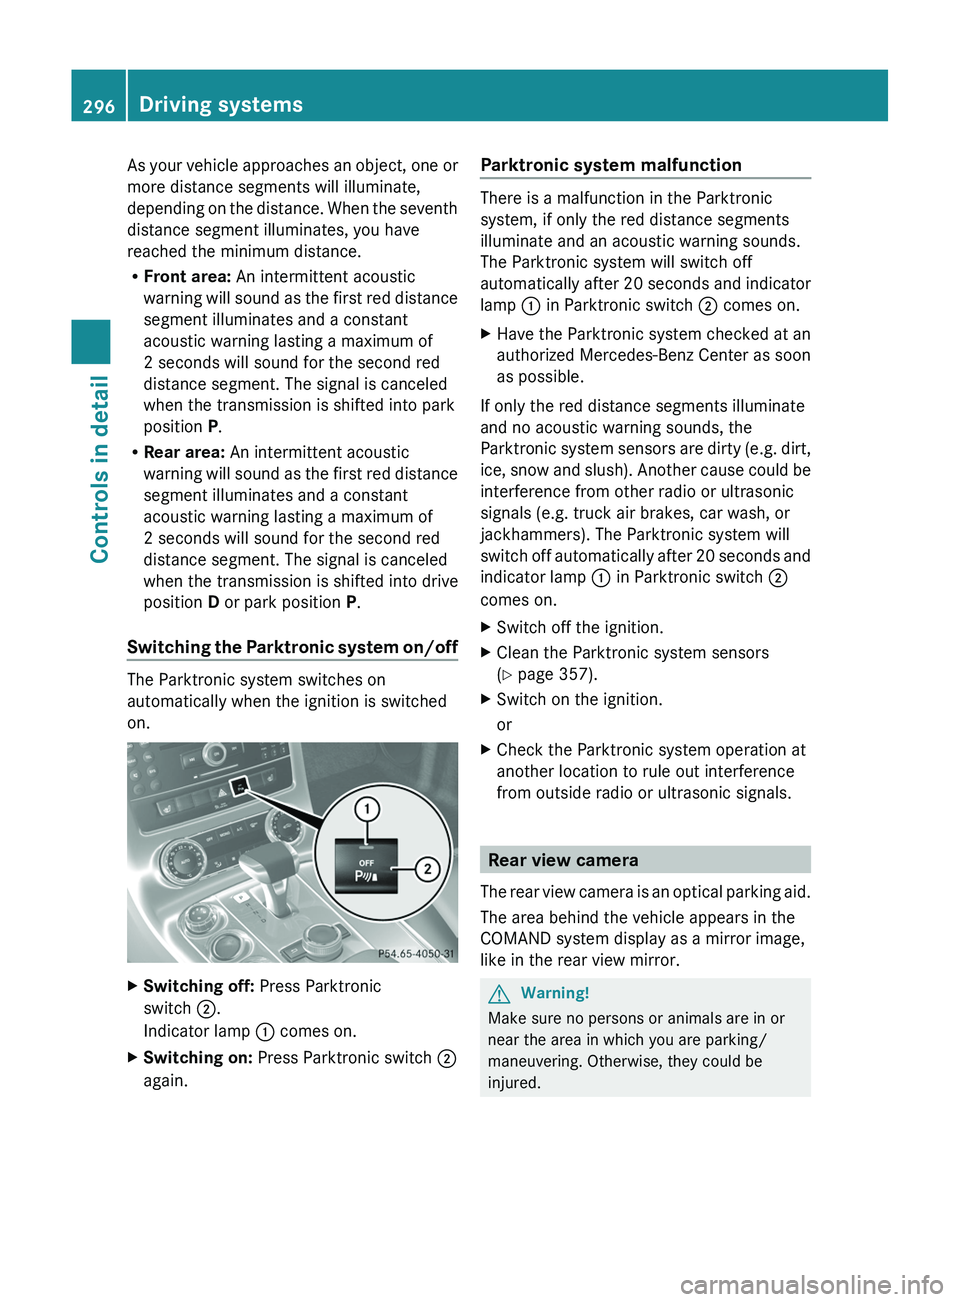
The Parktronic system switches on
automatically when the ignition is switched
on.
XSwitching off: Press Parktronic
switch \000G.
Indicator lamp \000F comes on.
XSwitching on: Press Parktronic switch \000G
again.
Parktronic system malfunction
There is a malfunction in the Parktronic
system, if only the red distance segments
illuminate and an acoustic warning sounds.
The Parktronic system will switch off
automatically after 20 seconds and indicator
lamp \000F in Parktronic switch \000G comes on.
XHave the Parktronic system checked at an
authorized Mercedes-Benz Center as soon
as possible.
If only the red distance segments illuminate
and no acoustic warning sounds, the
Parktronic system sensors are dirty (e.g. dirt,
ice, snow and slush). Another cause could be
interference from other radio or ultrasonic
signals (e.g. truck air brakes, car wash, or
jackhammers). The Parktronic system will
switch off automatically after 20 seconds and
indicator lamp \000F in Parktronic switch \000G
comes on.
XSwitch off the ignition.XClean the Parktronic system sensors
(Y page 357).
XSwitch on the ignition.
or
XCheck the Parktronic system operation at
another location to rule out interference
from outside radio or ultrasonic signals.
Rear view camera
The rear view camera is an optical parking aid.
The area behind the vehicle appears in the
COMAND system display as a mirror image,
like in the rear view mirror.
GWarning!
Make sure no persons or animals are in or
near the area in which you are parking/
maneuvering. Otherwise, they could be
injured.
296Driving systemsControls in detail
BA 197 USA, CA Edition A 2011; 1; 27, en-UShereepeVersion: 3.0.3.52010-03-24T15:31:10+01:00 - Seite 296
Page 299 of 436
GWarning!
The rear view camera is only an aid and may
display obstacles
R from a distorted perspective
R inaccurately
R may not display obstacles at all
The rear view camera does not relieve you of
the responsibility to be cautious. Take care
and pay careful attention. The rear view
camera may not show objects which are
R very close to the rear bumper
R under the rear bumper
You are responsible for safety at all times and
must continue to pay attention to the
immediate surroundings when parking and
maneuvering. This includes the area behind,
in front of, and beside the vehicle. Otherwise
you could endanger yourself and/or others.
GWarning!
The rear view camera either will not function
or will not function to its full capability if
R the trunk lid is open
R it is raining very hard, snowing or foggy
R it is night or you are parking/maneuvering
your vehicle in an area where it is very dark
R the camera is exposed to a very bright white
light
R the immediate surroundings are
illuminated with fluorescent light (the
COMAND system display can flicker)
R there is a sudden change in temperature,
e.g. if you drive into a heated garage from
the cold (lens condensation)
R the camera lens is dirty or covered
R the rear of your vehicle is damaged
In this case, have the position and setting
of the camera checked by a qualified
specialist workshop. Mercedes-Benz
recommends that you contact a Mercedes-
Benz Center for this purpose.
Do not use the rear view camera in these
situations. Otherwise you could injure
yourself or others and/or damage property
including your vehicle while parking/
maneuvering.
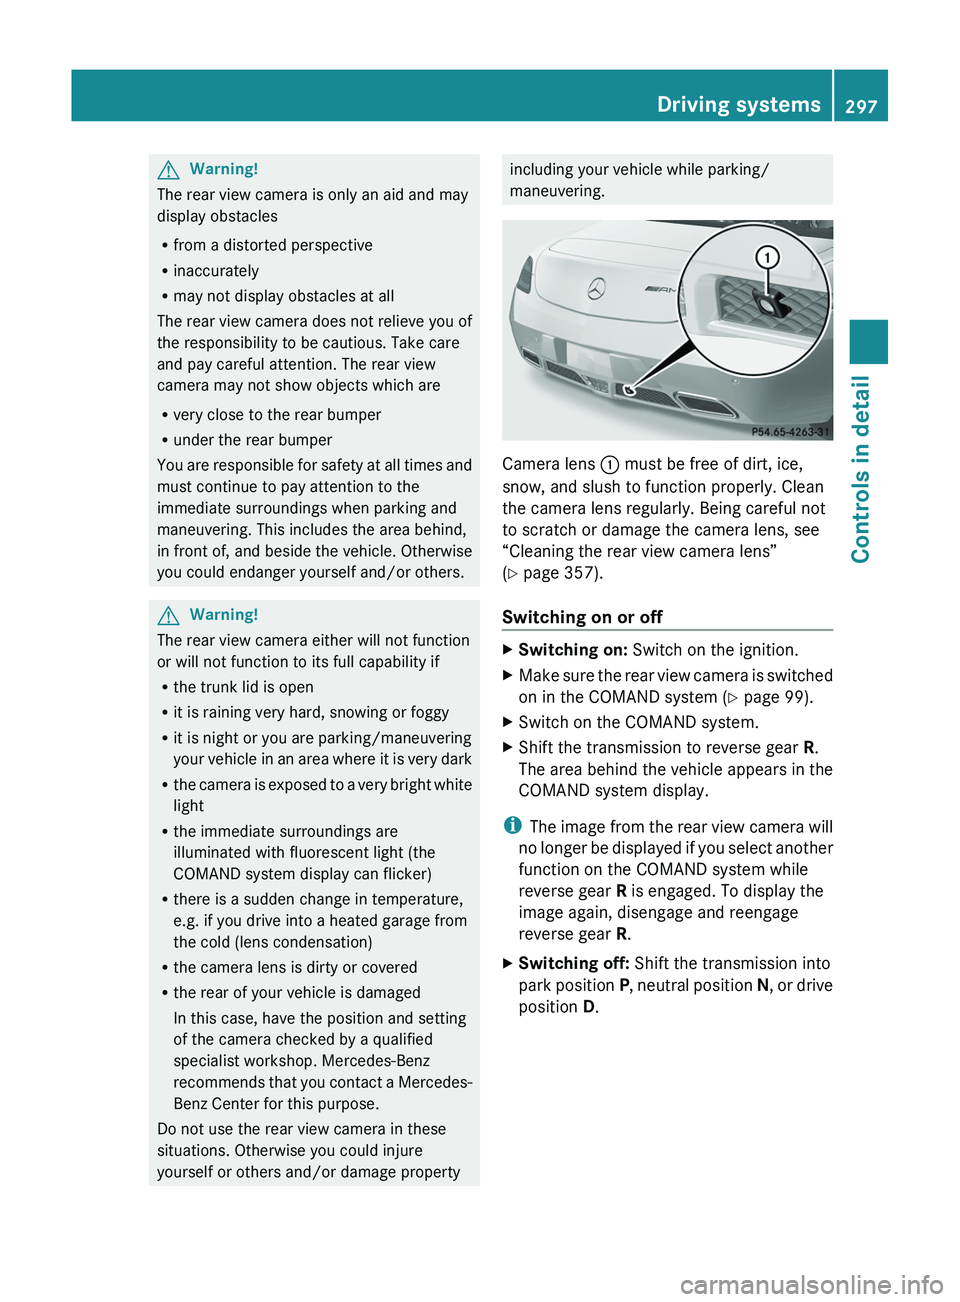
Camera lens 0046 must be free of dirt, ice,
snow, and slush to function properly. Clean
the camera lens regularly. Being careful not
to scratch or damage the camera lens, see
“Cleaning the rear view camera lens”
( Y page 357).
Switching on or off
XSwitching on: Switch on the ignition.XMake sure the rear view camera is switched
on in the COMAND system ( Y page 99).XSwitch on the COMAND system.XShift the transmission to reverse gear R.
The area behind the vehicle appears in the
COMAND system display.
i The image from the rear view camera will
no longer be displayed if you select another
function on the COMAND system while
reverse gear R is engaged. To display the
image again, disengage and reengage
reverse gear R.
XSwitching off: Shift the transmission into
park position P, neutral position N, or drive
position D.Driving systems297Controls in detailBA 197 USA, CA Edition A 2011; 1; 27, en-UShereepeVersion: 3.0.3.52010-03-24T15:31:10+01:00 - Seite 297Z
Page 306 of 436
XActivating: Adjust the air temperature, air
volume and air distribution.
XPress button \000`.
The indicator lamp in the button comes on.
The driver-side settings are used for the
passenger side.
XDeactivating: Press button \000` again.
The indicator lamp in the button goes out.
Rear window defroster
GWarning!
Any accumulation of snow and ice should be
removed from the rear window before driving.
Visibility could otherwise be impaired,
endangering you and others.
The rear window defroster uses a large
amount of power. To keep the battery drain
to a minimum, switch off the defroster as
soon as the rear window is clear. The
defroster is switched off automatically after
some time of operation depending on the
outside temperature.
XSwitch on the ignition.XSwitching on: Press button \000n.
The indicator lamp in the button comes on.
XSwitching off: Press button \000n again.
The rear window defroster switches off when
the battery voltage is too low. Too many
electrical consumers may be operating
simultaneously.
XSwitch off consumers that are currently not
needed if required.
Loading and storing
Parcel net
GWarning!
The parcel net is intended for storing light-
weight items only, such as road maps, mail,
etc.
Heavy objects, objects with sharp edges, or
fragile objects may not be transported in the
parcel net. In an accident, during hard
braking, or sudden maneuvers, they could be
thrown around inside the vehicle and cause
injury to vehicle occupants.
The parcel net cannot protect transported
goods in the event of an accident.
A parcel net is located in the passenger
footwell.
Storage compartments
GWarning!
To help avoid personal injury during a collision
or sudden maneuver, exercise care when
storing objects in the vehicle. Put luggage or
cargo in the trunk if possible.
Keep compartment lids closed. This will help
to prevent stored objects from being thrown
about and injuring vehicle occupants during
Rbraking
Rvehicle maneuvers
Ran accident
Glove box
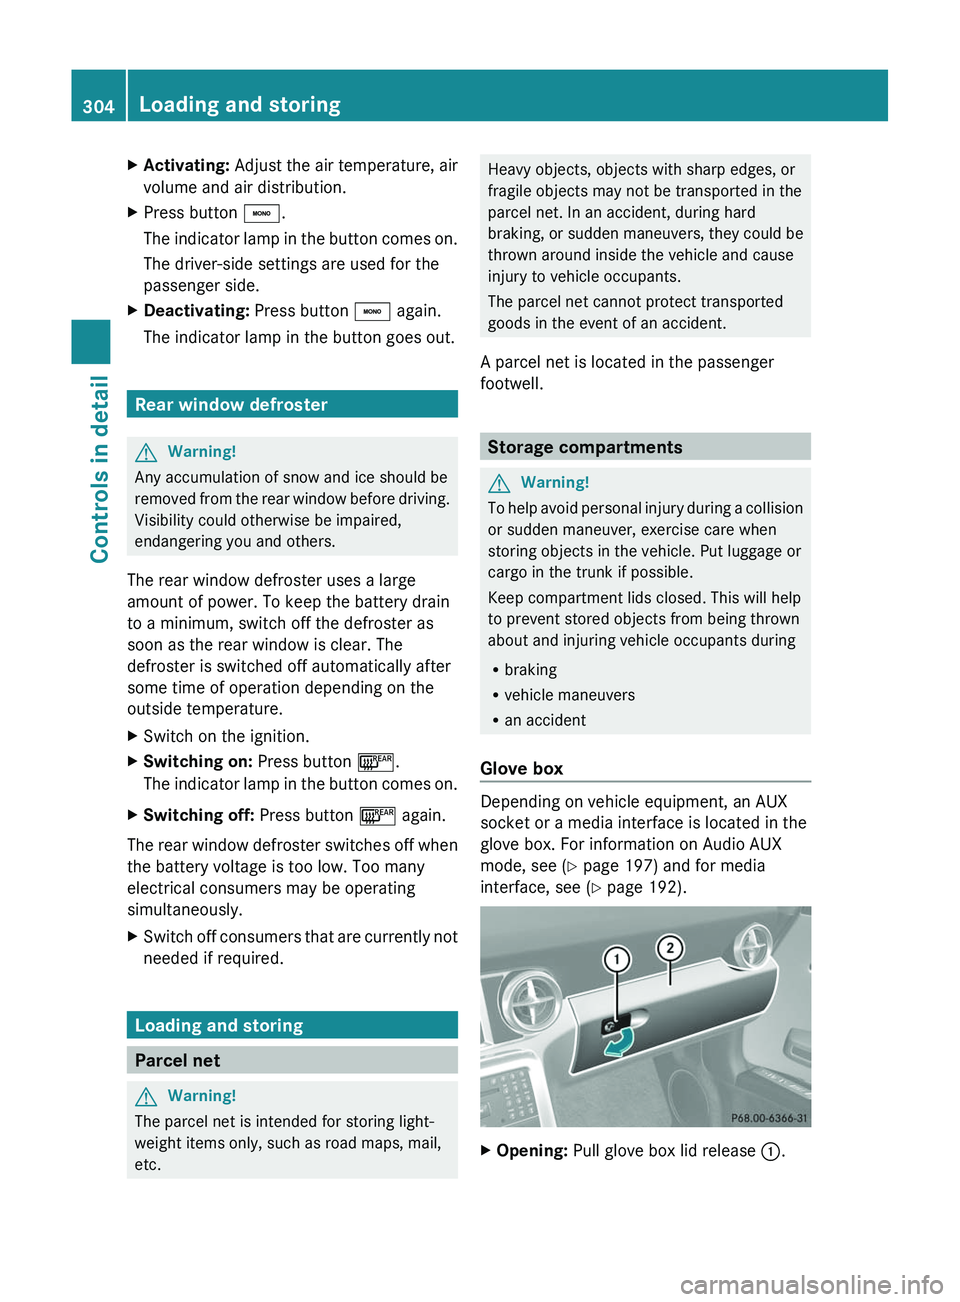
Depending on vehicle equipment, an AUX
socket or a media interface is located in the
glove box. For information on Audio AUX
mode, see (Y page 197) and for media
interface, see (Y page 192).
XOpening: Pull glove box lid release \000F.304Loading and storingControls in detail
BA 197 USA, CA Edition A 2011; 1; 27, en-UShereepeVersion: 3.0.3.52010-03-24T15:31:10+01:00 - Seite 304
Page 310 of 436
If the engine is off and the cigarette lighter is
being used extensively, the vehicle battery
may become discharged.
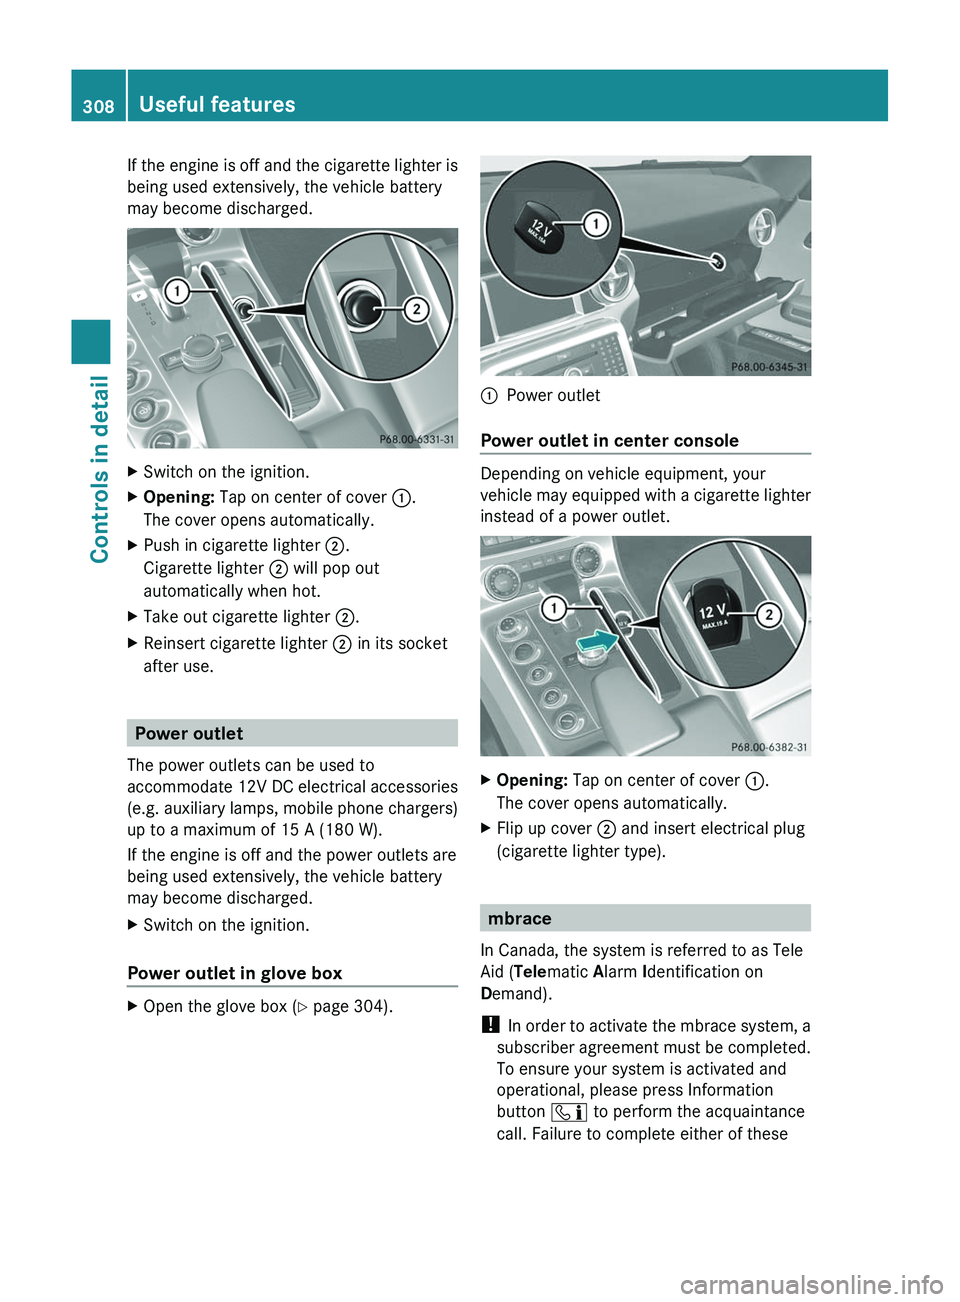
XSwitch on the ignition.XOpening: Tap on center of cover \000F.
The cover opens automatically.
XPush in cigarette lighter \000G.
Cigarette lighter \000G will pop out
automatically when hot.
XTake out cigarette lighter \000G.XReinsert cigarette lighter \000G in its socket
after use.
Power outlet
The power outlets can be used to
accommodate 12V DC electrical accessories
(e.g. auxiliary lamps, mobile phone chargers)
up to a maximum of 15 A (180 W).
If the engine is off and the power outlets are
being used extensively, the vehicle battery
may become discharged.
XSwitch on the ignition.
Power outlet in glove box
XOpen the glove box (Y page 304).\000FPower outlet
Power outlet in center console
Depending on vehicle equipment, your
vehicle may equipped with a cigarette lighter
instead of a power outlet.
XOpening: Tap on center of cover \000F.
The cover opens automatically.
XFlip up cover \000G and insert electrical plug
(cigarette lighter type).
mbrace
In Canada, the system is referred to as Tele
Aid (Telematic Alarm Identification on
Demand).
! In order to activate the mbrace system, a
subscriber agreement must be completed.
To ensure your system is activated and
operational, please press Information
button \000