2011 MERCEDES-BENZ SLS AMG length
[x] Cancel search: lengthPage 105 of 436
operation. As a result, you may have to drive
for some time until precise route guidance
takes place.
GPS Reception
The correct functioning of the navigation
system is also dependent on the GPS
reception. In certain situations, the GPS
reception may be impaired, distorted or even
impossible, e.g. in tunnels, multi-storey car
parks or due to snow on the GPS antenna. If
there is snow on the GPS antenna, you should
remove it. The GPS antenna is at the rear on
the vehicle's roof.
Route Guidance after Vehicle Transport
After vehicle transport (e.g. by ferry, car train
or by towing) COMAND must determine the
vehicle location again.
Position finding takes place automatically
when the vehicle is driven off again, even if
COMAND is switched off. The actual length of
time may vary from case to case.
While the vehicle is determining its position,
route guidance is subject to the following
restrictions:
R Navigation announcements, route
guidance displays and displayed street
names do not match the actual location.
R COMAND does not issue any navigation
announcements.
R The message Off Mapped Road and a
direction arrow are displayed instead of the
route guidance displays. The arrow
indicates the direction of the destination.
i Direction arrow accuracy is also
dependent on correct vehicle position
and/or direction.
Once the position finding operation has been
completed, route guidance takes place again
via navigation announcements and route
guidance displays.
Interrupting Journey during Route
Guidance
i An interruption in the journey means
parking the vehicle and switching off the
vehicle.
The continuation of the journey means
switching the vehicle on again and
continuing to drive.
If you interrupt the journey during route
guidance and continue it later, the following
applies:
R If you continue the journey within 2 hours,
COMAND automatically continues route
guidance.
R If you continue the journey after 2 hours,
route guidance is canceled. You will have
to continue the canceled route guidance
again manually ( Y page 137).
Measurement Units
The measurement units displayed in
navigation mode are identical to those set in
the instrument cluster.
Menu Overview
NaviSetting route calculation modeSelecting map orientationSelecting POI symbols on mapSelecting traffic information on mapSelecting text information on mapSwitching topographic map display on/offSwitching highway information on/offSwitching the automatic reading of traffic
messages on/offSwitching Audio Fadeout on/offNavigation (Introduction)103COMAND APSBA 197 USA, CA Edition A 2011; 1; 27, en-UShereepeVersion: 3.0.3.52010-03-24T15:31:10+01:00 - Seite 103Z
Page 123 of 436
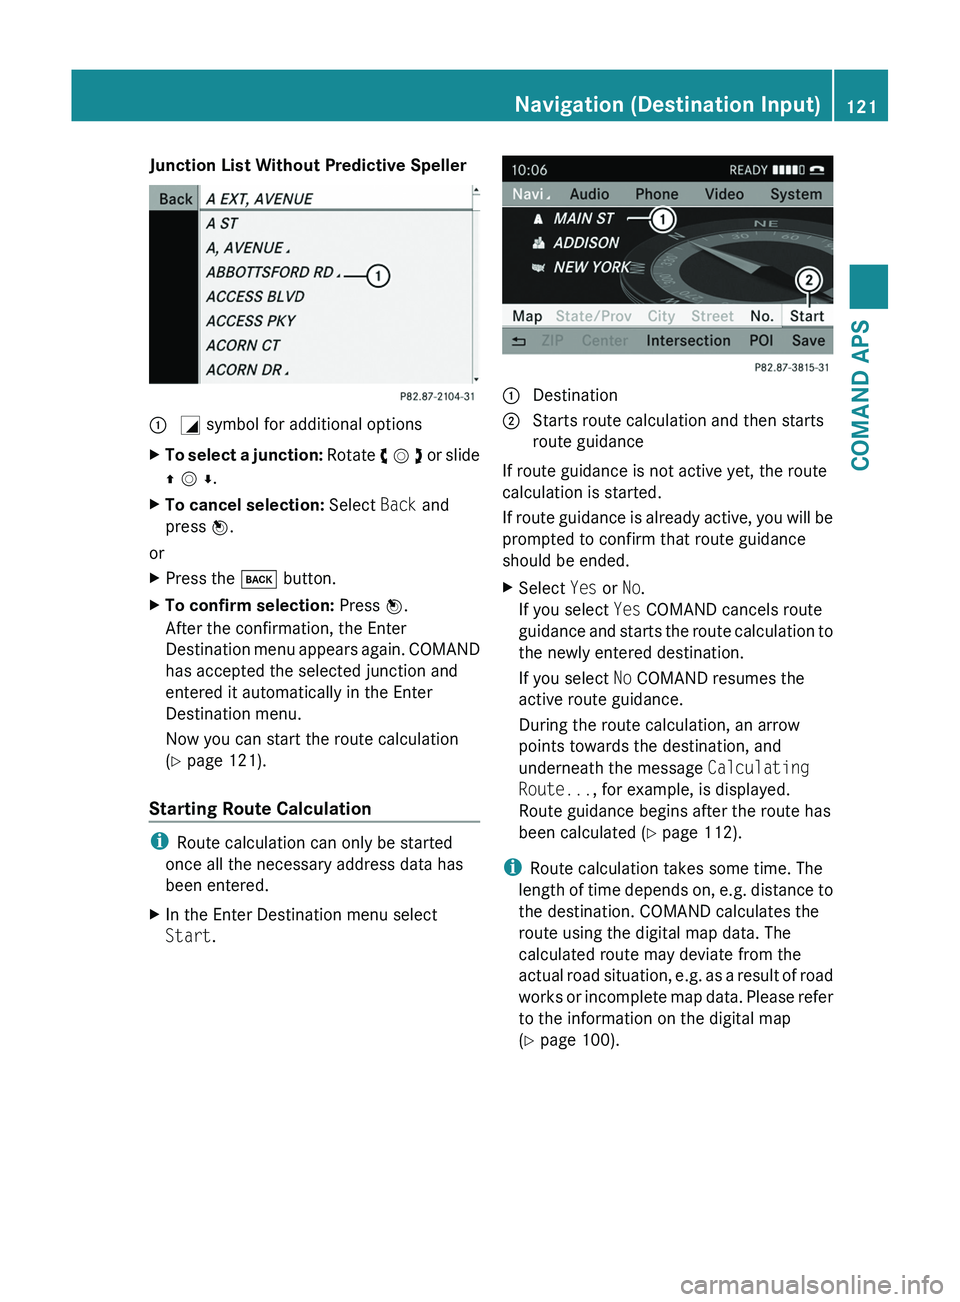
Junction List Without Predictive Speller\000F \000L symbol for additional optionsXTo select a junction: Rotate y m z or slide
q m r.
XTo cancel selection: Select Back and
press n.
or
XPress the \000= button.XTo confirm selection: Press n.
After the confirmation, the Enter
Destination menu appears again. COMAND
has accepted the selected junction and
entered it automatically in the Enter
Destination menu.
Now you can start the route calculation
(Y page 121).
Starting Route Calculation
iRoute calculation can only be started
once all the necessary address data has
been entered.
XIn the Enter Destination menu select
Start.1 Destination2 Starts route calculation and then starts
route guidance
If route guidance is not active yet, the route
calculation is started.
If route guidance is already active, you will be
prompted to confirm that route guidance
should be ended.
XSelect Yes or No.
If you select Yes COMAND cancels route
guidance and starts the route calculation to
the newly entered destination.
If you select No COMAND resumes the
active route guidance.
During the route calculation, an arrow
points towards the destination, and
underneath the message Calculating
Route..., for example, is displayed.
Route guidance begins after the route has
been calculated (Y page 112).
iRoute calculation takes some time. The
length of time depends on, e.g. distance to
the destination. COMAND calculates the
route using the digital map data. The
calculated route may deviate from the
actual road situation, e.g. as a result of road
works or incomplete map data. Please refer
to the information on the digital map
(Y page 100).
Navigation (Destination Input)121COMAND APSBA 197 USA, CA Edition A 2011; 1; 27, en-UShereepeVersion: 3.0.3.52010-03-24T15:31:10+01:00 - Seite 121Z
Page 139 of 436
As soon as the vehicle location is found again,
route guidance continues in the usual
manner.
Navigation Announcements
GWarning
Navigation announcements are intended to
direct you while driving without diverting your
attention from the road and driving.
Please always use this feature instead of
consulting the map display for directions.
Consulting the symbols or map display for
directions may cause you to divert your
attention from driving and increase your risk
of an accident.
i During an active telephone call, the
navigation announcements are
suppressed.
If you have missed an announcement, you can
call up the current announcement at any
time.
XTo request current announcement: In
map view with the menu system
( Y page 106) displayed, select RPT.XTo switch off navigation
announcements: During the
announcement, press the 007B button.
You will briefly see the message: The
driving instructions have been
muted .XTo switch navigation announcements
back on manually: In map view with the
menu system ( Y page 106) displayed,
select RPT.
or
XStart a new route calculation
( Y page 121).
or
XIf COMAND is switched on again or the
engine is restarted.XTo set the volume of the
announcements: Set the volume during
the automatic announcement ( Y page 89).
or
XCall up an announcement manually by
selecting RPT in map view with the menu
system displayed.XAdjust the volume.
Audio Fadeout
The Audio Fadeout function, if activated,
lowers the volume of the current audio source
when a navigation announcement is issued.
As soon as the navigation announcement has
ended, the audio source will be played with
the previous volume ( Y page 89).
Canceling Route Guidance
XIn the map display with the menu system
displayed ( Y page 106) select
Destination £ Cancel Route
Guidance .
Resuming Route Guidance
XSelect Destination £ Continue
Route Guidance in map view with the
menu system displayed.
COMAND calculates the route.
Detour Function
i The Detour function blocks a route
segment ahead. You can set the length of
the block. COMAND calculates a detour
route if possible.
XSelect Route £ Detour in map view with
the menu system displayed.Navigation (Route Guidance)137COMAND APSBA 197 USA, CA Edition A 2011; 1; 27, en-UShereepeVersion: 3.0.3.52010-03-24T15:31:10+01:00 - Seite 137Z
Page 140 of 436
XTo set the length of block: Select
Longer or Shorter repeatedly until the
required length is set.
The blocked segment is highlighted in red/
white on the map. Shown at the top of the
display is the length of the blocked
segment and the route segment to which
the block goes.XTo cancel the function: Select Back.XTo start route calculation: Select Start,
see also ( Y page 121).XTo delete block: In map view with the
menu system displayed, select Route £
Detour £ Delete .
Alternative Route
i You can have other routes calculated for
the original route guidance using the
Alternative Route function.
XIn the map display with the menu system
displayed ( Y page 106) select Route £
Alternative Route .
The display is split into two halves. On the
left is the map, which displays one or more
alternative routes between the start and
the destination. The current route is
highlighted in dark blue, other alternative
routes are light blue (day mode). If the
display is in night mode, the representation
is inverse.
The right side of the display shows
information on the active alternative route,
e.g. length of the segment and the
estimated time of arrival.XTo select next or previous alternative
route: Select Next or Previous .
The selected route is now highlighted in
dark blue.XTo return to the original route guidance:
Select Back.XTo start route guidance with the
selected alternative route guidance:
Select Start.Route Browser
i The route browser provides an overview
of the route. You can move along the route
segment by segment using the route
browser and view information and details
about the route segments.XIn the map display with the menu system
displayed, select Route £ Route
Browser .
The route browser is in the display.
The top of the display shows information on
the highlighted route segment, e.g. the
road name or number and the segment
length of the road to be driven.
The highlighted route segment is identified
on the map by its white color and red edge.XTo display next or previous route
segment: Select Next or Previous .XTo enlarge or reduce the map display:
Select ; or :.XTo close route browser: Select Back.
Displaying Destination Information
XIn the map display with the menu system
( Y page 106) shown, select Route £
Destination Information .
The destination information is given in the
display.138Navigation (Route Guidance)COMAND APS
BA 197 USA, CA Edition A 2011; 1; 27, en-UShereepeVersion: 3.0.3.52010-03-24T15:31:10+01:00 - Seite 138
Page 152 of 436
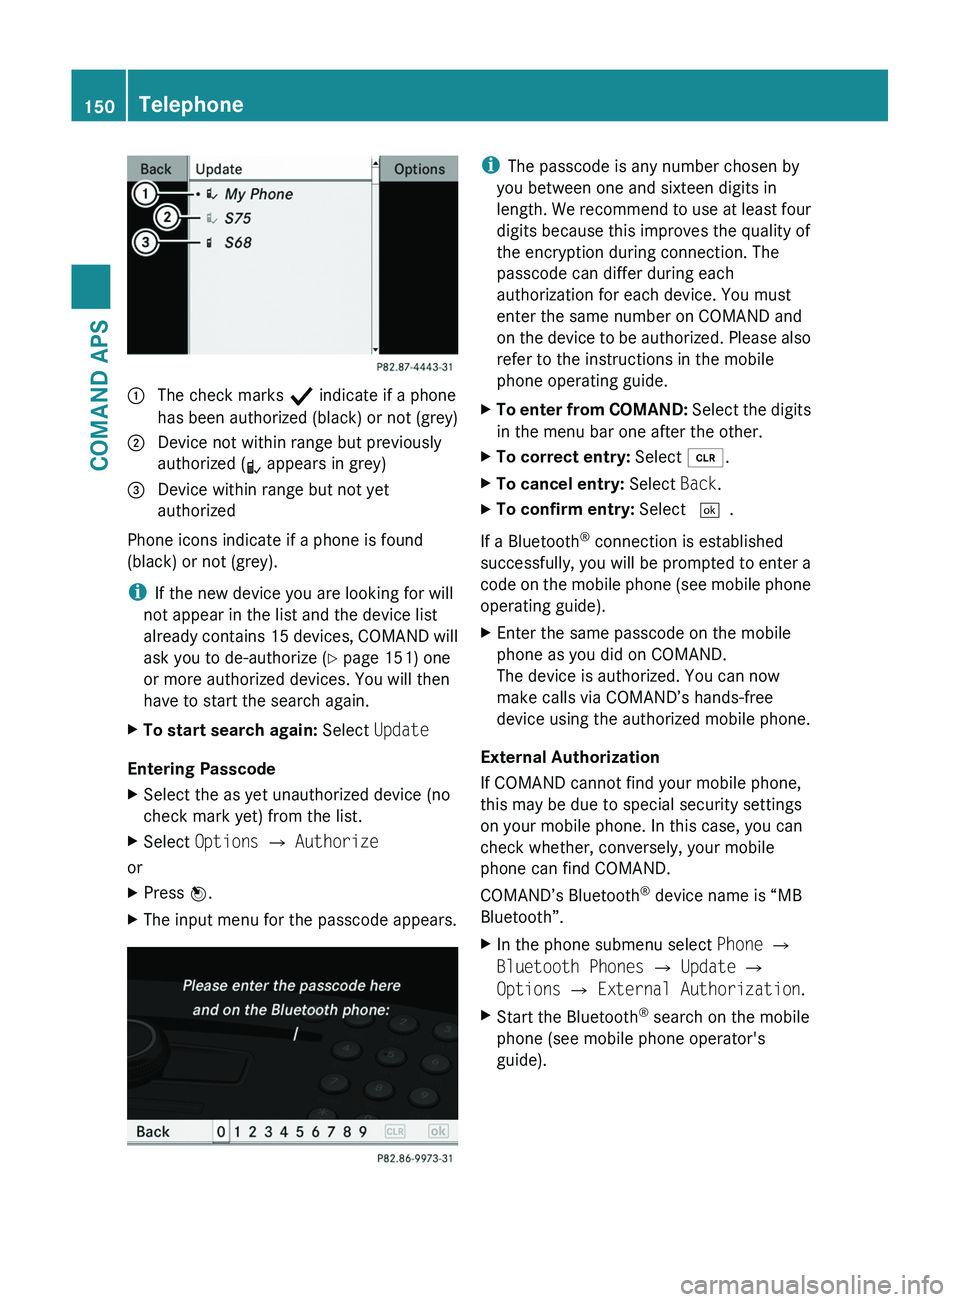
1 The check marks Ò indicate if a phone
has been authorized (black) or not (grey)
2 Device not within range but previously
authorized (¿ appears in grey)
3 Device within range but not yet
authorized
Phone icons indicate if a phone is found
(black) or not (grey).
iIf the new device you are looking for will
not appear in the list and the device list
already contains 15 devices, COMAND will
ask you to de-authorize (Y page 151) one
or more authorized devices. You will then
have to start the search again.
XTo start search again: Select Update
Entering Passcode
XSelect the as yet unauthorized device (no
check mark yet) from the list.
XSelect Options £ Authorize
or
XPress n.XThe input menu for the passcode appears.iThe passcode is any number chosen by
you between one and sixteen digits in
length. We recommend to use at least four
digits because this improves the quality of
the encryption during connection. The
passcode can differ during each
authorization for each device. You must
enter the same number on COMAND and
on the device to be authorized. Please also
refer to the instructions in the mobile
phone operating guide.
XTo enter from COMAND: Select the digits
in the menu bar one after the other.
XTo correct entry: Select õ.XTo cancel entry: Select Back.XTo confirm entry: Select \000T.
If a Bluetooth® connection is established
successfully, you will be prompted to enter a
code on the mobile phone (see mobile phone
operating guide).
XEnter the same passcode on the mobile
phone as you did on COMAND.
The device is authorized. You can now
make calls via COMAND’s hands-free
device using the authorized mobile phone.
External Authorization
If COMAND cannot find your mobile phone,
this may be due to special security settings
on your mobile phone. In this case, you can
check whether, conversely, your mobile
phone can find COMAND.
COMAND’s Bluetooth® device name is “MB
Bluetooth”.
XIn the phone submenu select Phone £
Bluetooth Phones £ Update £
Options £ External Authorization.
XStart the Bluetooth® search on the mobile
phone (see mobile phone operator's
guide).
150TelephoneCOMAND APS
BA 197 USA, CA Edition A 2011; 1; 27, en-UShereepeVersion: 3.0.3.52010-03-24T15:31:10+01:00 - Seite 150
Page 268 of 436
Effect0044Neutral position
No power is transmitted from the
engine to the drive axle. When the
brakes are released, the vehicle can
be moved freely (pushed or towed).
To avoid damage to the
transmission, never shift the
transmission into neutral position
N while driving.
Exception: If the ESC is switched off
or malfunctioning, shift the
transmission into neutral position
N if the vehicle is in danger of
skidding.
! Coasting the vehicle, or driving
for any other reason with the
transmission in neutral position
N can result in transmission
damage that is not covered by
the Mercedes-Benz Limited
Warranty.003ADrive position
The transmission shifts
automatically. All forward gears are
available.
Driving tips
Kickdown
Use the kickdown when you want maximum
acceleration.
XDepress the accelerator pedal past the
point of resistance.
Depending on the engine speed the
transmission shifts into a lower gear.
Working on the vehicle
GWarning!
When working on the vehicle, engage the
electronic parking brake and shift the
transmission into park position P. Otherwise
the vehicle could roll away which could result
in an accident and/or serious personal injury.
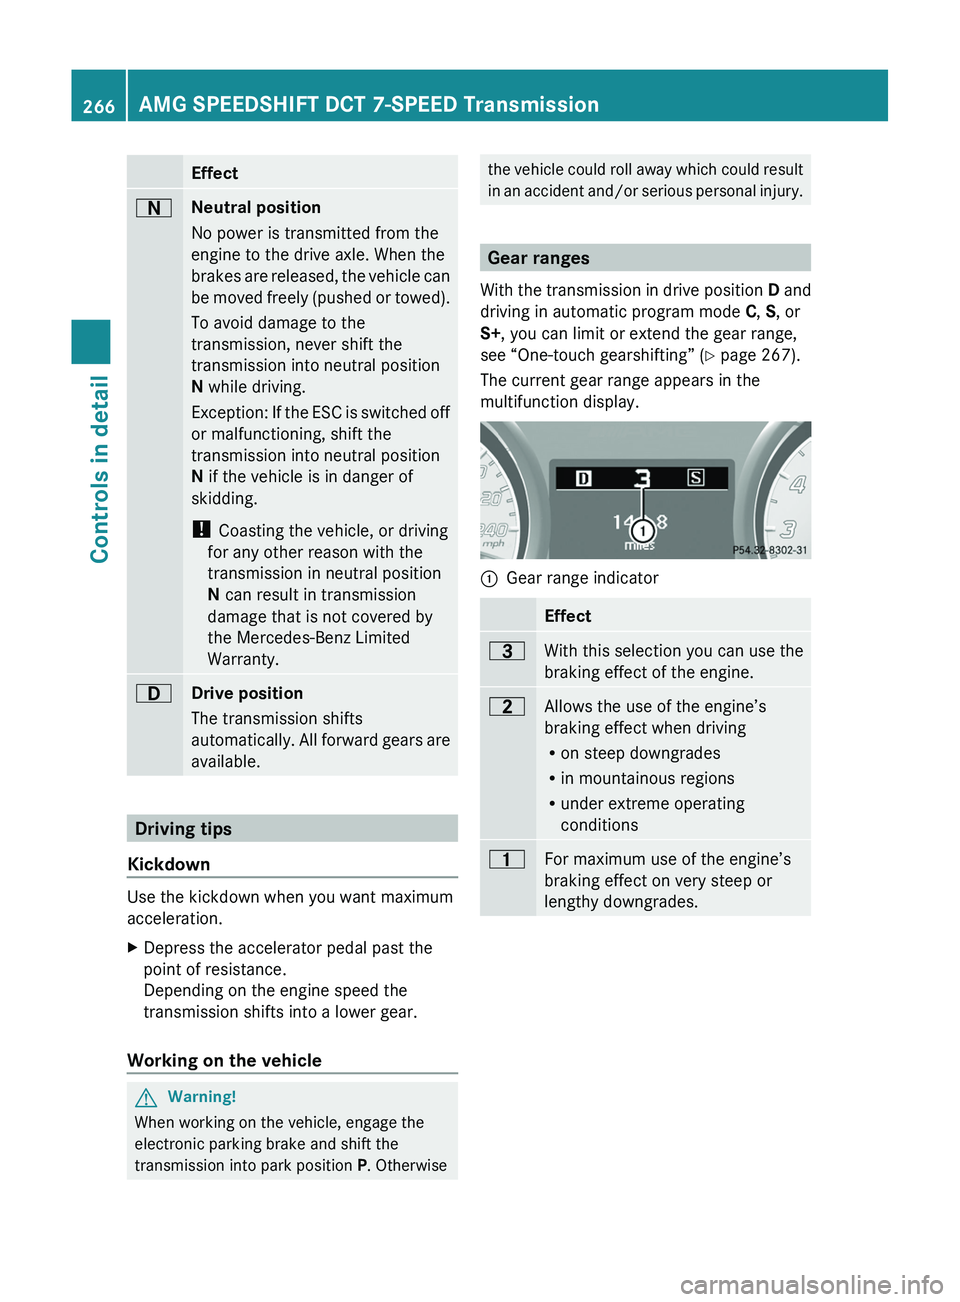
Gear ranges
With the transmission in drive position D and
driving in automatic program mode C, S , or
S+ , you can limit or extend the gear range,
see “One-touch gearshifting” ( Y page 267).
The current gear range appears in the
multifunction display.
0046Gear range indicatorEffect0040With this selection you can use the
braking effect of the engine.0038Allows the use of the engine’s
braking effect when driving
R on steep downgrades
R in mountainous regions
R under extreme operating
conditions0037For maximum use of the engine’s
braking effect on very steep or
lengthy downgrades.266AMG SPEEDSHIFT DCT 7-SPEED TransmissionControls in detail
BA 197 USA, CA Edition A 2011; 1; 27, en-UShereepeVersion: 3.0.3.52010-03-24T15:31:10+01:00 - Seite 266
Page 292 of 436
008AAverage speed during lap0088Lap length0086Maximum speed during lapXPress button 003D or 003C to see other lap
analyses.
Driving systems
Introduction
This section describes the following driving
systems of your vehicle:
R Cruise control
R RACE START
R Hill-start assist system
R Parktronic system
R Rear view camera
The driving safety systems ABS, Adaptive
Brake, BAS, EBP, ESC and Trunk Wing are
described in the “Safety and security” section
( Y page 61).
Cruise control
The cruise control maintains the speed you
set for your vehicle automatically.
The use of the cruise control is recommended
for driving at a constant speed for extended
periods of time.
The currently set speed or last set speed
(“Resume” function) appears in the
multifunction display for approximately
5 seconds.
GWarning!
The cruise control is a convenience system
designed to assist the driver during vehicle
operation. The driver is and must always
remain responsible for the vehicle’s speed
and for safe brake operation.
Only use the cruise control if the road, traffic,
and weather conditions make it advisable to
travel at a constant speed.
R The use of the cruise control can be
dangerous on winding roads or in heavy
traffic because conditions do not allow safe
driving at a constant speed.
R The use of the cruise control can be
dangerous on slippery roads. Rapid
changes in tire traction can result in wheel
spin and loss of control.
R Deactivate the cruise control when driving
in fog.
The “Resume” function should only be
operated if the driver is fully aware of the
previously set speed and wishes to resume
this particular preset speed.GWarning!
The cruise control brakes automatically so
that the set speed is not exceeded.
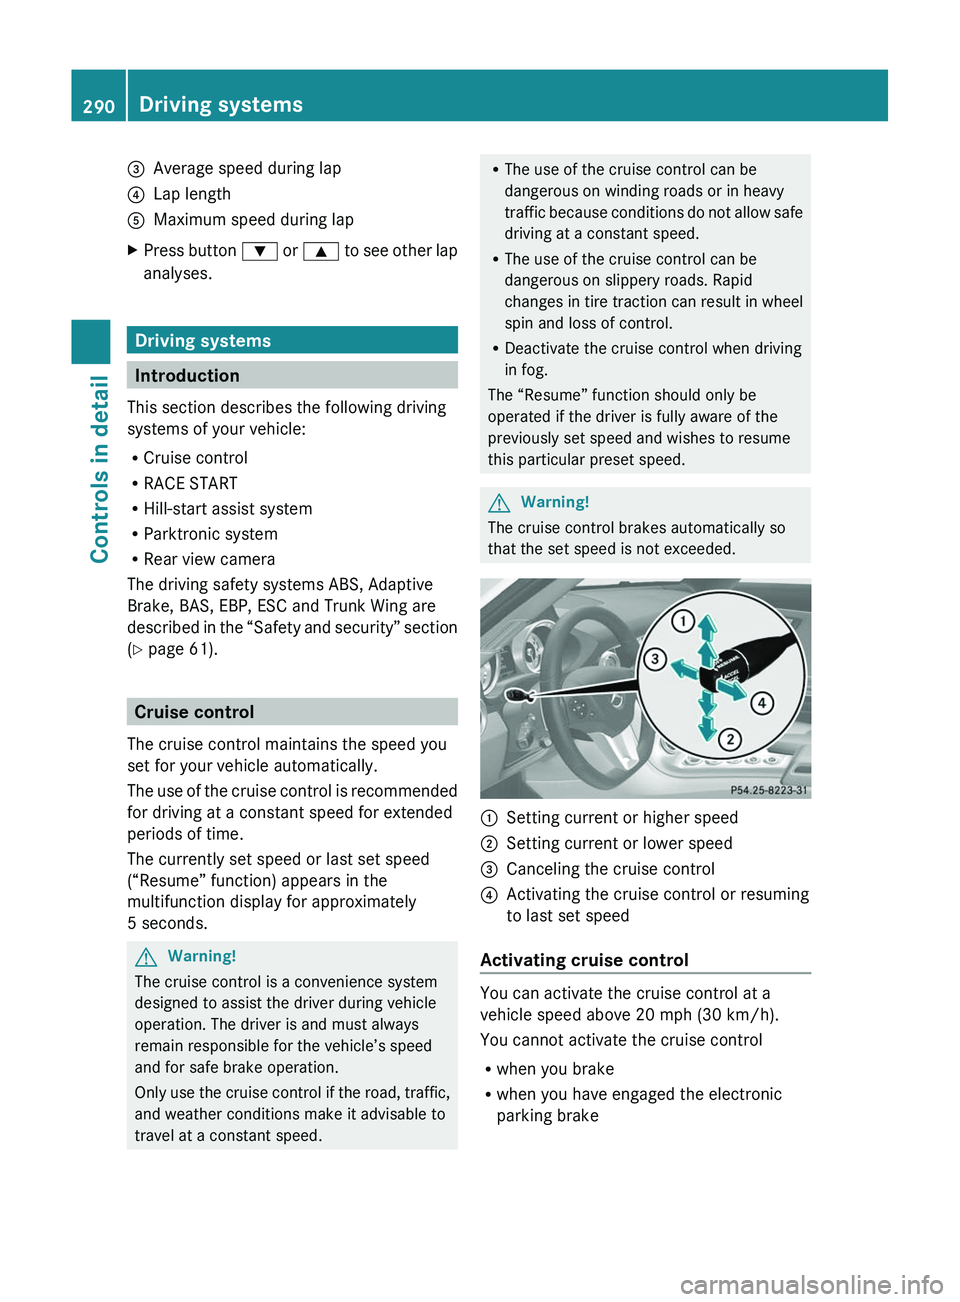
0046Setting current or higher speed0047Setting current or lower speed008ACanceling the cruise control0088Activating the cruise control or resuming
to last set speed
Activating cruise control
You can activate the cruise control at a
vehicle speed above 20 mph (30 km/h).
You cannot activate the cruise control
R when you brake
R when you have engaged the electronic
parking brake
290Driving systemsControls in detail
BA 197 USA, CA Edition A 2011; 1; 27, en-UShereepeVersion: 3.0.3.52010-03-24T15:31:10+01:00 - Seite 290
Page 318 of 436
Reprogramming a single signal
transmitter button
To program a device using a signal
transmitter button previously trained, follow
these steps:
XSwitch on the ignition.XPress and hold the desired signal
transmitter button ( 0047, 008A or 0088). Do not
release the button.
Indicator lamp 0046 will begin to flash after
20 seconds.XWithout releasing the signal transmitter
button, proceed with programming starting
with step 3.
Operation of integrated remote control
XSwitch on the ignition.XSelect and press the appropriate
integrated signal transmitter button ( 0047,
008A or 0088) to activate the remote controlled
device.
The integrated remote control transmitter
continues to send the signal as long as the
button is pressed – up to 20 seconds.
Erasing the integrated remote control
memory
i If you sell your vehicle, erase the codes of
all three channels.
XSwitch on the ignition.XSimultaneously press and hold outer signal
transmitter buttons 0047 and 0088, for
approximately 20 seconds, until indicator
lamp 0046 flashes rapidly. Do not hold for
longer than 30 seconds.
The codes of all three channels are erased.
Programming tips
If you are having difficulty programming the
integrated remote control, here are some
helpful tips:
R Check the frequency of hand-held remote
control 0086 (typically located on the reverse
side of the remote). The integrated remote
control is compatible with radio-frequency
devices operating between 280-390 MHz.
R Put a new battery in hand-held remote
control 0086. This will increase the likelihood
of the hand-held remote control sending a
stronger and more accurate signal to the
integrated remote control.
R While performing step 3, hold hand-held
remote control 0086 at different lengths and
angles from the signal transmitter button
( 0047 , 008A or 0088) you are programming.
Attempt varying angles at the distance of 2
to 12 inches (5 to 30 cm) away or the same
angle at varying distances.
R If another hand-held remote control is
available for the same device, try the
programming steps again using that other
hand-held remote control. Make sure new
batteries are in the hand-held remote
control before beginning the procedure.
R Straighten the antenna wire from the
garage door opener assembly. This may
help improve transmitting and/or receiving
signals.
i Certain types of garage door openers are
incompatible with the integrated remote
control. If you should experience further
difficulties with programming the
integrated remote control, contact an
authorized Mercedes-Benz Center, or call
the Mercedes-Benz Customer Assistance
Center (USA only) at
1-800-FOR-MERCedes (1-800-367-6372),
or the HomeLink ®
Hotline (USA only) at
1-800-355-3515, or the Customer Service
(Canada only) at 1-800-387-0100.
i USA only:
This device complies with Part 15 of the
FCC Rules. Operation is subject to the
following two conditions:
1. This device may not cause harmful
interference, and316Useful featuresControls in detail
BA 197 USA, CA Edition A 2011; 1; 27, en-UShereepeVersion: 3.0.3.52010-03-24T15:31:10+01:00 - Seite 316