2011 MERCEDES-BENZ M-CLASS SUV transmission
[x] Cancel search: transmissionPage 227 of 389

For information abou
tdriving off-road, see
(Y page 166). Yo uwillf ind information about
driving safety systems in conjunction with
LOW RANGE in the "Saf ety" section
(Y pag e60).
Shift ranges HIGH RANGE
Roa
dposition for all nor-
ma ldriving situations LO
WR ANGE Off-road position for driv-
ing off-road and fording
The transmission ratio
between the engine and
wheels is only approx-
imatel yone third of that in
the HIGH RANGE road
pos ition. The drive torque
is correspondingly higher
as aresult.
Do not use LOW RANGE:
R on slippery road surfa-
ces, e.g. in the case of
slush
R on snow or ice-covered
roads
R if you have snow chains
on your vehicle G
WARNING
Always wait for the gear change process from
HIGH RANGE to LOW RANGE –and from LOW
RANGE to HIGH RANGE –tocomple te.Don ot
tur no ff the engine while changi nggear and
do not switc hthe automatic transmission to
anot hergear.
If you do not wait for the gear change process
to complete, it may not be cor rectly imple-
mented. Th etransfer cas emay then be in
neutral and the connection between the
engine and the drive axles may be disen-
gaged .The vehicle coul dthen mov efreely,
eve nifa gear is engaged, and coul dinadver-
tently start moving, particularly if it is on a
slope. Observe the following description in "Mes-
sages in the multifunction display". From HIGH RANG
EtoLOW RAN GE
! Only carr yout the gear change process if:
R the engine is running
R the transmission is in position N
R you are not driving above 40 km/h
X Press LOW RANGE button :.
Indicator lamp ;flashes.
If the gear change process has taken place,
indicator lamp ;lights up. The LOW
RANGE display appears in multifunction
display ?and in status indicator =.
While indicator lamp ;is flashing, you can
cancel the gear change by pressing LOW
RANGE button :again.
i You cannot switch LOW RANGE on if the
SPORT on-road program is activated; the
LO WR ANGE Not in drive program SPORT message then appears in th
emulti-
function display. 224
Off-road driving systemsDrivin
gand parking
Page 228 of 389

From LOW RANGE to HIG
HRANGE
! Only carry out the gear change process if:
R the engin eisrunning
R the transmission is in position N
R you are not driving above 70 km/h
X Press LOW RANG Ebutton :.
Indicato rlamp ;flashes.
When the gear change is complete, indica-
tor lamp ;goes out. In th emultifunction
display, the LOWR ANGE Off message
appears and status indica tor=goes out.
While indica torlamp ;is flashing, you can
cancel the gear change by pressin gLOW
RANGE button :agai n.
Me ssages in th emultif un ction display
If ag ear chang eprocess ha snot been suc-
cessful, th efollowin gmessages may be dis-
played in the multifunction display:
LOW RANGE Max. speed 40 km/h :Y
ou have
been drivin gabove 40 km/h. Indicator
lamp ;also flashes.
X Drive mor eslowly to carr yout the gear
change process.
LO WR ANGE Shift to position N briefly :T
he transmission is in position D
and you ar enow drivin gatbelow 40 km/h.
X Shif tthe transmission to Nto complete the
gear change process.
LOW RANGE Shifting cancelled Please
reactivate :T
he shifting process has not
been completed.
X Maintai nall gear change condition sand
carry out the gea rchange process again.
LO WR ANGE Stop Apply parking brake :
Aw arning ton eisalso heard. The gear change
proces shas not been completed. LOW
RANGE is in the neut ralp osition .There is no
con nectio nbetween the engine and the drive
wheels.
! Do not driv eany further, otherwis eyou
coul ddamage the vehicle's drive train. X
Stop the vehicle. Take into account the
road and traffic conditions when doing this.
X Apply the electric parking brake
(Y page 161).
X Carry out the gear change process again.
If the gear change process has been carried
out, the LOWR ANGE Stop Apply park‐ ing brake message disapp
ears. ON&OFFROAD men
uint he COMAND
display (vehicles wit hthe ON&OFF-
ROA Dpackage)
Yo uc an displ ay some driving systems ,driving
programs and additional information in the
COMAND display. X
Make sure that th ekey is in position 2in
the ignition lock.
X Make sure that COMAN DOnline is activa-
ted, see the separate COMAND operating
instructions.
X Pres sthe : func tion button.
The corresponding displays appear in the
CO MAN Ddisplay:
R level control
R steering angle
R vehicle' sangle of inclination
R uphill or downhil lgradient in percentage
R on- road/off-road program selected
R condition of the differential lock for the
transfer case
R the LOW RANGE off-road gear is selected Off-road driving systems
225Drivingand parking Z
Page 232 of 389

pling
atrailer. Th evehicle level could change
and you could endanger yourself or others.
Never press the ADS button or operate the
leve lcontrol while you are coupling up or
decoupling atrailer.
Steel-spring vehicles X
Make sure that th etransmission is in posi-
tion P.
X Engag ethe electric parkin gbrake.
X Positio nthe trailer level behind the vehicle.
X Coupl eupthe trailer.
X Establish the electrical con nection
betwee nthe vehicle and the trailer.
X Chec kthat the trailer lighting system is
working.
Vehicles wit hthe AIRMATIC package X
Make sure that th etransmission is in posi-
tion P.
X Engag ethe electric parkin gbrake.
X Start th eengine.
X Set the vehicl etohighway level
(Y page 189).
X Set the Adaptive Dampin gSystem (ADS )to
AUTO orCOMF(Y page 188).
X Switch off the engine.
X Close the doors and tailgate.
X Position the trailer level behind the vehicle.
X Couple up the trailer.
X Establish the electrical connection
betwee nthe vehicle and the trailer.
X Chec kthat the trailer lighting system is
working.
i If you hav ecoupled atrailer, th evehicle
will remain at highway level.
The vehicle automatically lowers to high-
way level if you driv efaster than 30 km/h
with atrailer. Th evehicle is not lowered to
high-speed level even if you are travelling
at higher speeds. This also applies when using accessories
that are plugged into the socket of the
trailer tow hitch (e.g. abicycle rack). Decoupling
atrailer
Important safety notes G
WARNING
Do not disconnect atrailer with an engaged
overru nbrake .Otherwise, you rhand could
becom etrapped between th ebumpe rand
drawbar. G
WARNING
As soo nasyou raise the trailer drawbar, the
unladen vehicle rises slightly .The vehicle then
lower stod riving level.
Make sure that nobod yisinthe vicinit yofthe
wheel arch or the underbody. You coul doth-
erwise trap yoursel forothers. G
WARNING
Th ev ehicle is lowered as soo nasyou discon-
nec tthe trailer cable. Make sur ethat nobody
is in the vicinit yofthe wheel arch or the
underbody. You coul dotherwis etrap yourse lf
or othe rs.
As soon as you decoupl ethe trailer ,the unla-
den vehicle rise sslightly. Make sure that you
or others are not injured in the process.
! Do not disconnect atrailer wit han
engaged overrun brake. Otherwise, your
vehicle could be damage dbythe rebound-
ing of the overru nbrake.
Steel-spring vehic les X
Ma ke sure that the transmission is in posi-
tion P.
X Engag ethe electric parkin gbrake.
X Secure th etrailer agains trollin gaway.
X Remove the trailer cable and decouple the
trailer. Towing
atrailer
229Driving andparki ng Z
Page 233 of 389

Vehicles with the AIRMATIC package
X
Make sure tha tthe transmission is in posi-
tion P.
X Engage the electric parkin gbrake.
X Start th eengine.
X Clos ethe doors and tailgate.
X Secur ethe trailer against rolling away.
X Remove the trailer cable and decouple the
trailer.
X Switc hoff th eengine. Folding in the ball coupling
i Fold the ball coupling back in if you are
not using the trailer tow hitch.
X Make sure that the vehicl eisstationary and
the trailer cables are disconnected.
X Place the protective cap on the ball cou-
pling.
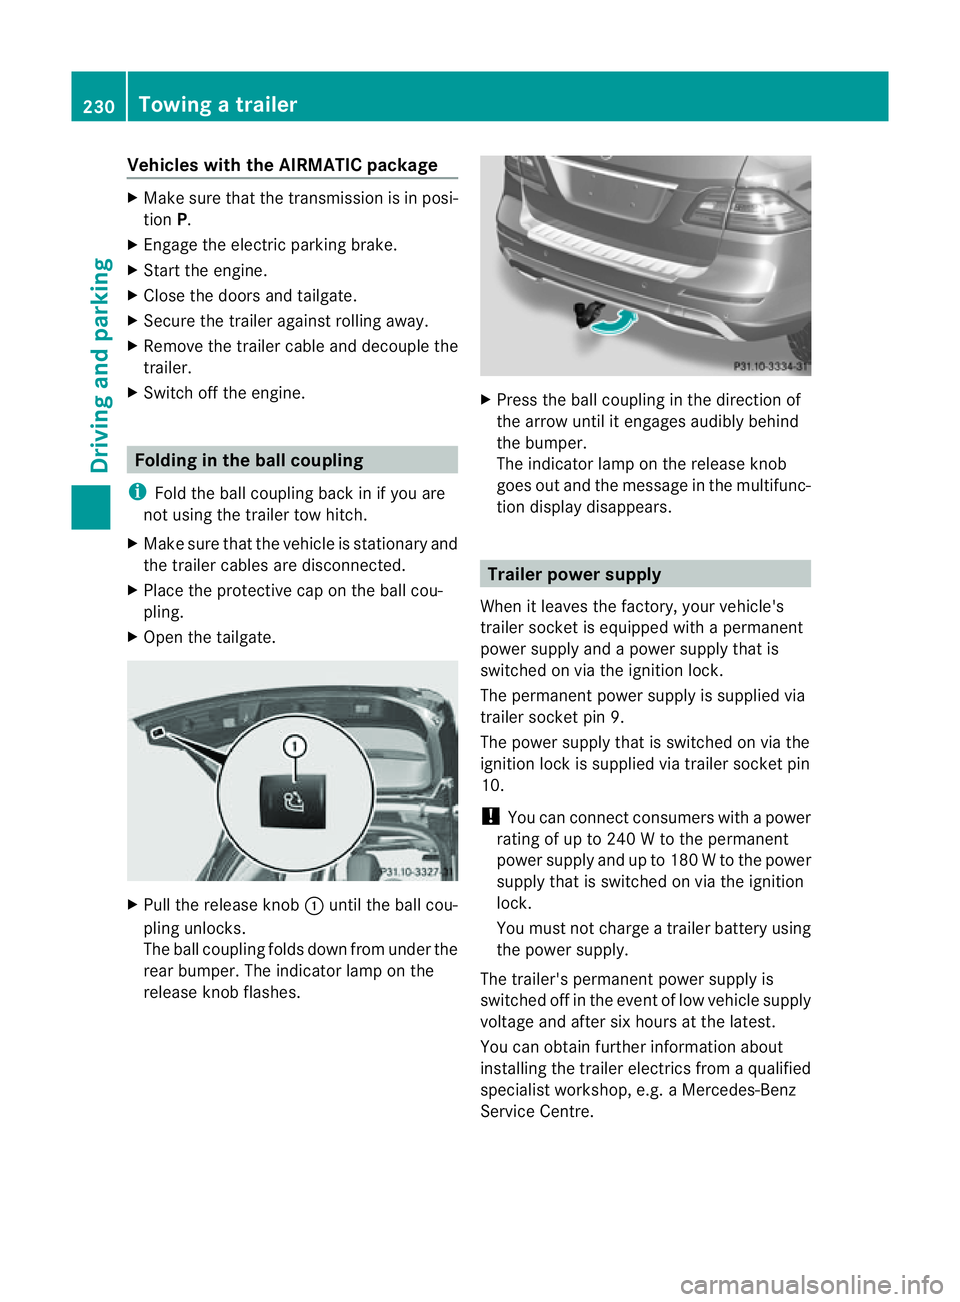
X Ope nthe tailgate. X
Pull the release knob :until the ball cou-
plin gunlocks.
The ball coupling folds dow nfrom under the
rea rbumper. The indicator lamp on the
release knob flashes. X
Press the ball coupling in the direction of
the arrow until it engage saudibly behind
the bumper.
The indicator lamp on the release knob
goes out and the messag einthe multifunc-
tion display disappears. Trailer power supply
When it leaves the factory ,your vehicle's
trailer socket is equipped with apermanent
power supply and apower supply that is
switched on via the ignition lock.
The permanen tpower supply is supplied via
trailer socket pin 9.
The power supply that is switched on via the
ignition lock is supplied via trailer socket pin
10.
! You can con nect consumers with apower
ratin gofupto2 40Wtot he permanent
power supply and up to 18 0Wto the power
supply that is switched on via the ignition
lock.
You must not charge atrailer battery using
th ep ower supply.
The trailer's permanen tpower supply is
switched off in the even toflow vehicle supply
voltage and after six hour satthe latest.
You can obtai nfurther information about
installing the trailer electrics from aqualified
specialist workshop, e.g. aMercedes-Benz
Ser vice Centre. 230
Towing
atrailerDriving and parking
Page 239 of 389

9
:
Press and hold:
R
In the Audio menu: select
sthe
previous/next station or selects
an audio track or avideo scene
using rapid scrolling
R In the Tel (telephone) menu:
starts rapid scrolling through the
phone book a R
Confirms selection/display mes-
sage
R In the Tel (telephone) menu:
switches to the telephone book
and starts dialling the selected
number
R In the Audio menu: stops the
station search func tion at the
desire dstation Right control panel
~ R
Rejects or ends acall
R Exit stelephone book/redial
memory 6 R
Makes or accepts acall
R Switches to the redial memory W
X R
Adjusts the volume 8 R
Mute Back button
%
Press briefly:
R
Back
R Switches off LINGUATRONIC
R Hides display message sorcalls
up the last Trip menu function
used
R Exit sthe telephone book/redial
memory %
Press and hold:
R
Calls up the standar ddisplay in
the Trip menu
Multifunction display
Values and settings as well as display mes-
sages are shown in the multifunction display. :
Time
; Outside temperature or speed
(Ypage 246)
= Description field
? Menu bar
A Driv eprogram
B Transmission position
X To sho wmenu bar ?:press the =
or ; button on the steering wheel. 236
Displays and operationOn-board computer and displays
Page 240 of 389

For further information on disp
laying the
transmission position, see (Y page 146).
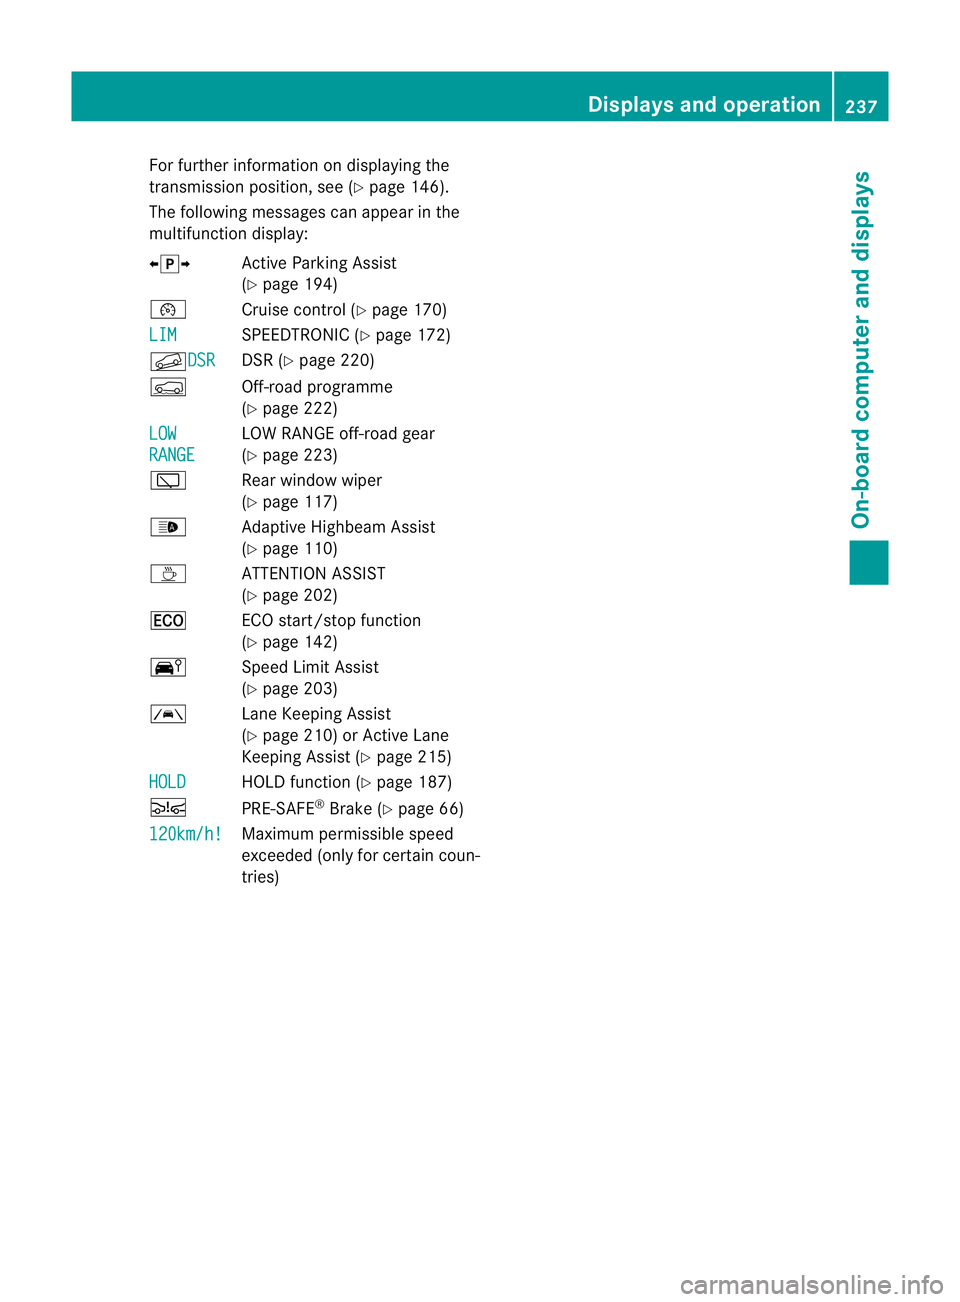
The following messages can appea rinthe
multifunction display:
Xj Y Active Parking Assist
(Y page 194)
¯ Cruise control (Y page 170)
LIM SPEEDTRONIC (Y
page 172)
fDSR DSR (Y
page 220)
Ç Off-road programme
(Ypage 222)
LOW RANGE LOW RANGE off-road gear
(Y page 223)
è Rear window wiper
(Ypage 117)
_ Adaptive Highbea mAssist
(Y page 110)
À ATTENTION ASSIST
(Y page 202)
¤ ECOs tart/stop function
(Y page 142)
Ä Speed Limit Assist
(Ypage 203)
à Lane Keeping Assist
(Y page 210) or Active Lane
Keeping Assist (Y page 215)
HOLD HOLD function (Y
page 187)
Ä PRE-SAFE®
Brake (Y page 66)
120km/h! Maximum permissible speed
exceeded (only for certain coun-
tries) Displays and operation
237On-boardcomputerand disp lays Z
Page 260 of 389

Displa
ymessages Possible causes/consequences and
M Solutions
!
Pa
rkingb rake See Owner'
sManual Th
ey ellow !warning lamp lights up.
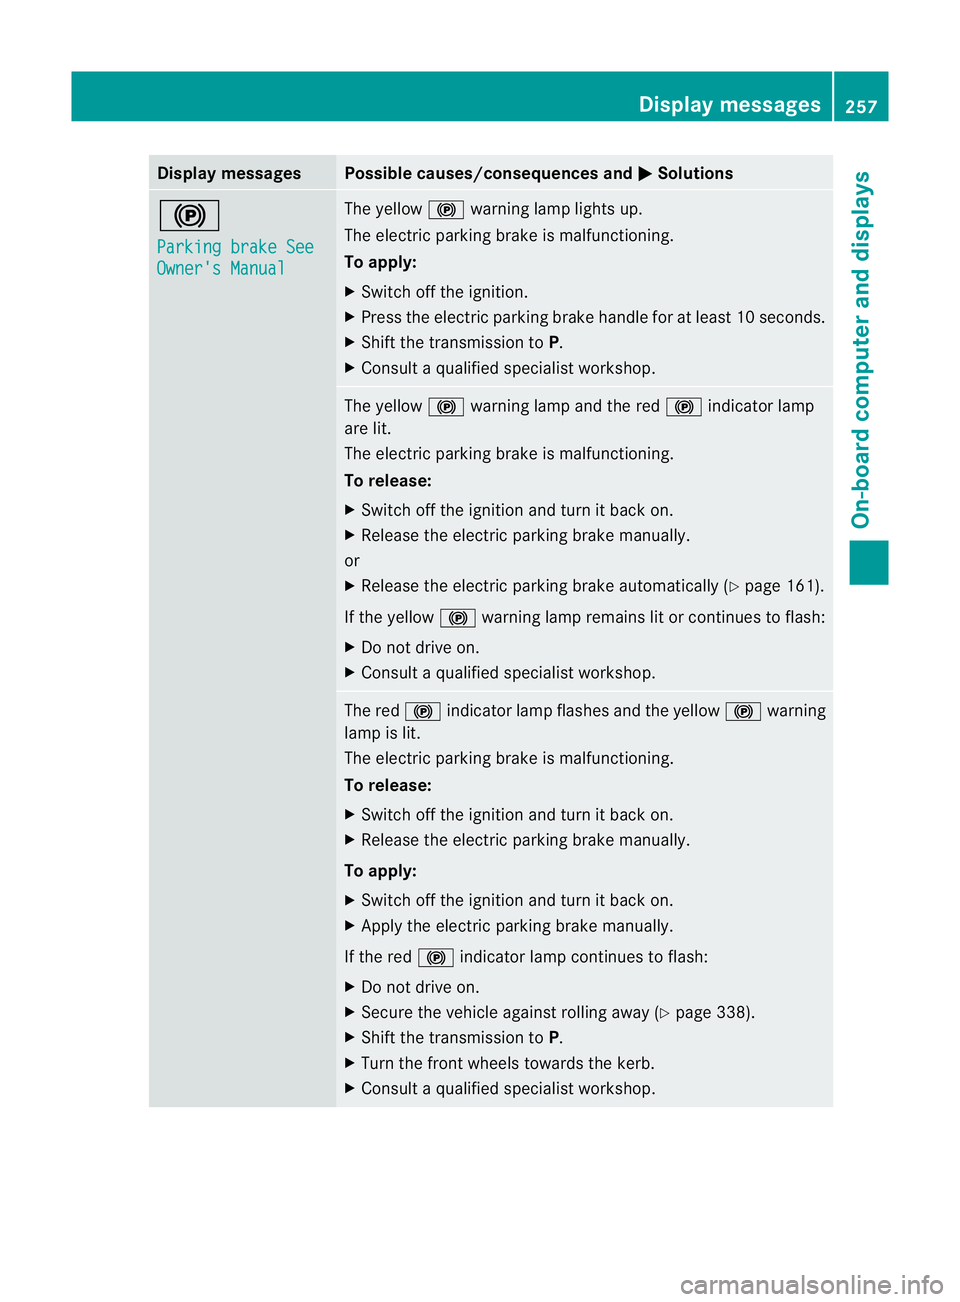
The electric parkin gbrak eism alfunctioning.
To apply:
X Switc hoffthe ignition.
X Press the electric parking brake handle fo ratleast 10 seconds.
X Shif tthe transmission to P.
X Consult aqualified specialist worksho p. The yellow
!warnin glamp and the red !indicator lamp
are lit.
The electric parking brake is malfunctioning.
To release:
X Switch off the ignitio nand turn it back on.
X Releas ethe electric parkin gbrake manu ally.
or
X Release the electric parkin gbrake automatically (Y page 161).
If the yellow !warning lamp remains lit or continues to flash:
X Do not drive on.
X Consult aqualified specialist worksho p. The red
!indicator lam pflashes and the yellow !warning
lamp is lit.
The electric parkin gbrake is malfunctioning.
To rel ease:
X Switch off the ignitio nand turn it back on.
X Releas ethe electric parkin gbrake manu ally.
To apply:
X Switch off the ignitio nand turn it back on.
X Appl ythe electric parkin gbrake manu ally.
If the red !indicator lamp continues to flash:
X Do not drive on.
X Secur ethe vehicle against rolling away (Y page 338).
X Shif tthe transmission to P.
X Tur nthe front wheels towards the kerb.
X Consult aqualified specialist worksho p. Display messages
257On-boardcomputer and displays Z
Page 261 of 389

Displa
ymessages Possible causes/consequences and
M Solutions
The yellow
!warning lamp lights up. The red !indicator
lamp flashes fo rabout 10 seconds after the electric parkin gbrake
ha sb een applied or released. It then goes out or remains lit.
The electric parkin gbrake is malfunctioning.
X Switch off th eignition and tur nitback on.
X Apply the electric parkin gbrake.
If it is not poss ible to apply the electric parkin gbrake:
X Shift th etransmission to P.
X Vis itaq uali fieds pecialist workshop.
If it is not possible to release the electric parkin gbrake:
X Releas ethe elec tricp arkin gbrake automaticall y(Ypage 16 1).
If th eelectric parkin gbrake can stil lnot be released:
X Consult aqualified specialist workshop. The yellow
!warning lamp lights up. If you manually apply or
release the electric parkin gbrake ,the red !indicator lamp
fla shes.
The electric parking brak eismalfunctioning. It is not poss ible to
apply the electric parking brake manu ally.
X Shift the transmission to P.
X Visit aquali fieds pecialist workshop. !
Pk
gb rake inopera‐ tive Th
ey ellow !warning lam plights up. The red !indicator
lamp flashes for about 10 seconds after the electric parkin gbrake
ha sb een applied or released. It then goes out or remains lit.
The electric parkin gbrake is malfunctioning ,e.g. because of over-
voltag eorundervoltage.
X Remove the cause for the overvoltage or undervoltage ,e.g. by
charging the battery or restarting the engine.
X Appl yorr elease the electric parkin gbrake.
If it remains impossibl etoapply or release the electric parking
brake:
X Swit choff the ignition and tur nitback on.
X Apply or release the electric parkin gbrake.
If th eelectric parkin gbrake can stil lnot be released:
X Consult aqualified specialist workshop. 258
Display messagesOn-board computer and displays