2011 MERCEDES-BENZ M-CLASS SUV transmission
[x] Cancel search: transmissionPage 262 of 389

Displa
ymessages Possible causes/consequences and
M Solutions
The display message is only shown while th
evehicl eisinm otion.
The red !indicato rlamp flashes and the yellow !warning
lamp is lit.
It is not possible to apply the electric parkin gbrake manually.
X Shift th etransmission to P.
X Visit aqualified specialist workshop. !
Turn on th
eigni‐ tion to release
the parking brake Th
er ed ! indicator lam pislit.
You attempted to release the electric parkin gbrake whil ethe igni-
tion was switched off.
X Key: turnthe key to position 1in the ignition lock.
X KEYLESS-GO: switchont he ignition. J
Chec
kbrake fluid level G
Ris
kofa ccident
There is insufficien tbrake flui dinthe brake flu idreservo ir.Ina ddi-
tion, the red Jwarning lamp in the instrumen tcluster lights
up and awarning tone sounds.
X Pul lover and stop th evehicle safely as soon as possible, paying
attention to road and traffic conditions. Do not continue driv ing
under any circumstances.
X Apply the electric parking brake.
X Consult aqualified specialist worksho p.
X Do not top up the brake fluid. Thi sdoes not correc tthe error. #
Chec
kbrake wear Th
eb rake pa ds/linings have reach edtheir wea rlimit.
X Visit aqualified specialist workshop. PRE-SAFE
inoperativ
eSee Owner's Manual G
Ris
kofi njury
Impor tant functions of PRE-SAFE ®
have failed. All other occupant
safety sys tems,e.g. airbags, remain available.
X Visit aqualified specialist worksho pimmediately. Display mess
ages
259On-boa rd comp uter and displays Z
Page 274 of 389

Displa
ymessages Possible causes/consequences and
M Solutions
8
Di
fferent. locking
sys
.c oolin gdown Please wait Th
ed ifferential loc kistoo hot and has been disengaged.
X Drive on carefully.
X Allow the differential lock to cool down.
The differential lock reengages as soon as it has cooled down. LO
WR ANGE Stop Apply parking brake Ag
earshif tprocess ha sbeen can celled. LOW RANGE is in the
neutral position. There is no connection between the engine and
the driv ewheels.
X Pull over and stop the vehicle safely as soon as possible, paying
attention to roa dand traffic conditions.
X Appl ythe electric parkin gbrake .Don ot con tinue driving under
any circumstances.
X Repe atthe gearshift process. LOW RANGE Malfunc‐
tion To park,
apply parking brake LO
WR ANGE is malfunctioning.
X Do not excee damaximum spee dof80k m/h.
X Apply th eelectric parkin gbrake to park.
X Have th evehicle checked at aqualified specialist workshop. LO
WR ANGE Max. speed 40 km/h Yo
uh ave exceeded the maximum spee dfor the gearshift process.
X Drive slower.
The gear change is made. LO
WR ANGE Max. speed 70 km/h Yo
uh ave exceeded the maximum spee dfor the gearshift process.
X Drive slower.
The gear change is made. LOW RANGE Shift to
position
Nbriefly Yo
uh ave reduced the vehicle speed, but the automatic transmis-
sion is not in position N.
X Briefly shift the automatic transmission to position N.LOW RANGE Shifting
cancelle
dPlease reactivate Th
eg earshif tprocess ha sbeen cancelled.
X Repeat the gearshif tprocess. Ã
inoperative DSR (Downhil
lSpeed Regulation) is deactivated due to afault.
X Hav eDSRchecked at aqualified specialist workshop. Display messages
271On-boar dcomp uter and displa ys Z
Page 283 of 389

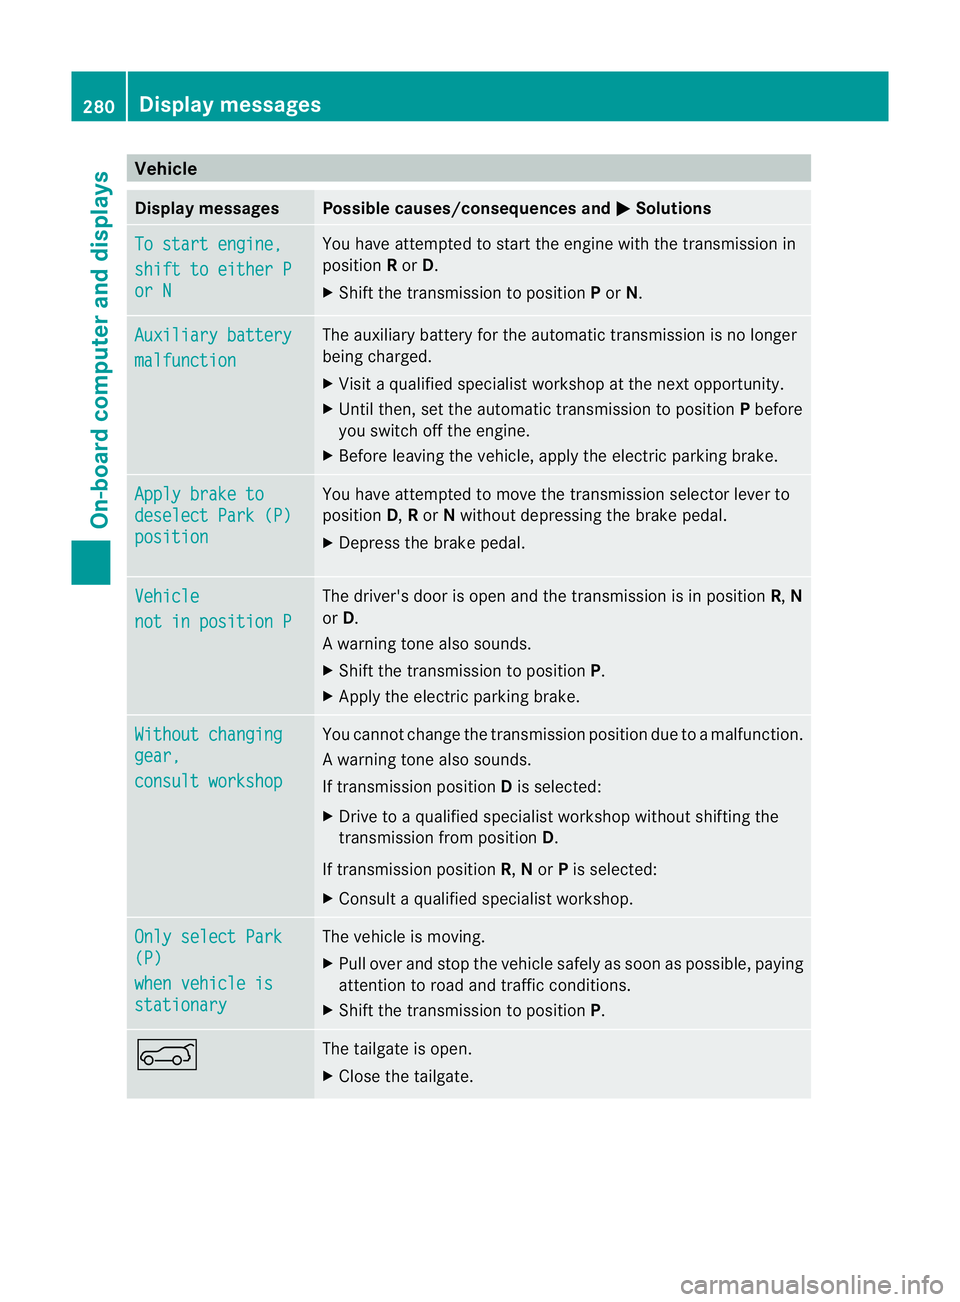
Vehicle
Display messages Possible caus
es/consequences and M Solutions
To start engine,
shift to either P
or N Yo
uh avea ttempte dtostart the engine with the transmission in
position Ror D.
X Shift the transmission to position Por N. Auxiliary battery
malfunction The auxiliary battery for the automatic transmission is no longer
being charged.
X Visit aquali fied sp ecialist worksho patthe nex toppor tunity.
X Until then, set the automatic transmission to position Pbefore
yo us witch off the engine.
X Before leaving the vehicle, appl ythe electr ic parking bra ke. Apply brake to
deselect Par
k(P) position Yo
uh ave attempted to mov ethe transmission selector lever to
position D,Ror Nwithout depressing the brake pedal.
X Depress the brake pedal. Vehicle
no
tinp osition P Th
ed river's door is open and th etransmission is in position R,N
or D.
Aw arning ton ealso sounds.
X Shift th etransmissio ntoposition P.
X Apply th eelectric parking brake. Wi
thoutc hanging gear,
consul
tworkshop Yo
uc annot change the transmission position due to amalfunction.
Aw arning ton ealso sounds.
If transmission position Dis selected:
X Drive to aqualified specialist workshop without shiftin gthe
transmissio nfromp osition D.
If transmission position R,Nor Pis selected:
X Consult aqualified specialist workshop. On
ly select Park (P)
whe
nv ehicl eis stationary Th
ev ehicle is moving.
X Pull ove rand sto pthe vehicle safel yassoonasp ossible, paying
attention to roa dand traffic conditions.
X Shift the transmissio ntoposition P. A The tailgate is open.
X Close the tailgate. 280
Display messagesOn-board computer and displays
Page 315 of 389

the separate mobil
ephone operating
instructions).
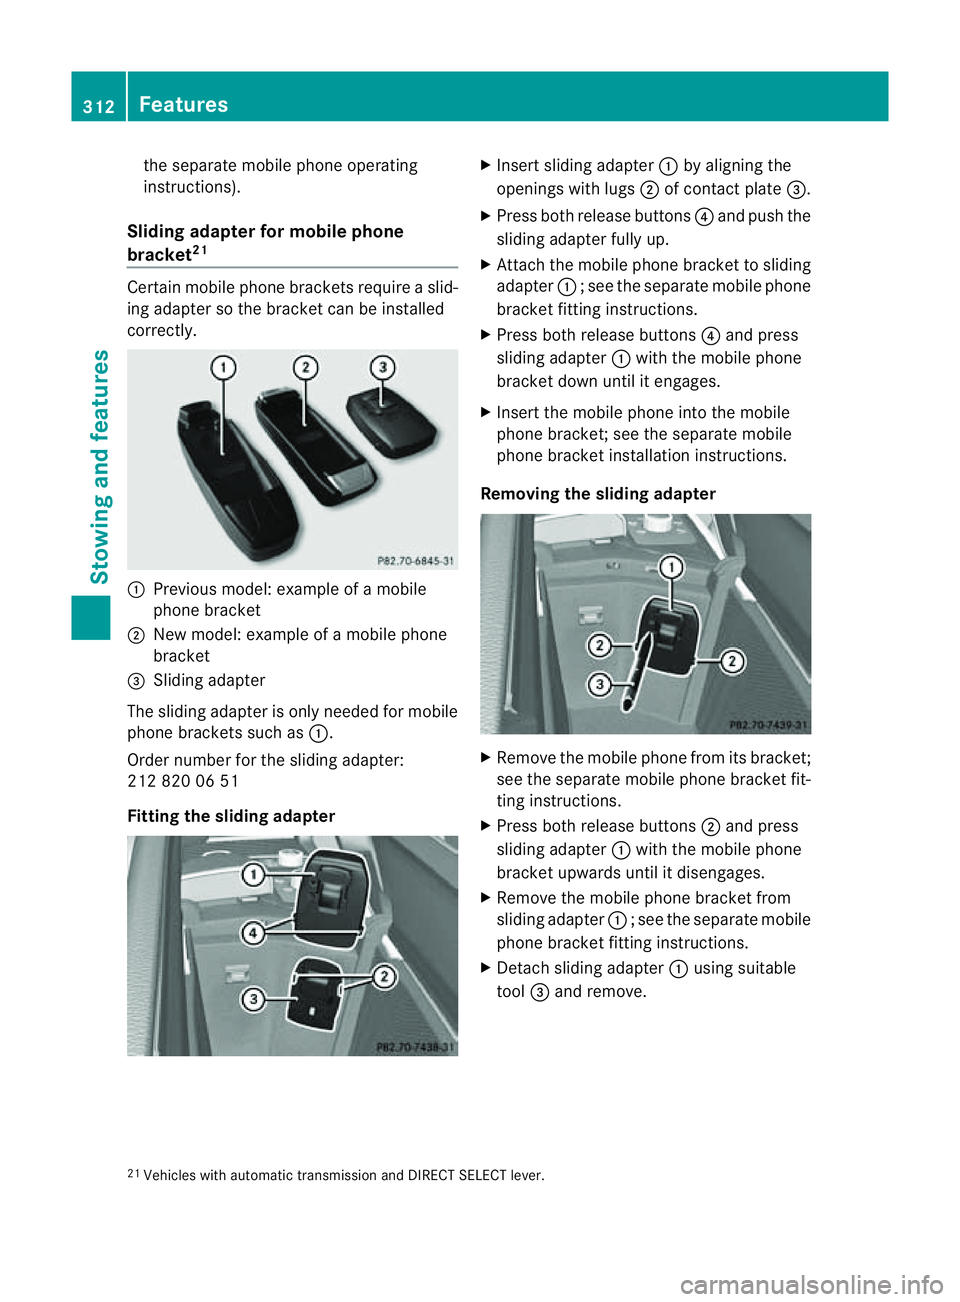
Sliding adapte rfor mobil ephone
bracket 21 Certain mobil
ephone brackets require aslid-
ing adapter so the bracket can be installed
correctly. :
Previou smodel :examp leof am obile
phone bracket
; New model :examp leof am obile phone
bracket
= Sliding adapter
The sliding adapter is only neede dfor mobile
phone brackets such as :.
Order number for the sliding adapter:
212 820 06 51
Fittin gthe sliding adapter X
Insert sliding adapter :by aligning the
openings wit hlugs ;of contact plate =.
X Press both release buttons ?and push the
sliding adapter fully up.
X Attach the mobile phone bracket to sliding
adapter :;see the separate mobile phone
bracket fit ting instructions.
X Pres sboth release buttons ?and press
slidin gadapter :with the mobile phone
bracket down unti litengages.
X Insert the mobil ephone int othe mobile
phone bracket ;see the separate mobile
phone bracket installation instructions.
Removing th esliding ada pter X
Remove the mobile phone from its bracket;
see the separate mobile phone bracket fit-
ting instructions.
X Press both release buttons ;and press
sliding adapter :with the mobile phone
bracket upwards until it disengages.
X Remove the mobile phone bracket from
sliding adapter :;see the separate mobile
phone bracket fit ting instructions.
X Detach sliding adapter :using suitable
tool =and remove.
21 Vehicles with automatic transmission and DIRECT SELECT lever. 312
FeaturesStowin
gand features
Page 317 of 389

If indicato
rlamp :lights up red:
X Repeat the programming procedure for the
transmitter buttons. When doing so, vary
the distance betwee nthe garage door drive
remote con troland the rear-view mirror.
i If the indicator lamp flashes gree nafter
successfu lprogramming, th egarage door
system is using arollin gcode. Af terp ro-
gramming ,you must synchronise the
garage door opener integrated in the rear-
view mirror with the receive rofthe garage
door system.
Synchronising th erolling code
Your vehicle must be within reach of the
garage or gate opener drive. Make sure that
neither your vehicle nor any persons/objects
are present within the sweep of the door or
gate.
Observe the safety notes when performing
the rolling code synchronisation.
X Turn the key to position 2in the ignition
lock.
X Press the programming button of the door
or gate drive (see the door or gate drive
operating instructions, e.g. under "Pro-
gramming of additional remote controls").
i Usually, you now have 30 seconds to ini-
tiate the next step.
X Press the previously programmed button of
the integrated HomeLink ®
garage door
opener repeatedly until the door starts to
move.
The rolling code synchronisation is then
complete.
Problems when programming
If you have problems when programming the
integrated garage door opener, please note
the following:
R check the transmitter frequency of garage
door remote control A(this can usually be
found on the rear of the remote control).
R change the batteries in garage door remote
control A.This increases the likelihood that garage door remote con
trolAwill
send astron gand precis esignal to the
integrated remote control in the rear-view
mirror.
R when programming, hold garage door
remote control Aat different distances
and angles from the transmitter button that
you are programming. Try various angles at
ad istance of between 5and 30 cm or the
same angle but varying distances.
R if there is another remote control for the
same garage doo rdrive ,perform the pro-
grammin gsteps again using this remote
control. Before performing thes esteps,
make sure that new batterie shave been
fitted in the garage door drive remote con-
trol.
R note that some remote controls transmit
only for alimited period (the indicator lamp
on the remote control goes out). Press the
button on the remote control again before
transmission ends.
R align the aerial cable of the garage door
opener unit. This can improv esignal recep-
tion/transmission.
Opening or closing the garage door Once programmed, the integrated garage
door opener will assume the func
tion of the
garage door system's remote con trol. Please
also read the operating instruc tions for the
garage door system.
X Tur nthe key to position 2in the ignition
lock.
X Press overhead con trolpanel transmitter
button ;,=or? that you have pro-
grammed to operate the garage door.
Garage door system with afixed code: indi-
cator lamp :lights up green.
Garage door system with arollin gcode:
indicator lamp :flashes green.
i The transmitter will transmit asignal for
as long as the transmitter button is
pressed. The transmission is halted after a
maximum of 10 seconds, and indicator 314
FeaturesStowin
gand features
Page 327 of 389

You can obtain fur
ther information about
BlueTE Cexhaus tgas aftertreatmen tand
AdBlue ®
from any Mercedes-Benz Service
Centre. Care
Note
sonc are
Regular care of your vehicle is aconditio nfor
retaining th equalit yint he long term.
Us ec arep roducts and cleani ngagent srec-
ommended and approved by Mercedes-Benz.
! For cleanin gyour vehicle ,donot useany
of the following:
R dry ,rough or hard cloths
R abrasive cleanin gagents
R solvents
R cleanin gagents con taining solvents
Do not scrub.
Do not touch the surfaces or protective
film swith hard objects, e.g. aring or ice
scraper .You coul dotherwis escratch or
damag ethe surfaces and protective film. H
Environmenta
lnote
Dispose of empty packaging and cleaning
cloths in an environmentally responsible man-
ner.
! Do not park up the vehicle for an extended
period straight after cleaning it, particular ly
after having cleaned the wheels with wheel
cleaner. Whee lcleaners could cause
increased corrosion of the brake discs and
brake pads/linings. For this reason, you
should drive for afew minutes after clean-
ing. Brakin gheats the brak ediscs and the
brake pads/linings, thus drying them. The
vehicle can then be parked up. Care of the exterior
Automatic car wash G
WARNING
Braking efficiency is reduced after washing
the vehicle. This could cause an accident. For
this reason, following acar wash, drive with
particular care until the brakes are dry.
You can wash the vehicle in an automatic car
wash from the very start.
If the vehicle is very dirty, pre-wash it before
cleaning it in an automatic car wash.
! In car washe swithatowing mechanism,
make sure that the automatic transmission
is in transmission position N,otherwis ethe
vehicle could be damaged.
R Vehicles with akey:
do not remove the key from the ignition
lock. Do not open the driver' sdoor or
front-passenger door when the engin eis
switched off .Otherwise, the automatic
transmission selects park position P
automaticall yand locks the wheels .You
can prevent this by shifting the auto-
matic transmission to Nbeforehand.
R Vehicles with KEYLE SS-GO:
do not ope nthe driver's door or front-
passenger door when the engin eis
switched off .Otherwise, the automatic
transmission selects park position P
automaticall yand locks the wheels.
Observe the following to make sure that the
automati ctransmission stays in position N:
X Make sure th evehicle is stationary and the
ignition is switched off.
X Turn the key to position 2(Y page 139) in
the ignition lock.
Use the key instead of the Start/Stop but-
ton on vehicles with KEYLE SS-GO.
X Depres sand hol dthe brake pedal.
X Shif tthe automatic transmission to posi-
tion N.
X Release the brake pedal. 324
CareMaintenance and care
Page 347 of 389

R
make sure that yo udonot create an elec-
trostati ccharge, e.g. by wearing synthetic
clothing or as aresul toff riction on fabrics.
Therefore, you should not pul lorslide the
battery over carpets or other synthetic
materials.
R never touc hthe battery fir st. To discharge
ap ossible electrostatic charge, ste pout of
the vehicle firs tand touch the bodywork.
R do not wipe the battery using acloth. The
battery may explode as aresul tofe lectro-
static charge or due to flying sparks.
! Switch off the engin eand remove the key
befo redisconnecting the terminal clamps
from the battery. On vehicles with KEY-
LESS-GO, mak esure that the ignition is
switched off .Check that all the indicator
lamps in the instrumen tcluster are off .You
ma yotherwis edestroy electronic compo-
nents, such as the alternator.
i When you park the vehicle, remove the
key if you do not require any electrical con-
sumers. The vehicle will then use ver ylittle
energy, thus conserving battery power.
Mercedes-Benz recom mends that you do not
carry out work on batteries yourself, e.g.
removing or charging. Have this work per-
formed at aqualified specialist workshop, e.g.
aM ercedes-Benz Servic eCentre. Installation location of the battery
Your vehicle is equipped with abattery in the
vehicle interior. It is located under the front
seat on the right-hand side of the vehicle
when viewed in the direction of travel.
X Apply the electric parking brake and shift
the transmission to position P.
X Position the right-hand front seat as far for-
wards as possible.
X Switch off all electrical consumer s(e.g.
radio, blower, etc.).
X Turn the key to position 0(Y page 139) in
the ignition lock and remove it. On vehicles with KEYLESS-GO, mak
esure the ignition
is switched off (Y page 139). All indicator
lamps in the instrument cluster must be off. X
Get into the rear compartment.
X Remove cap :under the right-hand front
seat. X
Use ashar pknifeonc arpet;to cut along
the dashe dwhite line until you reach the
perforated part.
X Position the right-hand front seat at its rear-
most position. 344
Ba
tteryBreakdown assistance
Page 349 of 389

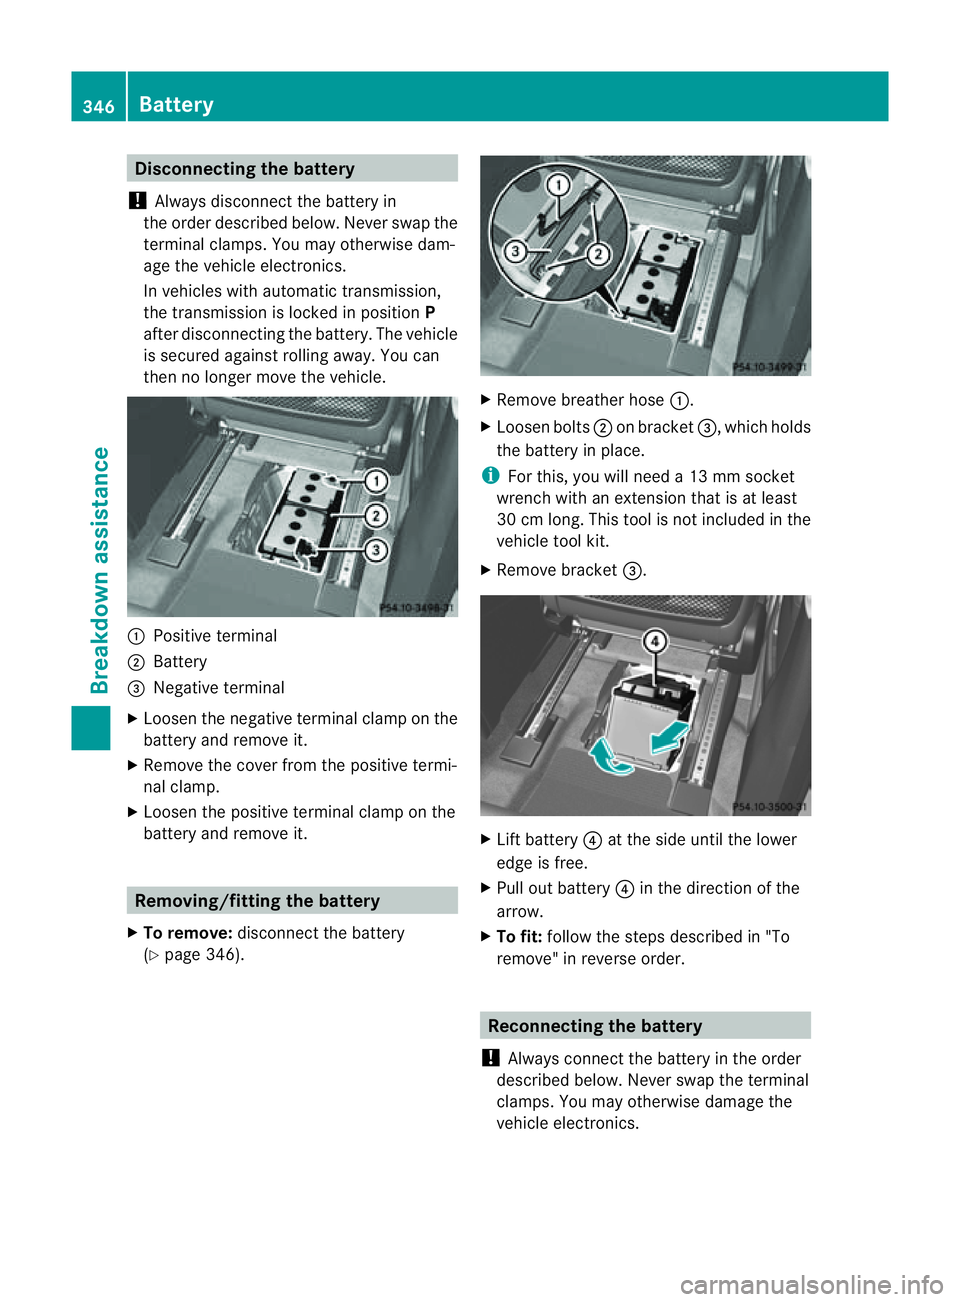
Disconnecting th
ebattery
! Always disconnect the battery in
the order described below. Never swap the
terminal clamps. You ma yotherwis edam-
age the vehicle electronics.
In vehicles with automatic transmission,
the transmission is locked in position P
after disconnecting the battery. The vehicle
is secured against rolling away .You can
then no longer mov ethe vehicle. :
Positive termi nal
; Battery
= Negative terminal
X Loosen the negative terminal clamp on the
battery and remove it.
X Remove the cover from the positive termi-
nal clamp.
X Loosen the positive terminal clamp on the
battery and remove it. Removing/fitting the battery
X To remove: disconnect the battery
(Y pag e346). X
Remove breather hose :.
X Loose nbolts ;on bracket =,which holds
the battery in place.
i For this, you will need a13mmsocket
wrenc hwith an extension that is at least
30 cm long. This tool is not included in the
vehicle tool kit.
X Remove bracket =. X
Lif tb attery ?at the side until the lower
edge is free.
X Pull out battery ?in the direction of the
arrow.
X To fit: follow the steps described in "To
remove" in reverse order. Reconnecting the battery
! Always connect the battery in the order
described below. Never swap the terminal
clamps. You may otherwise damage the
vehicle electronics. 346
BatteryBreakdown assistance