2011 MERCEDES-BENZ M-CLASS SUV buttons
[x] Cancel search: buttonsPage 76 of 389

signa
lcan be activated and deactivated using
the on-board computer (Y page 249).
X To unlock centrally: press the%but-
ton.
If you do not open the vehicle within approx-
imately 40 seconds of unlocking:
R the vehicle is locked again.
R the anti-theft system is primed again.
X To lock centrally: press the&button. KEYLESS-GO
You can start, lock or unlock the vehicle using
KEYLE SS-GO. To do this ,you only need carry
the key with you. When you touc hthe surface
of the sensor sonthe vehicle' soutside door
handles ,KEYLESS-GO establishes aradio
connection between the vehicle and the key.
When the engine is started and whils tyou are
driving, KEYLE SS-GO also checks whether a
valid key is in the vehicl ebyperiodically
establishing radi ocontact.
When locking or unlockin gwith KEYLESS-GO,
the distance between the key and the door
handle you wish to lock or unlock must not
be greater than 1m. X
To unlock the vehicle: touch the inner
surface of the doo rhandle.
X To lock the vehicle: touch sensorsur-
face :.
X Convenienc eclosing feature: touch
recessed sensor surface ;for an exten-
ded period (Y page 85). If you pull on the handle of the tailgate, only
the luggage compartmen
tofthe vehicle is
unlocked. Changing th
esettings of the locking
system
You can change the setting of the locking
system in such away that only the driver's
door and the fuel filler flap are unlocked. This
is useful if you frequently travel on your own.
X To change the setting: press and hold
down the %and& buttons simulta-
neously for approximately six seconds until
the battery check lamp (Y page 74)
flashes twice.
i If the setting of the locking system is
changed within the signal range of the vehi-
cle, pressing the &or% button locks
or unlocks the vehicle.
The key now function sasfollows:
X To unlock th edriver's door: press the
% button once.
X To unlock centrally: press the%but-
ton twice.
X To lock centrally: press the&button.
The KEYLESS-GO function is change dasfol-
lows:
X To unlock th edriver's door: touch the
inner surface of the doo rhandle on the
driver' sdoor.
X To unlock centrally: touchthe inner sur-
face of the door handl eonthe front-
passenger door or the rea rdoor.
X To lock centrally: touchthe outer sensor
surface on one of the door handles. Restoring th
efactory settings
X Press the %and& button ssimulta-
neously for approximately six seconds until
the battery check lamp flashes twice. Key
73Opening and closing Z
Page 96 of 389

in such
away that you have agood view of
roa dand traffic conditions.
X Vehicles with amemory function: save
the seat, steerin gwheel and exterior mirror
settings (Y page 103). Sea
ts Important safety notes
G
WARNING
The seats can still be adjusted when ther eis
no key in the ignition lock. For this reaso n,
children shoul dnever be left unsupervised in
the vehicle. They could adjust the seat sand
become trapped. G
WARNING
Only adjus tthe driver' sseat when the vehicle
is stationary. You will otherwise be distrac ted
from the road and traffic conditions and you
could lose control of the vehicle as aresult of
the seat moving. This could cause an acci-
dent. G
WAR
NING
If you adjus tthe seat height car elessly, you or
others could be trapped and thereb yinjured.
Children in particular could unintentionally
pres sthe buttons to electrically adjust the
seat sand become trapped.
Take care that:
R whil emoving the seats, your hands do not
get under the lever assembly of the seat
adjustmen tsystem.
R children in the vehicl edonot slidetheir
hands unde rthe levers. G
WARNING
Make sur ethat nobody can becom etrapped
when adjusting the seats.
Observe the notes on airbags.
Secure children as recomm ended; see the
"Children in the vehicle" section. G
WAR
NING
Make sure that the back of your head is sup-
ported at eye level by the central area of the
head restraint .Ifyour head is not supported
correctly by the head restraint ,you coul dsuf-
fer asever eneck injury in the event of an
accident .Never driv eifthe head rest raints are
not engaged and set correctly. G
WARNING
As eat belt can only offer its intended degree
of protection when the back rest is almost ver-
tical and the occupan tiss itting upright. Avoid
seat positions that do not allow the seat belt
to be routed correctly. Adjust the backrest so
that it is as upright as possible .Never travel
with the back rest reclined too fa rbackwards.
You could otherwise be seriousl yoreven
fatally injured in th eevent of an accident or
sudden braking.
! To avoid damag etothe seats and the seat
heating, observe the followin ginformation:
R do not spill any liquids on the seats. If
liquid is spilled on the seats, dry them as
soon as possible.
R if the sea tcover sare damp or wet, do not
switc hont he seat heating. The seat
heating should also not to be used to dry
the seats.
R clea nthe seat cover sasrecommended;
see the "In terior care" section.
R do not transport heav yloads on the
seats. Do not plac eshar pobjects on the
seat cushions ,e.g. knives, nails or tools.
Th es eats should only be occupied by
passengers, if possible.
R when the seat heatin gisinoperation ,do
not cover the seats with insulating mate-
rials, e.g. blanke ts,c oats, bags, seat cov-
ers, child seats or booster seats.
! When you mov ethe seats, make sur ethat
ther eare no objects in th efootwell or
behind the seats. Otherwise, you could
damage the seats and the objects. Seats
93Seats,steering wheeland mirrors Z
Page 100 of 389

i
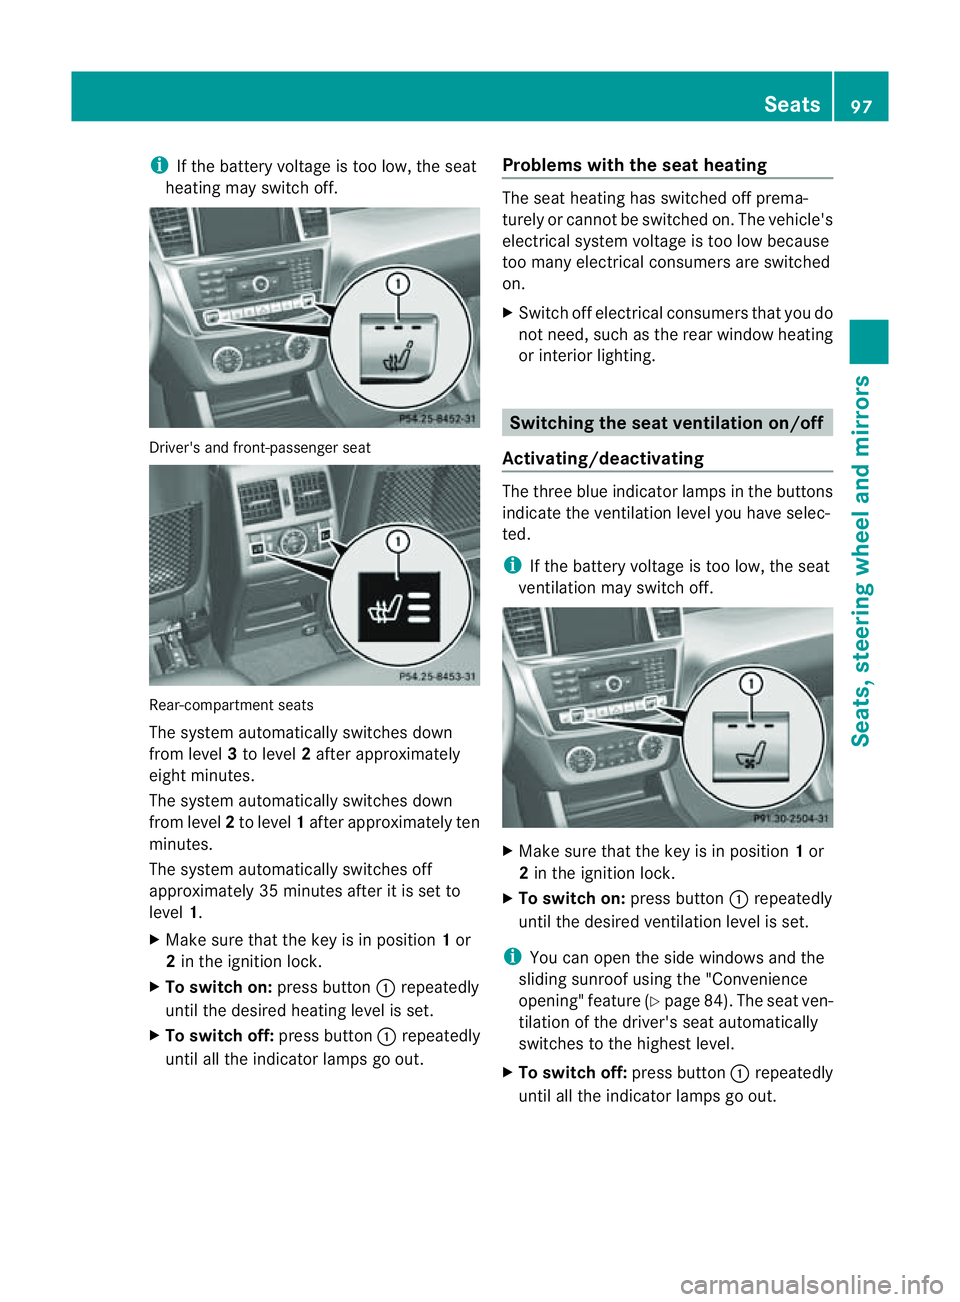
If th ebattery voltage is too low, the seat
heating may switch off. Driver's and front-passenger seat
Rear-compartment seats
The system automaticall
yswitches down
from level 3to level 2after approximately
eight minutes.
The system automaticall yswitches down
from level 2to level 1after approximately ten
minutes.
The system automatically switches off
approximately 35 minutes after it is set to
level 1.
X Make sure that the key is in position 1or
2 in the ignition lock.
X To switch on: press button:repeatedly
until the desire dheatin glevel is set.
X To switch off: press button:repeatedly
until all the indicator lam psgo out. Problems with th
eseat heating The seat heating has switched off prema-
turely or cannot be switched on. The vehicle's
electrical system voltage is too low because
too many electrical consumer sare switched
on.
X Switch off electrica lconsumers that you do
not need, such as the rea rwindow heating
or interior lighting. Switching the seat ventilation on/off
Activating/deactivating The three blu
eindicato rlamps in the buttons
indicate the ventilation level you have selec-
ted.
i If the battery voltage is too low, the seat
ventilation may switch off. X
Make sure that the key is in position 1or
2 in the ignition lock.
X To switch on: press button:repeatedly
until the desire dventilation level is set.
i You can open the side windows and the
sliding sunroof using the "Convenience
opening" featur e(Ypage 84). The seat ven-
tilation of the driver' sseat automatically
switches to the highest level.
X To switc hoff:press button :repeatedly
until all th eindicato rlamps go out. Seats
97Seats,steeri ngwheel and mirrors Z
Page 102 of 389

i
Related topics:
R EASY-ENTRY/EXI Tfeature
(Y page 99)
R Storing setting s(Ypage 103) Steering whee
lheating
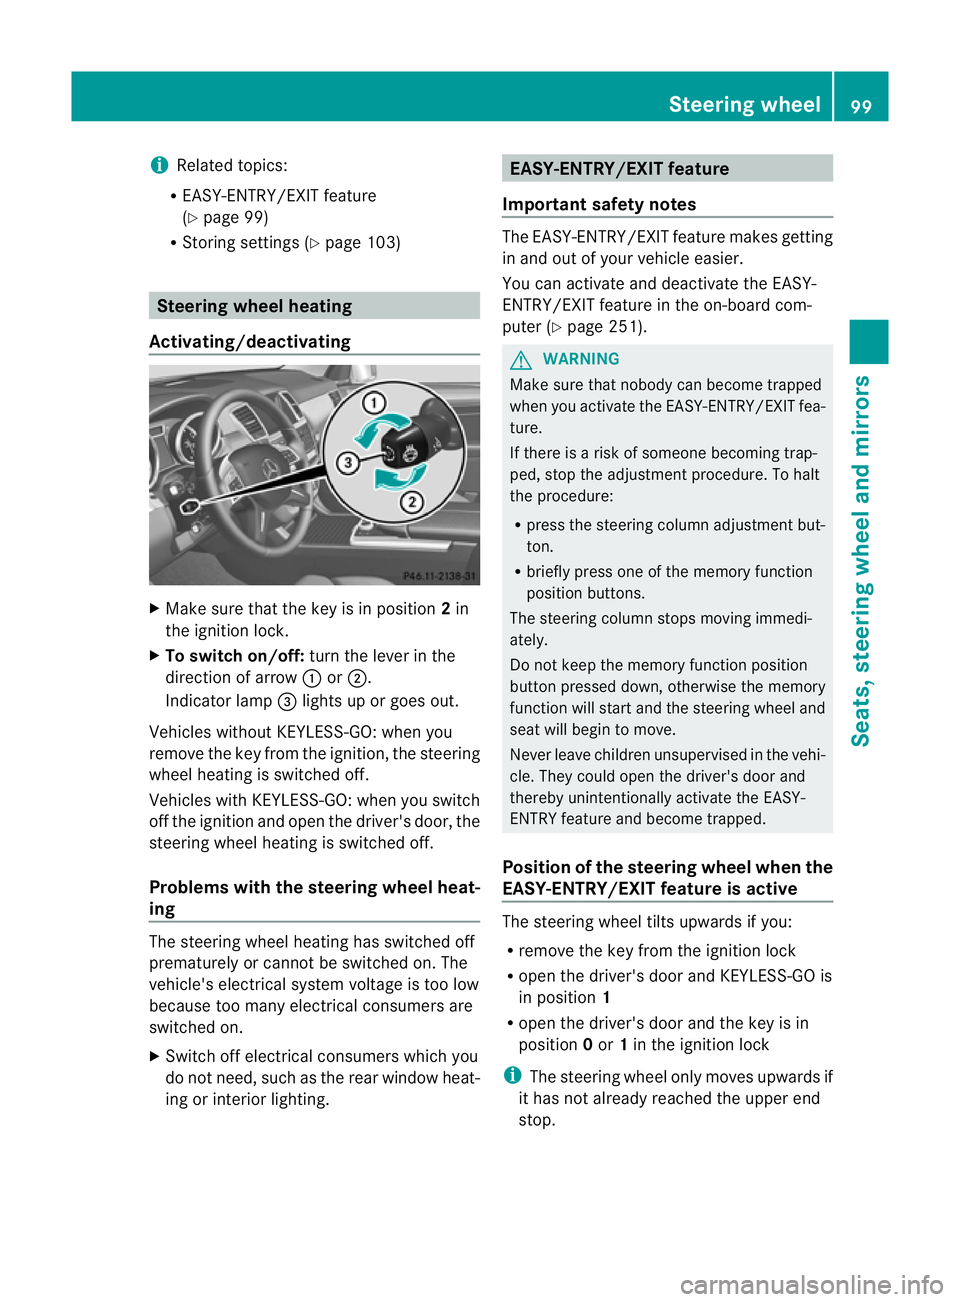
Activating/deactivating X
Mak esuret hat the key is in position 2in
th ei gnition lock.
X To switch on/off: turnthe lever in the
direction of arrow :or;.
Indicato rlamp =lights up or goes out.
Vehicles without KEYLESS-GO: when you
remove the key from the ignition ,the steering
wheel heating is switched off.
Vehicles with KEYL ESS-GO:when you switch
off the ignition and open the driver's door, the
steering wheel heating is switched off.
Problems wit hthe steering whee lheat-
ing The steering wheel heating has switched off
prematurely or cannot be switched on. The
vehicle's electrical system voltage is too low
because too many electrical consumer sare
switche don.
X Switch off electrical consumers which you
do not need ,such as the rear window heat-
ing or interior lighting. EASY-ENTRY/EXIT featu
re
Important safety notes The EASY-ENTRY/EXI
Tfeatur emakes getting
in and out of your vehicle easier.
You can activate and deactivate the EASY-
ENTRY/EXIT feature in the on-board com-
puter (Y page 251). G
WARNING
Make sure that nobody can become trapped
when you activate the EASY-ENTRY/EXI Tfea-
ture.
If there is arisk of someone becoming trap-
ped, stop the adjustment procedure. To halt
the procedure:
R press the steering column adjustment but-
ton.
R briefly press one of the memor yfunction
position buttons.
The steering column stops moving immedi-
ately.
Do not keep the memory function position
button presse ddown, otherwise the memory
function will star tand the steering wheel and
sea twill begin to move.
Never leave children unsupervised in the vehi-
cle. They could open the driver's door and
thereby unintentionally activate the EASY-
ENTRY featur eand become trapped.
Positio nofthe steering whee lwhen the
EAS Y-ENTRY/EXIT featur eisactive The steerin
gwheel tilt supwards if you:
R remove the key from the ignition lock
R open the driver' sdoor and KEYLESS -GOis
in position 1
R open the driver's door and the key is in
position 0or 1in the ignition lock
i The steerin gwheel only moves upwards if
it has not already reached the upper end
stop. Steering wheel
99Seats,steering wheeland mirror s Z
Page 125 of 389

=
To direct the airflow through the rea rair vents
? To direct the airflow through the footwell vents Notes on using THER
MATIC automatic
climate control
The following contains notes and recommen-
dations on optimum operation of THERMATIC
automatic climate control.
R Activate climate control using the Ãand
Á buttons. The indicato rlamps in the
à andÁ button slight up.
R Set the tempera tureto 22 †.
R Only use the demisting function briefly,
until the windscreen is clear again.
R Only use the air-recirculatio nmode briefly,
e.g. if ther eare unpleasant outsid eodours
or when in atunnel. The windows could
otherwis emist up as, in air-recirculation
mode, no fresh air is drawn into the vehicle.
R Use the ZONE func tion to adopt the tem-
peratur esettings on the driver' sside for
the front-passenger side as well. The indi-
cator lamp in the ábutton goes out. 122
Overview of climate control systemsClimate control
Page 127 of 389

Q
Switche srear-com partment climate contro lon/of f(Y page 124)
R Reduces the airflow (Y page 127)Notes on using THERMOTRONIC auto-
matic climat econtrol
The following contains notes and recommen-
dations on optimum operation of
THERMO TRONIC automatic climate contro l.
R Activate climate control using the Ãand
¿ buttons .The indicator lamps in the
à and¿ buttons light up.
R In automatic mode, you can also use the
ñ button to set aclimate mode
(FOCUS/MEDIUM/DIFFUSE). The
MEDIU Mlevel is rec ommended.
R Set th etemperature to 22 †.
R Only use the demisting function briefly,
unt ilthe windscreen is clear again.
R Only us ethe air-recircu lation mod ebriefly,
e.g .ift here ar eunpleasant outsid eodours
or when in atunnel. The window scould
otherwise mist up as ,inair-recirculation
mode, no fresh air is drawn int othe vehicle.
R Use the ZON Efunction to adopt the tem-
perature settings on the driver' sside for
the front-passenger side and the rear com-
partment as well. The indicator lamp in the
á button goes out.
R Use the residual heat function if you want
to heat or ventilate the vehicle interior
when the ignition is switched off. The resid-
ual heat function can only be activated or
deactivated with the ignition switched off. Operating the climat
econtrol system Switching climat
econtrol on/off
Importan tinfor mation i
Whe nclimate contro lisswitched off, the
air supply and air circulation are also
switched off. Only select this setting briefly. Otherwise, the windows may mist
up.
i Switc honc limatecontr ol primaril yusing
the à button( Ypage 12 5).
In th erear compartmen t,you can also switch
climat econtr olon and off using the Ãand
^ buttons.
Switching on/off X
Tur nthe key to position 2in the igni tion
lock.
X To switch on: press theÃbutton.
The indicator lam pintheà button lights
up. Air flow and air distribution ar eset to
automatic mode.
or
X Press button ^.
The indicator lam pinthe^ button goes
out. The previously selec teds ettings come
int oe ffect again.
X To switch off: press the^button.
Th eindicator lamp in the ^button lights
up. Activating/deactiv
ating the cooling
with air deh umidification function
Importan tinfor mation The cooling with air dehumidification function
is only availabl
ewhen the engin eisrunning.
The air inside the vehicle is cooled and dehu-
midified according to the temperature selec-
ted. G
WARNING
If the "cooling with air dehumidification" func-
tion is deactivated, the air inside the vehicle
will not be cooled (during warm weather) or
dehumidified. The windows could mist up 124
Operating th
eclimat econtrol systemClimat econtrol
Page 129 of 389

Setting th
etemperature
THERMATIC automatic climate control Differen
ttemperatures can be set for the
driver' sand front-passenger sides.
X Turn the key to position 2in the ignition
lock.
X To increase/reduce: turn controls:or
B clockwise or anti-clockwise
(Y pag e121).
Onl ychange the temperature setti ngin
small increments. Star tat2 2†.
THERMOTRONIC automatic climate
control THERMOTRONIC automatic climate control zones
You can select different temperature setti ngs
fo rt he driver's and front-passenger sides as
well as for the rea rcompartment.
X Tur nthe key to position 2in the ignition
lock.
X To increase/reduce th etemperature in
the front: turn controls :and Bclock-
wise or anti-clockwise (Y page 123).
Only change the temperatur esettin gin
small increments. Star tat2 2†.
X To increase/reduce the temperature in
the rear compartment using the front
contro lpanel: press the ábutton.
Th eindicato rlamp in the ábutton goes
out. X
Turn control :clockwise or anti-clockwise
(Y page 123).
Only change the temperature setting in
small increments. Start at 22 †.
The temperature setting for the driver's
side is adopted for the rear compartment
and the front-passenger side.
X To increase/decrease the rear compart-
ment temperature using the rear con-
trol panel: turn control Mclockwise or
anti-clockwise on the rear control panel
(Y page 123).
Only change the temperature setting in
small increments. Start at 22 †. Setting the air distribution
Front control unit:
P Directsair through the centre vents.
O Directsthe airflo wthrough the foot-
well air ven ts.
S Directsthe airflo wthrough the cen tre
and footwell vents.
¯ Directsthe airflo wthrough the demis-
ter ven ts.
b Directsthe airflo wthrough the demis-
ter and cen tre vents.
a Directs the airflow throug hthe foot-
well and demister ven ts.
_ Directsthe airflo wthrough the demis-
ter ,centre and footwell air ven ts.
Rear control panel:
M Directsthe airflo wthrough the rear
cen treand rear side air vents.
O Directsthe airflo wthrough the foot-
well air ven ts.
i Using the rear control panel, you can also
activate both air distribution positions
simultaneously .Inordertodot his, press
both air distribution buttons. The air is then
routed through all rea rair vents.
i Regardles softhe air distributio nsetting,
airflow is always directed through the side 126
Operating th
eclimat econtrol systemClimat econtrol
Page 315 of 389

the separate mobil
ephone operating
instructions).
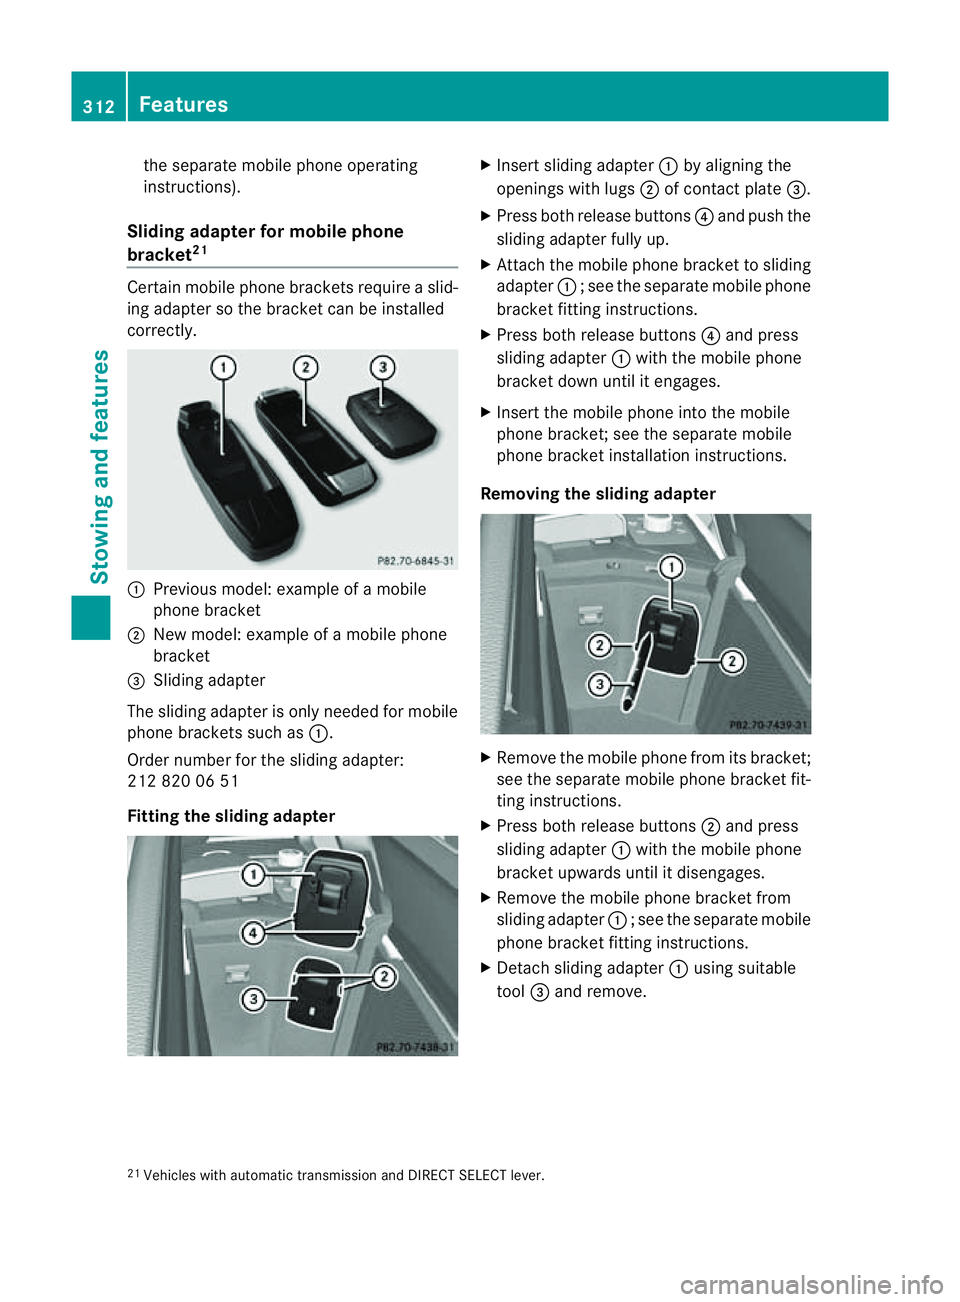
Sliding adapte rfor mobil ephone
bracket 21 Certain mobil
ephone brackets require aslid-
ing adapter so the bracket can be installed
correctly. :
Previou smodel :examp leof am obile
phone bracket
; New model :examp leof am obile phone
bracket
= Sliding adapter
The sliding adapter is only neede dfor mobile
phone brackets such as :.
Order number for the sliding adapter:
212 820 06 51
Fittin gthe sliding adapter X
Insert sliding adapter :by aligning the
openings wit hlugs ;of contact plate =.
X Press both release buttons ?and push the
sliding adapter fully up.
X Attach the mobile phone bracket to sliding
adapter :;see the separate mobile phone
bracket fit ting instructions.
X Pres sboth release buttons ?and press
slidin gadapter :with the mobile phone
bracket down unti litengages.
X Insert the mobil ephone int othe mobile
phone bracket ;see the separate mobile
phone bracket installation instructions.
Removing th esliding ada pter X
Remove the mobile phone from its bracket;
see the separate mobile phone bracket fit-
ting instructions.
X Press both release buttons ;and press
sliding adapter :with the mobile phone
bracket upwards until it disengages.
X Remove the mobile phone bracket from
sliding adapter :;see the separate mobile
phone bracket fit ting instructions.
X Detach sliding adapter :using suitable
tool =and remove.
21 Vehicles with automatic transmission and DIRECT SELECT lever. 312
FeaturesStowin
gand features