2011 MERCEDES-BENZ C-CLASS COUPE key
[x] Cancel search: keyPage 144 of 373

matically. All of the vehicle's systems remain
active. If you open the door, unfasten your
seat belt or remove your foot from the brake
pedal, the engine will automatically start. The
vehicle may begi nmoving. You could suffer
serious or even fatal injury or cause an acci-
dent resulting in injury or death.
Never leave the vehicle while the ECO symbol
in the multifunction display is shown in green
or yellow .Always secure the vehicle against
rolling away before leaving it.
! Always switch the ignition off and take the
key with you when leaving the vehicle.
Automatic engine switch-off The engine is only switched off if:
R
the outside temperature is within the range
that is suitable for the system.
R the engine is at normal operating temper-
ature.
R the set temperature for the vehicle interior
has been reached.
R the battery is sufficiently charged.
R the system detects that the windscreen is
not misted up when the air-conditioning
system is switched on.
R the bonnet is closed.
R the vehicle is not being steered.
R the driver's door is closed and the seat belt
is fastened.
i The engine can be switched off automat-
ically a maximum of four times (initial stop
and three repeats) in succession .The ECO
symbol is shown in yellow in the multifunc-
tion display after the engine has been star-
ted automatically for the fourth time. The
engine can only be switched off automati-
cally again when the ECO symbol is shown
in green in the multifunction display.
i During an automatic engine switch-off, air
conditioning is reduced. If full air condition-
ing is required, the ECO start/stop function can be switched off with the ECO button
(Y
page 142).
Vehicles with manual transmission The ECO start/stop function switches off the
engine automatically at low speeds.
X
Brake the vehicle until it comes to a stand-
still.
X Engage neutral N(Ypage 145) (follow
gearshift instruction :to engage neutral
N, if necessary).
X Release the clutch pedal.
The engine is switched off automatically.
Vehicles with automatic transmission
The ECO start/stop function switches the
engine off automatically if the vehicle is
braked to a standstill and the brake remains
depressed with the transmission in position
D or N.
i You can still activate HOLD when the vehi-
cle is stationary, even if the engine has
been switched off automatically .Itis then
not necessary to continue applying the
brakes during the automatic stop phase.
When you depress the accelerator pedal,
the engine starts automatically and the
braking effect of the HOLD function is deac-
tivated. Depress the accelerator pedal
carefully, as the engine must be started
first. Driving
141Driving and parking Z
Page 146 of 373

Problems with the engine
Problem Possible causes/consequences and
M Solutions
The engine does not
start. The HOLD function or DISTRONIC PLUS is activated.
X
Deactivate the HOLD function (Y page 177) or DISTRONIC
PLUS (Y page 164).
X Try to start the engine again. The engine does not
start. The starter motor
can be heard. R
There is a malfunction in the engine electronics.
R There is a malfunction in the fuel supply.
X Before attempting to start the engine again, turn the key in the
ignition back to position 0or press the Start/Stop button
repeatedly until all indicator lamps in the instrumen tcluste rgo
out.
X Try to start the engine again (Y page 138). Avoid excessively
long and frequent attempts to start the engine, as this will drain
the battery.
If the engine does not start after several attempts:
X Consult a qualified specialist workshop, e.g. a Mercedes-Benz
Service Centre. The engine does not
start.T
he starter motor
can be heard. The
reserve fuel warning
lamp is lit and the fuel
gauge display shows 0. The fuel tank is empty.
X
Refuel the vehicle. The engine does not
start. You cannot hear
the starter motor. The on-board voltage is too low because the battery is too weak
or discharged.
X
Jump-start the vehicle (Y page 329).
If the engine does not start despite attempts to jump-start it:
X Consult a qualified specialist workshop, e.g. a Mercedes-Benz
Service Centre. The starter motor was exposed to a thermal load that was too high.
X Allow the starter motor to cool down for approximately two
minutes.
X Try to start the engine again.
If the engine still does not start:
X Consult a qualified specialist workshop, e.g. a Mercedes-Benz
Service Centre. Driving
143Driving and parking Z
Page 149 of 373
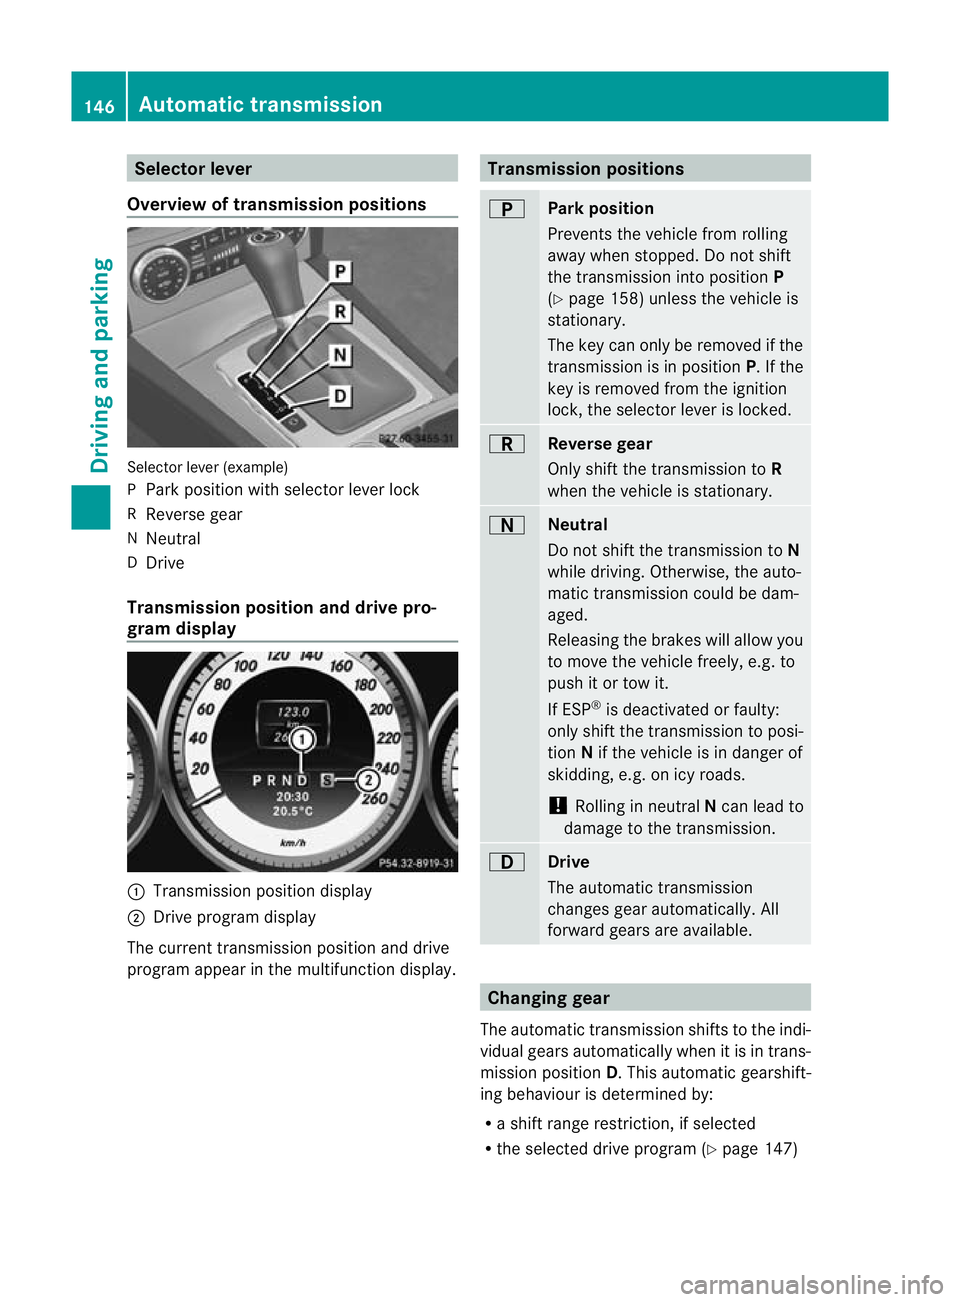
Selector lever
Overview of transmission positions Selector lever (example)
P
Park position with selector lever lock
R Reverse gear
N Neutral
D Drive
Transmission position and drive pro-
gram display :
Transmission position display
; Drive program display
The current transmission position and drive
program appear in the multifunction display. Transmission positions
B
Park position
Prevents the vehicle from rolling
away when stopped. Do not shift
the transmission into position
P
(Y page 158) unless the vehicle is
stationary.
The key can only be removed if the
transmission is in position P. If the
key is removed from the ignition
lock, the selector lever is locked. C
Reverse gear
Only shift the transmission to
R
when the vehicle is stationary. A
Neutral
Do not shift the transmission to
N
while driving. Otherwise, the auto-
matic transmission could be dam-
aged.
Releasing the brakes will allow you
to move the vehicle freely, e.g. to
push it or tow it.
If ESP ®
is deactivated or faulty:
only shift the transmission to posi-
tion Nif the vehicle is in danger of
skidding, e.g. on icy roads.
! Rolling in neutral Ncan lead to
damage to the transmission. 7
Drive
The automatic transmission
changes gear automatically. All
forward gears are available.
Changing gear
The automatic transmission shifts to the indi-
vidual gears automatically when it is in trans-
mission position D.This automatic gearshift-
ing behaviouri s determined by:
R a shift range restriction, if selected
R the selected drive program (Y page 147)146
Automatic transmissionDriving and parking
Page 158 of 373
Flow improver
Flow improvers can be added to improve the
cold resistance of diesel fuel .The effective-
ness of a flow improver is not guaranteed with
every fuel.
Correct dosage and thorough mixing are deci-
sive factors in ensuring improvement in low-
temperature resistance. Under certain cir-
cumstances, an excessive dosage may
actually decrease low-temperature resist-
ance and should therefore be avoided. Follow
the manufacturer's dosing instructions.
Mix the additive with the diesel in good time,
before the flow properties of the diesel
become inadequate. Malfunctions can other-
wise only be rectified by heating the entire
fuel system, e.g. by parking the vehicle in a
heated garage.
Observe the information provided by the man-
ufacturer when using a flow improver. Only
use flow improvers that have been tested and
approved by Mercedes-Benz. You can obtain
further information from any Mercedes-Benz
Service Centre. Refuelling
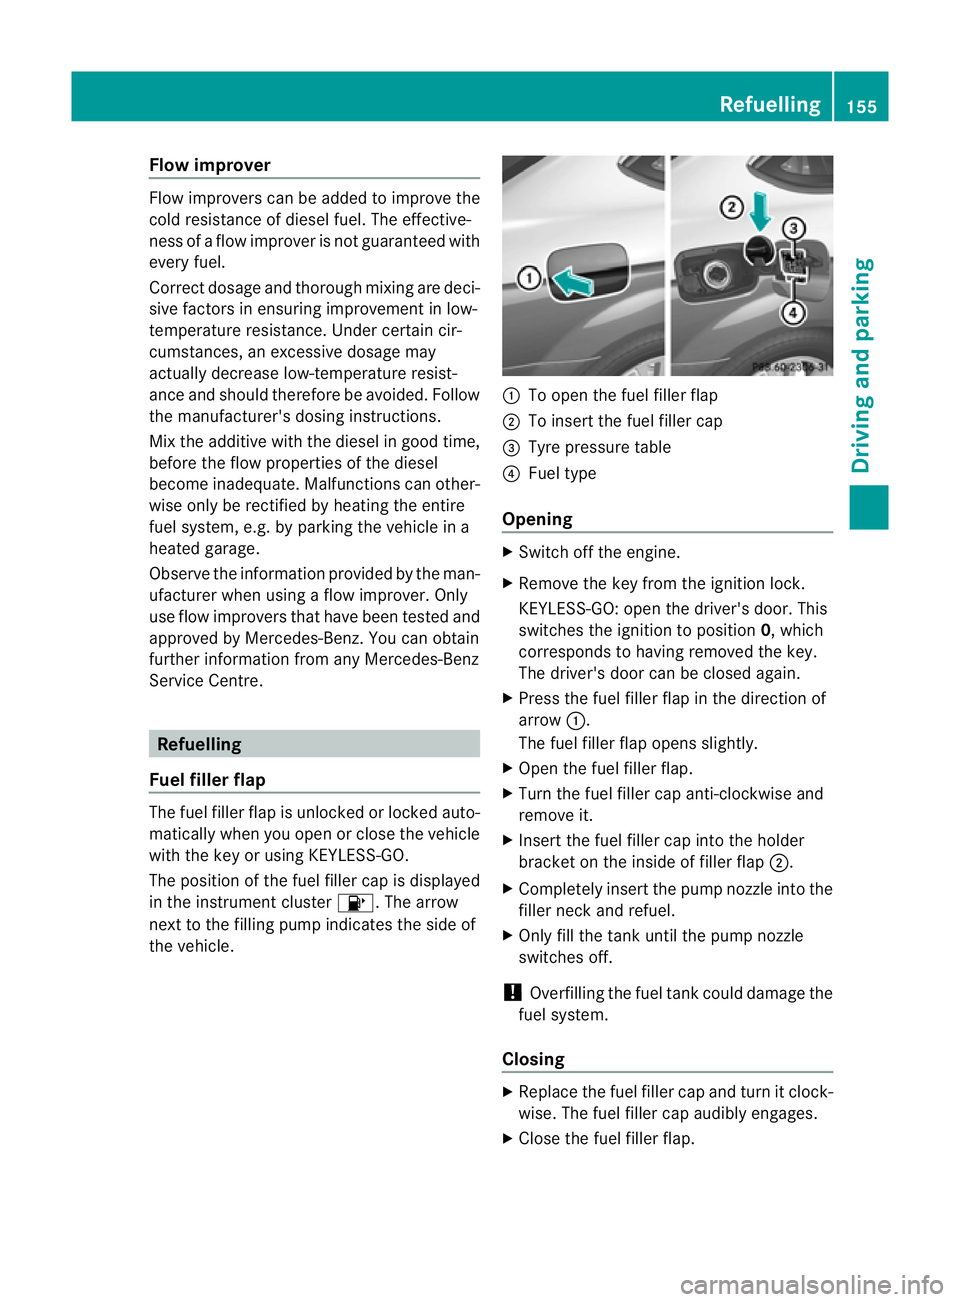
Fuel filler flap The fuel filler flap is unlocked or locked auto-
matically when you open or close the vehicle
with the key or using KEYLESS-GO.
The position of the fuel filler cap is displayed
in the instrument cluster 8.The arrow
next to the filling pump indicates the side of
the vehicle. :
To open the fuel filler flap
; To insert the fuel filler cap
= Tyre pressure table
? Fuel type
Opening X
Switch off the engine.
X Remove the key from the ignition lock.
KEYLESS-GO: open the driver's door. This
switches the ignition to position 0, which
corresponds to having removed the key.
The driver's door can be closed again.
X Press the fuel filler flap in the direction of
arrow :.
The fuel filler flap opens slightly.
X Open the fuel filler flap.
X Turn the fuel filler cap anti-clockwise and
remove it.
X Insert the fuel filler cap into the holder
bracket on the inside of filler flap ;.
X Completely insert the pump nozzle into the
filler neck and refuel.
X Only fill the tank until the pump nozzle
switches off.
! Overfilling the fuel tank could damage the
fuel system.
Closing X
Replace the fuel filler cap and turn it clock-
wise. The fuel filler cap audibly engages.
X Close the fuel filler flap. Refuelling
155Driving and parking Z
Page 160 of 373
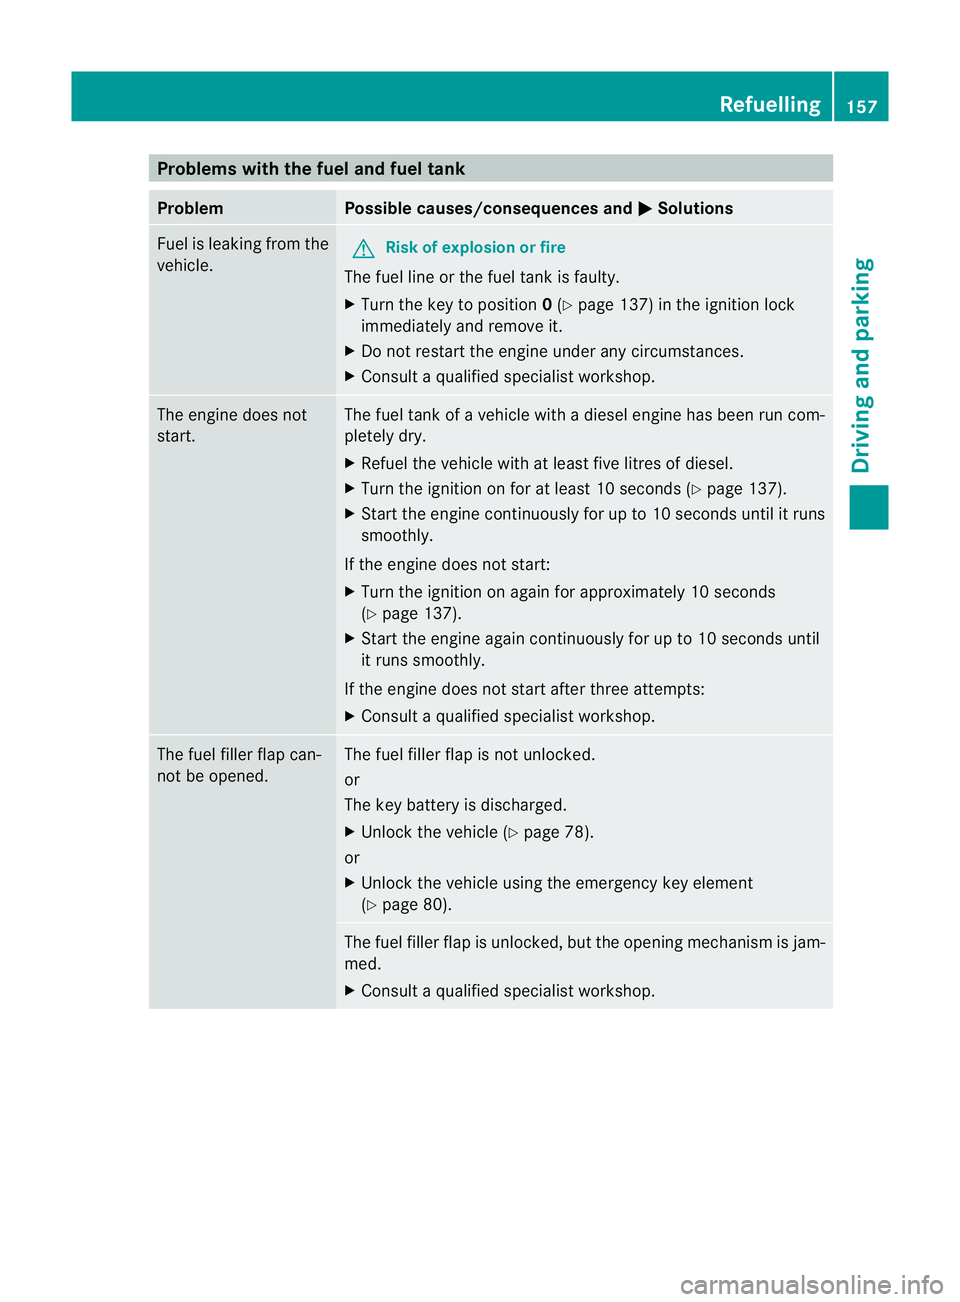
Problems with the fuel and fuel tank
Problem Possible causes/consequences and
M Solutions
Fuel is leaking from the
vehicle.
G
Risk of explosion or fire
The fuel line or the fuel tank is faulty.
X Turn the key to position 0(Y page 137) in the ignition lock
immediately and remove it.
X Do not restart the engine under any circumstances.
X Consult a qualified specialist workshop. The engine does not
start. The fuel tank of a vehicle with a diesel engine has been run com-
pletely dry.
X Refuel the vehicle with at least five litres of diesel.
X Turn the ignition on for at least 10 seconds (Y page 137).
X Start the engine continuously for up to 10 seconds until it runs
smoothly.
If the engine does not start:
X Turn the ignition on again for approximately 10 seconds
(Y page 137).
X Start the engine again continuously for up to 10 seconds until
it runs smoothly.
If the engine does not start after three attempts:
X Consult a qualified specialist workshop. The fuel filler flap can-
not be opened. The fuel filler flap is not unlocked.
or
The key battery is discharged.
X
Unlock the vehicle (Y page 78).
or
X Unlock the vehicle using the emergency key element
(Y page 80). The fuel filler flap is unlocked, but the opening mechanism is jam-
med.
X
Consult a qualified specialist workshop. Refuelling
157Driving and parking Z
Page 161 of 373

Parking
Important safety notes
G
WARNING
Only remove the key from the ignition lock
when the vehicle is stationary, as you cannot
steer the vehicle when the key is removed.
Never leave children unsupervised in the vehi-
cle. They could release the parking brake. This
could lead to a serious or fatal accident. G
WARNING
Under no circumstances should the exhaust
system come into contact with flammable
materials such as dry grass or petrol, for
example. Do not park the vehicle on dry grass-
land or harvested grain fields. The hot exhaust
system could otherwise ignite the flammable
material and set the vehicle on fire.
To ensure that the vehicle is secured against
rolling away unintentionally:
R the parking brake must be applied.
R on vehicles with manual transmission,
engage first gear or reverse gear.
R on vehicles with automatic transmission,
the transmission must be in position Pand
the key must be removed from the ignition
lock.
R on steep uphill or downhill gradients, turn
the front wheels towards the kerb. Switching off the engine
Important safety notes G
WARNING
If the engine is not running, there is no power
assistance for the steering and brakes. Steer-
ing and braking then requires significantly
greater effort.
As a result, you might lose control of the vehi-
cle, cause an accident and injure yourself and
others. Therefore, do not switch off the engine while
you are driving.
Vehicles with manual transmission X
Shift to either first gear or reverse gear R.
X Turn the key to position 0in the ignition
lock and remove it.
The immobiliser is activated.
X Apply the parking brake firmly.
Vehicles with automatic transmission X
Apply the parking brake firmly.
X Shift the transmission to position P.
Using the key
X Turn the key to position 0in the ignition
lock and remove it.
The immobiliser is activated.
i The key can only be removed if the trans-
mission is in position P.
Using KEYLESS-GO
X Press the Start/Stop button (Y page 137).
The engine stops and all the indicator
lamps in the instrumen tcluste rgo out.
i When the driver's door is closed, this cor-
responds to key position 1. When the driv-
er's door is open, this corresponds to key
position 0, i.e. key removed.
i The engine can be turned off while the
vehicle is in motion by pressing and holding
the Start/Stop button for three seconds.
This function operates independently of the
ECO start/stop automatic engine switch-
off function. 158
ParkingDriving and parking
Page 185 of 373
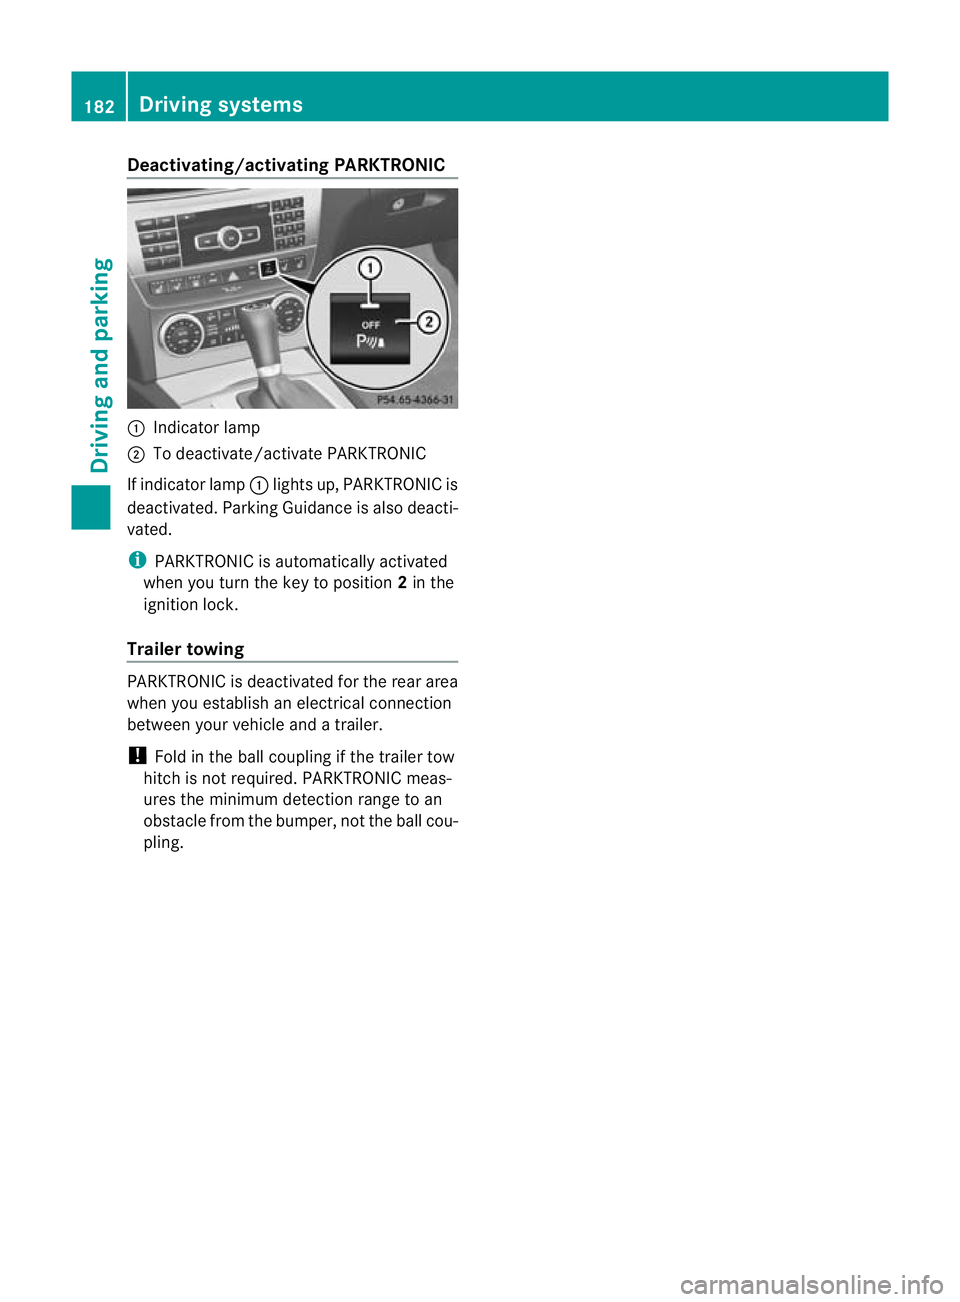
Deactivating/activating PARKTRONIC
:
Indicator lamp
; To deactivate/activate PARKTRONIC
If indicator lamp :lights up, PARKTRONIC is
deactivated. Parking Guidance is also deacti-
vated.
i PARKTRONIC is automatically activated
when you turn the key to position 2in the
ignition lock.
Trailer towing PARKTRONIC is deactivated fo
rthe rear area
when you establish an electrical connection
between your vehicle and a trailer.
! Fold in the ball coupling if the trailer tow
hitch is not required. PARKTRONIC meas-
ures the minimum detection range to an
obstacle from the bumper, not the ball cou-
pling. 182
Driving systemsDriving and parking
Page 190 of 373
behind, in fron
tofand next to the vehicle. You
could otherwise endanger yoursel fand oth-
ers. G
WARNING
Unde rthe following circumstances, the
reversing camera will not function, or will
function in a limited manner:
R if the boot lid is open
R in heavy rain, snow or fog
R at night or in very dark places
R if the camera is exposed to very bright light
R if the area is lit by fluorescent light (the dis-
play may flicker)
R if there is a sudden change in temperature,
e.g. when driving into a heated garage in
winter
R if the camera lens is dirty or obstructed
R if the rear of your vehicle is damaged. In this
event, have the camera position and setting
checked at a qualified specialist workshop.
Mercedes-Ben zrecommends that you use
a Mercedes-Benz Service Centre for this
purpose.
Do not use the reversing camera in these
types of situation .You could otherwise injure
others or damage objects and your vehicle
while you are parking.
Activating the reversing camera X
Make sure that the key is in position 2in
the ignition lock.
X Make sure that the "Reversing camera"
function is selected in COMAND Online
(see the separate operating instructions for
COMAND Online).
X Engage reverse gear.
The area behind the vehicle is shown in the
COMAND Online display with guide lines. Guide lines in the COMAND Online dis-
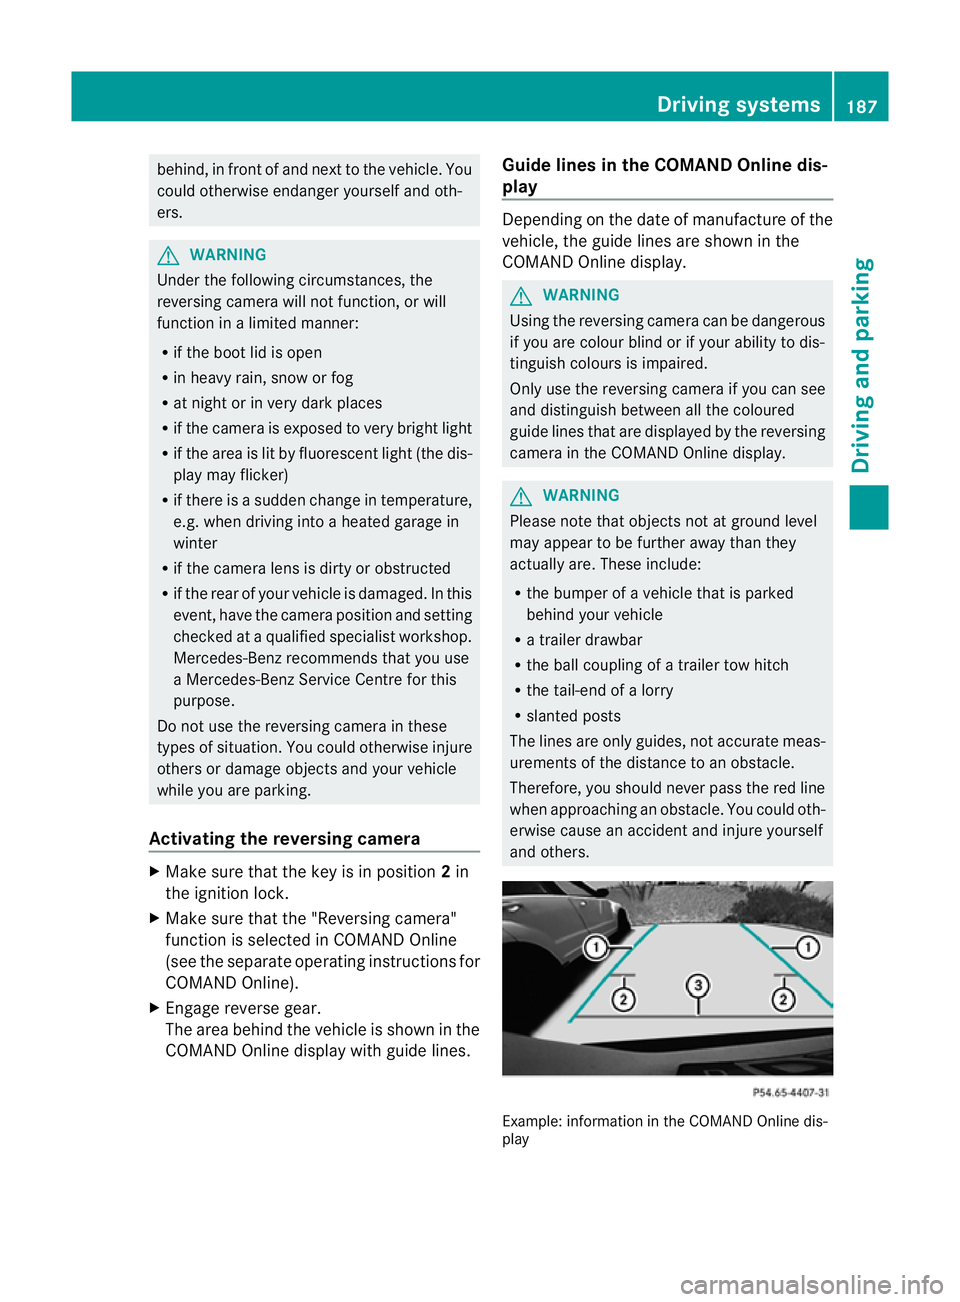
play Depending on the date of manufacture of the
vehicle, the guide lines are shown in the
COMAND Online display.
G
WARNING
Using the reversing camera can be dangerous
if you are colour blind or if your ability to dis-
tinguish colours is impaired.
Only use the reversing camera if you can see
and distinguish between all the coloured
guide lines that are displayed by the reversing
camera in the COMAND Online display. G
WARNING
Please note that objects not at ground level
may appear to be further away than they
actually are. These include:
R the bumper of a vehicle that is parked
behind your vehicle
R a trailer drawbar
R the ball coupling of a trailer tow hitch
R the tail-end of a lorry
R slanted posts
The lines are only guides, not accurate meas-
urements of the distance to an obstacle.
Therefore, you should never pass the red line
when approaching an obstacle. You could oth-
erwise cause an accident and injure yourself
and others. Example: information in the COMAND Online dis-
play Driving systems
187Driving and parking Z