2011 MERCEDES-BENZ C-CLASS COUPE child seat
[x] Cancel search: child seatPage 10 of 373

Parking brake
................................ 159
Warning lamp ................................. 275
Breakdown
see Flat tyre
see Towing away/tow-starting
Bulbs
see Changing bulbs C
Calling up a fault see Display messages
Capacities
see Technical data
Car
see Vehicle
Care
Automatic car wash .......................306
Display ........................................... 310
Exterior lighting ............................. 309
High-pressure cleaner .................... 307
Matt paintwork .............................. 308
Notes ............................................. 306
Paint .............................................. 307
Plastic trim .................................... 310
Reversing camera ..........................309
Seat bel t........................................ 311
Seat cover ..................................... 311
Sensors ......................................... 309
Tai lpipes ....................................... 309
Trim pieces .................................... 311
Wheels ........................................... 307
Windows ........................................ 308
Wiper blades .................................. 308
Wooden trim .................................. 311
Car key
see Key
Car wash (care) ................................. 306
CD player/CD changer (12-button
multifunction steering wheel) .......... 218
Cell phone see Mobile phone
Central locking
Automatic locking (on-board com-
puter) ............................................. 226
Locking/unlocking (key ).................. 78
Centre console ..................................... 40 Changing bulbs
Brake lamps ................................... 118
Cornering light function .................117
Dipped-bea mheadlamps ............... 116
Important safety notes ..................114
Main-beam headlamps ................... 116
Overview of bul btypes .................. 115
Parking lamps (front) .....................117
Reversing lamps ............................ 118
Standing lamps .............................. 117
Child-proof locks
Child sea tlock ................................. 56
Children
In the vehicle ................................... 55
Restraint systems ............................ 55
Child seat
Automatic recognition .....................57
Child sea tlock ................................. 56
Display message (12-button mul-
tifunction steering wheel) ..............243
Display message (4-button multi-
function steering wheel) ................237
ISOFIX .............................................. 58
On the front-passenger sea t............ 57
Problem (malfunction) .....................61
Recommendations ...........................63
Suitable positions ............................ 61
Cigarette lighter ................................ 291
Cleaning Trailer tow hitch ............................. 309
Climate control
Activating/deactivating rear win-
dow heating ................................... 126
Auxiliary heating/ventilation .......... 128
Controlling automatically ...............124
Convenience opening/closing (air
recirculation) ................................. 127
Cooling with aird ehumidification..124
Demisting the windows .................. 126
Demisting the windscreen .............126
Important safety notes ..................122
Indicator lamp ................................ 124
Notes on using THERMATIC auto-
matic climate control .....................123
Overview of systems ......................122
Problems with cooling with air
dehumidification ............................ 124 Index
7
Page 16 of 373

H
Handbrake see Parking brake
Hazard warning lamps ......................111
Headlamp Cleaning system (function) ............110
Headlamps
Misting up ...................................... 113
Topping up the cleaning system ....304
see Automatic headlamp mode
Head restraints
Adjusting ......................................... 98
Adjusting (electrically). ....................99
Adjusting (manually). .......................98
see NECK-PR Ohead restraints
Heating
see Climate control
High-pressure cleaners ....................307
Hill start assist .................................. 140
HOLD function Display message (12-button mul-
tifunctio nsteering wheel) ..............257
Display message (4-button multi-
function steering wheel) ................256
Function/notes ............................. 177 I
Ignition lock see Key positions
Immobiliser .......................................... 73
Indicator and warning lamps Coolant .......................................... 280
DISTRONI CPLUS ........................... 282
Engine diagnostics .........................280
Fuel tank ........................................ 280
Overview (12-button multifunc-
tion steering wheel) .........................37
Overview (4-button multifunction
steering wheel) ................................ 34
SPORT handling mode ...................278
Indicator lamps
see Warning and indicator lamps
Indicators
see Turn signals Instrument cluster (12-button mul-
tifunction steering wheel)
Indicator and warning lamps ............37
Overview .......................................... 35
Settings ......................................... 223
Instrument cluster (4-button mul-
tifunction steering wheel) Indicator and warning lamps ............34
Overview .......................................... 32
Instrument cluster lighting
Multifunctio nsteering wheel with
12 buttons ....................................... 35
Multifunctio nsteering wheel with
4b utton s......................................... 32
Instrument lighting
see Instrument cluster lighting
Intelligen tLight System
Activating/deactivatin g(12-but-
ton multifunctio nsteering wheel) ..224
Display message (12-button mul-
tifunctio nsteering wheel) ..............250
Setting the dipped-bea mhead-
lamps for driving on the right/left .224
Interior lighting
Automatic control system ..............114
Delayed switch-off (12-button
multifunctio nsteering wheel) ........225
Emergency lighting ........................114
Manual control ............................... 114
Overview ........................................ 114
Reading lamp ................................. 114
see Interior lighting
Interior motion sensor ........................74
ISOFIX child seat securing system ....58 J
Jack Storage location ............................ 315
Using ............................................. 322
Jump starting (engine) ......................329 K
Key Changing the battery .......................81
Checking the battery .......................81
Convenience closing feature ............89 Index
13
Page 21 of 373

Radio
Selecting a station (12-button
multifunction steering wheel )........ 217
see separate operating instructions
Rain closing feature (panorama
sliding sunroof) ................................... 91
Range (fuel) Displaying (12-button multifunc-
tion steering wheel) .......................215
Displaying (4-button multifunc-
tion steering wheel) .......................210
Reading lamp ..................................... 114
Rear compartment Setting the airv ents...................... 133
Rear-compartment seat belt sta-
tus indicator ........................................ 54
Rear foglamp Display message (12-button mul-
tifunctio nsteering wheel) ..............249
Display message (4-button multi-
function steering wheel) ................246
Switching on/off ........................... 109
Rear seat (folding the backrest for-
wards/back) ...................................... 286
Rear-view mirror Anti-dazzle mode (automatic) ........104
Dipping (manual )........................... 103
Rear window heating
Problem (fault) ............................... 127
Switching on/off ........................... 126
Refuelling
Fuel gauge ....................................... 32
Important safety notes ..................152
Refuelling proces s......................... 155
see Fuel
Releasing the parking loc kman-
ually (automatic transmission) ........152
Remote control Auxiliary heating/ventilation .......... 129
Changing the batteries (auxiliary
heating) ......................................... 130
Garage door opene r....................... 294
Replacing the battery (auxiliary
heating remote control) .................... 130
Reserve (fuel tank) see Fuel Reserve fuel
Display message (12-button mul-
tifunctio nsteering wheel) ..............255
Display message (4-button multi-
function steering wheel) ................253
Warning lamp ................................. 280
Restraint system
see SRS (Supplemental Restraint
System)
Rev counter
12-button multifunction steering
wheel ............................................. 210
4-button multifunction steering
wheel ............................................. 206
Reverse gear
Engaging (automatic transmis-
sion) ............................................... 146
Engaging (manual transmission) ....145
Reversing camera
Cleaning instructions .....................309
Function/notes ............................. 186
Reversing lamp
Changing bulbs .............................. 118
Display message (12-button mul-
tifunctio nsteering wheel) ..............250
Display message (4-button multi-
function steering wheel) ................246
Roller blind
see Roller sunblind
Roller sunblind
Opening/closing .............................. 92
Panorama sliding sunroo f................ 92
Roof carrier ........................................ 288
Roof load (maximum) see Technical data
Route
see Route guidance (navigation)
Route guidance (navigation) ............216 S
Safety Childre ninthe vehicle ..................... 55
Child restraint systems ....................55
Safety systems
see Driving safety systems 18
Index
Page 49 of 373
of a collision. In the first deployment stage,
the front airbag is filled with enough propel-
lant gas to reduce the risk of injuries. The
front airbag is fully deployed if a second
deployment threshold is exceeded within a
few milliseconds.
The belt tensioner and airbag triggering
thresholds are variable and are adapted to the
rate of deceleration or acceleration of the
vehicle. This process is pre-emptive in nature.
The triggering process must take place in
good time at the start of the collision.
i Airbags are not deployed in all types of
accidents. Also, not all airbags are
deployed together in an accident .The dif-
ferent airbag systems work independently
of each other.
How the airbag system works is deter-
mined by the severity of the collision detec-
ted, especially the vehicle deceleration or
acceleration, and the apparent type of acci-
dent:
R head-on collision
R side impact
R rear impact
The rate of vehicle deceleration or accelera-
tion and the direction of the force are essen-
tially determined by:
R the distribution of forces during the colli-
sion
R the collision angle
R the deformation characteristics of the vehi-
cle
R the characteristics of the object with which
the vehicle has collided
Factors which can only be seen and measured
after a collision has occurred do not play a
decisive role in the deployment of an airbag,
nor do they provide an indication of airbag
deployment.
The vehicle may be deformed significantly,
e.g. the bonnet or the wing, without an airbag
being deployed. This is the case if only parts
which are relatively easily deformed are affec- ted and the rate of deceleration is not high.
Conversely, airbags may be deployed even
though the vehicle suffers only minor defor-
mation. This is the case if, for example, very
rigid vehicle parts such as longitudinal body
members are hit, and sufficient deceleration
occurs as a result.
Airbags
Important safety notes Airbag deployment slows down and restricts
the movement of the vehicle occupant.
If the airbags are deployed, you will hear a
bang and a small amount of powder may also
be released. Only in rare cases will the bang
affect your hearing. The powder that is
released generally does not constitute a
health hazard. The 6SRS warning lamp
lights up.
The airbag installation locations are identified
by the AIRBAG symbol. G
WARNING
Airbags provide additional protection; they
are not, however, a substitute for seat belts.
Observe the following notes to reduce the risk
of serious or even fatal injury caused by airbag
deployment:
R all vehicle occupants –inparticular, preg-
nant women – must wear their seat belt
correctly at all times and lean back against
the backrest, which should be positioned
as close to the vertical as possible. The
head restraint must support the back of the
head at about eye level.
R always secure childre nless than 1.50mt all
and unde r12years of age in suitable child
restraint systems.
R all vehicle occupants must select a seat
position that is as far away from the airbag
as possible. The driver's seat position must
allow the vehicle to be driven safely. The
driver's chest should be as far away from 46
Occupant safetySafety
Page 50 of 373
the centre of the driver's airbag cover as
possible.
R move the front-passenger seat as far back
as possible. This is especially important if
you have secured a child in a child restraint
syste mont he front-passenger seat.
R vehicle occupants –inparticular, children
–m ust no tlean their heads into the area of
the window in which the sidebag/window-
bag is deployed.
R rearward-facing child restraint systems
must not be fitted to the front-passenger
seat unless the front-passenger airbag has
been disabled. On the front-passenger
seat, the front-passenger airbag is disabled
if a child restraint system with a trans-
ponder for automatic child seat recognition
is fitted to the front-passenger seat in a
vehicle equipped with automatic child seat
recognition. The 4PASSENGER AIRBAG
OFF indicator lamp must be continuously
lit.
If the front-passenger seat of your vehicle
does not have automatic child seat recog-
nition, or your rearward-facing child
restraint system does not have automatic
child seat recognition, children must be
secured in a child restraint system on a
suitable seat in the rear. If you secure a
forward-facing child restraint system to the
front-passenger seat, you must move the
front-passenger seat as far back as possi-
ble.
R make sure there are no heavy or sharp-
edged objects in the pockets of clothing.
R do not lean forwards, e.g. over the cover of
the driver's/front-passenger airbag, partic-
ularly when the vehicle is in motion.
R do not put your feet on the dashboard.
R only hold the steering wheel on the outside.
This allows the airbag to be fully deployed.
You could be injured if the airbag is
deployed and you are holding the inside of
the steering wheel. R
do not lean on the doors from inside the
vehicle.
R make sure that there are no people, ani-
mals or objects between the vehicle occu-
pants and the area where the airbags are
deployed.
R do not place any objects between the seat
backrest and the door.
R do not hang any hard objects, for example,
coat hangers, on the grab handles or coat
hooks.
R do not attach accessories, e.g. cup holders,
to the doors.
It is not possible to rule out a risk of injury
being caused by an airbag, due to the high
speed at which the airbag must be deployed. G
WARNING
Airbag functionality can only be assured if the
following parts are not covered and no badges
or stickers are attached to them:
R padded steering wheel boss
R kneebag cover below the steering column
R front-passenger airbag cover
R outer side of fron tseat bolsters
R side trim next to the rear seat backrest
R roof frame cover between the fron tA-pillar
and the C-pillar in the rear compartment G
WARNING
As mall amount of powder is released when
an airbag is deployed. The powder could
cause short-term breathing difficulties in peo-
ple with asthma or other respiratory prob-
lems.
In order to prevent breathing difficulties, you
should leave the vehicle as soon as it is safe
to do so. You can also open the window to
allow fresh air to enter the interior. The pow-
der does not constitute ahealth hazard and
does not indicate that there is a fire in the
vehicle. Occupant safety
47Safety Z
Page 51 of 373
G
WARNING
The airbag parts are hot after the airbag has
been deployed. Do not touch them as you
could burn yourself.
Have the airbags replaced at a qualified spe-
cialist workshop. Otherwise, occupants are
not protected by the airbags in the event of
another accident.
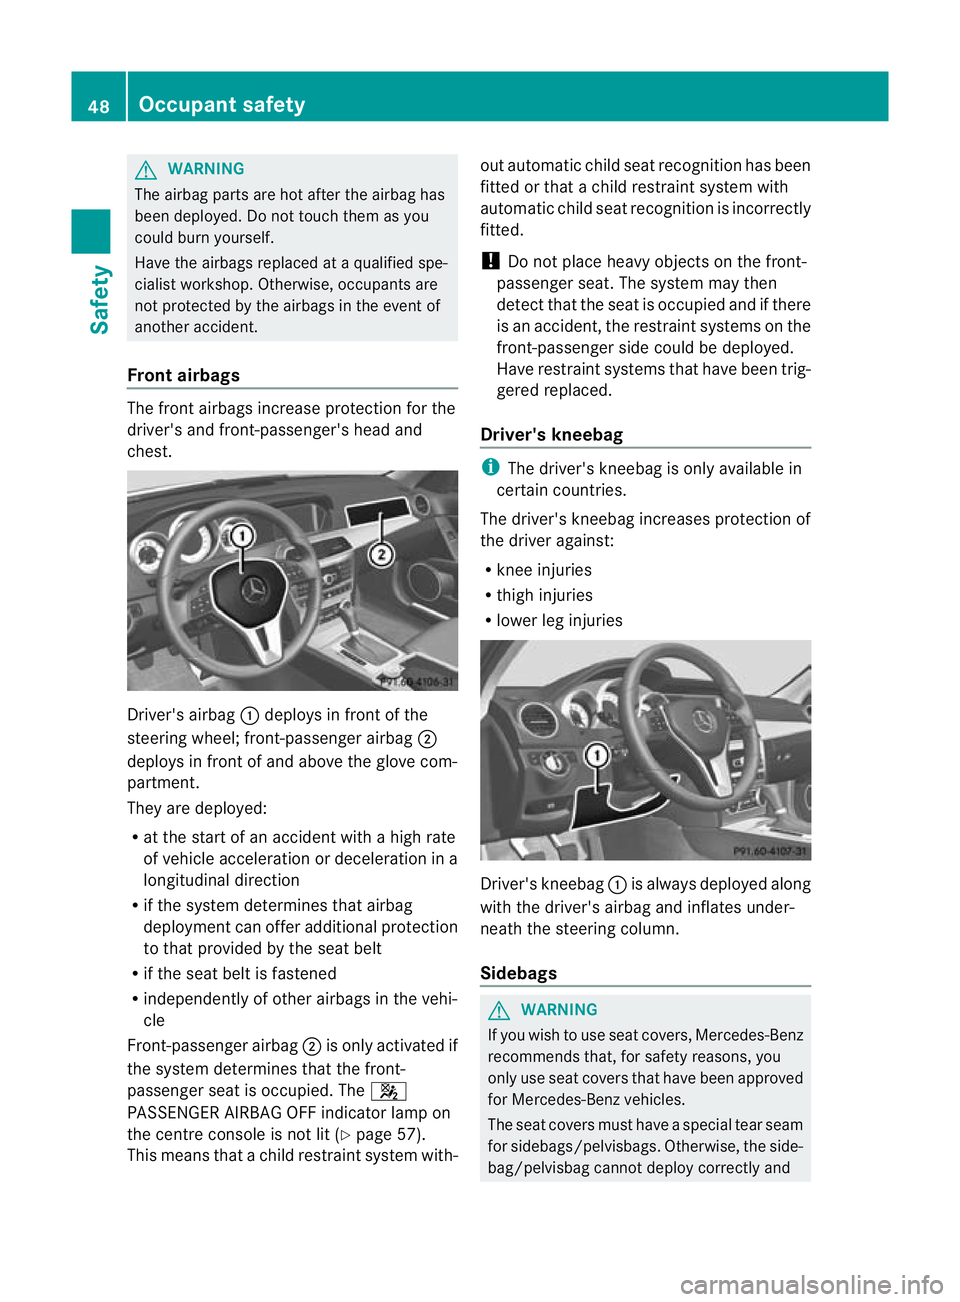
Fron tairbags The fron
tairbags increase protection for the
driver's and front-passenger's head and
chest. Driver's airbag
:deploys in front of the
steering wheel; front-passenger airbag ;
deploys in front of and above the glove com-
partment.
They are deployed:
R at the start of an accident with a high rate
of vehicle acceleration or deceleration in a
longitudinal direction
R if the system determines that airbag
deploymen tcan offer additional protection
to that provided by the seat belt
R if the seat belt is fastened
R independently of other airbag sinthe vehi-
cle
Front-passenger airbag ;is only activated if
the system determines that the front-
passenger seat is occupied. The 4
PASSENGER AIRBAG OFF indicator lamp on
the centre console is not lit (Y page 57).
This means that a child restraint system with- out automatic child seat recognition has been
fitted or that a child restraint system with
automatic child seat recognition is incorrectly
fitted.
!
Do not place heavy objects on the front-
passenger seat. The system may then
detect that the seat is occupied and if there
is an accident, the restraint systems on the
front-passenger side could be deployed.
Have restraint systems that have been trig-
gered replaced.
Driver's kneebag i
The driver's kneebag is only available in
certain countries.
The driver's kneebag increases protection of
the driver against:
R knee injuries
R thigh injuries
R lower leg injuries Driver's kneebag
:is always deployed along
with the driver's airbag and inflates under-
neath the steering column.
Sidebags G
WARNING
If you wish to use seat covers, Mercedes-Benz
recommends that, for safety reasons, you
only use seat covers that have been approved
for Mercedes-Ben zvehicles.
The seat covers must have a special tear seam
for sidebags/pelvisbags. Otherwise, the side-
bag/pelvisbag cannot deploy correctly and 48
Occupant safetySafety
Page 55 of 373
The shoulder belt section must be routed
across the centre of your shoulder – on no
account across your neck or under your
arm
–and pulled tight against your upper
body .The lap belt must always pass across
your lap as low down as possible, i.e. over
your hip joints –not across your abdomen.
If necessary, push down the belt strap
slightly and then retighten it in the roll-up
direction.
R Do not route the belt strap across sharp
edges or fragile objects, especially if these
are located on or in your clothing, e.g. spec-
tacles, pens, keys, etc. The seat belt strap
could be damaged and tear in an accident,
and you or other vehicle occupants could
be injured.
R Only one person should use each seat belt
at any one time. Children must never travel
sitting on the lap of other occupants. It
would not be possible to restrain the child
in the event of a sudden change in direc-
tion, braking or an accident .This could
result in severe or even fatal injuries to the
child and other occupants.
R Persons less than 1.50 m tall cannot wear
the seat belts correctly. For this reason,
secure persons less than 1.50 mtall in spe-
cially designed, suitable restraint systems.
R Children less than 1.50 m tall or under 12
years of age canno twear the seat belts
properly. Therefore, they should always be
secured in a suitable child restraint system
on a suitable vehicle seat. You can find
more information under "Children in the
vehicle" in the "Safety" section of the Own-
er's Manual. Follow the manufacturer's
installation instructions when fitting a child
restraint system.
R Do not secure any objects with a seat belt
if the seat belt is also being used by one of
the vehicle's occupants. G
WARNING
The seat belt does not offer the intended level
of protection unless the backrest is almost vertical. Under certain circumstances, this
could cause severe or even fatal injuries in the
event of an accident.
Before starting a journey, make sure that the
seat is properly adjusted and that the back-
rest is almost vertical.
G
WARNING
Ad irty or damaged seat belt or a seat belt that
has been subjected to a load in an accident
or which has been modified no longer offers
the intended level of protection. Under certain
circumstances, this could cause severe or
even fatal injuries in the even tofanaccident.
For this reason, check regularly that the seat
belts are not damaged or dirty.
Always have damaged sea tbelts or seat belts
that have been subjected to a load in an acci-
dent replaced at a qualified specialist work-
shop. Consult a qualified specialist workshop
which has the necessary specialist knowledge
and tools to carry out the work required.
Mercedes-Benz recommends that you use a
Mercedes-Benz Service Centre for this pur-
pose.
For safety reasons, Mercedes-Benz recom-
mends that you only use seat belts which have
been approved by Mercedes-Benz for your
vehicle. 52
Occupant safetySafety
Page 56 of 373
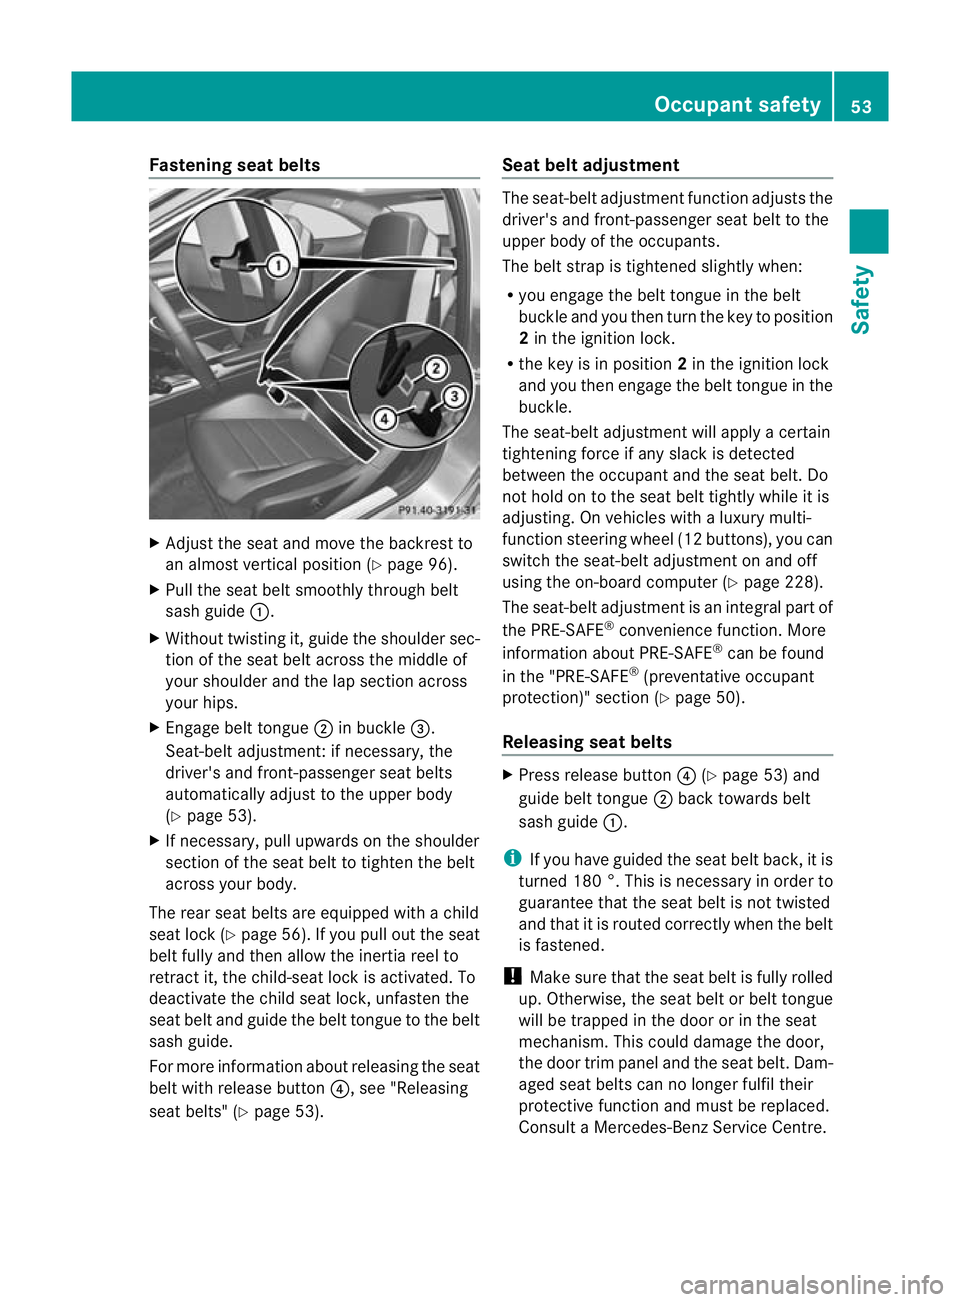
Fastening seat belts
X
Adjust the seat and move the backrest to
an almost vertical position (Y page 96).
X Pull the seat belt smoothly through belt
sash guide :.
X Without twisting it, guide the shoulder sec-
tion of the seat belt across the middle of
your shoulder and the lap section across
your hips.
X Engage belt tongue ;in buckle =.
Seat-belt adjustment: if necessary, the
driver's and front-passenger seat belts
automatically adjust to th eupper body
(Y page 53).
X If necessary, pull upwards on the shoulder
section of the seat belt to tighten the belt
across your body.
The rear seat belts are equipped with a child
seat lock (Y page 56). If you pull out the seat
belt fully and then allow the inertia reel to
retract it, the child-seat lock is activated. To
deactivate the child seat lock, unfasten the
seat belt and guide the belt tongue to the belt
sash guide.
For more information about releasing the seat
belt with release button ?, see "Releasing
seat belts" (Y page 53). Seat belt adjustment The seat-belt adjustment function adjusts the
driver's and front-passenger seat belt to the
upper body of the occupants.
The belt strap is tightened slightly when:
R
you engage the belt tongue in the belt
buckle and you then turn the key to position
2in the ignition lock.
R the key is in position 2in the ignition lock
and you then engage the belt tongue in the
buckle.
The seat-belt adjustment will apply a certain
tightening force if any slack is detected
between the occupant and the seat belt. Do
not hold on to the seat belt tightly while it is
adjusting. On vehicles with a luxury multi-
function steering wheel (12 buttons), you can
switch the seat-belt adjustment on and off
using the on-board computer (Y page 228).
The seat-belt adjustment is an integral part of
the PRE-SAFE ®
convenience function. More
information about PRE-SAFE ®
can be found
in the "PRE-SAFE ®
(preventative occupant
protection)" section (Y page 50).
Releasing seat belts X
Press release button ?(Ypage 53) and
guide belt tongue ;back towards belt
sash guide :.
i If you have guided the seat belt back, it is
turned 180 °. This is necessary in order to
guarantee that the seat belt is not twisted
and that it is routed correctly when the belt
is fastened.
! Make sure that the seat belt is fully rolled
up. Otherwise, the seat belt or belt tongue
will be trapped in the door or in the seat
mechanism. This could damage the door,
the door trim panel and the seat belt. Dam-
aged seat belts can no longer fulfil their
protective function and must be replaced.
Consult a Mercedes-Benz Service Centre. Occupant safety
53Safety Z