2011 INFINITI QX56 suspension
[x] Cancel search: suspensionPage 4269 of 5598
RSU-14
< REMOVAL AND INSTALLATION >
SUSPENSION ARM
1. Move the ball joint at least ten times by hand to check for smooth movement.
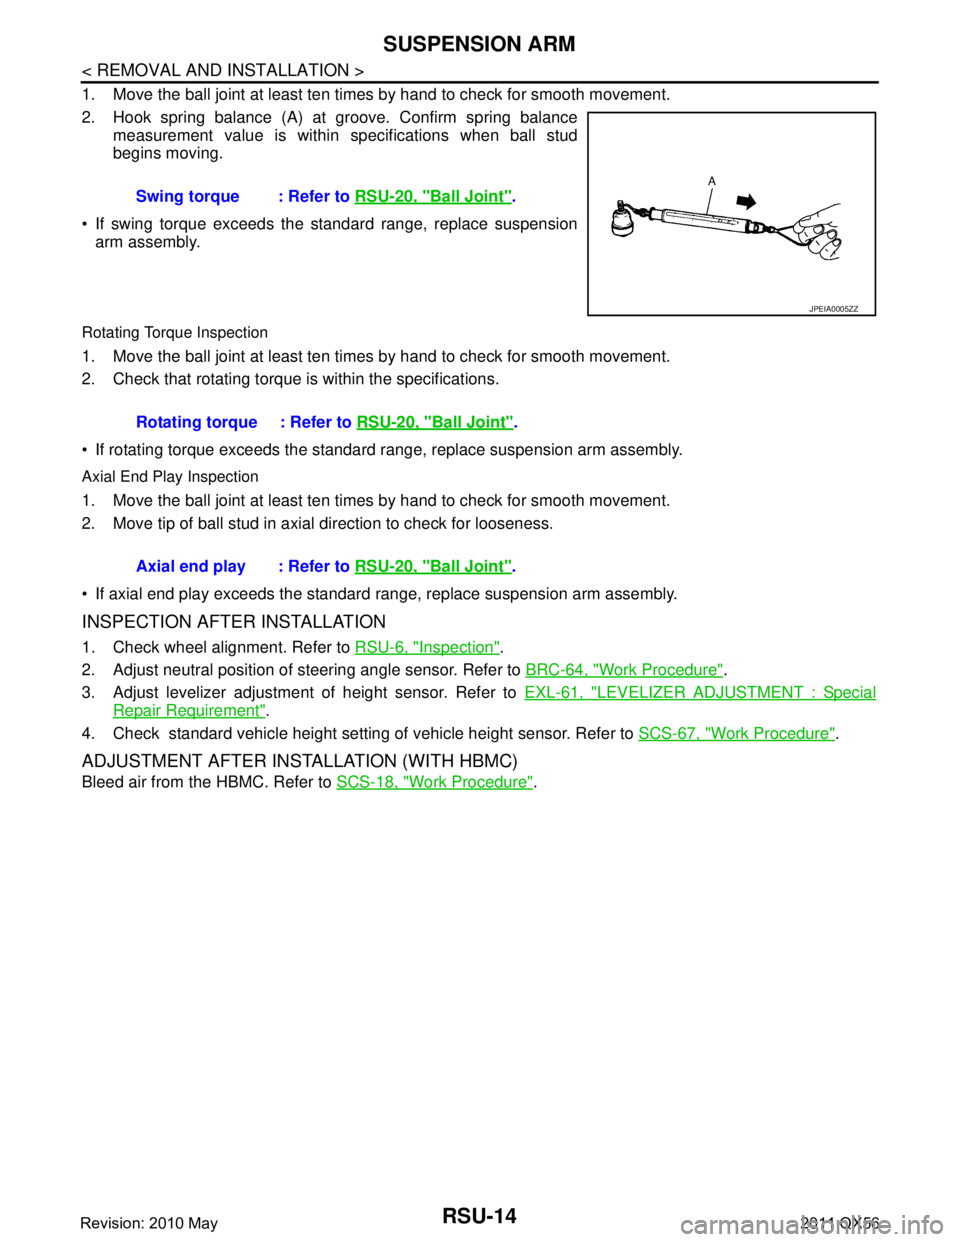
2. Hook spring balance (A) at groove. Confirm spring balancemeasurement value is within specifications when ball stud
begins moving.
If swing torque exceeds the standard range, replace suspension arm assembly.
Rotating Torque Inspection
1. Move the ball joint at least ten times by hand to check for smooth movement.
2. Check that rotating torque is within the specifications.
If rotating torque exceeds the standard range, replace suspension arm assembly.
Axial End Play Inspection
1. Move the ball joint at least ten times by hand to check for smooth movement.
2. Move tip of ball stud in axial direction to check for looseness.
If axial end play exceeds the standard r ange, replace suspension arm assembly.
INSPECTION AFTER INSTALLATION
1. Check wheel alignment. Refer to RSU-6, "Inspection".
2. Adjust neutral position of steering angle sensor. Refer to BRC-64, "
Work Procedure".
3. Adjust levelizer adjustment of height sensor. Refer to EXL-61, "
LEVELIZER ADJUSTMENT : Special
Repair Requirement".
4. Check standard vehicle height setting of vehicle height sensor. Refer to SCS-67, "
Work Procedure".
ADJUSTMENT AFTER INSTALLATION (WITH HBMC)
Bleed air from the HBMC. Refer to SCS-18, "Work Procedure".
Swing torque : Refer to
RSU-20, "
Ball Joint".
JPEIA0005ZZ
Rotating torque : Refer to RSU-20, "Ball Joint".
Axial end play : Refer to RSU-20, "
Ball Joint".
Revision: 2010 May2011 QX56
Page 4270 of 5598
FRONT LOWER LINKRSU-15
< REMOVAL AND INSTALLATION >
C
DF
G H
I
J
K L
M A
B
RSU
N
O P
FRONT LOWER LINK
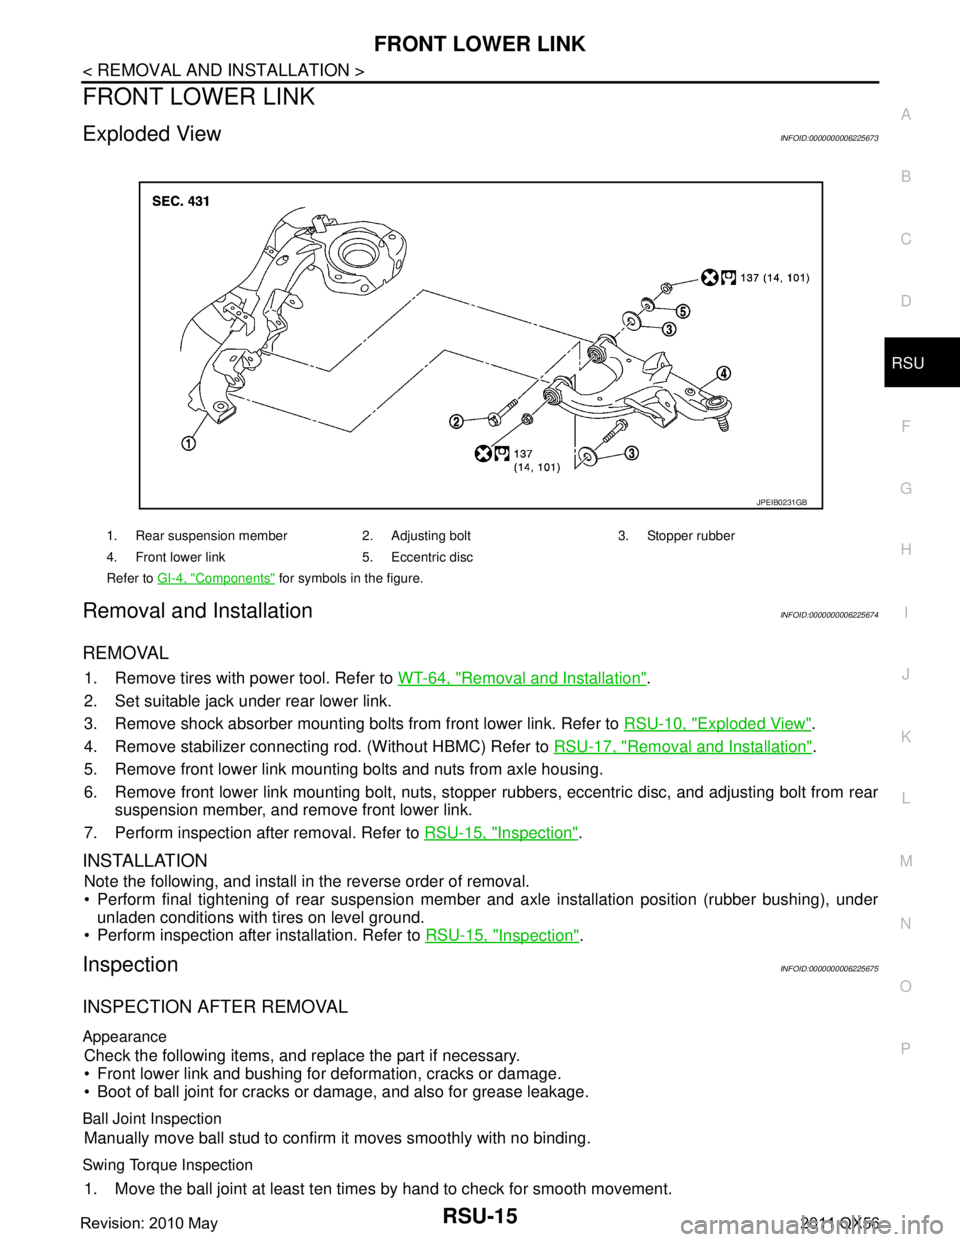
Exploded ViewINFOID:0000000006225673
Removal and InstallationINFOID:0000000006225674
REMOVAL
1. Remove tires with power tool. Refer to WT-64, "Removal and Installation".
2. Set suitable jack under rear lower link.
3. Remove shock absorber mounting bolts from front lower link. Refer to RSU-10, "
Exploded View".
4. Remove stabilizer connecting rod. (Without HBMC) Refer to RSU-17, "
Removal and Installation".
5. Remove front lower link mounting bolts and nuts from axle housing.
6. Remove front lower link mounting bolt, nuts, stopper rubbers, eccentric disc, and adjusting bolt from rear
suspension member, and remove front lower link.
7. Perform inspection after removal. Refer to RSU-15, "
Inspection".
INSTALLATION
Note the following, and install in the reverse order of removal.
Perform final tightening of rear suspension mem ber and axle installation position (rubber bushing), under
unladen conditions with tires on level ground.
Perform inspection after installation. Refer to RSU-15, "
Inspection".
InspectionINFOID:0000000006225675
INSPECTION AFTER REMOVAL
Appearance
Check the following items, and replace the part if necessary.
Front lower link and bushing for deformation, cracks or damage.
Boot of ball joint for cracks or damage, and also for grease leakage.
Ball Joint Inspection
Manually move ball stud to confirm it moves smoothly with no binding.
Swing Torque Inspection
1. Move the ball joint at least ten times by hand to check for smooth movement.
1. Rear suspension member 2. Adjusting bolt 3. Stopper rubber
4. Front lower link 5. Eccentric disc
Refer to GI-4, "
Components" for symbols in the figure.
JPEIB0231GB
Revision: 2010 May2011 QX56
Page 4273 of 5598
RSU-18
< UNIT REMOVAL AND INSTALLATION >
REAR SUSPENSION MEMBER
UNIT REMOVAL AND INSTALLATION
REAR SUSPENSION MEMBER
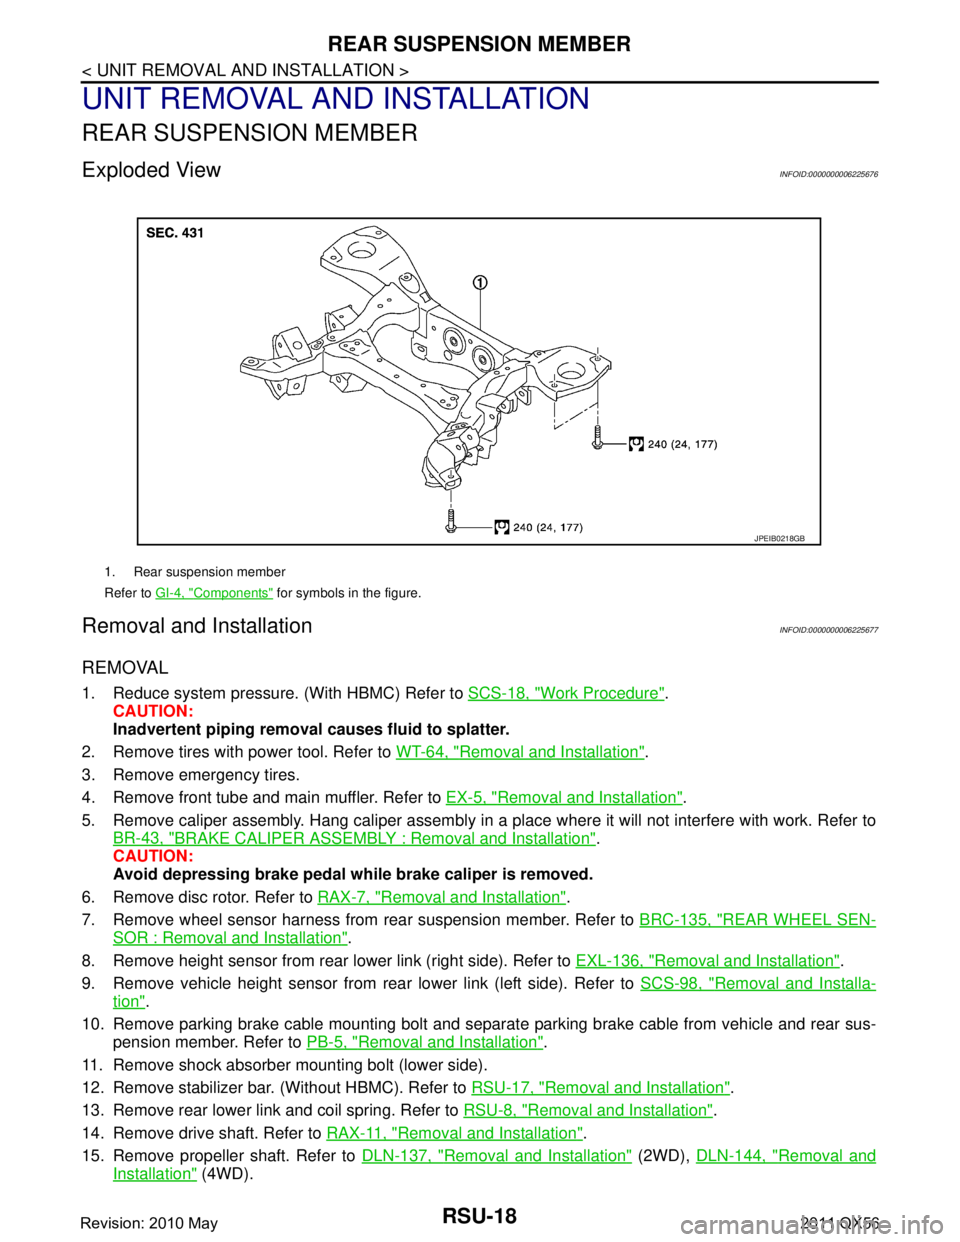
Exploded ViewINFOID:0000000006225676
Removal and InstallationINFOID:0000000006225677
REMOVAL
1. Reduce system pressure. (With HBMC) Refer to SCS-18, "Work Procedure".
CAUTION:
Inadvertent piping removal causes fluid to splatter.
2. Remove tires with power tool. Refer to WT-64, "
Removal and Installation".
3. Remove emergency tires.
4. Remove front tube and main muffler. Refer to EX-5, "
Removal and Installation".
5. Remove caliper assembly. Hang caliper assembly in a place where it will not interfere with work. Refer to BR-43, "
BRAKE CALIPER ASSEMBLY : Removal and Installation".
CAUTION:
Avoid depressing brake pedal wh ile brake caliper is removed.
6. Remove disc rotor. Refer to RAX-7, "
Removal and Installation".
7. Remove wheel sensor harness from rear suspension member. Refer to BRC-135, "
REAR WHEEL SEN-
SOR : Removal and Installation".
8. Remove height sensor from rear lower link (right side). Refer to EXL-136, "
Removal and Installation".
9. Remove vehicle height sensor from rear lower link (left side). Refer to SCS-98, "
Removal and Installa-
tion".
10. Remove parking brake cable mounting bolt and separa te parking brake cable from vehicle and rear sus-
pension member. Refer to PB-5, "
Removal and Installation".
11. Remove shock absorber mounting bolt (lower side).
12. Remove stabilizer bar. (Without HBMC). Refer to RSU-17, "
Removal and Installation".
13. Remove rear lower link and coil spring. Refer to RSU-8, "
Removal and Installation".
14. Remove drive shaft. Refer to RAX-11, "
Removal and Installation".
15. Remove propeller shaft. Refer to DLN-137, "
Removal and Installation" (2WD), DLN-144, "Removal and
Installation" (4WD).
1. Rear suspension member
Refer to GI-4, "
Components" for symbols in the figure.
JPEIB0218GB
Revision: 2010 May2011 QX56
Page 4274 of 5598
REAR SUSPENSION MEMBERRSU-19
< UNIT REMOVAL AND INSTALLATION >
C
DF
G H
I
J
K L
M A
B
RSU
N
O P
16. Remove final drive. Refer to DLN-201, "Removal and Installation".
17. Remove rear tube assembly A and rear tube assembly B. (With HBMC) Refer to SCS-44, "
REAR TUBE
ASSEMBLY : Removal and Installation".
18. Set suitable jack under rear suspension member.
19. Slowly lower jack, then remove rear suspension member, suspension arm, front lower link, wheel hub and housing from vehicle as a unit.
20. Remove mounting bolts and nuts, then remove suspension arm, front lower link, wheel hub and housing from rear suspension member.
21. Perform inspection after removal. Refer to RSU-19, "
Inspection and Adjustment".
INSTALLATION
Note the following, and install in the reverse order of the removal.
Perform the final tightening of each of parts under unladen conditions, which were removed when removing
rear suspension assembly.
Perform inspection after installation. Refer to RSU-19, "
Inspection and Adjustment".
Perform adjustment after installation. (With HBMC) Refer to RSU-19, "
Inspection and Adjustment".
Inspection and AdjustmentINFOID:0000000006225678
INSPECTION AFTER REMOVAL
Check rear suspension member for deformation, cracks, or any other damage. Replace if necessary.
INSPECTION AFTER INSTALLATION
1. Adjust parking brake operation (stroke). Refer to PB-3, "Inspection and Adjustment".
2. Check wheel alignment. Refer to RSU-6, "
Inspection".
3. Adjust neutral position of steering angle sensor. Refer to BRC-64, "
Work Procedure".
4. Adjust levelizer adjustment of height sensor. Refer to EXL-61, "
LEVELIZER ADJUSTMENT : Special
Repair Requirement".
5. Check standard vehicle height setting of vehicle height sensor. Refer to SCS-67, "
Work Procedure".
6. Check wheel sensor harness for proper connection. Refer to BRC-135, "
REAR WHEEL SENSOR :
Exploded View"
ADJUSTMENT AFTER INSTALLATION (WITH HBMC)
Bleed air from the HBMC. Refer to SCS-18, "Work Procedure".
Revision: 2010 May2011 QX56
Page 4275 of 5598
RSU-20
< SERVICE DATA AND SPECIFICATIONS (SDS)
SERVICE DATA AND SPECIFICATIONS (SDS)
SERVICE DATA AND SPECIFICATIONS (SDS)
SERVICE DATA AND SPECIFICATIONS (SDS)
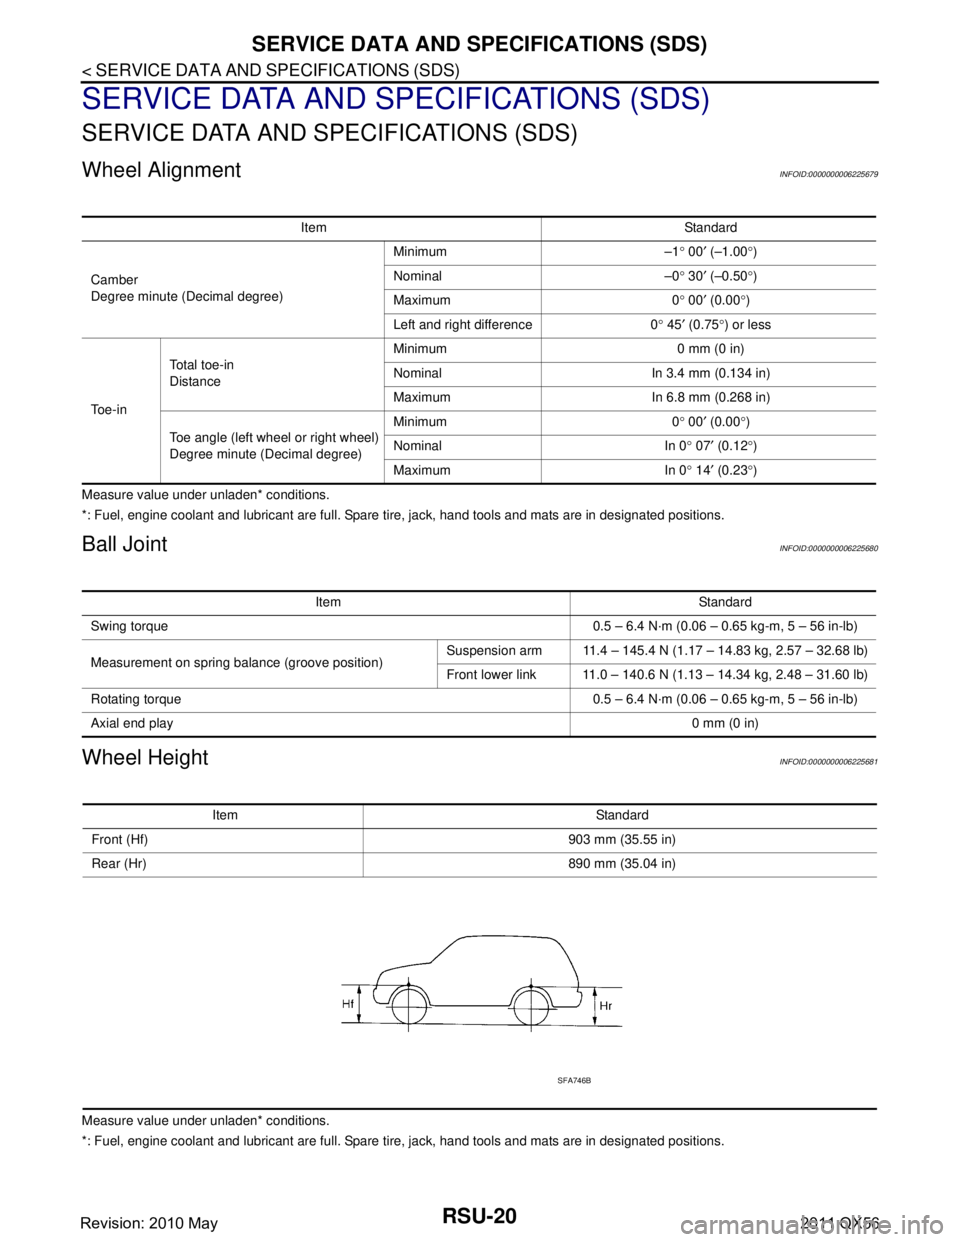
Wheel AlignmentINFOID:0000000006225679
Measure value under unladen* conditions.
*: Fuel, engine coolant and lubricant are full. Spare tire, jack, hand tools and mats are in designated positions.
Ball JointINFOID:0000000006225680
Wheel HeightINFOID:0000000006225681
Measure value under unladen* conditions.
*: Fuel, engine coolant and lubricant are full. Spare tire, jack, hand tools and mats are in designated positions.Item Standard
Camber
Degree minute (Decimal degree) Minimum –1
° 00 ′ (–1.00 °)
Nominal –0 ° 30 ′ (–0.50 °)
Maximum 0 ° 00 ′ (0.00 °)
Left and right difference 0 ° 45 ′ (0.75 °) or less
To e - i n Total toe-in
Distance
Minimum 0 mm (0 in)
Nominal In 3.4 mm (0.134 in)
Maximum In 6.8 mm (0.268 in)
Toe angle (left wheel or right wheel)
Degree minute (Decimal degree) Minimum 0
° 00 ′ (0.00 °)
Nominal In 0 ° 07 ′ (0.12 °)
Maximum In 0 ° 14 ′ (0.23 °)
Item Standard
Swing torque 0.5 – 6.4 N·m (0.06 – 0.65 kg-m, 5 – 56 in-lb)
Measurement on spring balance (groove position) Suspension arm 11.4 – 145.4 N (1.17 – 14.83 kg, 2.57 – 32.68 lb)
Front lower link 11.0 – 140.6 N (1.13 – 14.34 kg, 2.48 – 31.60 lb)
Rotating torque 0.5 – 6.4 N·m (0.06 – 0.65 kg-m, 5 – 56 in-lb)
Axial end play 0 mm (0 in)
Item Standard
Front (Hf) 903 mm (35.55 in)
Rear (Hr) 890 mm (35.04 in)
SFA746B
Revision: 2010 May2011 QX56
Page 4361 of 5598

SCS-1
SUSPENSION
C
DF
G H
I
J
K L
M
SECTION SCS
A
B
SCS
N
O PCONTENTS
SUSPENSION CONTROL SYSTEM
HBMC
PRECAUTION ................ ...............................
4
PRECAUTIONS .............................................. .....4
Precaution for Supplemental Restraint System
(SRS) "AIR BAG" and "SEAT BELT PRE-TEN-
SIONER" ............................................................. ......
4
Precaution Necessary for Steering Wheel Rota-
tion after Battery Disconnect .....................................
4
Precaution for Procedure without Cowl Top Cover ......5
Precaution for Hydraulic Body-Motion Control
System ......................................................................
5
PREPARATION ............................................6
PREPARATION .............................................. .....6
Special Service Tools .......................................... ......6
Commercial Service Tools ........................................6
SYSTEM DESCRIPTION ..............................7
DESCRIPTION ............................................... .....7
Description .......................................................... ......7
COMPONENT PARTS ........................................8
Component Parts Location .................................. ......8
Component Description .............................................8
STRUCTURE AND OPERATION ........................9
Hydraulic Body-Motion Control System .............. ......9
Shock Absorber .........................................................9
PPMU ......................................................................10
Accumulator ............................................................11
PPMU Pipe ..............................................................11
SYSTEM .............................................................12
System Diagram .................................................. ....12
System Description .................................................12
Component Description ...........................................14
BASIC INSPECTION ...................................15
CHECK SYSTEM PRESSURE .........................15
Work Procedure ................................................... ....15
PRESSURE REDUCING METHOD ..................17
Work Procedure .......................................................17
AIR BLEEDING METHOD ................................18
Work Procedure .......................................................18
CHECK INTERNAL LEAKAGE ........................20
Work Procedure .......................................................20
CHECK FOR MALFUNCTION ..........................22
Work Procedure .......................................................22
CHECK SHOCK ABSORBER FOR MAL-
FUNCTION ....................................... .................
24
Work Procedure ................................................... ....24
CHECK ORIFICE FOR CLOGGING .................27
Work Procedure .......................................................27
SYMPTOM DIAGNOSIS ..............................29
DIFFERENCE IN APPEARANCE .....................29
Description ........................................................... ....29
Inspection Procedure ...............................................29
LARGE ROLL ANGLE ......................................30
Description ...............................................................30
Inspection Procedure ...............................................30
REMOVAL AND INSTALLATION ...............31
HYDRAULIC BODY-MOTION CONTROL
SYSTEM ............................................................
31
Hydraulic Piping ................................................... ....31
FRONT TUBE ASSEMBLY .......................................31
FRONT TUBE ASSEMBLY : Exploded View ...... ....32
FRONT TUBE ASSEMBLY : Removal and Instal-
lation ........................................................................
32
FRONT TUBE ASSEMBLY : Inspection ..................34
Revision: 2010 May2011 QX56
Page 4362 of 5598

SCS-2
ACCUMULATOR ......................................................34
ACCUMULATOR : Exploded View .........................35
ACCUMULATOR : Removal and Installation ..........35
ACCUMULATOR : Inspection ................................38
ACCUMULATOR : Disposal ...................................38
PPMU, MIDDLE TUBE ASSEMBLY, PPMU PIPE ...38
PPMU, MIDDLE TUBE ASSEMBLY, PPMU PIPE
: Exploded View ......................................................
39
PPMU, MIDDLE TUBE ASSEMBLY, PPMU PIPE
: Removal and Installation ......................................
39
PPMU, MIDDLE TUBE ASSEMBLY, PPMU PIPE
: Inspection .............................................................
43
PPMU, MIDDLE TUBE ASSEMBLY, PPMU PIPE
: Disposal ................................................................
43
REAR TUBE ASSEMBLY ...................................... ...43
REAR TUBE ASSEMBLY : Exploded View ............44
REAR TUBE ASSEMBLY : Removal and Installa-
tion ....................................................................... ...
44
REAR TUBE ASSEMBLY : Inspection ...................46
AIR LEVELIZER CONTROL SYSTEM
PRECAUTION ....... ....................... ...............
47
PRECAUTIONS .............................................. ...47
Precaution for Supplemental Restraint System
(SRS) "AIR BAG" and "SEAT BELT PRE-TEN-
SIONER" .............................................................. ...
47
Precaution Necessary for Steering Wheel Rota-
tion after Battery Disconnect ..................................
47
Precaution for Procedure without Cowl Top Cover ...48
Precaution for Air Levelizer Control System ...........48
SYSTEM DESCRIPTION ............................49
DESCRIPTION ................................................ ...49
Description ........................................................... ...49
COMPONENT PARTS .......................................50
Component Parts Location .................................. ...50
Component Description ..........................................50
Air Levelizer Control Module ..................................51
Vehicle Height Sensor ............................................51
Air Compressor .......................................................51
Air Compressor Relay ............................................51
CK SUSP Indicator Lamp .......................................51
STRUCTURE AND OPERATION ......................52
Rear Shock Absorber .......................................... ...52
Vehicle Height Sensor ............................................53
SYSTEM .......................................................... ...54
System Diagram .................................................. ...54
System Description .................................................54
Fail-safe ..................................................................55
DIAGNOSIS SYSTEM (AIR LEVELIZER
CONTROL MODULE) ........................................
56
CONSULT-III Function ........................................ ...56
ECU DIAGNOSIS INFORMATION .............58
AIR LEVELIZER CONTROL MODULE .......... ...58
Reference Value .................................................. ...58
Fail-safe ..................................................................59
DTC Inspection Priority Chart .................................59
DTC Index ...............................................................59
WIRING DIAGRAM ....................................61
AIR LEVELIZER CONTROL SYSTEM ........... ...61
Wiring Diagram .................................................... ...61
BASIC INSPECTION ..................................65
DIAGNOSIS AND REPAIR WORKFLOW ...... ...65
Work Flow ............................................................ ...65
Diagnostic Work Sheet ...........................................66
STANDARD VEHICLE HEIGHT SETTING .......67
Description ........................................................... ...67
Work Procedure ......................................................67
DTC/CIRCUIT DIAGNOSIS ........................69
C1801 VHCL HEIGHT SENSOR .................... ...69
DTC Logic ............................................................ ...69
Diagnosis Procedure ..............................................69
Component Inspection ............................................70
C1802 AIR SUS COMPRS RELAY ...................72
DTC Logic ............................................................ ...72
Diagnosis Procedure ..............................................72
C1803 AIR SUSPENSION EXH SOL ................74
DTC Logic ............................................................ ...74
Diagnosis Procedure ..............................................74
Component Inspection ............................................75
C1804 VHCL HEIGHT ADJ UP .........................77
DTC Logic ............................................................ ...77
Diagnosis Procedure ..............................................77
Component Inspection (Air Compressor Relay) .....79
Component Inspection (Air Compressor) ............. ...79
C1805 VHCL HEIGHT ADJ DOWN ...................80
DTC Logic ............................................................ ...80
Diagnosis Procedure ..............................................80
C1806 VHCL HEIGHT SEN FIX ........................81
DTC Logic ............................................................ ...81
Diagnosis Procedure ...............................................81
C1807 VHCL HEIGHT SEN VOLT ....................82
DTC Logic ............................................................ ...82
Diagnosis Procedure ..............................................82
C1808 AIR SUS COMPRS FNCTN ...................84
DTC Logic ............................................................ ...84
Diagnosis Procedure ..............................................84
U1000 CAN COMM CIRCUIT ............................87
Revision: 2010 May2011 QX56
Page 4365 of 5598
![INFINITI QX56 2011 Factory Service Manual
PRECAUTIONSSCS-5
< PRECAUTION > [HBMC]
C
D
F
G H
I
J
K L
M A
B
SCS
N
O P
5. When the repair work is completed, re-connect both battery cables. With the brake pedal released, turn
the push-button ign INFINITI QX56 2011 Factory Service Manual
PRECAUTIONSSCS-5
< PRECAUTION > [HBMC]
C
D
F
G H
I
J
K L
M A
B
SCS
N
O P
5. When the repair work is completed, re-connect both battery cables. With the brake pedal released, turn
the push-button ign](/manual-img/42/57033/w960_57033-4364.png)
PRECAUTIONSSCS-5
< PRECAUTION > [HBMC]
C
D
F
G H
I
J
K L
M A
B
SCS
N
O P
5. When the repair work is completed, re-connect both battery cables. With the brake pedal released, turn
the push-button ignition switch from ACC position to ON position, then to LOCK position. (The steering
wheel will lock when the push-button ignition switch is turned to LOCK position.)
6. Perform self-diagnosis check of a ll control units using CONSULT-III.
Precaution for Procedure without Cowl Top CoverINFOID:0000000006256138
When performing the procedure after removing cowl top cover, cover
the lower end of windshield with urethane, etc.
Precaution for Hydraulic Body-Motion Control SystemINFOID:0000000006255996
WARNING:
Always check the piping for loose co nnections, damage, or twists before starting operation, since
pressure in hydraulic circuit becom es high during air bleeding operation.
When repairing or replacing a malfunctioning pa rt, always release pressure from hydraulic circuit,
since dangerous conditions may be created when oil leakage occurs during air bleeding operation.
Clean surrounding areas of oil inlet and air bleeder usi ng steam before starting operation, since there may
be mud on it.
Always decrease pressure when removing a system related part, since system pressure is high.
Seal the removed part using vinyl tape for preventi ng dirt from getting on or entering the removed part.
Check system pressure again 1 day or more after bleeding operation is complete, since system pressure may decrease when air bleeding is insufficient.
Use Genuine NISSAN Hydraulic Suspension Fluid for suspension fluid.
Never reuse drained suspension fluid.
Check for suspension fluid leakage after removing a system-related part.
PIIB3706J
Revision: 2010 May2011 QX56