2011 INFINITI QX56 door lock
[x] Cancel search: door lockPage 1745 of 5598
SQUEAK AND RATTLE TROUBLE DIAGNOSESDLK-209
< SYMPTOM DIAGNOSIS >
C
DE
F
G H
I
J
L
M A
B
DLK
N
O P
SQUEAK AND RATTLE TROUBLE DIAGNOSES
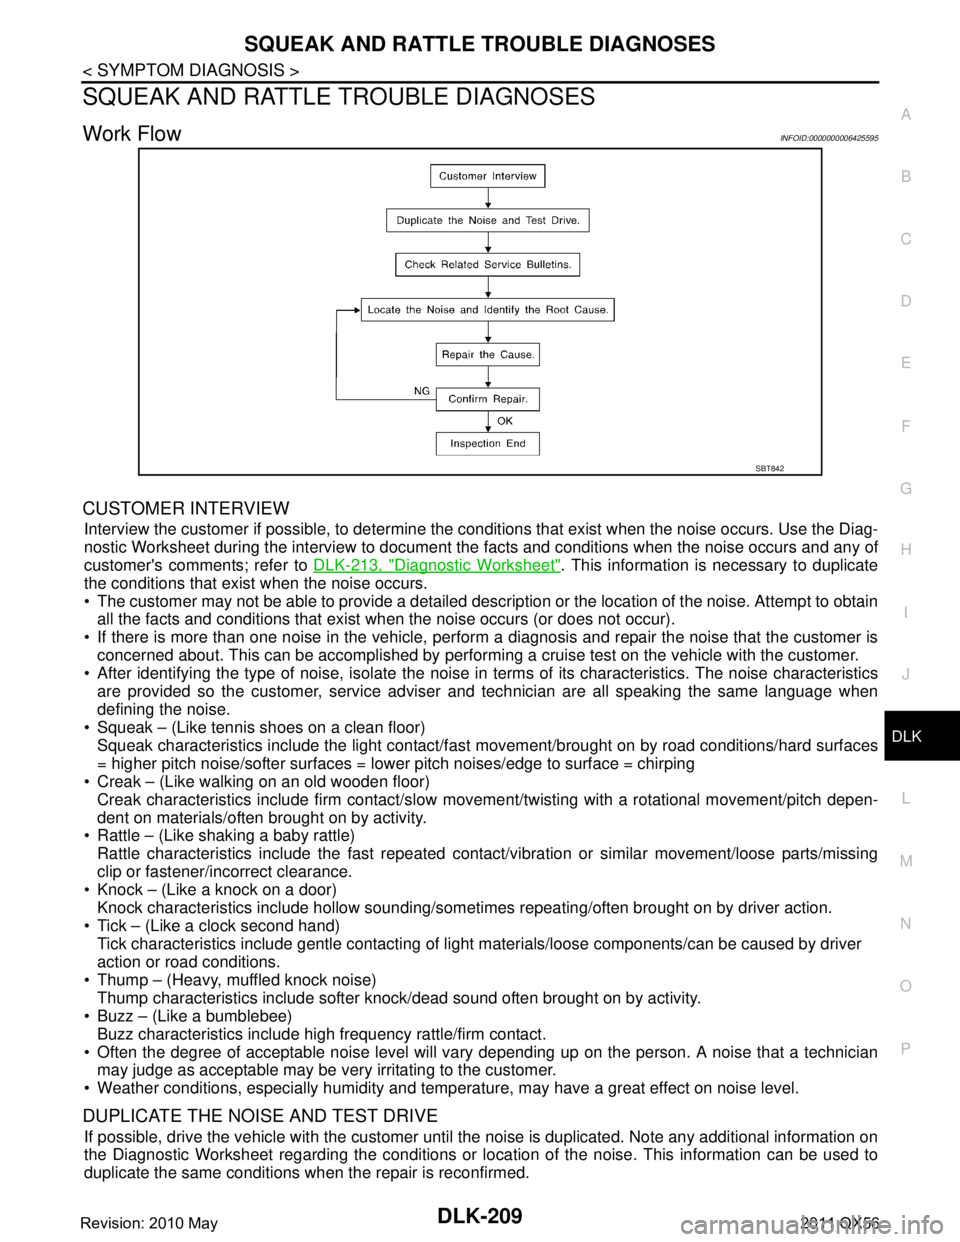
Work FlowINFOID:0000000006425595
CUSTOMER INTERVIEW
Interview the customer if possible, to determine the conditions that exist when the noise occurs. Use the Diag-
nostic Worksheet during the interview to document t he facts and conditions when the noise occurs and any of
customer's comments; refer to DLK-213, "
Diagnostic Worksheet". This information is necessary to duplicate
the conditions that exist when the noise occurs.
The customer may not be able to provide a detailed description or the location of the noise. Attempt to obtain all the facts and conditions that exist when the noise occurs (or does not occur).
If there is more than one noise in the vehicle, perform a diagnosis and repair the noise that the customer is
concerned about. This can be accomplished by performing a cruise test on the vehicle with the customer.
After identifying the type of noise, isolate the noise in terms of its characteristics. The noise characteristics
are provided so the customer, service adviser and technician are all speaking the same language when
defining the noise.
Squeak – (Like tennis shoes on a clean floor)
Squeak characteristics include the light contact/fast movement/brought on by road conditions/hard surfaces
= higher pitch noise/softer surfaces = lower pitch noises/edge to surface = chirping
Creak – (Like walking on an old wooden floor)
Creak characteristics include firm contact/slow mo vement/twisting with a rotational movement/pitch depen-
dent on materials/often brought on by activity.
Rattle – (Like shaking a baby rattle)
Rattle characteristics include the fast repeated contac t/vibration or similar movement/loose parts/missing
clip or fastener/incorrect clearance.
Knock – (Like a knock on a door)
Knock characteristics include hollow sounding/someti mes repeating/often brought on by driver action.
Tick – (Like a clock second hand) Tick characteristics include gentle contacting of li ght materials/loose components/can be caused by driver
action or road conditions.
Thump – (Heavy, muffled knock noise) Thump characteristics include softer k nock/dead sound often brought on by activity.
Buzz – (Like a bumblebee)
Buzz characteristics include high frequency rattle/firm contact.
Often the degree of acceptable noise level will vary depending up on the person. A noise that a technician may judge as acceptable may be very irritating to the customer.
Weather conditions, especially humidity and temperat ure, may have a great effect on noise level.
DUPLICATE THE NOISE AND TEST DRIVE
If possible, drive the vehicle with the customer until the noise is duplicated. Note any additional information on
the Diagnostic Worksheet regarding the conditions or lo cation of the noise. This information can be used to
duplicate the same conditions when the repair is reconfirmed.
SBT842
Revision: 2010 May2011 QX56
Page 1746 of 5598
DLK-210
< SYMPTOM DIAGNOSIS >
SQUEAK AND RATTLE TROUBLE DIAGNOSES
If the noise can be duplicated easily during the test drive, to help identify the source of the noise, try to dupli-
cate the noise with the vehicle stopped by doing one or all of the following:
1) Close a door.
2) Tap or push/pull around the area where the noise appears to be coming from.
3) Rev the engine.
4) Use a floor jack to recreate vehicle “twist”.
5) At idle, apply engine load (electrical load, half-cl utch on M/T models, drive position on A/T models).
6) Raise the vehicle on a hoist and hit a tire with a rubber hammer.
Drive the vehicle and attempt to duplicate the conditions the customer states exist when the noise occurs.
If it is difficult to duplicate the noise, drive the v ehicle slowly on an undulating or rough road to stress the
vehicle body.
CHECK RELATED SERVICE BULLETINS
After verifying the customer concern or symptom, chec k ASIST for Technical Service Bulletins (TSBs) related
to that concern or symptom.
If a TSB relates to the symptom, follo w the procedure to repair the noise.
LOCATE THE NOISE AND IDENTIFY THE ROOT CAUSE
1. Narrow down the noise to a general area. To help pi npoint the source of the noise, use a listening tool
(Chassis ear: J-39570, Engine ear and mechanics stethoscope).
2. Narrow down the noise to a more specific area and identify the cause of the noise by:
Removing the components in the area that is are suspected to be the cause of the noise.
Do not use too much force when removing clips and fasteners, otherwise clips and fastener can be broken
or lost during the repair, resulting in the creation of new noise.
Tapping or pushing/pulling the component that is are suspected to be the cause of the noise.
Do not tap or push/pull the component with excessive force, otherwise the noise will be eliminated only tem-
porarily.
Feeling for a vibration by hand by touching the component (s) that is are suspected to be the cause of the
noise.
Placing a piece of paper between components that are suspected to be the cause of the noise.
Looking for loose components and contact marks. Refer to DLK-211, "
Inspection Procedure".
REPAIR THE CAUSE
If the cause is a loose component, tighten the component securely.
If the cause is insufficient clearance between components:
- Separate components by repositioning or loos ening and retightening the component, if possible.
- Insulate components with a suitable insulator such as urethane pads, foam blocks, felt cloth tape or ure-
thane tape. A Nissan Squeak and Rattle Kit (J-43980) is available through the authorized Nissan Parts
Department.
CAUTION:
Never use excessive force as many components are constructed of plastic and may be damaged.
NOTE:
Always check with the Parts Departm ent for the latest parts information.
The following materials are contained in the Nissan Squeak and Rattle Kit (J-43980). Each item can be
ordered separately as needed.
URETHANE PADS [1.5 mm (0.059 in) thick]
Insulates connectors, harness, etc.
76268-9E005: 100 ×135 mm (3.94 ×5.31 in)/76884-71L01: 60 ×85 mm (2.36 ×3.35 in)/76884-
71L02:15 ×25 mm (0.59 ×0.98 in)
INSULATOR (Foam blocks)
Insulates components from contact. Can be used to fill space behind a panel.
73982-9E000: 45 mm (1.77 in) thick, 50 ×50 mm (1.97 ×1.97 in)/73982-
50Y00: 10 mm (0.39 in) thick, 50 ×50 mm (1.97 ×1.97 in)
INSULATOR (Light foam block)
80845-71L00: 30 mm (1.18 in) thick, 30 ×50 mm (1.18 ×1.97in)
FELT CLOTHTAPE
Used to insulate where movement does not occu r. Ideal for instrument panel applications.
68370-4B000: 15 ×25 mm (0.59 ×0.98 in) pad/68239-13E00: 5 mm (0.20 in) wide tape roll
The following materials, not found in the kit, can also be used to repair squeaks and rattles.
UHMW (TEFLON) TAPE
Revision: 2010 May2011 QX56
Page 1747 of 5598

SQUEAK AND RATTLE TROUBLE DIAGNOSESDLK-211
< SYMPTOM DIAGNOSIS >
C
DE
F
G H
I
J
L
M A
B
DLK
N
O P
Insulates where slight movement is present. Ideal for instrument panel applications.
SILICONE GREASE
Used in place of UHMW tape that is be visible or does not fit. Will only last a few months.
SILICONE SPRAY
Used when grease cannot be applied.
DUCT TAPE
Used to eliminate movement.
CONFIRM THE REPAIR
Confirm that the cause of a noise is repaired by test driving the vehicle. Operate the vehicle under the same
conditions as when the noise originally occurred. Refer to the notes on the Diagnostic Worksheet.
Inspection ProcedureINFOID:0000000006226060
Refer to Table of Contents for specific component removal and installation information.
INSTRUMENT PANEL
Most incidents are caused by contact and movement between:
1. Cluster lid A and instrument panel
2. Acrylic lens and combination meter housing
3. Instrument panel to front pillar garnish
4. Instrument panel to windshield
5. Instrument panel mounting pins
6. Wiring harnesses behind the combination meter
7. A/C defroster duct and duct joint
These incidents can usually be located by tapping or moving the components to duplicate the noise or by
pressing on the components while driving to stop the noi se. Most of these incidents can be repaired by apply-
ing felt cloth tape or silicon spray (in hard to reach areas). Urethane pads can be used to insulate wiring har-
ness.
CAUTION:
Do not use silicone spray to isolate a squeak or ra ttle. If you saturate the area with silicone, you will
not be able to recheck the repair.
CENTER CONSOLE
Components to pay attention to include:
1. Shifter assembly cover to finisher
2. A/C control unit and cluster lid C
3. Wiring harnesses behind audio and A/C control unit
The instrument panel repair and isolation pr ocedures also apply to the center console.
DOORS
Pay attention to the:
1. Finisher and inner panel making a slapping noise
2. Inside handle escutcheon to door finisher
3. Wiring harnesses tapping
4. Door striker out of alignment causing a popping noise on starts and stops
Tapping or moving the components or pressing on them while driving to duplicate the conditions can isolate
many of these incidents. You can usually insulate the areas with felt cloth tape or insulator foam blocks to
repair the noise.
TRUNK
Trunk noises are often caused by a loose jack or loose items put into the trunk by the owner.
In addition look for:
1. Trunk lid dumpers out of adjustment
2. Trunk lid striker out of adjustment
3. Trunk lid torsion bars knocking together
4. A loose license plate or bracket
Revision: 2010 May2011 QX56
Page 1760 of 5598
DLK-224
< REMOVAL AND INSTALLATION >
FRONT DOOR
FRONT DOOR
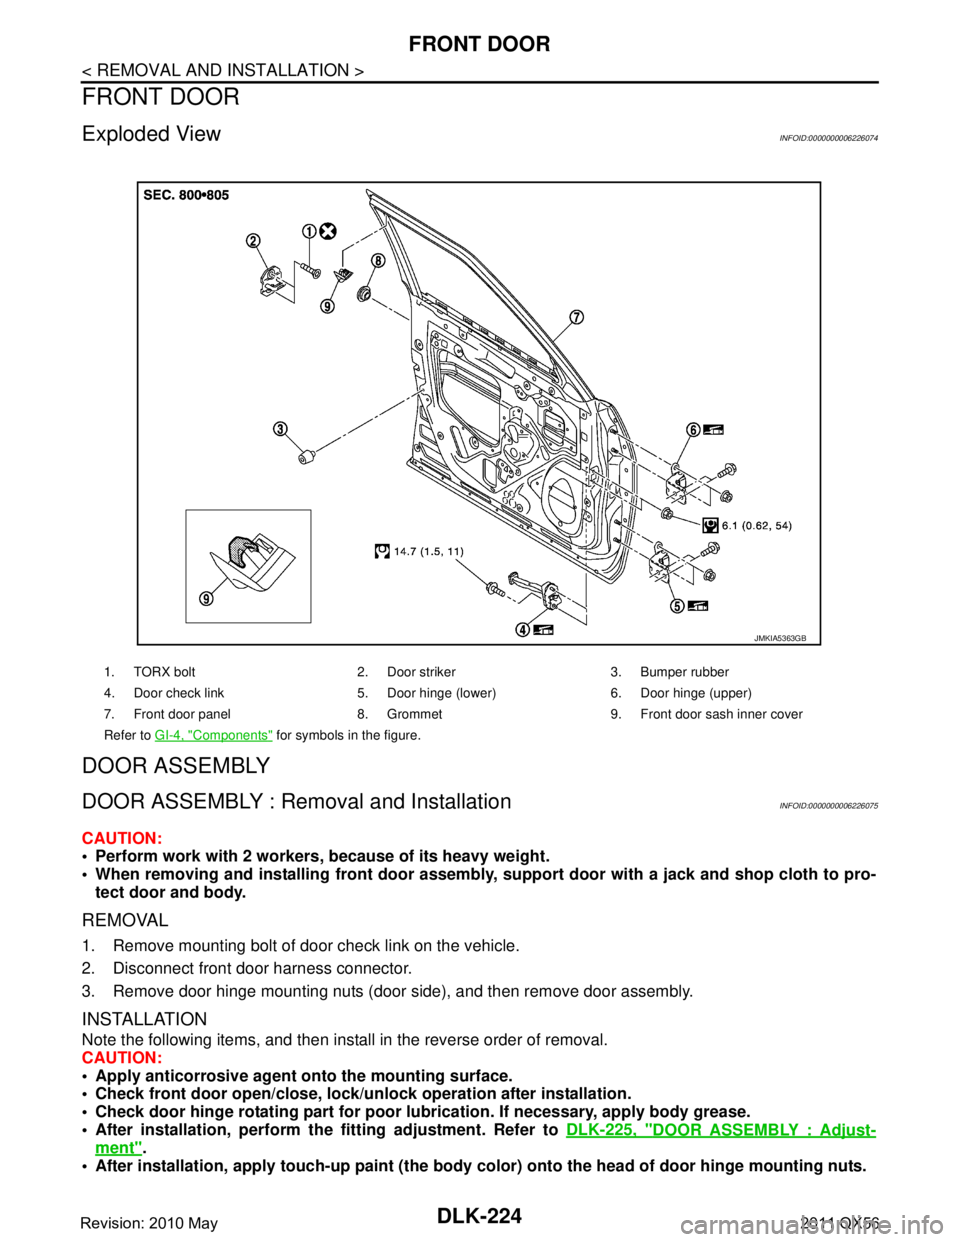
Exploded ViewINFOID:0000000006226074
DOOR ASSEMBLY
DOOR ASSEMBLY : Removal and InstallationINFOID:0000000006226075
CAUTION:
Perform work with 2 workers, because of its heavy weight.
When removing and installing front door assembly, support door with a jack and shop cloth to pro-
tect door and body.
REMOVAL
1. Remove mounting bolt of door check link on the vehicle.
2. Disconnect front door harness connector.
3. Remove door hinge mounting nuts (door side), and then remove door assembly.
INSTALLATION
Note the following items, and then install in the reverse order of removal.
CAUTION:
Apply anticorrosive agent onto the mounting surface.
Check front door open/close, lock/un lock operation after installation.
Check door hinge rotating pa rt for poor lubrication. If necessary, apply body grease.
After installation, perform th e fitting adjustment. Refer to DLK-225, "
DOOR ASSEMBLY : Adjust-
ment".
After installation, apply touch-up paint (the body color) onto the head of door hinge mounting nuts.
1. TORX bolt 2. Door striker 3. Bumper rubber
4. Door check link 5. Door hinge (lower) 6. Door hinge (upper)
7. Front door panel 8. Grommet 9. Front door sash inner cover
Refer to GI-4, "
Components" for symbols in the figure.
JMKIA5363GB
Revision: 2010 May2011 QX56
Page 1762 of 5598
DLK-226
< REMOVAL AND INSTALLATION >
FRONT DOOR
4. Temporarily tighten door hinge mounting nuts on door side.
5. Loosen door hinge mounting bolts on body side.
6. Raise front door at rear end to adjust clearance of the front door according to the fitting standard dimen-
sion.
7. After adjustment tighten bolts and nuts to the specified torque. CAUTION:
After installation, apply touch-up paint (the bo dy color) onto the head of hinge mounting bolts
and nuts.
Check door hinge rotating part for poor lubrication. If necessary, apply body grease.
8. Install front fender. Refer to refer to DLK-222, "
FRONT FENDER : Removal and Installation".
DOOR STRIKER ADJUSTMENT
Adjust door striker so that it becomes parallel with door lock insertion direction.
DOOR STRIKER
DOOR STRIKER : Removal and InstallationINFOID:0000000006226077
REMOVAL
Remove TORX bolts, and then remove door striker.
INSTALLATION
Note the following items, and then install in the reverse order of removal.
CAUTION:
Check front door open/close, operation after installation.
After installation, be sure to perf orm the fitting adjustment. Refer to DLK-225, "
DOOR ASSEMBLY :
Adjustment".
DOOR HINGE
DOOR HINGE : Removal and InstallationINFOID:0000000006226078
REMOVAL
CAUTION:
Perform work with 2 workers, because of its heavy weight.
When removing and installing front door assembly, support door with a jack and shop cloth to pro-
tect door and body.
1. Remove front fender. Refer to DLK-222, "
FRONT FENDER : Removal and Installation".
2. Remove front door assembly. Refer to DLK-224, "
DOOR ASSEMBLY : Removal and Installation".
3. Remove front door hinge mounting bolts (body side), and then remove front door hinge.
INSTALLATION
Note the following items, and then install in the reverse order of removal.
CAUTION:
Apply anticorrosive agent onto the mounting surface.
Check front door open/close, lock/un lock operation after installation.
Check door hinge rotating pa rt for poor lubrication. If necessary, apply body grease.
After installation, perform th e fitting adjustment. Refer to DLK-225, "
DOOR ASSEMBLY : Adjust-
ment".
After installation, apply touch-up paint (the body color) onto the head of door hinge mounting nuts.
DOOR CHECK LINK
DOOR CHECK LINK : Re moval and InstallationINFOID:0000000006226079
REMOVAL
1. Fully close the front door window.
2. Remove front door finisher. Refer to INT-14, "
Removal and Installation".
3. Remove front door speaker mounting bolts.
4. Disconnect connector and remove front door speaker.
Revision: 2010 May2011 QX56
Page 1764 of 5598
DLK-228
< REMOVAL AND INSTALLATION >
REAR DOOR
REAR DOOR
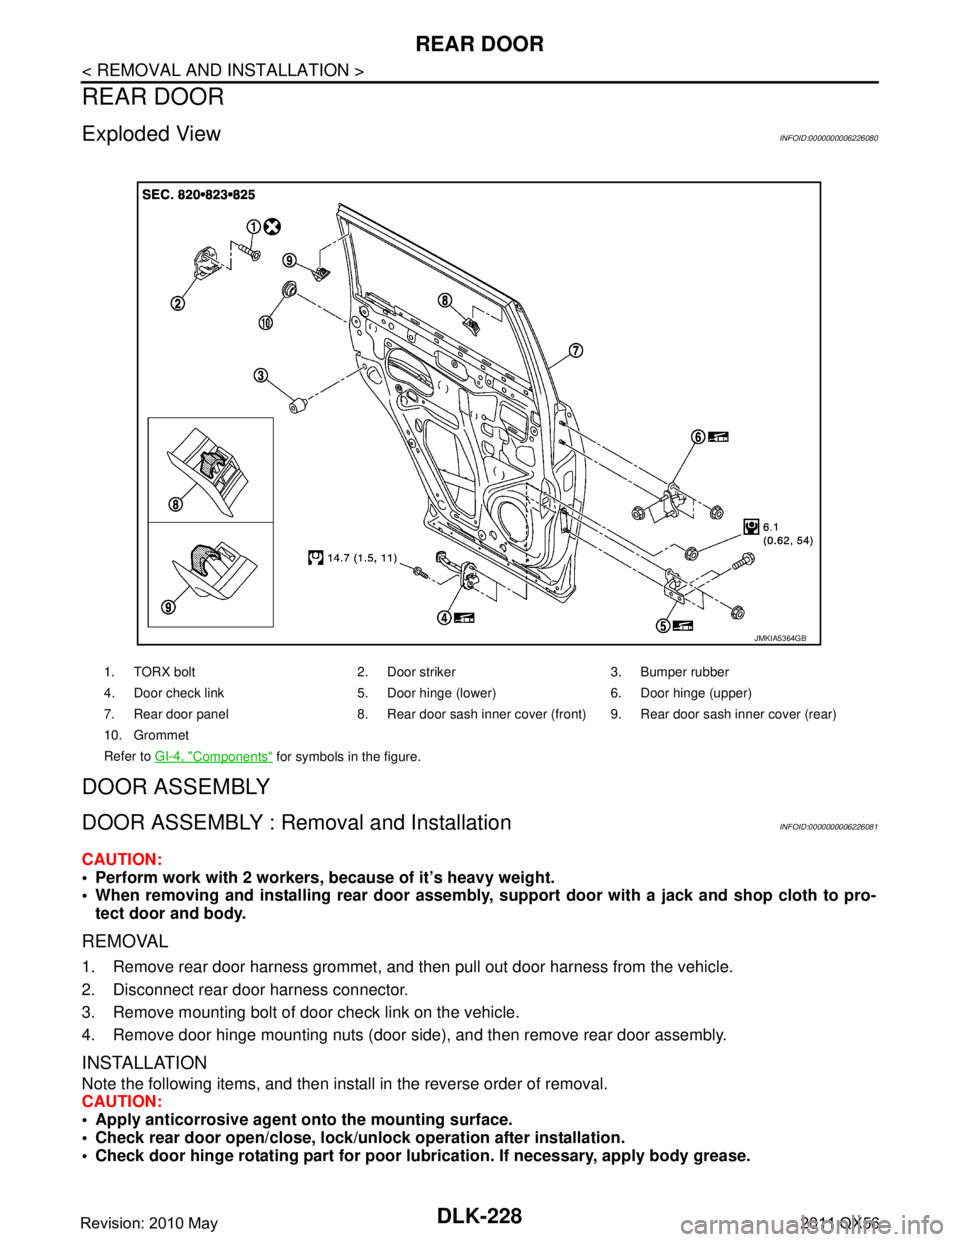
Exploded ViewINFOID:0000000006226080
DOOR ASSEMBLY
DOOR ASSEMBLY : Removal and InstallationINFOID:0000000006226081
CAUTION:
Perform work with 2 workers, because of it’s heavy weight.
When removing and installing rear door assembly, support door with a jack and shop cloth to pro-
tect door and body.
REMOVAL
1. Remove rear door harness grommet, and then pull out door harness from the vehicle.
2. Disconnect rear door harness connector.
3. Remove mounting bolt of door check link on the vehicle.
4. Remove door hinge mounting nuts (door side), and then remove rear door assembly.
INSTALLATION
Note the following items, and then install in the reverse order of removal.
CAUTION:
Apply anticorrosive agent onto the mounting surface.
Check rear door open/close, lock/unl ock operation after installation.
Check door hinge rotating pa rt for poor lubrication. If necessary, apply body grease.
1. TORX bolt 2. Door striker 3. Bumper rubber
4. Door check link 5. Door hinge (lower) 6. Door hinge (upper)
7. Rear door panel 8. Rear door sash inner cove r (front) 9. Rear door sash inner cover (rear)
10. Grommet
Refer to GI-4, "
Components" for symbols in the figure.
JMKIA5364GB
Revision: 2010 May2011 QX56
Page 1766 of 5598
DLK-230
< REMOVAL AND INSTALLATION >
REAR DOOR
1. Remove center pillar lower garnish. Refer to INT-22, "CENTER PILLAR LOWER GARNISH : Removal
and Installation".
2. Loosen door hinge mounting nuts on door side.
3. Adjust the surface height of rear door according to the fitting standard dimension.
4. Temporarily tighten door hinge mounting nuts on door side.
5. Loosen door hinge mounting nuts and bolts on body side.
6. Raise rear door at rear end to adjust clearance of rear door according to the fitting standard dimension.
7. After adjustment tighten bolts and nuts to the specified torque. CAUTION:
After installation, apply touch-up paint (the bo dy color) onto the head of hinge mounting bolts
and nuts.
Check door hinge rotating part for poor lubrication. If necessary, apply body grease.
8. Install center pillar lower garnish. Refer to INT-22, "
CENTER PILLAR LOWER GARNISH : Removal and
Installation".
DOOR STRIKER ADJUSTMENT
Adjust door striker so that it becomes parallel with door lock insertion direction.
DOOR STRIKER
DOOR STRIKER : Removal and InstallationINFOID:0000000006226083
REMOVAL
Remove TORX bolts, and then remove door striker.
INSTALLATION
Note the following items, and then install in the reverse order of removal.
CAUTION:
Check rear door open/c lose, after installation.
After installation, be sure to perf orm the fitting adjustment. Refer to DLK-229, "
DOOR ASSEMBLY :
Adjustment".
DOOR HINGE
DOOR HINGE : Removal and InstallationINFOID:0000000006226084
CAUTION:
Perform work with 2 workers, because of it’s heavy weight.
When removing and installing r ear door assembly, support door with a jack and shop cloth to pro-
tect door and body.
REMOVAL
1. Remove rear door assembly. Refer to DLK-228, "DOOR ASSEMBLY : Removal and Installation".
2. Remove center pillar lower garnish. Refer to INT-22, "
CENTER PILLAR LOWER GARNISH : Removal
and Installation".
3. Remove rear door hinge mounting bolts and nuts (body side), and then remove door hinge.
INSTALLATION
Note the following items, and then install in the reverse order of removal.
CAUTION:
Apply anticorrosive agent onto the mounting surface.
Check rear door open/close op eration after installation.
Check door hinge rotating pa rt for poor lubrication. If necessary, apply body grease.
When removing and inst alling rear door assembly, perform the fitting adjustment. Refer to DLK-229,
"DOOR ASSEMBLY : Adjustment".
After installing, apply the touch-up paint (the body color) onto the head of door hinge mounting nuts.
DOOR CHECK LINK
DOOR CHECK LINK : Removal and InstallationINFOID:0000000006226085
REMOVAL
Revision: 2010 May2011 QX56
Page 1769 of 5598
BACK DOORDLK-233
< REMOVAL AND INSTALLATION >
C
DE
F
G H
I
J
L
M A
B
DLK
N
O P
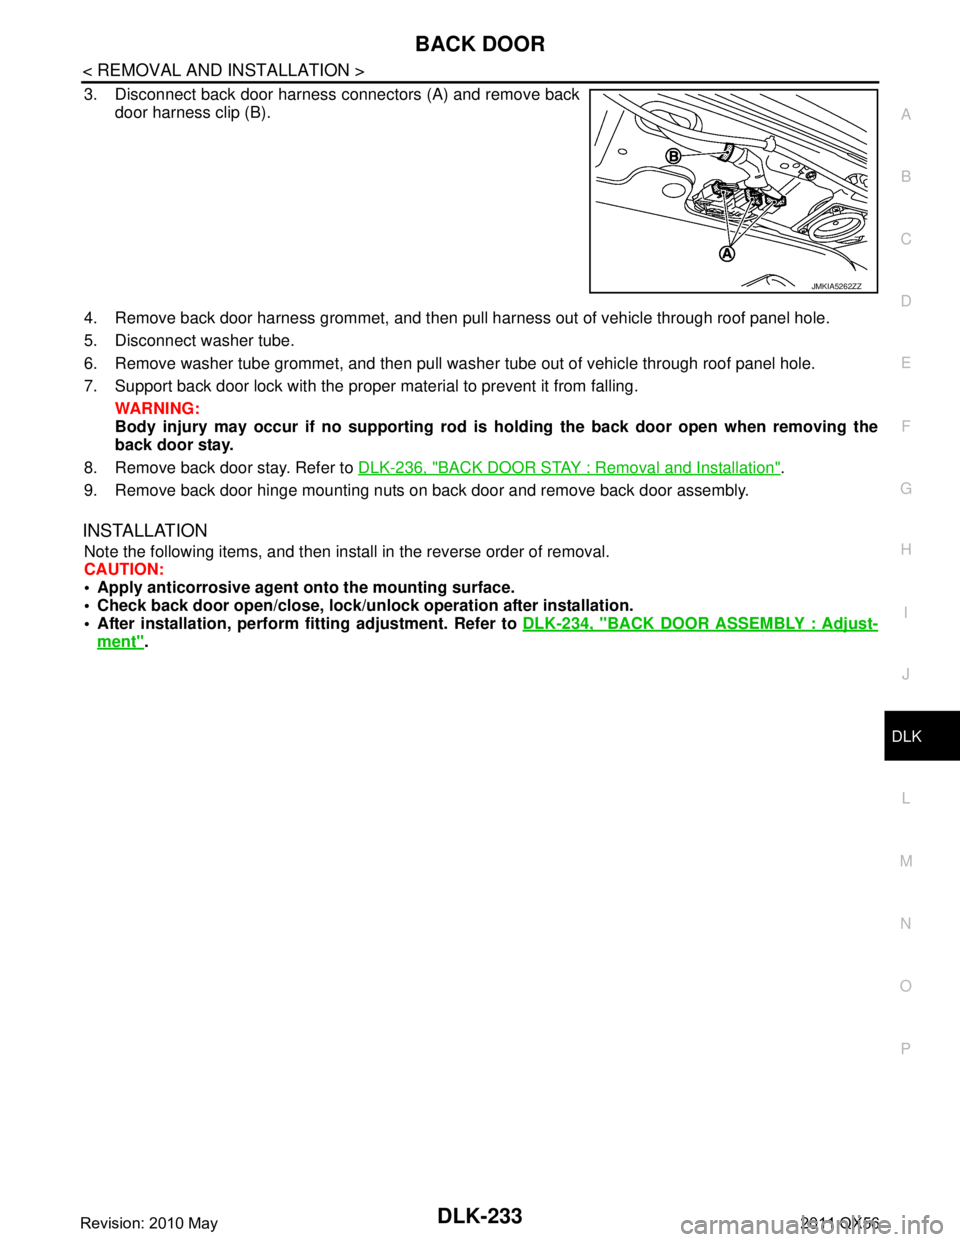
3. Disconnect back door harness connectors (A) and remove back door harness clip (B).
4. Remove back door harness grommet, and then pull harness out of vehicle through roof panel hole.
5. Disconnect washer tube.
6. Remove washer tube grommet, and then pull was her tube out of vehicle through roof panel hole.
7. Support back door lock with the proper material to prevent it from falling. WARNING:
Body injury may occur if no sup porting rod is holding the back door open when removing the
back door stay.
8. Remove back door stay. Refer to DLK-236, "
BACK DOOR STAY : Removal and Installation".
9. Remove back door hinge mounting nuts on back door and remove back door assembly.
INSTALLATION
Note the following items, and then install in the reverse order of removal.
CAUTION:
Apply anticorrosive agen t onto the mounting surface.
Check back door open/close, lock/un lock operation after installation.
After installation, perform fitting adjustment. Refer to DLK-234, "
BACK DOOR ASSEMBLY : Adjust-
ment".
JMKIA5262ZZ
Revision: 2010 May2011 QX56