2011 INFINITI QX56 instrument panel
[x] Cancel search: instrument panelPage 4766 of 5598

PRECAUTIONSSR-3
< PRECAUTION >
C
DE
F
G
I
J
K L
M A
B
SR
N
O P
5. When the repair work is completed, re-connect both battery cables. With the brake pedal released, turn
the push-button ignition switch from ACC position to ON position, then to LOCK position. (The steering
wheel will lock when the push-button ignition switch is turned to LOCK position.)
6. Perform self-diagnosis check of a ll control units using CONSULT-III.
Precaution for Battery ServiceINFOID:0000000006113045
Before disconnecting the battery, lower both the driver and passenger windows. This will prevent any interfer-
ence between the window edge and the vehicle when the door is opened/closed. During normal operation, the
window slightly raises and lowers automatically to prev ent any window to vehicle interference. The automatic
window function will not work with the battery disconnected.
Occupant Classification SystemINFOID:0000000006113047
Replace occupant classification system control uni t and passenger front seat cushion as an assembly.
Refer to SE-105, "
Exploded View".
ServiceINFOID:0000000006113046
Never use electrical test equipment to check SRS circuits unless instructed to in this Service Manual.
Before servicing the SRS, turn ignition switch OFF, disconnect battery negative terminal and wait at least 3
minutes.
For approximately 3 minutes after the battery negative termi nal is removed, it is still possible for the air bag
and seat belt pre-tensioner to deploy. Therefore, never work on any SRS connectors or wires until at least 3
minutes have elapsed.
Diagnosis sensor unit must always be installed with their arrow marks “ ⇐” pointing towards the front of the
vehicle for proper operation. Also check diagnosis sensor unit for cracks, deformities, or rust before installa-
tion and replace as required.
The spiral cable must be aligned in the neutral position since its rotations are limited. Never turn steering
wheel and column after removal of steering gear.
Handle air bag module carefully. Always place driver and front passenger air bag modules with the pad side facing upward and seat mounted front side air bag m odule standing with the stud bolt side facing downward.
Perform self-diagnosis to check entire SRS fo r proper function after replacing any components.
After air bag deploys, the front instrument panel assembly should be replaced if damaged.
Always replace instrument panel pad following front passenger air bag deployment.
Revision: 2010 May2011 QX56
Page 4769 of 5598

SR-6
< BASIC INSPECTION >
COLLISION DIAGNOSIS
FOR FRONTAL COLLISION : When SRS is not activated in a collision
INFOID:0000000006113081
CAUTION:
Due to varying models and option levels, not all part s listed in the chart below apply to all vehicles.
WORK PROCEDURE
1. Before performing any of the following steps, ensur e that all vehicle body and structural repairs have been
completed.
2. Check the SRS components using the table below: Replace any SRS components showing visible signs of damage. (dents, cracks and deformation, etc.)
3. Perform self-diagnosis using CONSULT-III or air bag warning lamp. Refer to SRC-14, "
Description" for
details. Ensure entire SRS operates properly.
4. After the work is completed, perform self-diagnosis to check that no malfunction is detected. Refer to
SRC-14, "
Description".
SRS INSPECTION (FOR FRONTAL COLLISION)
Harness and connectors 1. Check connectors for poor connection, damage, and terminals for deformities.
2. Check harness for binding, chafing, cuts, or deformities.
3. If no damage is found, reinstall the harness and connectors.
4. If damaged
− REPLACE the damaged harness. Do not attempt to repair, splice or modify any
SRS harness.
Instrument panel assembly If the front passenger air bag has deployed:
REPLACE the instrument panel assembly. (integrated type)
Part Inspection
Part Inspection
Driver air bag module If the driver air bag has NOT been deployed:
1. Remove driver air bag module. Check harness cover and connectors for damage, terminals for
deformities, and harness for binding.
2. Install driver air bag module into the steering wheel to check fit and alignment with the wheel.
3. If no damage is found, reinstall with new fasteners.
4. If damaged − REPLACE. Install driver air bag module with new fasteners.
Front passenger air bag module
(if equipped) If the front passenger air bag has NOT been deployed:
1. Remove front passenger air bag module. Check harness cover and connectors for damage, ter-
minals for deformities, and harness for binding.
2. Install front passenger air bag module into the instrument panel to check fit with the instrument panel.
3. If no damage is found, reinstall with new fasteners.
4. If damaged − REPLACE. Install front passenger air bag modules with new fasteners.
Crash zone sensor If the front air bags or seat belt pre-tensioners have NOT been activated:
1. Remove the crash zone sensor. Check harness connectors for damage, terminals for deformi-
ties, and harness for binding.
2. Check for visible signs of damage (dents, cracks, deformation, etc.) of the crash zone sensor and bracket.
3. Install the crash zone sensor to check fit.
4. If no damage is found, reinstall with new fasteners.
5. If damaged − REPLACE the crash zone sensor and bracket with new fasteners.
Seat belt pre-tensioner assem-
blies
(All applicable locations: buckle,
retractor, lap outer) If the pre-tensioners have NOT been activated:
1. Remove seat belt pre-tensioners.
Check harness cover and connectors for damage , terminals for deformities, and harness for
binding.
2. Check belts for damage and anchors for loose mounting.
3. Check retractor for smooth operation.
4. Check seat belt adjuster for damage.
5. Check for deformities of the center pillar inner.
6. If the center pillar inner has no damage, REPLACE the seat belt pre-tensioner assembly.
7. If no damage is found, reinstall seat belt pre-tensioner assembly.
8. If damaged − REPLACE. Install the seat belt pre-tensioners with new fasteners.
Revision: 2010 May2011 QX56
Page 4770 of 5598

COLLISION DIAGNOSISSR-7
< BASIC INSPECTION >
C
DE
F
G
I
J
K L
M A
B
SR
N
O P
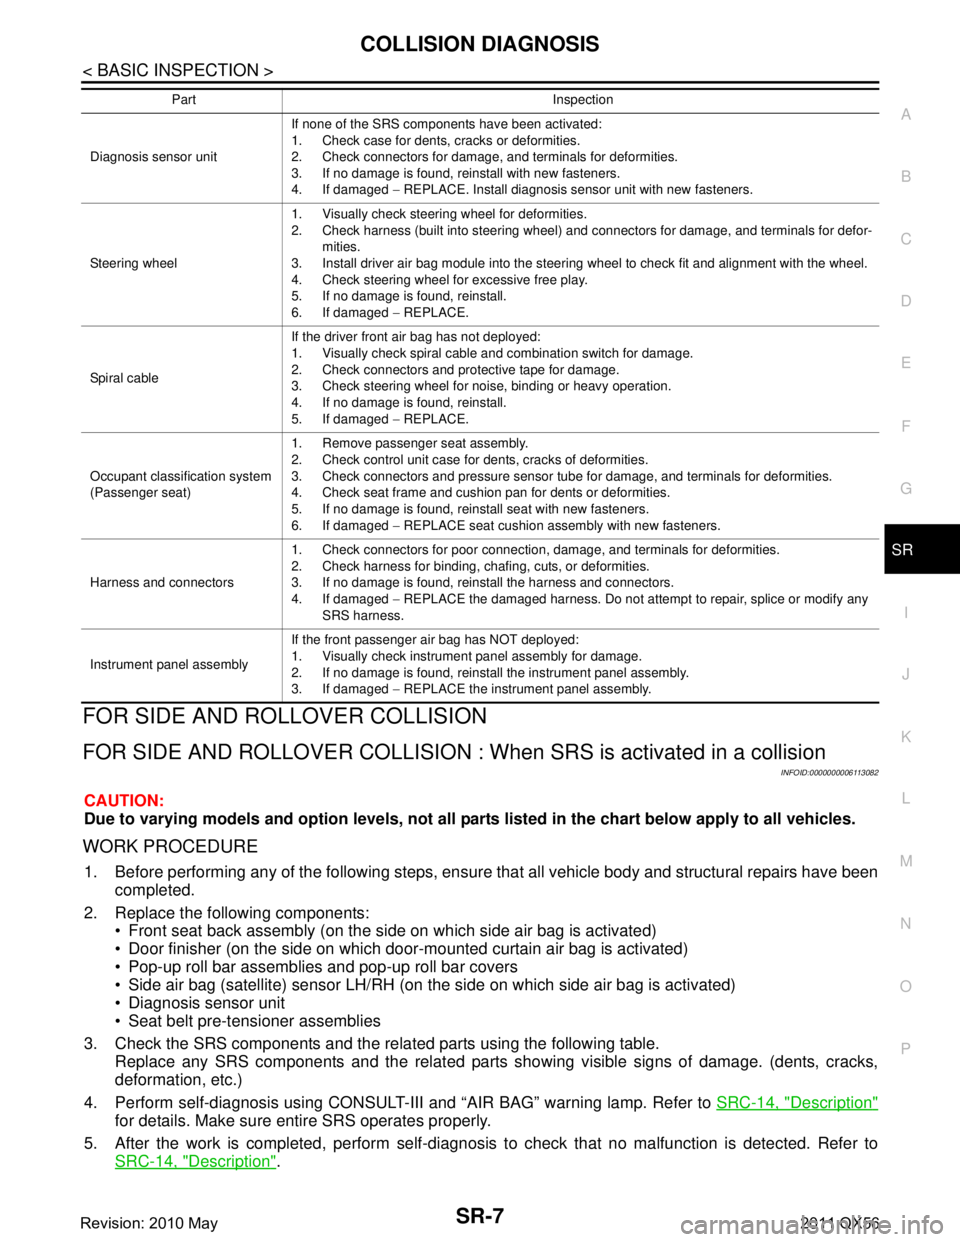
FOR SIDE AND ROLLOVER COLLISION
FOR SIDE AND ROLLOVER CO LLISION : When SRS is activated in a collision
INFOID:0000000006113082
CAUTION:
Due to varying models and option levels, not all parts listed in the chart below apply to all vehicles.
WORK PROCEDURE
1. Before performing any of the following steps, ensur e that all vehicle body and structural repairs have been
completed.
2. Replace the following components: Front seat back assembly (on the side on which side air bag is activated)
Door finisher (on the side on which door-mounted curtain air bag is activated)
Pop-up roll bar assemblies and pop-up roll bar covers
Side air bag (satellite) sensor LH/RH (on the side on which side air bag is activated)
Diagnosis sensor unit
Seat belt pre-tensioner assemblies
3. Check the SRS components and the related parts using the following table. Replace any SRS components and the related parts s howing visible signs of damage. (dents, cracks,
deformation, etc.)
4. Perform self-diagnosis using CONSULT-III and “AIR BAG” warning lamp. Refer to SRC-14, "
Description"
for details. Make sure entire SRS operates properly.
5. After the work is completed, perform self-diagnosis to check that no malfunction is detected. Refer to
SRC-14, "
Description".
Diagnosis sensor unit If none of the SRS components have been activated:
1. Check case for dents, cracks or deformities.
2. Check connectors for damage, and terminals for deformities.
3. If no damage is found, reinstall with new fasteners.
4. If damaged
− REPLACE. Install diagnosis sensor unit with new fasteners.
Steering wheel 1. Visually check steering wheel for deformities.
2. Check harness (built into steering wheel) and connectors for damage, and terminals for defor-
mities.
3. Install driver air bag module into the steering wheel to check fit and alignment with the wheel.
4. Check steering wheel for excessive free play.
5. If no damage is found, reinstall.
6. If damaged − REPLACE.
Spiral cable If the driver front air bag has not deployed:
1. Visually check spiral cable and combination switch for damage.
2. Check connectors and protective tape for damage.
3. Check steering wheel for noise, binding or heavy operation.
4. If no damage is found, reinstall.
5. If damaged
− REPLACE.
Occupant classification system
(Passenger seat) 1. Remove passenger seat assembly.
2. Check control unit case for dents, cracks of deformities.
3. Check connectors and pressure sensor tube for damage, and terminals for deformities.
4. Check seat frame and cushion pan for dents or deformities.
5. If no damage is found, reinstall seat with new fasteners.
6. If damaged
− REPLACE seat cushion assembly with new fasteners.
Harness and connectors 1. Check connectors for poor connection, damage, and terminals for deformities.
2. Check harness for binding, chafing, cuts, or deformities.
3. If no damage is found, reinstall the harness and connectors.
4. If damaged
− REPLACE the damaged harness. Do not attempt to repair, splice or modify any
SRS harness.
Instrument panel assembly If the front passenger air bag has NOT deployed:
1. Visually check instrument panel assembly for damage.
2. If no damage is found, reinstall the instrument panel assembly.
3. If damaged
− REPLACE the instrument panel assembly.
Part Inspection
Revision: 2010 May2011 QX56
Page 4780 of 5598

FRONT PASSENGER AIR BAG MODULESR-17
< REMOVAL AND INSTALLATION >
C
DE
F
G
I
J
K L
M A
B
SR
N
O P
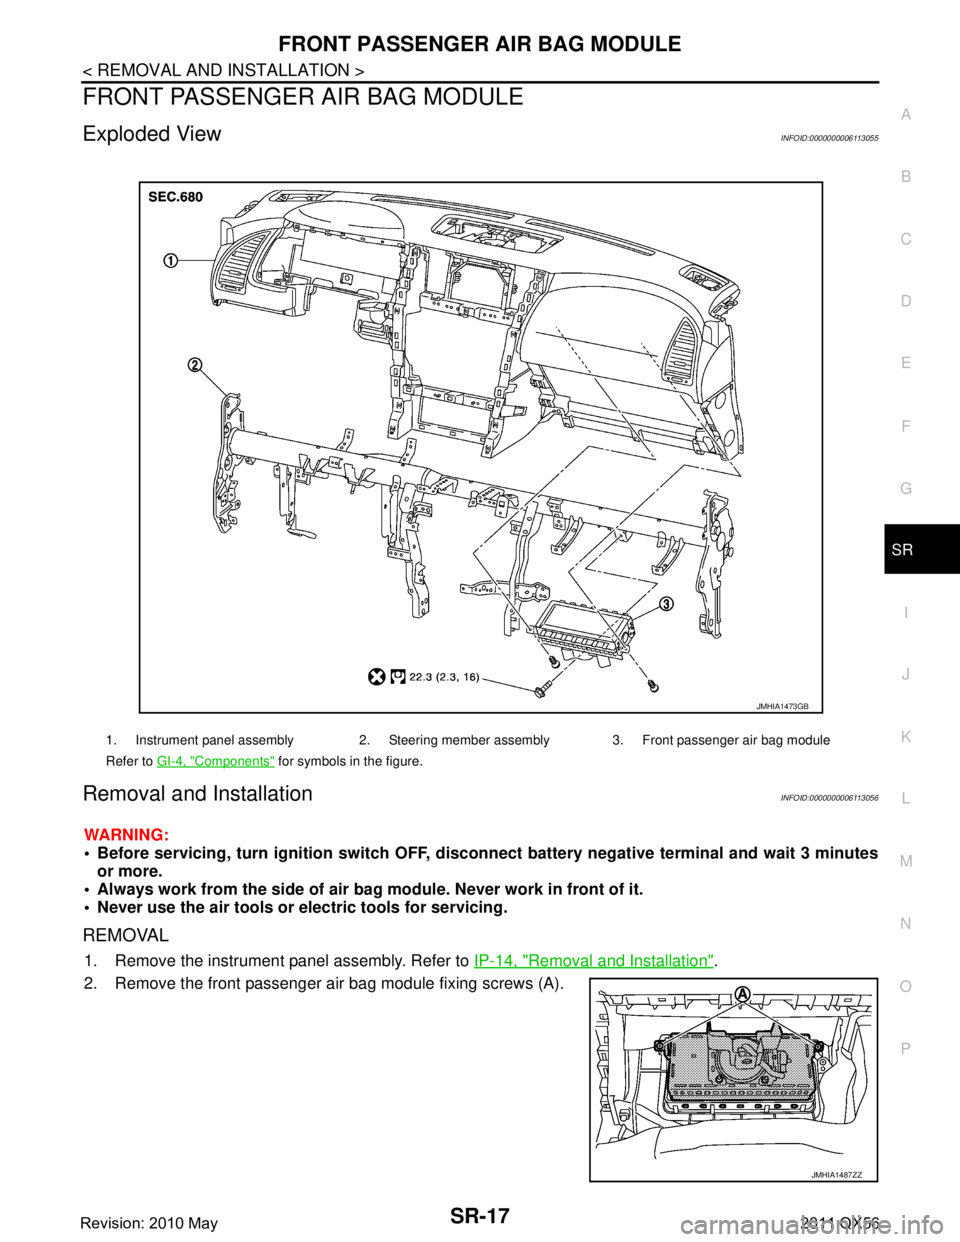
FRONT PASSENGER AIR BAG MODULE
Exploded ViewINFOID:0000000006113055
Removal and InstallationINFOID:0000000006113056
WARNING:
Before servicing, turn ignition switch OFF, disconnect battery ne gative terminal and wait 3 minutes
or more.
Always work from the side of air bag module. Never work in front of it.
Never use the air tools or el ectric tools for servicing.
REMOVAL
1. Remove the instrument panel assembly. Refer to IP-14, "Removal and Installation".
2. Remove the front passenger air bag module fixing screws (A).
1. Instrument panel assembly 2. Steering member assembly 3. Front passenger air bag module
Refer to GI-4, "
Components" for symbols in the figure.
JMHIA1473GB
JMHIA1487ZZ
Revision: 2010 May2011 QX56
Page 4799 of 5598

SRC-6
< PRECAUTION >
PRECAUTIONS
PRECAUTION
PRECAUTIONS
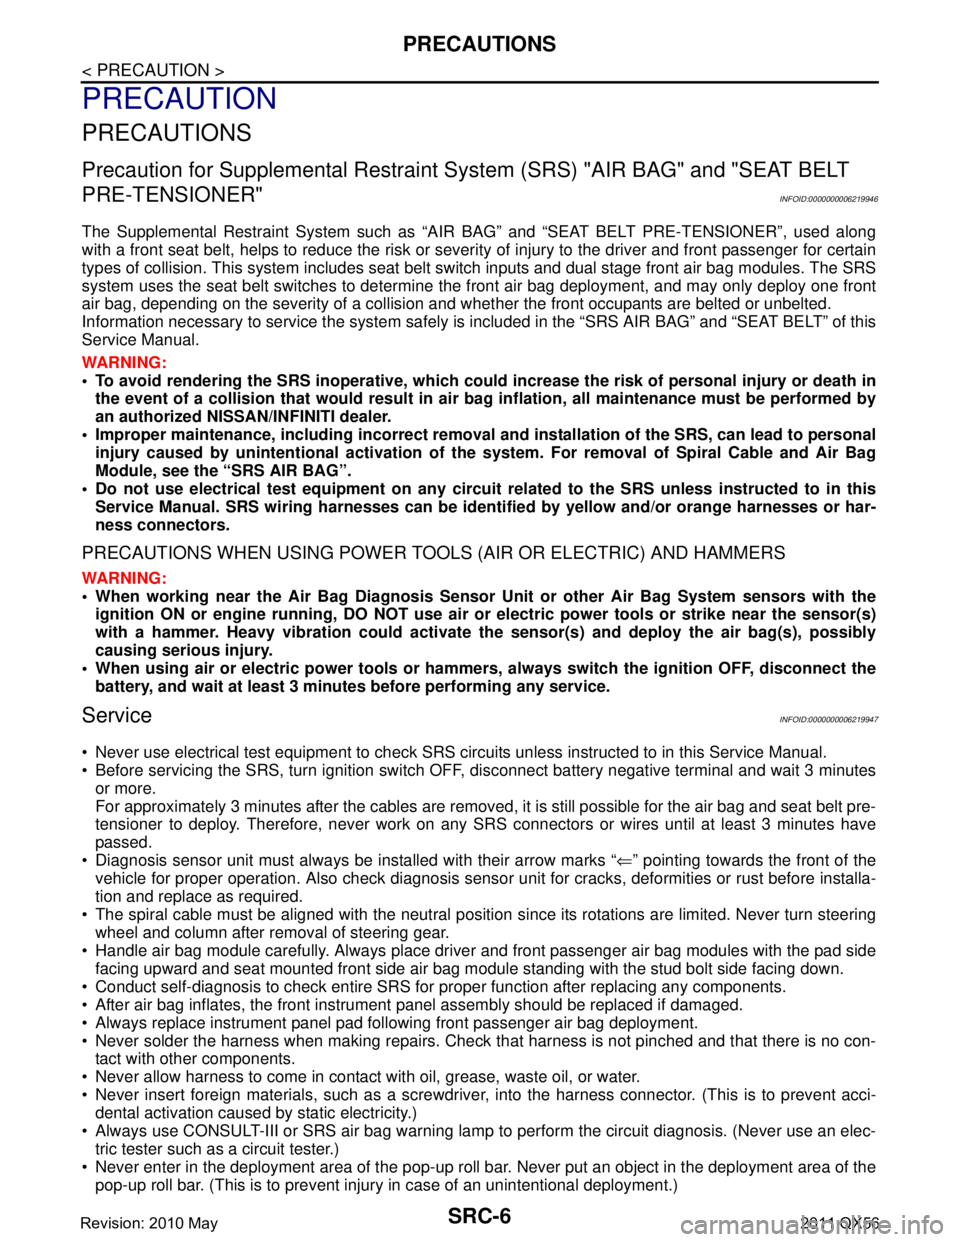
Precaution for Supplemental Restraint System (SRS) "AIR BAG" and "SEAT BELT
PRE-TENSIONER"
INFOID:0000000006219946
The Supplemental Restraint System such as “A IR BAG” and “SEAT BELT PRE-TENSIONER”, used along
with a front seat belt, helps to reduce the risk or severi ty of injury to the driver and front passenger for certain
types of collision. This system includes seat belt switch inputs and dual stage front air bag modules. The SRS
system uses the seat belt switches to determine the front air bag deployment, and may only deploy one front
air bag, depending on the severity of a collision and w hether the front occupants are belted or unbelted.
Information necessary to service the system safely is included in the “SRS AIR BAG” and “SEAT BELT” of this
Service Manual.
WARNING:
• To avoid rendering the SRS inopera tive, which could increase the risk of personal injury or death in
the event of a collision that would result in air bag inflation, all maintenance must be performed by
an authorized NISS AN/INFINITI dealer.
Improper maintenance, including in correct removal and installation of the SRS, can lead to personal
injury caused by unintent ional activation of the system. For re moval of Spiral Cable and Air Bag
Module, see the “SRS AIR BAG”.
Do not use electrical test equipmen t on any circuit related to the SRS unless instructed to in this
Service Manual. SRS wiring harnesses can be identi fied by yellow and/or orange harnesses or har-
ness connectors.
PRECAUTIONS WHEN USING POWER TOOLS (AIR OR ELECTRIC) AND HAMMERS
WARNING:
When working near the Air Bag Diagnosis Sensor Unit or other Air Bag System sensors with the ignition ON or engine running, DO NOT use air or electric power tools or strike near the sensor(s)
with a hammer. Heavy vibration could activate the sensor(s) and deploy the air bag(s), possibly
causing serious injury.
When using air or electric power tools or hammers , always switch the ignition OFF, disconnect the
battery, and wait at least 3 minu tes before performing any service.
ServiceINFOID:0000000006219947
Never use electrical test equipment to check SRS circuits unless instructed to in this Service Manual.
Before servicing the SRS, turn ignition switch OF F, disconnect battery negative terminal and wait 3 minutes
or more.
For approximately 3 minutes after the cables are removed, it is still possible for the air bag and seat belt pre-
tensioner to deploy. Therefore, never work on any SR S connectors or wires until at least 3 minutes have
passed.
Diagnosis sensor unit must always be installed with their arrow marks “ ⇐” pointing towards the front of the
vehicle for proper operation. Also chec k diagnosis sensor unit for cracks, deformities or rust before installa-
tion and replace as required.
The spiral cable must be aligned with the neutral position since its rotations are limited. Never turn steering
wheel and column after removal of steering gear.
Handle air bag module carefully. Always place driver and front passenger air bag modules with the pad side facing upward and seat mounted front side air bag module standing with the stud bolt side facing down.
Conduct self-diagnosis to check entire SRS for proper function after replacing any components.
After air bag inflates, the front instrument panel assembly should be replaced if damaged.
Always replace instrument panel pad following front passenger air bag deployment.
Never solder the harness when making repairs. Check that harness is not pinched and that there is no con-
tact with other components.
Never allow harness to come in contact with oil, grease, waste oil, or water.
Never insert foreign materials, such as a screwdriver , into the harness connector. (This is to prevent acci-
dental activation caused by static electricity.)
Always use CONSULT-III or SRS air bag warning lamp to perform the circuit diagnosis. (Never use an elec- tric tester such as a circuit tester.)
Never enter in the deployment area of the pop-up roll bar. Never put an object in the deployment area of the
pop-up roll bar. (This is to prevent injury in case of an unintentional deployment.)
Revision: 2010 May2011 QX56
Page 4843 of 5598

SRC-50
< DTC/CIRCUIT DIAGNOSIS >
B1023 PASS A/B INDCTR CKT
B1023 PASS A/B INDCTR CKT
DescriptionINFOID:0000000006219978
Suppresses the deployment of front passenger air bag when the condition of passenger seat is empty or occu-
pied with a child and child-seat. Also illuminates front passenger air bag OFF indicator lamp when the condi-
tion of passenger seat is occupied with a child-seat and ch ild. In case of malfunction the blinking of the air bag
warning lamp reports the malfunction to driver, and by the on board self-diagnosis system or CONSULT-III can
detect the cause.
OPERATION
Illuminates front passenger air bag OFF indicator when t he passenger seat is empty or occupied by a child or
a child-seat.
STRUCTURE
Front passenger air bag OFF indicator with LED illumination.
INSTALLATION
Front passenger air bag OFF indicator is inst alled at the instrument panel center.
DTC LogicINFOID:0000000006219979
DTC DETECTION LOGIC
DTC CONFIRMATION PROCEDURE
1.CHECK SELF-DIAG RESULT
With CONSULT-III
1. Turn ignition switch ON.
2. Perform “AIR BAG” Self Diagnostic Result CONSULT-III.
Without CONSULT-III
1. Turn ignition switch ON.
2. Check the air bag warning lamp status. Refer to SRC-14, "
On Board Diagnosis Function".
NOTE:
SRS does not enter diagnosis mode if no malfunction is detected in user mode.
Is malfunctioning part detected?
YES >> Refer to SRC-50, "Diagnosis Procedure".
NO >> INSPECTION END
Diagnosis ProcedureINFOID:0000000006219980
WARNING:
Before servicing, turn ignition sw itch OFF, disconnect battery negative terminal and wait at least 3
minutes. (To discharge backup capacitor.)
Never use unspecified tester or other measuring device.
DIAGNOSTIC PROCEDURE
1.CHECK HARNESS CONNECTOR
Check the connection of harness connector.
Is the inspection result normal?
YES >> GO TO 2.
NO >> Replace harness connectors.
DTC No. Trouble diagnosis name DTC detecting condition Possible cause
B1023 PASS A/B INDCTR CKT [UNIT FAIL] Passenger air bag OFF indicator circuit
is open or shorted to ground or the cir-
cuits are shorted each other Disconnection of wiring harness
Malfunction in front passenger air
bag OFF indicator
Malfunction in air bag diagnosis sen- sor unit
Revision: 2010 May2011 QX56
Page 5021 of 5598

ST-34
< REMOVAL AND INSTALLATION >
STEERING COLUMN
STEERING COLUMN
Exploded ViewINFOID:0000000006225601
Removal and InstallationINFOID:0000000006225602
REMOVAL
CAUTION:
Never give axial impact to steering column assembly during removal.
Never move steering gear assembly when removing steering column assembly.
Never rotate the steering shaft when removing steering column assembly.
1. Set the vehicle to the straight-ahead position.
2. Place the tilt to the highest level. Place the telescopic to the longest level.
3. Remove driver air bag module. Refer to SR-11, "
Removal and Installation".
4. Remove steering wheel. Refer to ST-33, "
Removal and Installation".
5. Remove instrument lower panel LH. Refer to IP-14, "
Removal and Installation".
6. Remove the steering column cover. Refer to IP-14, "
Removal and Installation".
7. Remove spiral cable. Refer to SR-14, "
Removal and Installation".
8. Remove combination switch. Refer to BCS-82, "
Removal and Installation".
9. Disconnect each switch harness connectors installed to steering column assembly.
10. Remove the upper joint mounting bolt and separate the joint from upper joint.
11. Remove steering column assembly.
1. Bracket 2. Steering column mounting bracket 3. Upper joint
4. Telescopic motor 5. Tilt motor 6. Steering column assembly
Refer to GI-4, "
Components" for symbols in the figure.
JPGIA0066GB
Revision: 2010 May2011 QX56
Page 5068 of 5598

POWER STEERING CONTROL UNITSTC-23
< REMOVAL AND INSTALLATION >
C
DE
F
H I
J
K L
M A
B
STC
N
O P
REMOVAL AND INSTALLATION
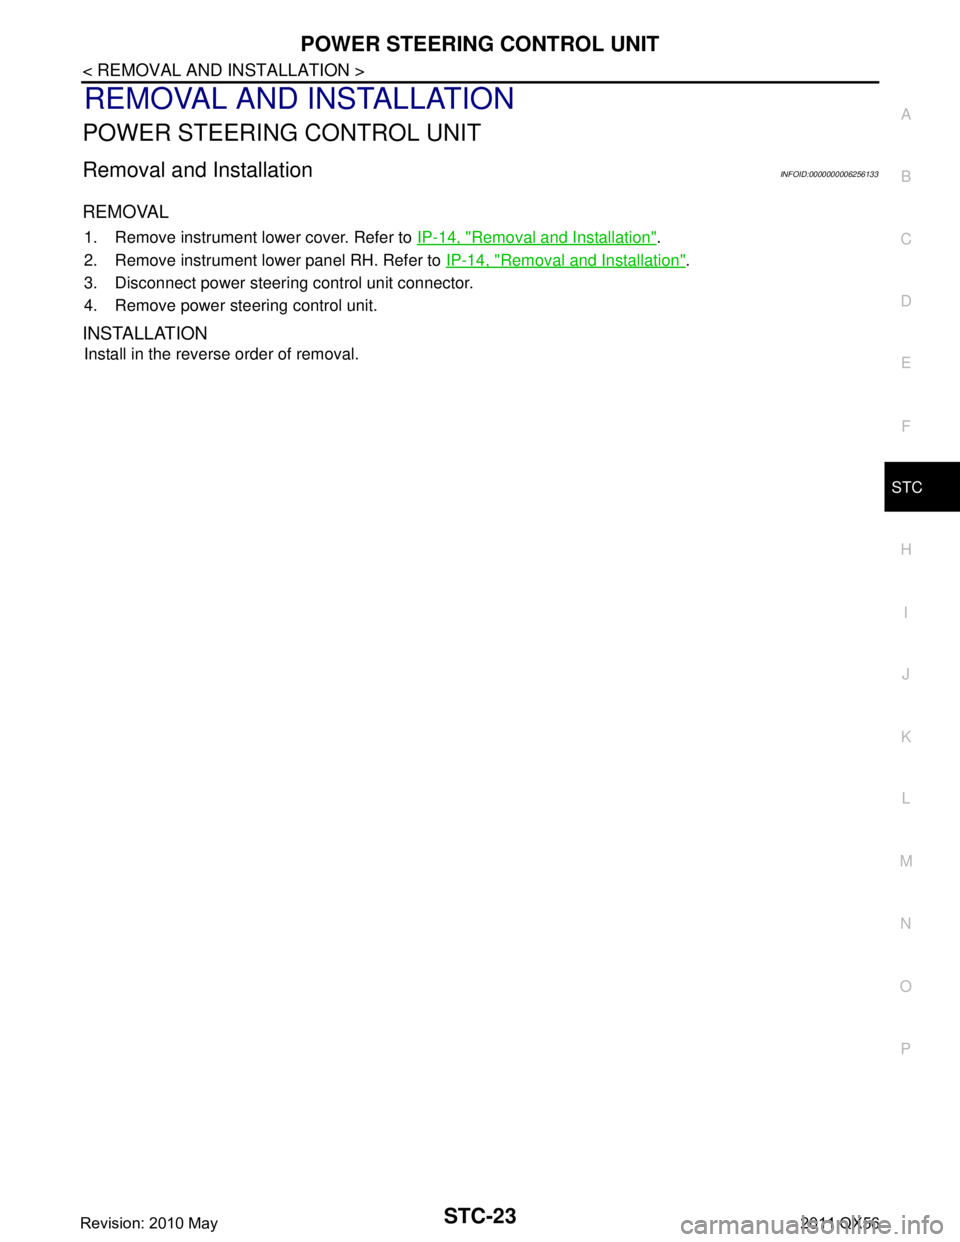
POWER STEERING CONTROL UNIT
Removal and InstallationINFOID:0000000006256133
REMOVAL
1. Remove instrument lower cover. Refer to IP-14, "Removal and Installation".
2. Remove instrument lower panel RH. Refer to IP-14, "
Removal and Installation".
3. Disconnect power steering control unit connector.
4. Remove power steering control unit.
INSTALLATION
Install in the reverse order of removal.
Revision: 2010 May2011 QX56