Page 464 of 722
Select ‘‘Wide’’ by turning the
interf ace dial then press the ENTER
button. The available settings are
displayed, and the current setting is
highlighted in blue. Select the
desired setting by turning the
interf ace dial, then press the ENTER
button.The selected setting will be
highlighted in blue f or 1 second, and
the screen returns to the play mode
in the selected setting.
Select ‘‘Zoom’’ by turning the
interf ace dial then press the ENTER
button. The available settings are
displayed, and the current setting is
highlighted in blue. Select the
desired setting by turning the
interf ace dial, then press the ENTER
button.Wide
Zoom
CONT INUED
Ultrawide Rear Entertainment System
Features
461
10/07/17 10:36:07 31TK8600_466
2011 Odyssey
Page 466 of 722
CONT INUED
Select ‘‘Music,’’ ‘‘Cinema,’’ or ‘‘Voice’’
by turning the interf ace dial, and
enter your selection by pressing the
ENTER button.
If you select ‘‘Of f ,’’ there will be no
special sound ef f ect.Language
You can change the display language
to English, French, or Spanish.
Rotate the interface dial to the
setting you want, then press the
ENTER button.
There are three selectable menus:
‘‘Language Settings,’’ ‘‘Dynamic
Range,’’ and ‘‘Angle Mark.’’ When you press the MENU button
on the rear control panel when a
DVD is not playing, the ‘‘INITIAL
SETTINGS’’ menu is displayed. INIT IA L SET T INGS Menu
Ultrawide Rear Entertainment System
Features
463
10/07/17 10:36:22 31TK8600_468
2011 Odyssey
Page 467 of 722
�Ý�Û
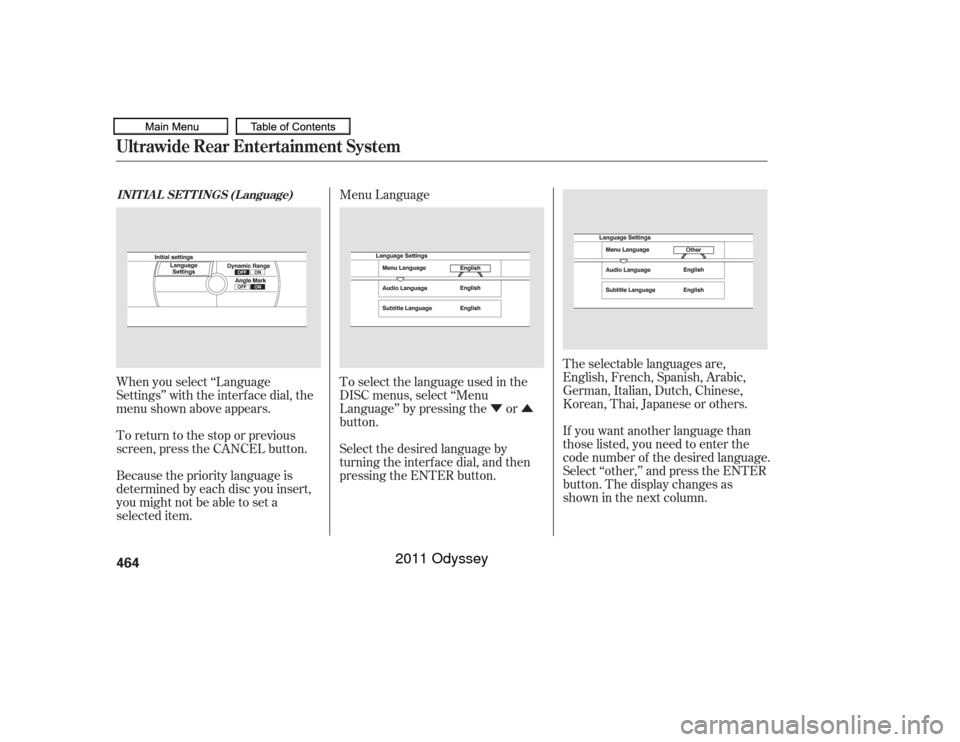
To select the language used in the
DISC menus, select ‘‘Menu
Language’’ by pressing the or
button.
Select the desired language by
turning the interf ace dial, and then
pressing the ENTER button.
Because the priority language is
determined by each disc you insert,
you might not be able to set a
selected item. To return to the stop or previous
screen, press the CANCEL button. When you select ‘‘Language
Settings’’ with the interf ace dial, the
menu shown above appears. Menu Language
The selectable languages are,
English, French, Spanish, Arabic,
German, Italian, Dutch, Chinese,
Korean, Thai, Japanese or others.
If you want another language than
those listed, you need to enter the
code number of the desired language.
Select ‘‘other,’’ and press the ENTER
button. The display changes as
showninthenextcolumn.
INIT IA L SET T INGS (L anguage)Ultrawide Rear Entertainment System464
10/07/17 10:36:32 31TK8600_469
2011 Odyssey
Page 468 of 722
If you select ‘‘No,’’ and press the
ENTER button, the display returns
to the initial screen of the ‘‘Language
Settings’’ menu.If you select ‘‘Yes,’’ the display
changes to the language code input
mode. Select the f irst digit using the
interf ace dial, and press the ENTER
button to enter it. Repeat this until all
f our digits are f illed. Press the
button on the control panel to
enter the new language code. If you made a mistake entering a
number digit, press the button
on the control panel. Then select and
enter the correct digit as described.
The display returns to the initial
‘‘Language Settings’’ menu screen.
CONT INUED
Ultrawide Rear Entertainment System
Features
465
10/07/17 10:36:40 31TK8600_470
2011 Odyssey
Page 470 of 722
Select the ‘‘Dynamic Range’’ by
turning the interf ace dial.
To turn ‘‘Dynamic Range’’ on or of f ,
select ‘‘ON’’ or ‘‘OFF’’ by turning the
interf ace dial, and then press the
ENTER button.You can set the system to display or
not display this angle mark. Select the ‘‘Angle Mark’’ by turning
the interf ace dial. If you want the
angle mark to be displayed, select
‘‘ON’’ by turning the interf ace dial,
and then press the ENTER button.
Angle Mark
When you switch to another angle
while playing a DVD, the angle mark
is displayed in the lower right corner
of the screen.
Ultrawide Rear Entertainment System
Features
467
ANGLE MARK
10/07/17 10:36:56 31TK8600_472
2011 Odyssey
Page 472 of 722

Error Message Cause
Insert a dif f erent disc. If the new
disc plays, there is a problem with
the f irst disc. If the error message
cycle repeats and you cannot clear it,
take your vehicle to a dealer. Theaudiosystemwilltrytoplaythe
disc. If there is still a problem, the
error message will reappear. Press
the eject button, and pull out the disc. If you see an error message in the
display while playing a disc, press
the eject button. After ejecting the
disc, check it for damage or
deformation. If there is no damage,
insert the disc again. Thechartontherightexplainsthe
error messages you may see in the
display while playing a disc. Solution
FOCUS Error
Mechanical Error
High Temperature
Invalid region code
DVD format not
supported
Mechanical ErrorPress the disc eject button, and remove the disc.
Check for an error indication. Insert the disc
again. If the code does not disappear, consult
your dealer.
Will disappear when the temperature returns to
normal.
The disc is not playable in this unit. Eject the
disc, and insert a disc compatible with this
system.
Press the EJECT button and pull out the disc.
Check the disc for serious damage, signs of
deformation, excessive scratches, and/or dirt
(see page
353). Insert the disc again. If the code
does not disappear, or the disc cannot be
removed, consult your dealer. Do not try to
force the disc out of the player.
On vehicles with navigation systemDVD Player Error Messages
Ultrawide Rear Entertainment System
Features
469
DISC ERROR
MECH ERROR HEAT ERRORREGION ERR
UNSUPPORTED
PUSH EJECTBAD DISC
PLEASE CHECK
OWNERS MANUAL
10/07/17 10:37:14 31TK8600_474
2011 Odyssey
Page 478 of 722

The compass may need to be
manually calibrated af ter exposure to
a strong magnetic field. If the
compassseemstobecontinually
showing the wrong direction and is
not self -calibrating, or the compass
display is blinking with the CAL
indicator on, do the f ollowing
procedure.Do this procedure in an open
area, away f rom buildings, power
lines, and other vehicles.
Turn the ignition switch to the ON
(II) position.
Press and hold the SETUP button
f or about 5 seconds. The display
shows you the compass setting
menu items.
When you turn the ignition switch to
the ON (II) position, the compass is
self-calibrating, then the compass
display is shown in the display. Compass operation can be af f ected
by driving near power lines or
stations, across bridges, through
tunnels, over railroad crossings, past
large vehicles, or driving near large
objects that can cause a magnetic
disturbance. It can also be af f ected
by accessories such as antennas and
roof racks that are mounted by
magnets.
1.
2.
CONT INUED
On EX and EX-L models withoutnavigation system
Compass Calibration
Compass Operation
Compass
Features
475
NOTE:
U.S. EX models
EX-L and Canadian EX models U.S. EX models
EX-L and Canadian EX models
10/07/19 15:54:24 31TK8600_480
2011 Odyssey
Page 479 of 722
Turn the selector knob to select
‘‘CALIBRATION.’’While setting the compass, press
the RETURN button to go back to
the previous display. Pressing the
SETUP button will cancel the
compass setting mode.When the calibration is successf ully
completed, the CAL indicator goes
of f and the compass display will stop
blinking and show an actual heading.
The audio system is not related to
the compass system. Even if the
compasssystemiscalibrating,the
display returns to the normal display
which you last selected.
Drive the vehicle slowly in two
complete circles.
Press the selector knob to enter
your selection. The display shows
you ‘‘PUSH CAL START’’ or ‘‘Start
Calibration.’’ Press the selector knob. The
compass display is blinking and
the CAL indicator is shown.
3. 4. 5.
6.
Compass476U.S. EX models
EX-L and Canadian EX models
U.S. EX models
EX-L and Canadian EX models
10/07/19 15:54:33 31TK8600_481
2011 Odyssey