Page 97 of 722

�Î�Î�Î
�Î �Î
�Î �Î
�Î
�Î
�µ�™�¶ �™
�µ�™�¶ �™
�ΠLOW
MIN
LANGUAGE
SELECTION
ADJUST OUTSIDE
TEMP. DISPLAY
TRIP A RESET WITH
REFUEL
ELAPSED TIME
RESET
MEMORY POSIT ION
LINK
INTERIOR LIGHT
DIMMING T IME
HEADLIGHT AUT O
OFF TIMER
AUTO LIGHT
SENSITIVITY Changes the language used in the display.
Changes the outside temperature reading above or
below its current reading.
Causes trip meter A and the average fuel economy
to reset when you refuel.
Resets the elapsed time of your current trip.
Changes the driver’s seat and the outside mirror
positions to a stored setting.
Changes how long (in seconds) the interior lights
stay on after you close the doors and the tailgate.
Changes how long (in seconds) the exterior lights
stay on after you close the driver’s door.
Changes the timing of when the headlights come
on. The headlight switch needs to be in the AUTO
position.
MET ER SET UP
(P.100)
POSITION SETUP
(P.109)
LIGHTING
SETUP
(P.112)
101
103
105
107
110
113
115
117
ENGLISH
FRENCH
SPANISH
5°F 0°F 5°F (U.S.)
3°C 0°C 3°C
(Canada)
ON
OFF
IGN OFF
TRIP A RESET
TRIP B RESET
ON
OFF
15 sec
30 sec
60 sec
0sec
15 sec
30 sec
60 sec
MAX
HIGH
MID
Default setting
:
Menu Item Description
Group Setup Page
Setting Option
Multi-Inf ormation Display94
10/07/17 09:47:19 31TK8600_099
2011 Odyssey
Page 113 of 722
�Û
�Ý �Û�Ý
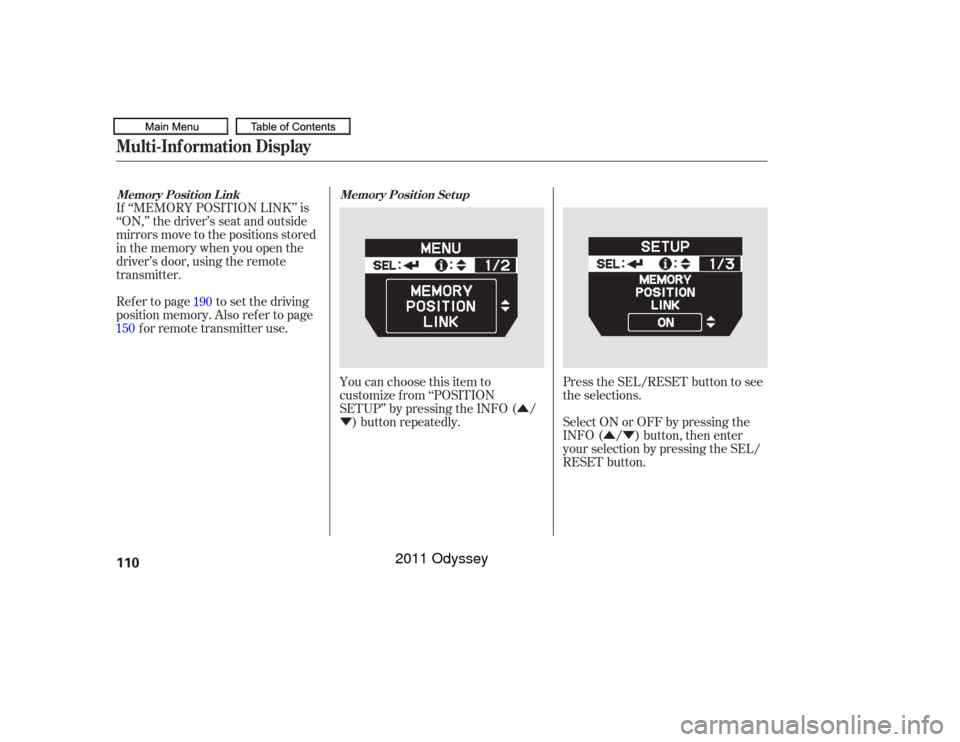
If ‘‘MEMORY POSITION LINK’’ is
‘‘ON,’’ the driver’s seat and outside
mirrors move to the positions stored
in the memory when you open the
driver’s door, using the remote
transmitter.
Refertopage tosetthedriving
position memory. Also ref er to page
forremotetransmitteruse.
You can choose this item to
customize f rom ‘‘POSITION
SETUP’’ by pressing the INFO ( /) button repeatedly. Press the SEL/RESET button to see
the selections.
Select ON or OFF by pressing the
INFO ( / ) button, then enter
your selection by pressing the SEL/
RESET button.
190
150
Memory Posit ion Set up
Memory Posit ion L ink
Multi-Inf ormation Display110
10/07/17 09:49:00 31TK8600_115
2011 Odyssey
Page 145 of 722
. This
causes all outside turn signals and
both indicators in the instrument
panel to f lash. Use the")
Push the button between the center
vents to turn on the hazard warning
lights (f our-way f lashers). This
causes all outside turn signals and
both indicators in the instrument
panel to f lash. Use the hazard
warning lights if you need to park in
a dangerous area near heavy traffic,
or if your vehicle is disabled.The rear window def ogger clears f og,
frost,andthinicefromthewindow.
Push the def ogger button to turn it
onandoff.Pushingthisbuttonalso
turns the mirror heaters on and of f .
The indicator in the button comes on
to show the def ogger is on. If you do
not turn it of f , the def ogger will shut
itself of f af ter 10 to 30 minutes
(depending on the ambient
temperature). It also shuts of f when
you turn of f the ignition switch. You have to turn it on again when you
restart the vehicle.
The def ogger will shut itself of f
within about 20 minutes.
Make sure the rear window is clear
and you have good visibility bef ore
starting to drive.
The def ogger wires on the inside of
the rear window can be accidentally
damaged. When cleaning the glass,
always wipe side-to-side.
Pushing this button also turns the
mirror heaters on or of f . For more
inf ormation, see page .
199
On LX models
If equipped
Hazard Warning Button Rear Window Def oggerHazard Warning Button, Rear Window Def ogger142
Except U.S.
LX model
U.S. LX
model
10/07/17 09:52:49 31TK8600_147
2011 Odyssey
Page 155 of 722
Here are the settings activated with
the remote:Customized settings
(see page ).
Driving position memory
(see page ).
When you unlock and open the
driver’s door with the remote
transmitter, the driver’s seat (except
the power lumbar feature) and
outside mirrors start to move to the
positions stored in memory. The
indicator in the related memory
button to the remote comes on.
When you unlock the door with your
remote, each remote activates the
keyless memory settings related to
that remote. The driver’s ID (Driver
1orDriver2)isshownontheback
of each remote.
You can customize the power
tailgate keyless unlock mode setting
(see page or ).
93
128 165
190
On Touring models
Remote Transmitter
Recalling a Memorized DrivingPosition
152
With Driver 1 With Driver 2
10/07/17 09:54:09 31TK8600_157
2011 Odyssey
Page 193 of 722
 position. You cannot add a
new seat position in memory
unless the ignition switch is in the
ON")
Store a driver’s seat position only
when the vehicle is parked.Turn the ignition switch to the ON
(II) position. You cannot add a
new seat position in memory
unless the ignition switch is in the
ON (II) position. You can recall a
memorized position with the
ignition switch in any position.
Adjust the seat to a comfortable
position (see page ).
Adjust the outside mirrors f or best
visibility (see page ).
Your vehicle has a memory feature
f or the driver’s seat and outside
mirror positions.
Two seat and outside mirror
positionscanbestoredinseparate
memories. You select a memorized
position by pushing the appropriate
button or using the appropriate
remote transmitter (Driver 1 or
Driver 2).
You can change the ‘‘MEMORY
POSITION LINK’’ setting on the
multi-inf ormation display (see page
). Press and release the SET button
on the driver’s door. You will hear
a beep. Immediately press and
hold one of the memory buttons (1
or 2) until you hear two beeps.
The indicator in the memory
button will come on. The current
positions of the driver’s seat and
outside mirrors are now stored.
1.
2.
3.
4.
110 175
198
On Touring models
Storing a Driving Position in
Memory
Driving Position Memory System190
MEMORY BUTTONS
SET BUTTON
10/07/17 09:59:45 31TK8600_195
2011 Odyssey
Page 194 of 722

Fail to press a memory button
within 5 seconds.
Readjust the seat position.
Readjusting the outside mirror
position.
All stored driving positions will be
lost if your vehicle’s battery goes
dead or is disconnected. Each memory button stores only one
driving position. Storing a new
position erases the previous setting
stored in that button’s memory. If
you want to add a new position while
retaining the current one, use the
other memory button. To cancel the storing procedure
af ter pressing the SET button, do
any of the f ollowing: Pressing the SET button again
within 5 seconds. To select a memorized position, do
this:
Make sure the shif t lever is in the
Park (P) position.
Press the desired memory button
(1 or 2) until you hear a beep.
The system will move the seat and
outside mirrors to the memorized
positions. The indicator in the
selected memory button will f lash
during movement. When the
adjustments are complete, you will
hear two beeps, and the indicator will
remain on. To stop the system’s automatic
adjustment, do any of these actions:
Adjust the outside mirrors. Shif t out of Park. Push any of the adjustment
switches f or the seat.
If desired, you can use the
adjustment switches to change the
positions of the seat or outside
mirrors af ter they are in their
memorized positions. If you change
the memorized position, the
indicator in the memory button will
go out. To keep this driving position
f or later use, you must store it in the
driving position memory. Press any button on the driver’s
door:SET,1,or2.
1.
2. Selecting a Memorized Position
Driving Position Memory System
Instruments and Controls
191
10/07/17 09:59:57 31TK8600_196
2011 Odyssey
Page 200 of 722
Keeptheinsideandoutsidemirrors
clean and adjusted f or best visibility.
Be sure to adjust the mirrors bef ore
you start driving.
The inside mirror has day and night
positions. The night position reduces
glare f rom headlights behind you.
Flip the tab on the bottom edge of
the mirror to select the day or night
position.The inside mirror can automatically
darken to reduce glare. To turn on
this feature, press the button on the
bottom of the mirror. The AUTO
indicator comes on as a reminder.
When it is on, the mirror darkens
when it senses the headlights of a
vehicle behind you, then returns to
normal visibility when the lights are
gone. Press the button again to turn
of f this f eature.
On EX-L and Touring models
On LX, EX models
Mirrors
Instruments and Controls
197
There is also a sensor on the back of
the mirror. Items hung on the mirror
may block this sensor and af f ect its
perf ormance.
10/07/17 10:00:41 31TK8600_202
2011 Odyssey
Page 201 of 722
Move the selector switch to L
(driver’s side) or R (passenger’s
side). Turn the ignition switch to the ON
(II) position.When you f inish, move the
selector switch to the center (off)
position. This turns the
adjustment switch of f to keep your
settings. Push the appropriate edge of the
adjustment switch to move the
mirrorright,left,up,ordown.To turn the feature off, place the
switch in the center position. To tilt the passenger’s mirror,
place the switch in the right
position. To tilt the driver’s mirror, place
the selector switch in the left
position.
Both outside door mirrors have a
reverse tilt f eature. When in reverse,
the selected mirror will tilt down
slightly to improve your view as you
parallel park. Shif ting out of reverse
will return the mirror to its original
position.
1.
2. 3.
If equipped
Adjusting the Power Mirrors
Reverse Tilt Door MirrorMirrors198
ADJUSTMENT SWITCH
SELECTOR SWITCH
10/07/17 10:00:51 31TK8600_203
2011 Odyssey
.
Driving position memory
(see page ).
When you unlock and open the
driver’s door with the remote
transmitter, the driv")

 or R (passenger’s
side). Turn the ignition switch to the ON
(II) position.When you f inish, move the
selector switch to the center (off)
position. Thi")