2011 FORD KUGA air condition
[x] Cancel search: air conditionPage 1164 of 2057
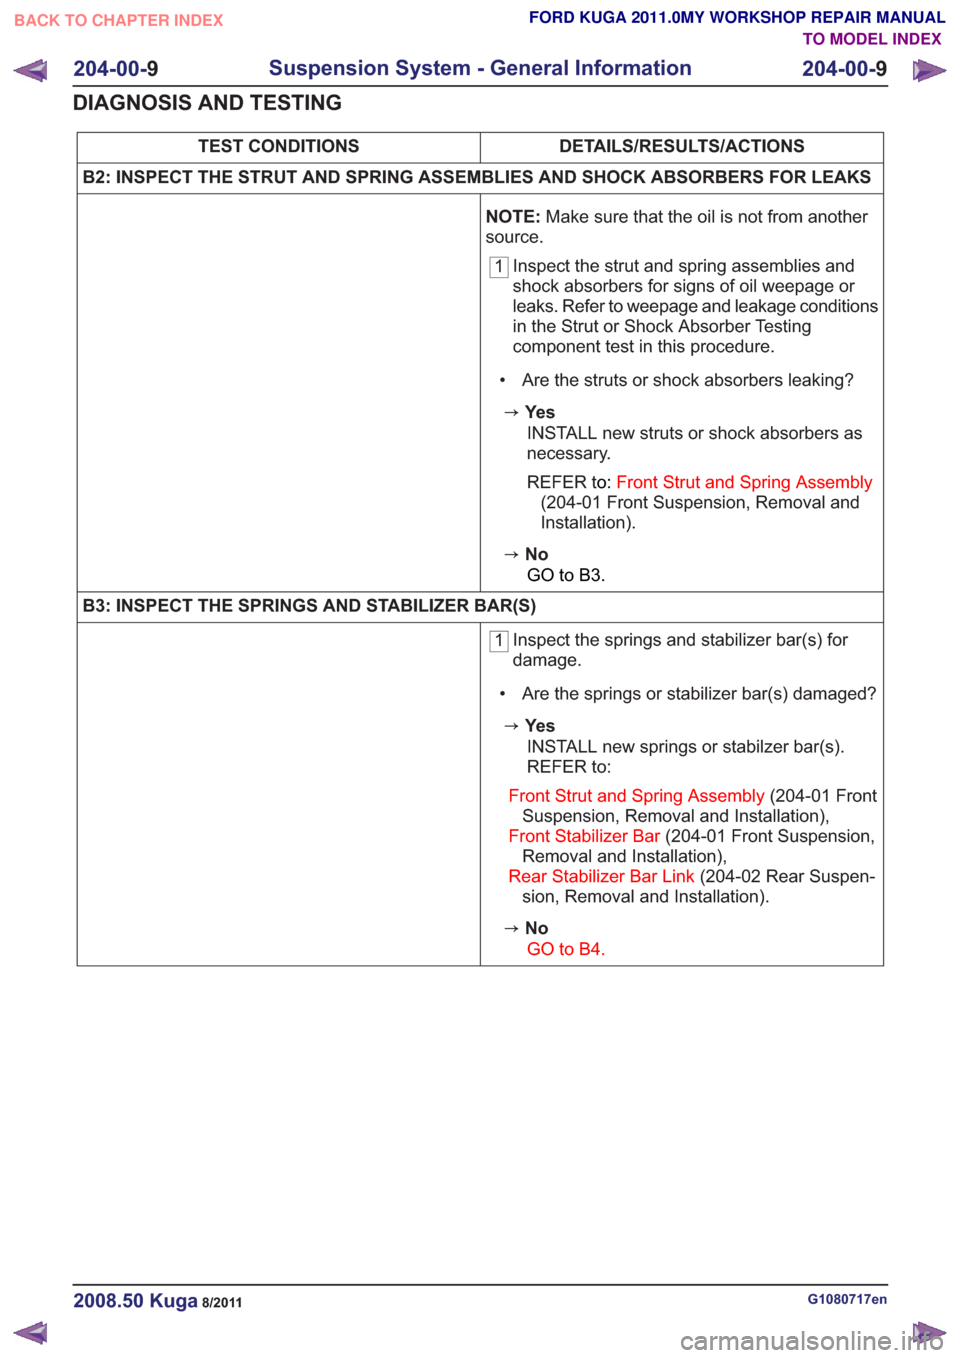
DETAILS/RESULTS/ACTIONS
TEST CONDITIONS
B2: INSPECT THE STRUT AND SPRING ASSEMBLIES AND SHOCK ABSORBERS FOR LEAKS
NOTE:Make sure that the oil is not from another
source.
1 Inspect the strut and spring assemblies and
shock absorbers for signs of oil weepage or
leaks. Refer to weepage and leakage conditions
in the Strut or Shock Absorber Testing
component test in this procedure.
• Are the struts or shock absorbers leaking?
zYe s INSTALL new struts or shock absorbers as
necessary.
REFER to: Front Strut and Spring Assembly
(204-01 Front Suspension, Removal and
Installation).
zNo
GO to B3.
B3: INSPECT THE SPRINGS AND STABILIZER BAR(S)
1 Inspect the springs and stabilizer bar(s) for
damage.
• Are the springs or stabilizer bar(s) damaged?
zYe s INSTALL new springs or stabilzer bar(s).
REFER to:
Front Strut andSpring Assembly (204-01 Front
Suspension, Removal and Installation),
Front Stabilizer Bar (204-01 Front Suspension,
Removal and Installation),
Rear Stabilizer Bar Link (204-02 Rear Suspen-
sion, Removal and Installation).
zNo
GO to B4.
G1080717en2008.50 Kuga8/2011
204-00- 9
Suspension System - General Information
204-00- 9
DIAGNOSIS AND TESTING
TO MODEL INDEX
BACK TO CHAPTER INDEX
FORD KUGA 2011.0MY WORKSHOP REPAIR MANUAL
Page 1165 of 2057
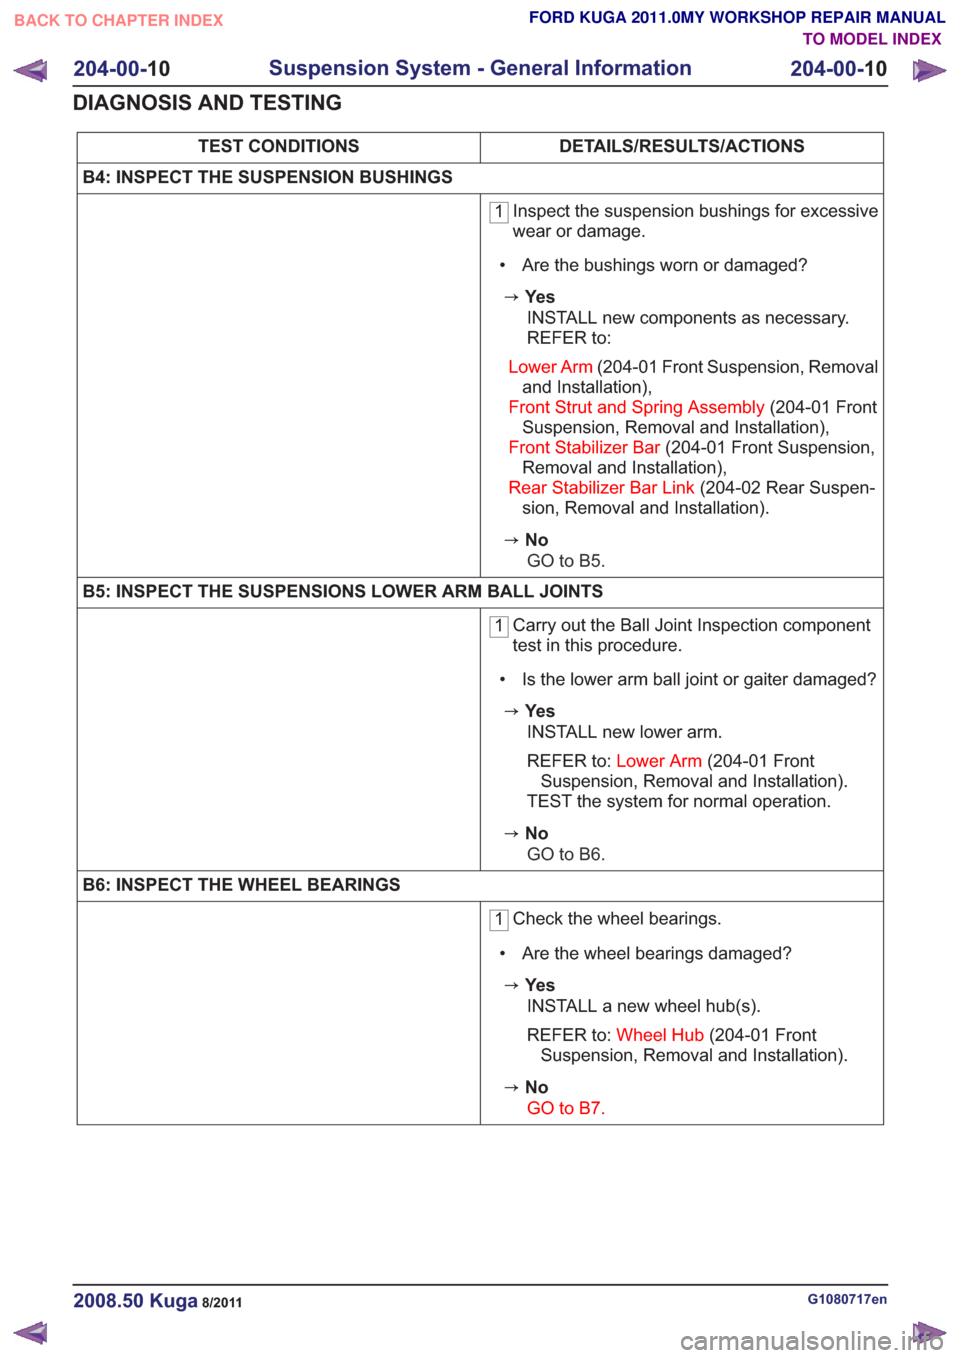
DETAILS/RESULTS/ACTIONS
TEST CONDITIONS
B4: INSPECT THE SUSPENSION BUSHINGS
1 Inspect the suspension bushings for excessive
wear or damage.
• Are the bushings worn or damaged?
zYe s INSTALL new components as necessary.
REFER to:
Lower Arm (204-01 Front Suspension, Removal
and Installation),
Front Strut and Spring Assembly (204-01 Front
Suspension, Removal and Installation),
Front Stabilizer Bar (204-01 Front Suspension,
Removal and Installation),
Rear Stabilizer Bar Link (204-02 Rear Suspen-
sion, Removal and Installation).
zNo
GO to B5.
B5: INSPECT THE SUSPENSIONS LOWER ARM BALL JOINTS
1 Carry out the Ball Joint Inspection component
test in this procedure.
• Is the lower arm ball joint or gaiter damaged?
zYe s INSTALL new lower arm.
REFER to: Lower Arm (204-01 Front
Suspension, Removal and Installation).
TEST the system for normal operation.
zNo
GO to B6.
B6: INSPECT THE WHEEL BEARINGS
1 Check the wheel bearings.
• Are the wheel bearings damaged?
zYe s INSTALL a new wheel hub(s).
REFER to: Wheel Hub (204-01 Front
Suspension, Removal and Installation).
zNo
GO to B7.
G1080717en2008.50 Kuga8/2011
204-00- 10
Suspension System - General Information
204-00- 10
DIAGNOSIS AND TESTING
TO MODEL INDEX
BACK TO CHAPTER INDEX
FORD KUGA 2011.0MY WORKSHOP REPAIR MANUAL
Page 1166 of 2057
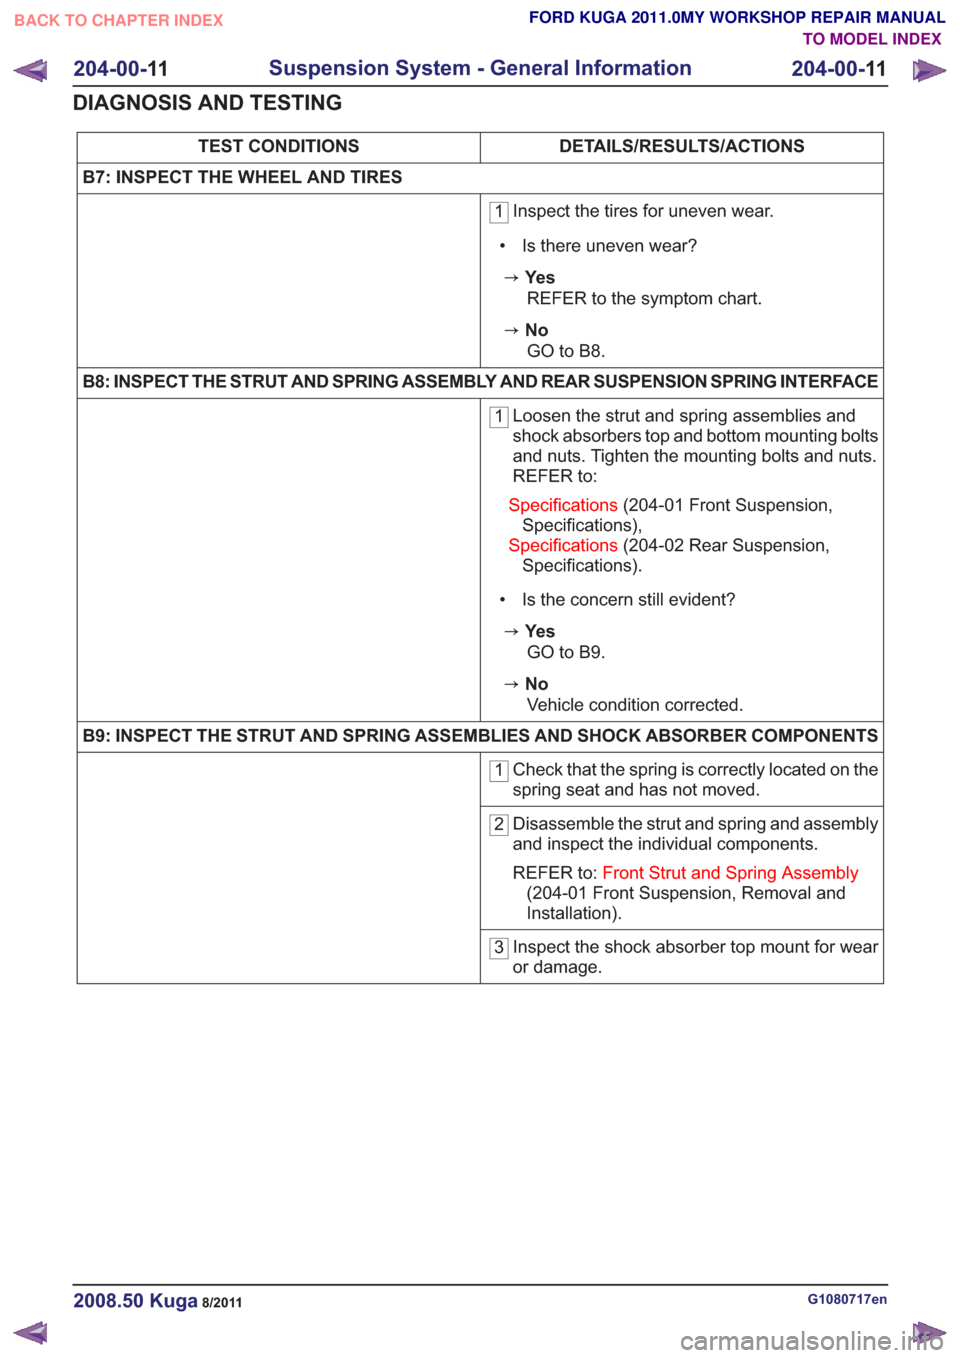
DETAILS/RESULTS/ACTIONS
TEST CONDITIONS
B7: INSPECT THE WHEEL AND TIRES
1 Inspect the tires for uneven wear.
• Is there uneven wear?
zYe s REFER to the symptom chart.
zNoGO to B8.
B8: INSPECT THE STRUT AND SPRING ASSEMBLY AND REAR SUSPENSION SPRING INTERFACE
1 Loosen the strut and spring assemblies and
shock absorbers top and bottom mounting bolts
and nuts. Tighten the mounting bolts and nuts.
REFER to:
Specifications (204-01 Front Suspension,
Specifications),
Specifications (204-02 Rear Suspension,
Specifications).
• Is the concern still evident?
zYe s GO to B9.
zNoVehicle condition corrected.
B9: INSPECT THE STRUT AND SPRING ASSEMBLIES AND SHOCK ABSORBER COMPONENTS
1 Check that the spring is correctly located on the
spring seat and has not moved.
2Disassemble the strut and spring and assembly
and inspect the individual components.
REFER to:
Front Strut and Spring Assembly
(204-01 Front Suspension, Removal and
Installation).
3 Inspect the shock absorber top mount for wear
or damage.
G1080717en2008.50 Kuga8/2011
204-00-
11
Suspension System - General Information
204-00- 11
DIAGNOSIS AND TESTING
TO MODEL INDEX
BACK TO CHAPTER INDEX
FORD KUGA 2011.0MY WORKSHOP REPAIR MANUAL
Page 1167 of 2057
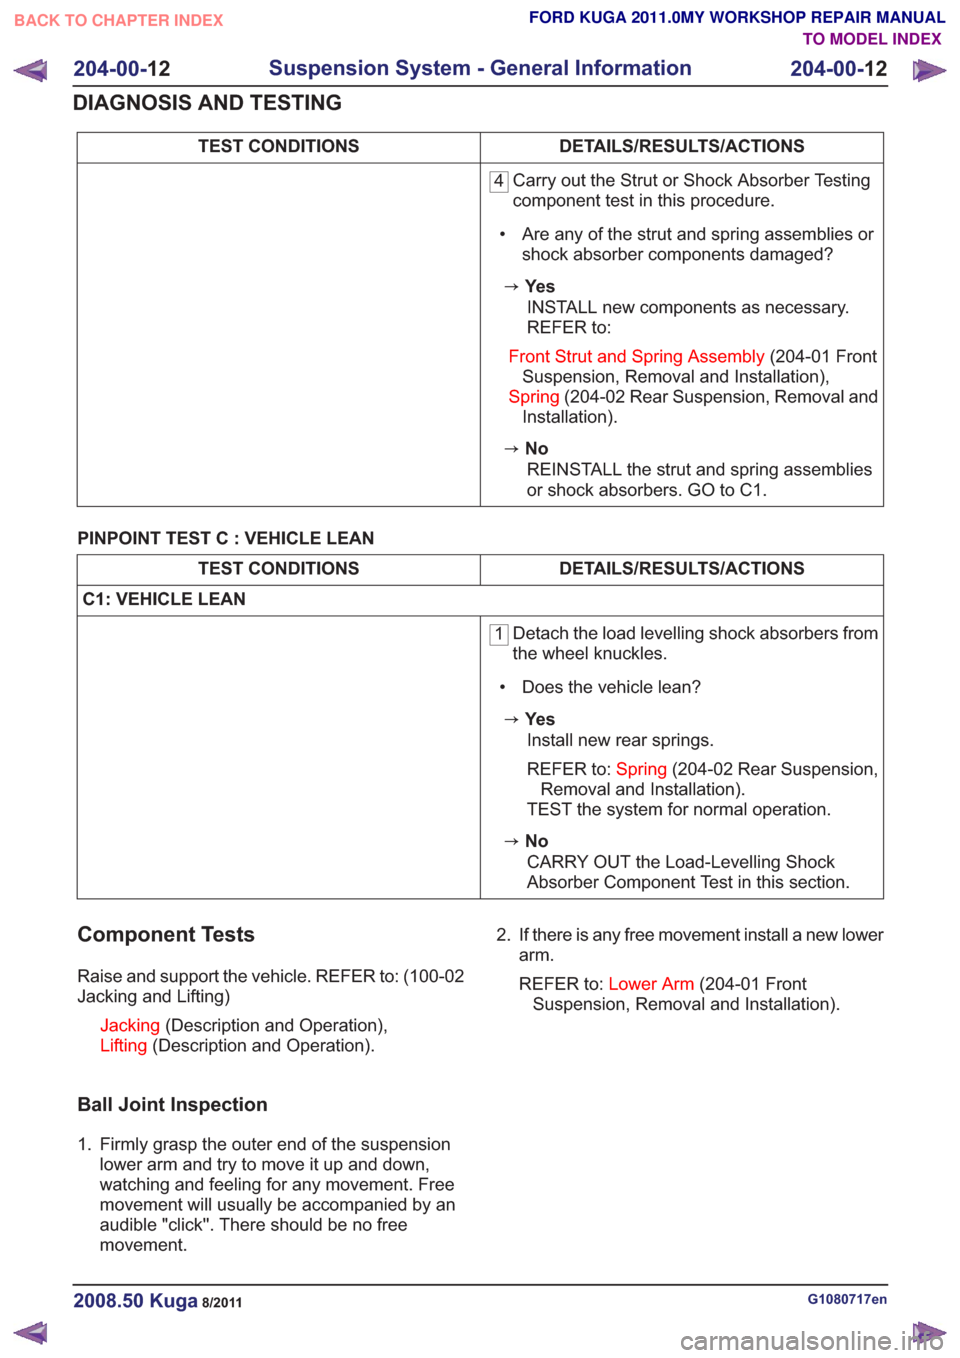
DETAILS/RESULTS/ACTIONS
TEST CONDITIONS
4 Carry out the Strut or Shock Absorber Testing
component test in this procedure.
• Are any of the strut and spring assemblies or shock absorber components damaged?
zYe s
INSTALL new components as necessary.
REFER to:
Front Strut and Spring Assembly (204-01 Front
Suspension, Removal and Installation),
Spring (204-02 Rear Suspension, Removal and
Installation).
zNo
REINSTALL the strut and spring assemblies
or shock absorbers. GO to C1.
PINPOINT TEST C : VEHICLE LEAN
DETAILS/RESULTS/ACTIONS
TEST CONDITIONS
C1: VEHICLE LEAN
1 Detach the load levelling shock absorbers from
the wheel knuckles.
• Does the vehicle lean?
zYe s Install new rear springs.
REFER to: Spring(204-02 Rear Suspension,
Removal and Installation).
TEST the system for normal operation.
zNo
CARRY OUT the Load-Levelling Shock
Absorber Component Test in this section.
Component Tests
Raise and support the vehicle. REFER to: (100-02
Jacking and Lifting)
Jacking (Description and Operation),
Lifting (Description and Operation).
Ball Joint Inspection
1. Firmly grasp the outer end of the suspension
lower arm and try to move it up and down,
watching and feeling for any movement. Free
movement will usually be accompanied by an
audible "click''. There should be no free
movement. 2. If there is any free movement install a new lower
arm.
REFER to: Lower Arm (204-01 Front
Suspension, Removal and Installation).
G1080717en2008.50 Kuga8/2011
204-00- 12
Suspension System - General Information
204-00- 12
DIAGNOSIS AND TESTING
TO MODEL INDEX
BACK TO CHAPTER INDEX
FORD KUGA 2011.0MY WORKSHOP REPAIR MANUAL
Page 1168 of 2057
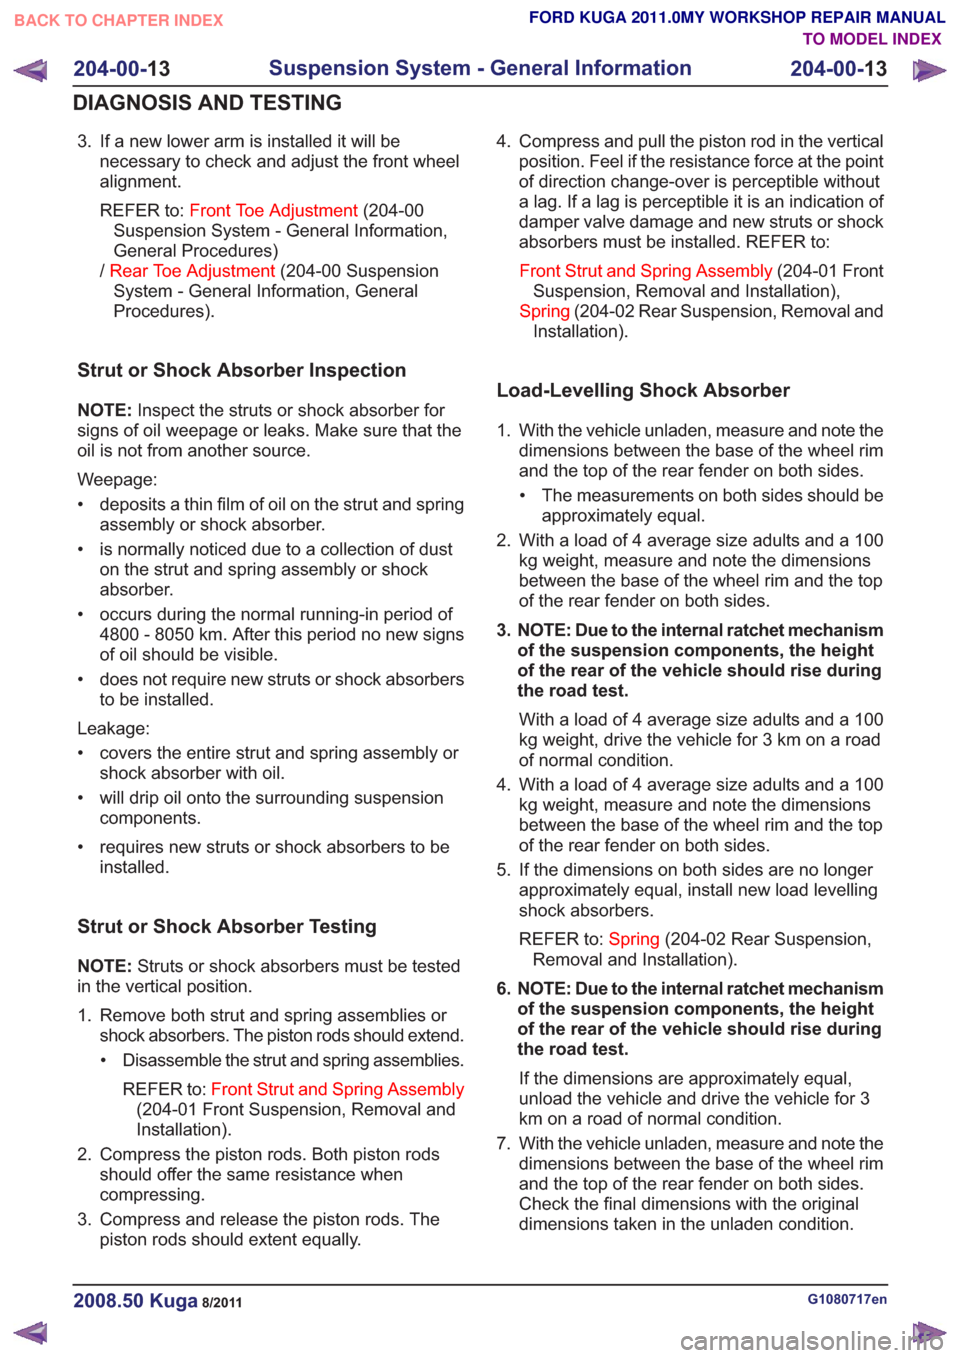
3. If a new lower arm is installed it will benecessary to check and adjust the front wheel
alignment.
REFER to: Front Toe Adjustment (204-00
Suspension System - General Information,
General Procedures)
/ Rear Toe Adjustment (204-00 Suspension
System - General Information, General
Procedures).
Strut or Shock Absorber Inspection
NOTE: Inspect the struts or shock absorber for
signs of oil weepage or leaks. Make sure that the
oil is not from another source.
Weepage:
• deposits a thin film of oil on the strut and spring assembly or shock absorber.
• is normally noticed due to a collection of dust on the strut and spring assembly or shock
absorber.
• occurs during the normal running-in period of 4800 - 8050 km. After this period no new signs
of oil should be visible.
• does not require new struts or shock absorbers to be installed.
Leakage:
• covers the entire strut and spring assembly or shock absorber with oil.
• will drip oil onto the surrounding suspension components.
• requires new struts or shock absorbers to be installed.
Strut or Shock Absorber Testing
NOTE: Struts or shock absorbers must be tested
in the vertical position.
1. Remove both strut and spring assemblies or shock absorbers. The piston rods should extend.
• Disassemble the strut and spring assemblies.
REFER to: Front Strut and Spring Assembly
(204-01 Front Suspension, Removal and
Installation).
2. Compress the piston rods. Both piston rods should offer the same resistance when
compressing.
3. Compress and release the piston rods. The piston rods should extent equally. 4. Compress and pull the piston rod in the vertical
position. Feel if the resistance force at the point
of direction change-over is perceptible without
a lag. If a lag is perceptible it is an indication of
damper valve damage and new struts or shock
absorbers must be installed. REFER to:
Front Strut and Spring Assembly (204-01 Front
Suspension, Removal and Installation),
Spring (204-02 Rear Suspension, Removal and
Installation).
Load-Levelling Shock Absorber
1. With the vehicle unladen, measure and note the dimensions between the base of the wheel rim
and the top of the rear fender on both sides.
• The measurements on both sides should be approximately equal.
2. With a load of 4 average size adults and a 100 kg weight, measure and note the dimensions
between the base of the wheel rim and the top
of the rear fender on both sides.
3. NOTE: Due to the internal ratchet mechanism of the suspension components, the height
of the rear of the vehicle should rise during
the road test.
With a load of 4 average size adults and a 100
kg weight, drive the vehicle for 3 km on a road
of normal condition.
4. With a load of 4 average size adults and a 100 kg weight, measure and note the dimensions
between the base of the wheel rim and the top
of the rear fender on both sides.
5. If the dimensions on both sides are no longer approximately equal, install new load levelling
shock absorbers.
REFER to: Spring(204-02 Rear Suspension,
Removal and Installation).
6. NOTE: Due to the internal ratchet mechanism of the suspension components, the height
of the rear of the vehicle should rise during
the road test.
If the dimensions are approximately equal,
unload the vehicle and drive the vehicle for 3
km on a road of normal condition.
7. With the vehicle unladen, measure and note the dimensions between the base of the wheel rim
and the top of the rear fender on both sides.
Check the final dimensions with the original
dimensions taken in the unladen condition.
G1080717en2008.50 Kuga8/2011
204-00- 13
Suspension System - General Information
204-00- 13
DIAGNOSIS AND TESTING
TO MODEL INDEX
BACK TO CHAPTER INDEX
FORD KUGA 2011.0MY WORKSHOP REPAIR MANUAL
Page 1232 of 2057
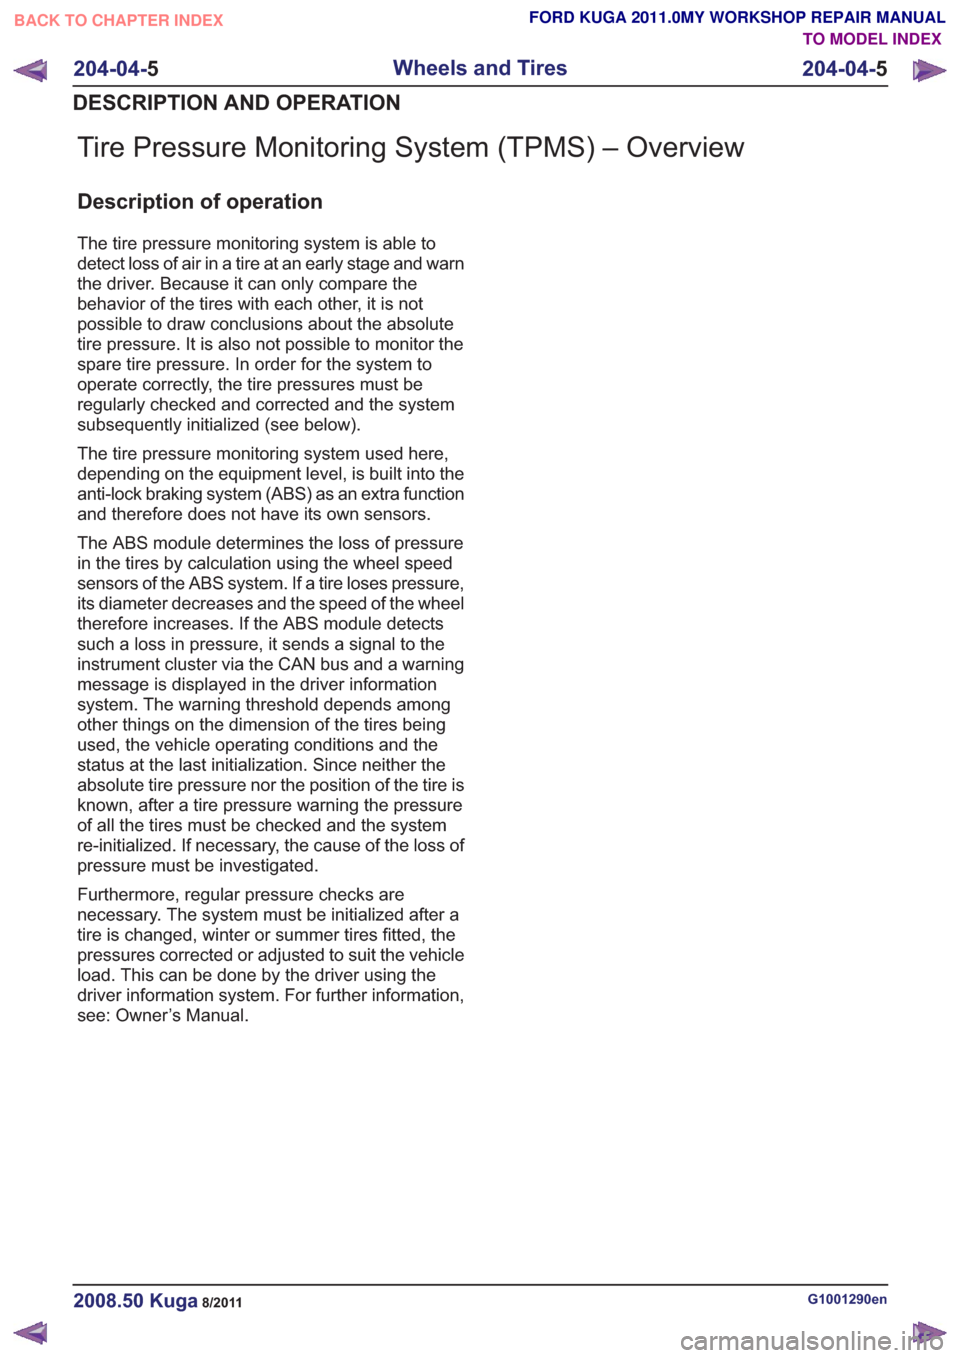
Tire Pressure Monitoring System (TPMS) – Overview
Description of operation
The tire pressure monitoring system is able to
detect loss of air in a tire at an early stage and warn
the driver. Because it can only compare the
behavior of the tires with each other, it is not
possible to draw conclusions about the absolute
tire pressure. It is also not possible to monitor the
spare tire pressure. In order for the system to
operate correctly, the tire pressures must be
regularly checked and corrected and the system
subsequently initialized (see below).
The tire pressure monitoring system used here,
depending on the equipment level, is built into the
anti-lock braking system (ABS) as an extra function
and therefore does not have its own sensors.
The ABS module determines the loss of pressure
in the tires by calculation using the wheel speed
sensors of the ABS system. If a tire loses pressure,
its diameter decreases and the speed of the wheel
therefore increases. If the ABS module detects
such a loss in pressure, it sends a signal to the
instrument cluster via the CAN bus and a warning
message is displayed in the driver information
system. The warning threshold depends among
other things on the dimension of the tires being
used, the vehicle operating conditions and the
status at the last initialization. Since neither the
absolute tire pressure nor the position of the tire is
known, after a tire pressure warning the pressure
of all the tires must be checked and the system
re-initialized. If necessary, the cause of the loss of
pressure must be investigated.
Furthermore, regular pressure checks are
necessary. The system must be initialized after a
tire is changed, winter or summer tires fitted, the
pressures corrected or adjusted to suit the vehicle
load. This can be done by the driver using the
driver information system. For further information,
see: Owner’s Manual.
G1001290en2008.50 Kuga8/2011
204-04-5
Wheels and Tires
204-04- 5
DESCRIPTION AND OPERATION
TO MODEL INDEX
BACK TO CHAPTER INDEX
FORD KUGA 2011.0MY WORKSHOP REPAIR MANUAL
Page 1233 of 2057
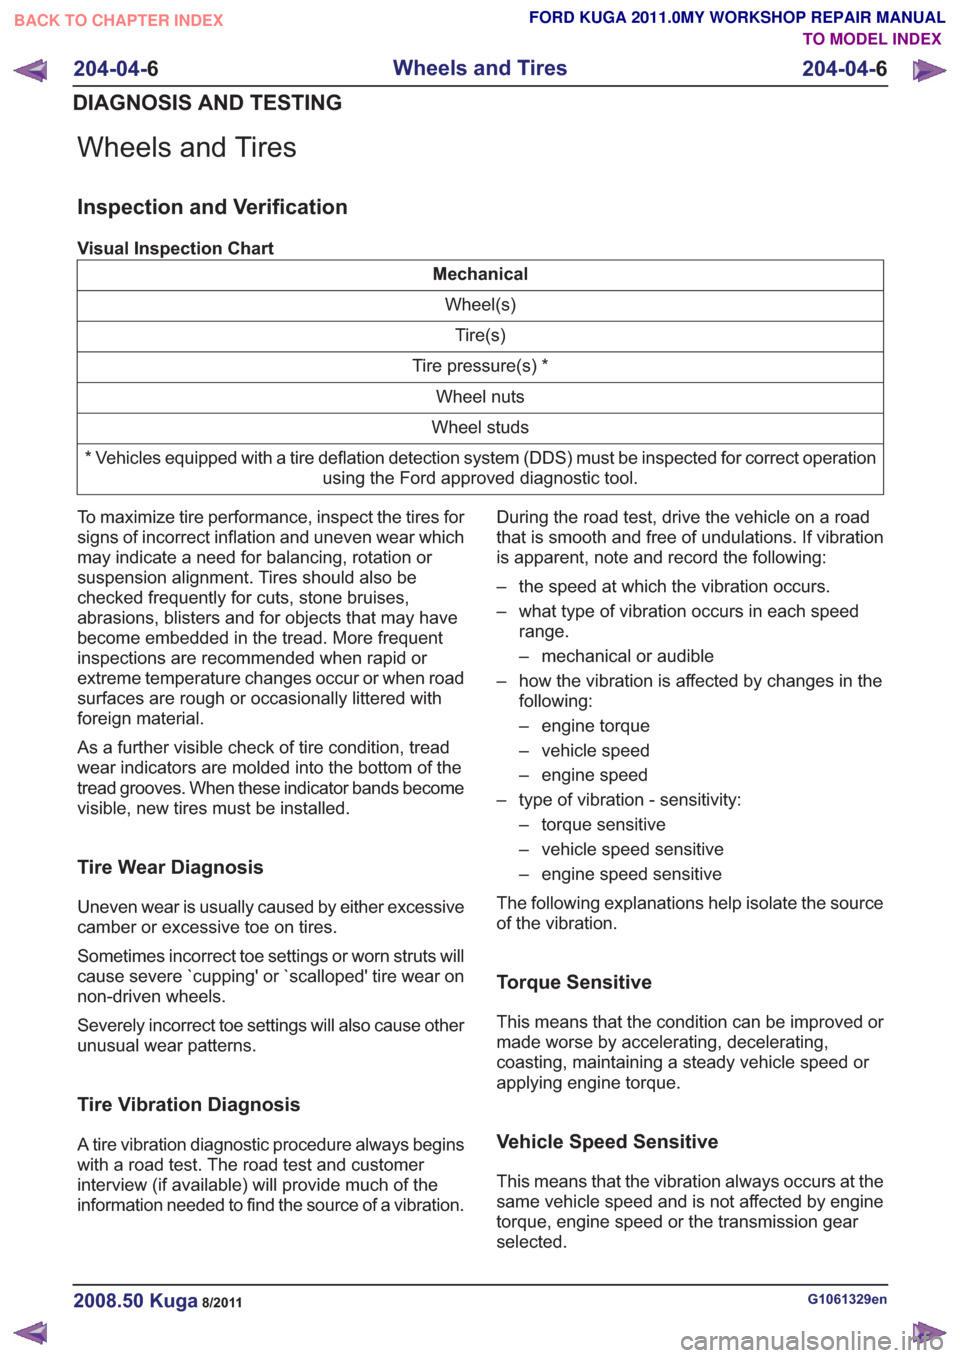
Wheels and Tires
Inspection and Verification
Visual Inspection Chart
MechanicalWheel(s)Tire(s)
Tire pressure(s) * Wheel nuts
Wheel studs
* Vehicles equipped with a tire deflation detection system (DDS) must be inspected for correct operation using the Ford approved diagnostic tool.
To maximize tire performance, inspect the tires for
signs of incorrect inflation and uneven wear which
may indicate a need for balancing, rotation or
suspension alignment. Tires should also be
checked frequently for cuts, stone bruises,
abrasions, blisters and for objects that may have
become embedded in the tread. More frequent
inspections are recommended when rapid or
extreme temperature changes occur or when road
surfaces are rough or occasionally littered with
foreign material.
As a further visible check of tire condition, tread
wear indicators are molded into the bottom of the
tread grooves. When these indicator bands become
visible, new tires must be installed.
Tire Wear Diagnosis
Uneven wear is usually caused by either excessive
camber or excessive toe on tires.
Sometimes incorrect toe settings or worn struts will
cause severe `cupping' or `scalloped' tire wear on
non-driven wheels.
Severely incorrect toe settings will also cause other
unusual wear patterns.
Tire Vibration Diagnosis
A tire vibration diagnostic procedure always begins
with a road test. The road test and customer
interview (if available) will provide much of the
information needed to find the source of a vibration. During the road test, drive the vehicle on a road
that is smooth and free of undulations. If vibration
is apparent, note and record the following:
– the speed at which the vibration occurs.
– what type of vibration occurs in each speed
range.
– mechanical or audible
– how the vibration is affected by changes in the following:
– engine torque
– vehicle speed
– engine speed
– type of vibration - sensitivity: – torque sensitive
– vehicle speed sensitive
– engine speed sensitive
The following explanations help isolate the source
of the vibration.
Torque Sensitive
This means that the condition can be improved or
made worse by accelerating, decelerating,
coasting, maintaining a steady vehicle speed or
applying engine torque.
Vehicle Speed Sensitive
This means that the vibration always occurs at the
same vehicle speed and is not affected by engine
torque, engine speed or the transmission gear
selected.
G1061329en2008.50 Kuga8/2011
204-04- 6
Wheels and Tires
204-04- 6
DIAGNOSIS AND TESTING
TO MODEL INDEX
BACK TO CHAPTER INDEX
FORD KUGA 2011.0MY WORKSHOP REPAIR MANUAL
Page 1234 of 2057
Engine Speed Sensitive
This means that the vibration occurs at varying
vehicle speeds when a different transmission gear
is selected. It can sometimes be isolated by
increasing or decreasing engine speed with the
transmission in NEUTRAL or by stall testing with
the transmission in gear. If the condition is engine
speed sensitive, the cause is probably not related
to the tires.
If the road test indicates that there is tire whine,
but no shake or vibration, the noise originates with
the contact between the tire and the road surface.A thumping noise usually means that the tire is flat
or has soft spots making a noise as they slap the
roadway. Tire whine can be distinguished from axle
noise. Tire whine remains the same over a range
of speeds.
A complete road test procedure is described in
Section 100-04.
REFER to:
Noise, Vibration and Harshness (NVH)
(100-04 Noise, Vibration and Harshness,
Diagnosis and Testing).
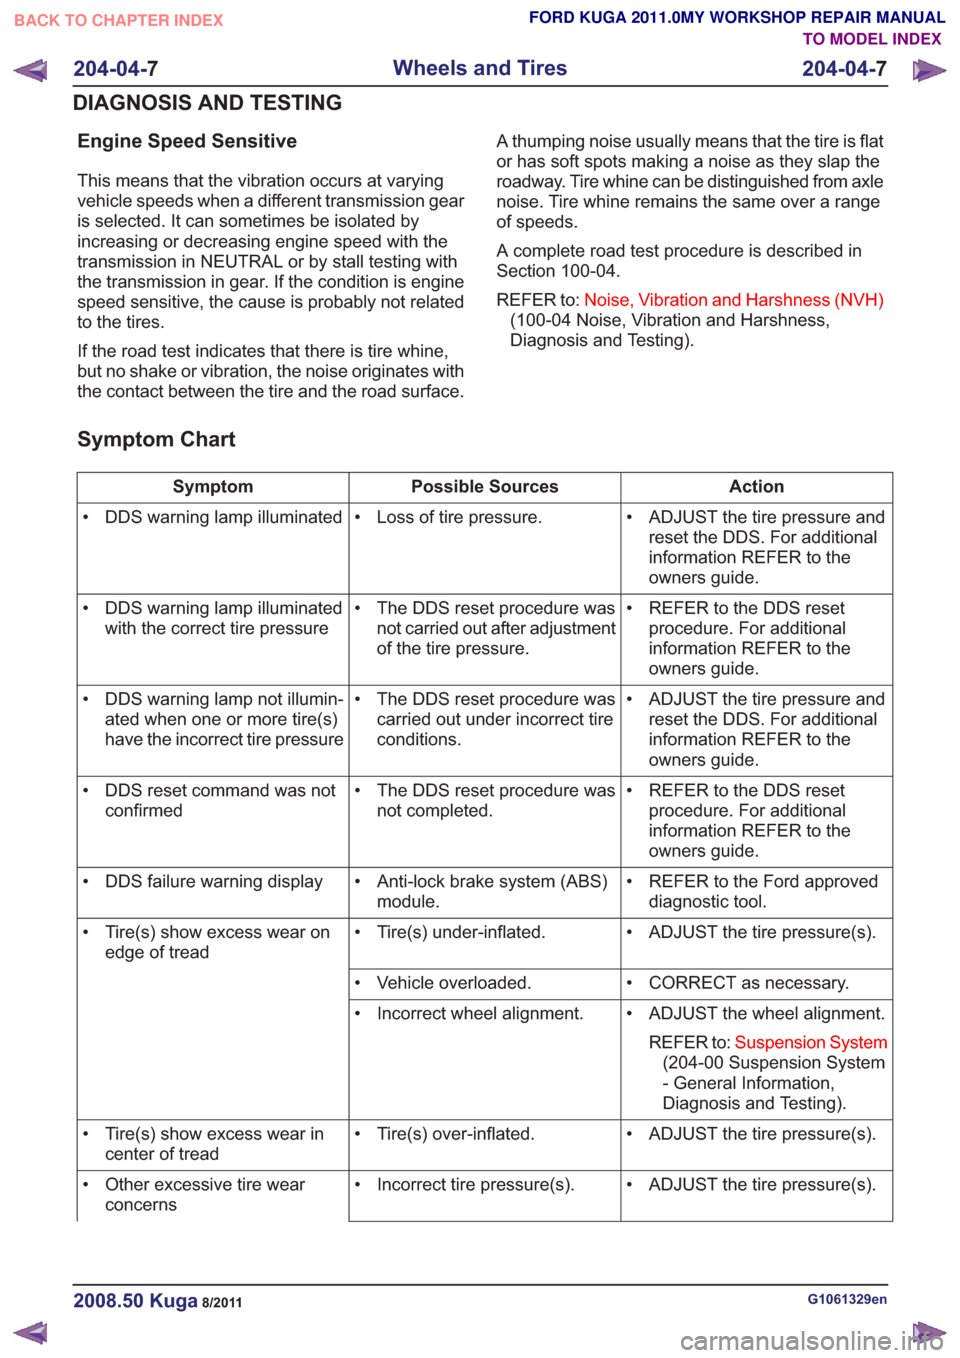
Symptom Chart
Action
Possible Sources
Symptom
• ADJUST the tire pressure andreset the DDS. For additional
information REFER to the
owners guide.
• Loss of tire pressure.
• DDS warning lamp illuminated
• REFER to the DDS resetprocedure. For additional
information REFER to the
owners guide.
• The DDS reset procedure was
not carried out after adjustment
of the tire pressure.
• DDS warning lamp illuminated
with the correct tire pressure
• ADJUST the tire pressure andreset the DDS. For additional
information REFER to the
owners guide.
• The DDS reset procedure was
carried out under incorrect tire
conditions.
• DDS warning lamp not illumin-
ated when one or more tire(s)
have the incorrect tire pressure
• REFER to the DDS resetprocedure. For additional
information REFER to the
owners guide.
• The DDS reset procedure was
not completed.
• DDS reset command was not
confirmed
• REFER to the Ford approveddiagnostic tool.
• Anti-lock brake system (ABS)
module.
• DDS failure warning display
• ADJUST the tire pressure(s).
• Tire(s) under-inflated.
• Tire(s) show excess wear on
edge of tread
• CORRECT as necessary.
• Vehicle overloaded.
• ADJUST the wheel alignment.REFER to: Suspension System
(204-00 Suspension System
- General Information,
Diagnosis and Testing).
• Incorrect wheel alignment.
• ADJUST the tire pressure(s).
• Tire(s) over-inflated.
• Tire(s) show excess wear in
center of tread
• ADJUST the tire pressure(s).
• Incorrect tire pressure(s).
• Other excessive tire wear
concerns
G1061329en2008.50 Kuga8/2011
204-04- 7
Wheels and Tires
204-04- 7
DIAGNOSIS AND TESTING
TO MODEL INDEX
BACK TO CHAPTER INDEX
FORD KUGA 2011.0MY WORKSHOP REPAIR MANUAL