Page 217 of 260

Returning to the Start menu
"' Pre ss the I Reset ! button longer than 2 sec
onds to return from any menu leve l to the
Start menu .
(D Tips
Before resetting the TPMS, the current
pressures of
all four tire s must correspond
to the specified values. Adjust the tire
pressure and reset the pressure in the tire
pressure monitoring system according to
the load you are carrying
c::;, page 198.
Run-flat tires
Introduction
Applies to vehicles: with Run-flat tires
Run-flat tires help keep you moving if a tire
goes flat.
Reinforced s idewalls give the tires run-flat ca
pability if tire pressure is lost.
We recommend that run-flat tires only be
mounted on vehicles that were originally
equ ipped w ith these special tires at the facto
ry and have a Tire Pressure Monitor ing Sys
tem.
Run-flat t ires can be ident ifi ed by th e lett ers
"RSC" on the tire sidewall.
If you do change the tires on yo ur vehicle from
normal to run-flat tires, you must buy the
specia l rims required for run-flat tires, and the
Ti re Pressure Monito ring System must be re
programmed by an a uthorized Audi dea ler or
other qualified workshop.
What do run-flat tires do?
These special tires have run-flat capabilities
that help keep you moving if a tire loses pres
sure and goes flat. Under favorable cond itions
tires can be driven
at l ea st 30 mil es (SO km ),
but you must not d rive fa ste r than SO mph
(80 km /h)
c::;, page 216, Driving with run-flat
tires .
Tire s an d wheel s 215
When it is not po ssible to continue
driv ing , ev en with run-flat tire s?
- If the Electronic Stabilization Program (ESP)
is not work ing or keeps coming on.
- If the Tire Pressure Monitoring System does
not work.
- If the tire has been severely damaged, in a
crash, for example. The tread can separate
from a damaged tire as the wheel turns, and
hit parts of the vehicle, such as the fuel tank
filler neck, fuel lines or brake lines.
- Do not continue driving if severe vibration
occurs or if the t ire starts to smoke because
the tire is ru nning hot.
- Do not continue driving if damage to the
tire, such as cracks in the sidewall, appears.
A WARNING
Improper use of run-flat tires can cause
vehicle damage that can lead to loss of ve h icl e cont ro l, a c rash and serious personal
in Jury.
- Run-flat tires can only be used with spe
cial rims.
- Run-flat tires must always be monito red
with a prope rly p rogrammed Tire Pre
ssure Monito ring System.
- Always inspect a tire that has lost air to
make sure it is sa fe to dr ive with the tire
in the run-flat mode.
- Never d rive with run-f lat t ires that have
been damaged in a co llision.
- Never d rive with run-flat t ires if heat
bu ild-up causes the tire to give off
smoke.
- Never d rive with run-f lat t ires if the vehi
cle shakes or vibrates severely.
- Never d rive with a run-flat ti re that de
velops s idewa ll cracks or other damage
while in use.
- I f you sw itch between standa rd and run
f lat ti res, an aut horiz ed Aud i dealer o r
qu alified wor kshop must reprogram the
con tro l mod ule.
•
•
Page 218 of 260

216 Tires and wheels
Run-flat tires have special characteristics
and requirements, that are very different
from conventiona l tires. Run-flat tires re
quire special rims for run-flat use and can
not be used on conventional wheel rims.
(D Tips
- If you are not able to continue driving
with run-flat tires, please seek professio
nal assistance .
- Please contact your authorized Audi
dealer or Audi of America, Inc. if you
have questions about tires and r ims.
Driving with run-flat tires
App lies to vehicles: with Run -flat tires
Handling characteristics change when tire
pressure is low .
Driving on tires with low tire pressure changes
the way a vehicle handles, particularly when
cornering and braking . The handling charac
teristics of run-flat tires do not seem to
change a lot even when dr iving on low pres
sure or in the run-flat mode . Nevertheless you
must still take special precautions when oper
ating a vehicle on run-flat tires when tire pres
sure is low or the tire(s) is fla t:
"'The Electronic Stabilization Program (ESP)
must be switched on.
> Never drive faste r than 50 mph (80 km/h)
¢,& .
"'Plan ahead when driving and anticipate
what you will have to do considering traffic
and road conditions up ahead.
"' Accelerate carefully.
"' Avoid unnecessary and sudden steer ing and
braking maneuvers .
"' Reduce your speed in plenty of time before
i ntersections, curves and other places where
you may have to react quickly.
Please see:
¢ page 215, When it is not possi
ble to continue driving, even with run-flat
tires?
Handling characteristics change when
driving with low air pressure or with flat
tires even with special run-flat tires
A low pressure or flat front tire affects vehicle
handling characterist ics by pulling the vehicle
slightly to the side whe re the tire is mounted
and reduces braking performance .
A low pressure or flat
rear tire also affects
driving characteristics by pulling to the s ide
where the tire is mounted and also reduces
braking performance . The effect on vehicle
handling is most noticeable when driving
aro und curves .
A WARNING
Changed vehicle hand ling characteristics
when driving in the run-flat mode can
cause loss of vehicle control, a crash and
serious personal injury.
- Driving on special run-flat tires in the
run-flat mode will change vehicle han
dling characterist ics dur ing braking,
when cornering and under heavy acceler
ation .
- Never drive faster than the max imum
rated speed of 50 mph (80 km/h) when
driving in the run-flat mode.
- Always adjust vehicle speed to traff ic,
road and weather conditions and drive
slower than the maximum rated speed if
necessary weathe r and road cond it ion s
are taken into account.
- Always obey speed limits and other traf
f ic laws.
(D Note
We always recommend driving with even
more care when using these special tires in
the run-flat mode. Always avoid sudden
maneuve rs.
Page 219 of 260

Replacing run-flat tires and rims
Appl ies to vehicles: with Run -flat tires
Your vehicle was especially designed to use
special run-flat tires .
You may use and combine only approved run
flat t ires and spec ial matching rims that have
been designed for run -flat tires. Mount ing
special run-flat t ires on standard wheels will
not work and will not provide the advantages
fo the run-falt featu re. Neve r use specia l run
flat t ires on standard wheel rims .
After driving with a tire in the run-flat mode,
a lways have the vehicle and affected tire(s)
and rim(s) inspected by an autho rized Aud i
dealer . T ir es that have been driven in the run
flat mode must be replaced.
A WARNING
Use of damaged run-flat tires and rims can
cause vehicle damage that can lead to loss
o f vehicle control, a crash and ser ious per
sonal injury.
- Always have the veh icle and affected
t ire(s) and rim(s) inspected by an author
ized Audi dealer after driving a t ire in the
run-f lat mode.
- Tires that have been driven in the run
flat mode must be rep laced.
Tire s an d wheel s 21 7
•
•
Page 220 of 260

218 What do I do now?
What do I do now?
Trunk escape handle
In case of an emergency, the rear lid can be
opened from the inside using the trunk es
cape handle.
Fig. 157 Luggage compartment: Trunk escape handle
... To open the trunk lid pull the handle down
as indicated by the -arrow- ~
fig. 157.
The trunk escape handle inside the storage
compartment is made of fluorescent materia l
to g low in the dark.
A WARNING
The trunk escape handle is to be used only
in an emergency.
Vehicle tool kit
The tools are stored underneath the floor
panel in the luggage compartment.
Fig. 158 Luggage compa rtmen t: vehicle tool kit
... Swing the Luggage compartment floor up
wards .
... Remove the vehicle tool k it.
The on board tool kit includes: -
Hook for removing wheel covers *
- Plastic clip to remove wheel bo lt covers•
- Wheel bolt wrench
-Alignment pin for changing wheels
- Screwdriver with reversible blade
- Replacement bit (reversible Torx bit for
chang ing lamps)
- Open ended wrench 10 x 13
- Towing eye
Note : some of the on board items listed above
are provided on certain models only or are op
tiona l extras .
A WARNING ~
-Using a bumper jack to raise the vehicle
will damage the bumper system. The
jack may slip, caus ing injury .
- Never support your vehicle on cinder
b locks, bricks or other objects. These
may not be able to support the load and
could cause injury when they fail.
- Never start or run the eng ine while the
veh icle is supported by the jack.
- If you must work under the vehicle, al
ways use safety stands specifically de
signed for th is purpose.
- Never use the hexagonal socket in the
handle of the screwdriver to loosen or
tighten the wheel bolts.
Tire repair
General and safety pointers
Appl ies to vehicles: wit h Tire Mobility Sys tem
Tire repair is intended only for temporary,
short-term use.
Fig. 159 Tire damage for whic h t he Tir e Mob ility Sys-
tem is not suited
II>
Page 221 of 260
*.
In the event of a tire fa ilu re, the TMS is in the
l uggage compartment under the floor.
It con
s")
Your vehicle is equipped with a tire repair kit,
the
Tire Mobility System (TMS)*.
In the event of a tire fa ilu re, the TMS is in the
l uggage compartment under the floor.
It con
sists of the tire sea lant and an electric a ir
pump .
Using
TMS , tire damage caused by foreign
bod ies up to abou t
0.16 inch (4 mm) in diam
eter can be sealed reliab ly.
The foreign object can stay in the t ire.
The tire sealant must not be used:
-for cuts or punctures in the tire which are
larger than 0.16 inch (4 mm)
c> fig. 159 (D
- for damage to the rim@
- if you have been driving with very low tire
pressures or tires with no air @
Using the
TMS is desc ribed in the section
c> page 220, Preliminary steps.
TMS can be used at temperatures dow n to -
4 °F (- 20 °().
A WARNING
Take the following precautions after re
pairing the tire:
-
- Do not drive faster than 50 mph (80 km/
h)!
- Avoid full-throttle acce le rat ion, heavy
braking and fast cornering.
- T he veh icle's road behavior can be affect
ed.
- T ires sealed with
TMS a re intended only
for
temporary, short-term use.
- After using the tir e sea lant the tire pres
sure monitoring system may no longer
work prope rly. Drive carefully to the next
professional repair facility .
-TMS mus t NOT be used,
- for cuts or punctures in the tire which are larger than 0.16 inch (4 mm)
- for damage to the rim
- if you have been driving with very low
tire pressures or tires with no air
What do I do now? 219
-Seek professional assistance if it is not
possible to repa ir the tire w ith the t ire
sealant.
A WARNING
The tire sealant must not come into con
tact with skin, eyes or clothing.
- If you get any tire sealant in your eyes or
come into contact w ith it, rinse the af
fected area thoroughly with clean water .
Find a phys ician immediately!
- Change any clothing contaminated with
tire sealant immediately.
- Do not inha le the vapor!
- If you have swallowed tire sealant, rinse
your mouth thoroughly right away and
drink plenty of water.
- Do not induce vomiting! Find a physi
c ian i mmediately!
- If you have allergic react ions, find a
phys ician immediately.
- Keep the tire sealant away from children.
(D Note
Do not use commercially availab le tire
sealants . The electr ical components of the
tire pressure monitoring system will no
l onge r work properly.
@ For the sake of the environment
Used sealant bottles can be dropped off at
a recycling facility .
@ Tips
-If sea lant has run out, allow it to dry.
Then you can peel it off.
- Have the tire sealant replaced every 4
years at a dealership .
•
•
-
Page 222 of 260

220 What do I do now?
Preliminary steps
Applies to vehicles: with T ire Mobility System
Some preliminary steps are necessary for tire
repair .
Fig. 160 Tire Mobili ty System under luggage co mpart
men t floor
• If you have a flat tire, park the vehicle as far
as possible from mov ing traffic .
• Apply the
park ing brake firmly .
• Move the
selector lever to the P position .
• Check whether a repa ir using the Tire Mobili
ty System is possible
¢ page 218, General
and safety pointers.
• Have all passengers leave the vehicle and
stay away from the danger zone ¢
_A.
• Take the sealant bottle and the electric air
pump
from the luggage compartment un
der the floor
c> fig. 160.
• Remove the "max. 50 mph" (80 km/h) stick
er from the sealant bottle and aff ix it to the
instrument cluster in the driver's view .
..&, WARNING
- Turn the hazard flashers on and set up
the warning triangle if you have a flat
tire in moving t raff ic. In this way you pro
tect yo u rs elf and other road users .
- Make sure that all passengers are in a
safe place, out of the danger zone (for
example, behind a guard rail).
(D Note
Particular care is necessary if you are mak
ing a tir e repair on a steep incline.
@ Tips
Obey all laws.
Making a tire repair
Applies to vehicles: with Tire Mob ility System
Tire repair consists of the following sections .
Fig. 161 Parts of the Tire Mob ility System
Fig . 1 62 Con nector for the Tire Mob ility System
Assembling Tire Mobility System
• Open the lid @of the electr ic air pump
c>fig . 161 .
• Pull the plug@) and the pressu re hose ®
w ith the gauge out of the housing.
• Screw the pressure hose® of the electric
air pump onto the flange@ of the sealant
bott le @ .
• Push the sealant bott le with the flange
down into the recess @ on the lid of the
electric air pump.
• Remove the dust cap from the valve of the
defective tire .
• Screw the hose @) onto the valve
¢fig. 162 .
• In sert the plug @ c> fig. 161 into the socket
for the cigarette lighter. .,.
Page 223 of 260

Inflating tire
"' Move the switch @¢ fig. 162 on the elec
tric air pump
ll to posit ion I. After 5 mi
nutes, tire pressure must have reached at
l east 1.8 bar .
"' Switch the electric a ir pump off - switch in
position
0 . If the required tire pressure of at
least 1.8 bar has not been reached, follow
the instructions in the section Re-inflating
tire .
Re-infl ating tire
"' Remove the hose from the valve and pu ll the
plug out of the socket.
"' Drive the vehicle slow ly 10 meters backward
or forward. This helps to distribute the seal
ant better.
"' Remove the empty inflat ion bottle and
screw the hose®¢ fig. 161 from the elec
tric pump directly onto the va lve.
"' Insert the plug @¢ fig. 161 into the socket
for the cigarette lighter .
"' Move the switch@¢ fig. 162 on the elec
tric a ir pump
l) to posit ion I. After 5 mi
nutes, t ire pressure must have reached at
least 1.8 bar .
"' Switch the electric a ir pump off - switch in
pos ition
0 . If the requ ired tire p ressure of at
least 1.8 bar has not been reached, it is not
poss ib le to make a repa ir with the tire seal
ant . Seek pro fessional ass istance .
Disassembling Tire Mobility System
"'Remove the hose from the valve and pull the
plug out of the socket.
"' Screw th e dust cap onto the va lve.
"' Place the empty sealant bottle back in the
o riginal packaging and clip it in p lace under
the floor so that no tire sealant can run out
into the vehicle.
"' Place the electric air pump in the luggage
compartment for the time being .
"' Start driving r ight away so t hat the sealant
is d istributed in the tire .
l) The e lectr ic a ir pu m p sh oul d never r un for long er than
8 m in utes.
What do I do now? 221
A WARNING
- Follow the manufacturer's safety instruc
tions on the decal for the air pump and
the sealant bottle.
- If a tire pressure of 1.8 bar cannot be
achieved after pumping for 5 minutes,
the t ire is too severely damaged . Do not
continue to dr ive.
- Seek professional ass istance if it is not
possible to repa ir the tire w ith the t ire
sealant.
(D Tips
- Do not operate the electric air pump for
more than 8 minutes witho ut stopping,
otherwise it can overheat . When the a ir
pump has coo led down, you can continue
to use it.
- I f sea lant has escaped, allow it to dry,
t hen yo u can peel it off.
Final check
Applies to vehicles: wit h Tire Mobility System
Aft er driv ing for a short distance, tire
pre ssure must be chec ked
"' After driving for about 10 min utes, stop and
check the tire pressure.
"' If tire pressure is st ill at least 1.3 bar, in
flate the tire to specified pressure (see dr iv
er's side B-pillar), drive to the next repa ir
shop and have the tire and the sealant bot
tle replaced .
"'I f ti re pressu re is less than 1.3 ba r, the t ire
is too severely damaged. Do not con tinue to
drive . See k professiona l assist ance.
A WARNING
= -
If tire press ure is less than 1.3 bar after
d riving for 10 minutes, the ti re is too se
verely damaged. Do not cont in ue to drive.
Seek professional ass istance.
•
•
Page 224 of 260

222 What do I do now ?
@ Tips
After a tire repair, have the sealant bottle
rep laced at a dealership . This restores full
functionality to the Tire Mob ility System.
What should I be
aware of when
changing a tire?
General information
The follow ing sections will provide you with
important information o n how to change a
tire using the vehicle tool kit.
However , we recommend that you have a
qua lified service center change the tire and
pe rform all work associated with changing it .
Decorative wheel covers
Applies to vehicles: with decorative wheel covers
The decorative wheel covers must be removed
first to access the wheel bolts .
Fig. 1 63 Wheel ch an ge : remo ving th e wh eel cove r
Removing
,.. In se rt the hook provided wi th t he on board
tool kit into the hole on the center h ub
piece .
,.. Pull
off the decorat ive wheel cover
Q fig . 163 .
' Wheels with cap-covered wheel bolts
Applies to vehicles: with cap-covered wheel bolts
The caps must be removed first from the
wheel bolts before the bolts can be un
screwed .
Fig . 164 W heel c hange: re moving th e wh eel bolt cap s
Removing
,.. Push the plasti c clip provided wi th the on
board too l kit down over the wheel bo lt cap
until it engages .
,.. Pull on th e properly engaged
pla stic clip to
extract the cap
Q fig. 164 .
Refitting
,.. Place the c aps over the whee l bolts and
push them back in.
T he caps are the re to protect and keep the
whee l bolts clean .
Loosening and tightening the wheel
bolts
The wheel bolts must be loosened before rais
ing the vehicle.
Fi g. 16 5 W hee l cha nge : loose ning t he wh eel bol ts
 1
1 2
2 3
3 4
4 5
5 6
6 7
7 8
8 9
9 10
10 11
11 12
12 13
13 14
14 15
15 16
16 17
17 18
18 19
19 20
20 21
21 22
22 23
23 24
24 25
25 26
26 27
27 28
28 29
29 30
30 31
31 32
32 33
33 34
34 35
35 36
36 37
37 38
38 39
39 40
40 41
41 42
42 43
43 44
44 45
45 46
46 47
47 48
48 49
49 50
50 51
51 52
52 53
53 54
54 55
55 56
56 57
57 58
58 59
59 60
60 61
61 62
62 63
63 64
64 65
65 66
66 67
67 68
68 69
69 70
70 71
71 72
72 73
73 74
74 75
75 76
76 77
77 78
78 79
79 80
80 81
81 82
82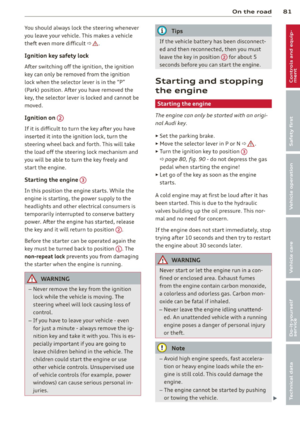 83
83 84
84 85
85 86
86 87
87 88
88 89
89 90
90 91
91 92
92 93
93 94
94 95
95 96
96 97
97 98
98 99
99 100
100 101
101 102
102 103
103 104
104 105
105 106
106 107
107 108
108 109
109 110
110 111
111 112
112 113
113 114
114 115
115 116
116 117
117 118
118 119
119 120
120 121
121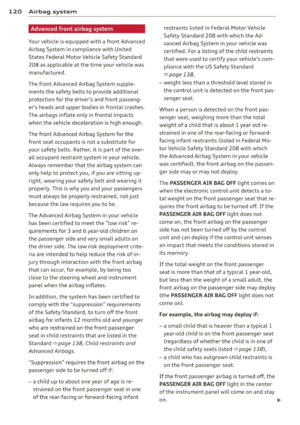 122
122 123
123 124
124 125
125 126
126 127
127 128
128 129
129 130
130 131
131 132
132 133
133 134
134 135
135 136
136 137
137 138
138 139
139 140
140 141
141 142
142 143
143 144
144 145
145 146
146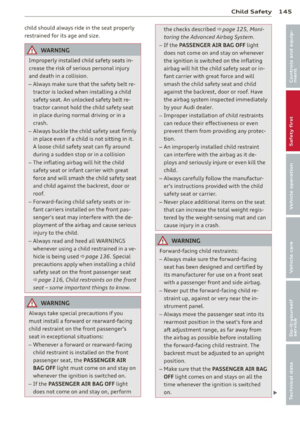 147
147 148
148 149
149 150
150 151
151 152
152 153
153 154
154 155
155 156
156 157
157 158
158 159
159 160
160 161
161 162
162 163
163 164
164 165
165 166
166 167
167 168
168 169
169 170
170 171
171 172
172 173
173 174
174 175
175 176
176 177
177 178
178 179
179 180
180 181
181 182
182 183
183 184
184 185
185 186
186 187
187 188
188 189
189 190
190 191
191 192
192 193
193 194
194 195
195 196
196 197
197 198
198 199
199 200
200 201
201 202
202 203
203 204
204 205
205 206
206 207
207 208
208 209
209 210
210 211
211 212
212 213
213 214
214 215
215 216
216 217
217 218
218 219
219 220
220 221
221 222
222 223
223 224
224 225
225 226
226 227
227 228
228 229
229 230
230 231
231 232
232 233
233 234
234 235
235 236
236 237
237 238
238 239
239 240
240 241
241 242
242 243
243 244
244 245
245 246
246 247
247 248
248 249
249 250
250 251
251 252
252 253
253 254
254 255
255 256
256 257
257 258
258 259
259