Page 97 of 260

Programming the Homelink®
transmitter
The transmitter is programmed in two phas
es. For rolling code transmitters, a third
phase is also necessary.
F ig . 104 Overhead console: Homelink ® keypad
Fig. 105 Front bumper, driver side: locat ion of trans
mitte r unit
Phase 1:
programming the overhead keypad
1. Make sure your vehicle is w ith in operat ing
ra nge of the remote controlled garage
door opener .
2. Set the parking brake~&.
in General in
formation on page 94.
3. Turn the ignition on . Do not start the en
g ine!
4 . Press and hold the two outside Home
Link ® buttons
(D and @for approxi
mately 20 seconds until indicator light@
~ fig. 104 begins to flash . Then release
both buttons . Do not hold the buttons for
longer than 30 seconds.
.. This procedure only needs to be performed
once. It erases the factory-set default codes
and does not have to be repeated to pro
gram additional remote controls .
Homelin k® 95
5. Press and ho ld the Homelink ® button (D ,
@ or§ until the indicator light@
starts flashing
slowly . Release the button.
.. The system will remain in programming
mode for 5 minutes.
Go to the front of the
vehicle and proceed with phase 2 .
Phase 2:
programming the bumper mounted trans
mitter
6. Hold the original remote control at a d is
tance between
0 -6 in. (0 -15 cm) from the
bumper below the appropr iate headlight
for your vehicleQ
fig . 105 (use the short
est distance possible) .
7. Aim the remote control just below the
driver side headligh t.
8. Press and hold the activation button on
the remote control.
.. May be different in Canada . If so, press and
re-press (cycle) the activation button on your
remote control every two seconds .
9. The emergency flashers will flash
three
times
(after about 15-60 seconds) when
the programming is successful. Re lease
the button on the remote control.
.. To program more devices, repeat steps 4 to
9.
10. Press and hold the trained Homelink ®
button and observe the indicator light @
Qfig . 104.
.. If the indicator light is solid/continuous,
programm ing is complete and your device
should activate when you press and release
the trained Homelink ® button.
.. If the indicator light blinks rapidly for 2 sec
onds and is then a solid/continuous light,
proceed w ith phase 3 to program a rolling
code device.
Phase 3: rolling code programming
.. A second person on a ladder who can safely
reach the garage door opener motor is rec
ommended .
11. Locate the "learn" button on the garage
door opener motor (refer to the operating
instructions for the opener, as the loca
tion of this button may vary by manufac
turer) .
Page 98 of 260

96 Homelink®
12. Press and release the learn button on the
garage door opener motor.
• Note: once the button is pressed, there are
30 seconds in which to initiate the next
step.
13 . On the Homel ink ® keypad inside the vehi
cle, firmly press and hold the Homelink ®
button previously programmed in phases
1 and 2 for two seconds and release. Re
peat this sequence
twice .
• Some vehicles may require the press/hold/
release sequence up to t hree times to com
plete the training process.
• HomeLink ® should now activate your rolling
code equipped device.
If the 5 minute time limit is exceeded, the
emergency flashers will flash one time to in
d icate that the process has been terminated.
In this case, repeat steps 4 through 9 .
If the emergency flashers do not flas h
three
times (after about 15-60 seconds), program
ming was not successful. In this case, repeat
steps 4 through 9.
Remote control units for garage door openers
i n Canada are set to stop transmitting radio
frequency signals after two seconds. This time
may not be sufficient for the Homelink ® sys
tem to learn the radio frequency s ignal. Per
form all other steps as described above .
Operating the Homelink® transmitter
The HomeLink ® transmitter works in the
same manner as the original handheld re
mote control that came with the system .
Fig. 106 Overhead console: Homelin k® keypad
• Press the appropr iate p rogrammed button
(D, ® or@ to activate the desired remote
contro l function
~ A in General informa
tion on page 94.
Reprogramming a single button
A HomeLink ® button can be reprogrammed
individually without affecting the other but
ton allocations.
Programming the overhead keypad
• Press the appropriate Homelink ® button un-
til the indicator light begins flashing slowly.
Programming the bumper mounted trans
mitter
1. Hold the original remote control at a dis
tance between
0-5 i n. (0 -13 cm) from the
bumper below the appropriate headlight
for your vehicle (use the shortest distance
possible) .
2. Aim the remote control just below the
driver side headlight .
3 . Press and hold the act ivation button on
the remote control.
4. The emerge ncy flashers will flash
three
times
(after about 15-60 seconds) when
the programming is successful. Now re
l ease the button on the remote control.
• If the device utilizes a rolling code, please
follow phase 3 of
c:> page 95, Programming
the HomeLink ® transmitter
for rolling code
programm ing .
This procedure will cause the existing pro
gramming on the Homelink ® button to be
erased!
Erasing the programming of the
Homelink ® transmitter
When you erase the programming, the pro
gramming on all three of the transmitter
channels with be lost!
.,. Perform steps 1 to 4 as described on
c:> page 95, Phase 1: programming the over-
head keypad . ..,.
Page 99 of 260
When completed, the Homelink® system will
be in the programming mode and is then
ready to learn the codes for remote contro lled
devices.
@ Tips
- Programmed buttons cannot be erased
individually.
- For security reasons you are advised to
erase the programming of the Home
Link ® system before you sell your vehicle. H
om elin k® 97
Page 100 of 260

98 Driving Safel y
Driving Safely
General notes
Safe driving habits
Please remember -safety first!
This chapter contains important information,
tips, instructions and warnings that you need
to read and observe for your own safety, the
safety of your passengers and others . We have
summarized here what you need to know
about safety belts, a irbags, ch ild restra ints as
well as child safety. Your safety is for us
priori
ty number 1.
Always observe the info rmat ion
and warn ings in th is sect ion -fo r yo ur own
safety as well as for that of your passengers.
The information in this se ction app lies to all
model ve rsions of your veh icle . Some of the
feat ures desc ribed in this sec tions may be
standa rd equipment on some models, or may
be optional equipment on others . If you are
not sure, ask your authorized Aud i dealer.
A WARNING
- Make certain that you follow the instruc
t ions and heed the WARNINGS in this
Manual. It is in your interest and in the
interest of your passengers .
- Always keep the complete Owner's Liter
ature in your Audi when you lend or sell
yo ur vehicle so that this important info r
mation will a lways be ava ilable to the
dr iver and passenge rs.
- Always keep the Owner's literature handy
so that you can find i t eas ily if yo u have
ques tions.
Safety equipment
The safety features are part of the occupant
restraint system and work together to help
reduce the risk of injury in a wide variety of
accident situations.
Your safety and the safety of your passenge rs
should not be left to chance. Advances in
technology have made a varie ty o f fea tures
avai la bl e to he lp re duce the risk of injury in an accident
. The following is a lis ting o f just a
few of the safety features in your Audi:
- sophis tic ated s afety be lts fo r drive r and a ll
passenger sea ting pos it ions,
- safety belt pre-tensione rs,
- fro nt airbags,
- knee airbags for the front seats,
- side airbags in the front seats,
- LATCH anchorages for child restraints,
- ad justab le steering column .
T hese ind iv idual safety features can wor k to
ge ther as a sys tem to he lp p rotec t you and
you r passengers in a wide range of accidents.
These features cannot wo rk as a system if
they are not always p roper ly adjusted and
properly used!
Safet y is everybody's re sponsibilit y!
Important things to do before driving
Safety is everybody's job! Vehicle and occu
pant safety always depends on the informed and careful driver.
For yo ur safe ty and the safety of you r passen
gers,
befor e driving alwa ys:
"' Make s ure that all lights and signa ls are op
erati ng correctly .
"' Ma ke su re t hat the t ire p ressu re is co rrec t.
"' Mak e su re that all windows are clean and a f
ford good vis ibility to the outs ide.
"' Sec ure all luggage and other items caref ully
I:!) page 7 3.
"'Make sure that nothing can interfere with
the pedals.
"' Adjust front seat, head restraint and mirrors
correctly for your height .
"' Inst ruct passe ngers to adjust the head re
st raints accord ing to the ir height .
"' Ma ke sur e to use the r igh t chi ld restraint
correc tly to protect c hild ren
¢ page 136,
Child Safety .
"'Sit properly in your seat and make sure that
your passengers do the same
I:!) page 66,
General recommendations. .,_
Page 101 of 260

.. Fasten your safety belt and wear it properly.
Also instruct your passengers to fasten the ir
safety belts proper ly ¢
page 107 .
What impairs driving safety?
Safe driving is directly related to the condi
tion of the vehicle, the driver as well as the
driver's ability to concentrate on the road
without being distrac ted.
The driver is responsible for the safety of the
veh icle and a ll of its occupants . If your ability
to drive is impaired, safety risks for everybody
in the vehicle increase and you also become a
hazard to everyone else on the road ¢
,&..
Therefore:
.,. Do not let yourself be distracted by passen
gers or by us ing a cellular telephone .
.. NEVER dr ive when your driv ing ability is im
paired (by medicat ions, alcohol, drugs, etc.) .
.. Observe all traffic laws, ru les of the road
and speed limits and plain common sense .
.. ALWAYS adj ust yo ur speed to road, traff ic
and weather condit ions .
.. Take frequent breaks on long trips . Do not
drive for more than two hours at a stretch .
.. Do NOT drive when you are tired , under
pressure or when you are stressed.
A WARNING
Impaired driving safety increases the risk
of serious personal injury and death when
ever a veh icle is being used .
Drivin g Sa fely 99
Proper occupant
seating positions
Proper seating position for the driver
The proper driver seating position is impor
tant for safe, relaxed driving.
Fig . 107 The correct d istance betwee n drive r an d
stee ring wheel
Fig . 1 08 Co rrec t head rest raint pos it ion fo r dr ive r
For your own safety and to reduce the risk of
injury in the event of an accident, we recom
mend that you adjust the driver's seat to the
fol low ing position:
.,. Adjust the driver 's seat so that you can easi
ly push the pedals all the way to the floor
while keeping your knee(s) slightly bent
<=> ,& .
.. Adjust the angle of the seatbac k so that it is
in an upright position so that your back
comes in full contact with it when yo u drive .
.. Adjust the steering wheel so that there is a
distance of at least 10 inches (25 cm) be
tween the steering wheel and your breast
bone
c:> fig . 107 . If not possible, see your au
thorized Audi dealersh ip about adaptive
equ ipment .
.. Adjust t he steer ing wheel so that the steer
ing wheel and a irbag cover poi nts at your
chest and not at your face .
Page 102 of 260
 slightly bent.
• Adjust the head restraint so that the upper
edge is as even with the top")
100 Driving Safely
• Grasp the top of the steering wheel with
your elbow(s) slightly bent.
• Adjust the head restraint so that the upper
edge is as even with the top of your head as
possible but no lower than eye level and so
that it is as close to the back of your head as
possible
t::;> fig. 108 .
• Fasten and wear safety belts correctly
t::;> page 110.
• Always keep both feet in the footwell so
that you are in control of the vehicle at all
times.
For detailed information on how to adjust the
driver's seat, see
¢page 67 .
.&_ WARNING
Drivers who are unbelted, out of position
or too close to the airbag can be seriously
injured by an airbag as it deploys. To help
reduce the risk of serious personal injury:
- Always adjust the driver's seat and the
steering wheel so that there are at least
10 inches (25 cm) between your breast
bone and the steering wheel.
- Always adjust the driver's seat and the
steering wheel so that there are at least
4 inches (10 cm) between the knees and
the lower part of the instrument panel.
- Always hold the steering wheel on the
outside of the steering wheel rim with
your hands at the 9 o'clock and 3 o'clock positions to help reduce the risk of per
sonal injury if the driver's airbag inflates.
- Never hold the steering wheel at the
12 o'clock position or with your hands at
other positions inside the steering wheel
rim or on the steering wheel hub. Hold
ing the steering wheel the wrong way
can cause serious injuries to the hands,
arms and head if the driver's airbag in
flates
- Pointing the steering wheel toward your
face decreases the ability of the supple
mental driver's airbag to protect you in a
collision.
- Always sit in an upright position and nev
er lean against or place any part of your body too close to the area where the air
bags are located.
- Before driving, always adjust the front
seats and head restraints properly and make sure that all passengers are prop
erly restrained .
- Never adjust the seats while the vehicle
is moving. Your seat may move unexpect
ed Ly and you could lose control of the ve
hicle .
- Never drive with the backrest reclined or
tilted far back! The farther the backrests
are tilted back, the greater the risk of in
jury due to incorrect positioning of the safety belt and improper seating posi
tion .
- Children must always ride in child seats
t::;> page 136. Special precautions apply
when installing a child seat on the front
passenger seat
t::;> page 115.
Proper seat ing position for the front
passenger
The proper front passenger seating position
is important for safe, relaxed driving.
For your own safety and to reduce the risk of
injury in the event of an accident, we recom
mend that you adjust the seat for the front
passenger to the following position :
• Adjust the angle of the seatback so that it is
in an upright position and your back comes
in full contact with it whenever the vehicle is
moving.
• Adjust the head restraint so that the upper
edge is as even with the top of your head as possible but not lower than eye level and so
that it is as close to the back of your head as
possible
¢ page 101.
• Keep both feet flat on the floor in front of
the front passenger seat.
• Fasten and wear safety belts correctly
t::;> page 110.
For detailed information on how to adjust the
front passenger's seat, see
¢ page 66.
Page 103 of 260

A WARNING 1-=
Front seat passengers who are unbelted,
out of position or too close to the airbag
can be seriously injured or killed by the air
bag as it unfolds. To help reduce the risk of
serious personal injury:
- Passengers must always sit in an upright
position and never lean against or place
any part of their body too close to the
area where the airbags are located.
- Passengers who are unbelted, out of po
sition or too close to the airbag can be
seriously injured by an airbag as it un
folds with great force in the blink of an
eye.
- Always make sure that there are at least
10 inches (25 cm) between the front
passenger's breastbone and the instru
ment panel.
- Always make sure that there are at least
4 inches (10 cm) between the front pas
senger's knees and the lower part of the
instrument panel.
- Each passenger must always sit on a seat of their own and properly fasten and
wear the safety belt belonging to that
seat .
- Before driving, always adjust the front
passenger seat and head restraint prop
erly .
- Always keep your feet on the floor in
front of the seat . Never rest them on the
seat, instrument panel, out of the win
dow, etc. The airbag system and safety
belt will not be able to protect you prop
erly and can even increase the risk of in
jury in a crash.
- Never drive with the backrest reclined or
tilted far back! The farther the backrests
are tilted back, the greater the risk of in
jury due to incorrect positioning of the safety belt and improper seating posi
tion.
- Children must always ride in child seats
c> page 136. Special precautions apply
when installing a child seat on the front
passenger seat
c> page 115.
Driving Safely 101
Proper adjustment of head restraints
Correctly adjusted head restraints are an im
portant part of your vehicle's occupant re straint system and can help to reduce the risk
of injuries in accident situations .
Fig. 109 Corre ctl y adju sted head restra int vi ewe d fro m
the side
The head restraints must be correctly adjust
ed to achieve the best protection.
.. Adjust the head restraint so that the upper
edge of the restraint is level with the top of
your head, but no lower than eye level and
so it is as close to the back of your head as
possible
c> fig . 109.
Adjusting head restraints c> page 70 .
A WARNING
Driving without head restraints or with
head restraints that are not properly ad
justed increases the risk of serious or fatal
neck injuriy dramatically . To help reduce
the risk of injury:
- Always drive with the head restraints in
place and properly adjusted.
- Every person in the vehicle must have a
properly adjusted head restraint.
- Always make sure each person in the ve
hicle properly adjusts their head re
straint. Each head restraint must be ad
justed according to occupants' size so that the upper edge is as even with the
top of the person's head, but no lower
than eye level and so it is as close to the
back of to the head as possible.
- Never attempt to adjust head restraint
while driving. If you have driven off and
•
•
Page 104 of 260

102 Driving Safel y
must adjust the driver headrest for any
r eason, first stop the vehicle safe ly be
fore attempting to adjust the head re straint.
- Children must always be properly re
strained in a ch ild restraint that is appro
pr iate for their age and s ize <=>
page 136.
Examples of improper seating positions
The occupant restraint system can only re
duce the risk of injury if vehicle occupants are
properly seated .
Improper seating posit ions can ca use serio us
inj ury or death. Safety belts can only work
when they are properly positioned on the body . Imprope r seat ing pos itions reduce the
effectiveness of safety be lts and will even in
crease the risk of i njury and death by moving
the safety bel t to critical a rea s of the body .
I mpro per sea ting posit io ns also i ncrease the
ris k of serious injury and dea th when an air
bag de ploys and strikes an occupant who is
not in the prope r seat ing pos ition. A drive r is
respons ible for the safety of a ll vehicle occu
pants and especially for c hildren. Therefore:
• Never allow anyone to ass ume an inco rrect
seat ing position when the ve hicle is being
used <=>.&, .
The fo llowing bullets list only some sample
positions that wi ll increase the risk of ser ious
in ju ry and deat h. Our hope is that these exam
p les w ill make you more awa re of seating po
sitions that are dangero us.
The refore, whenever the vehicle is
moving :
- never stand up in t he vehicle
- never stand on the seats
- never knee l on the seats
- n ever ride w ith the seatbac k reclined
- n ever lie dow n on t he rear seat
- never lean up aga inst the inst rument pa nel
- never sit o n the edge of the seat
- never sit s ideways
- never lean out the w indow -
neve r put your feet o ut the window
- neve r pu t your feet on t he instr ument pane l
- neve r rest your feet on the seat cus hion or
back of the seat
- neve r ride in the footwell
- neve r ride in the ca rgo area
.&_ WARNING
---Im proper sea ting posit ions increase the
r isk of ser ious persona l inju ry and death
whenever a vehicle is being used.
- Always ma ke sur e that all vehi cle occ u
pa nts stay in a proper seating position
a nd ar e prop erly rest rained whenever the
veh icle is being used.
Driver and passenger
side footwell
Important safety instructions
.&_ WARNING ~
A lways make sure that the knee airbag can
i nflate witho ut interference. Objects be
tween yourself and the a irbag can increase
the r isk of injury in a n accident by interfer
i ng with the way the airbag deploys or by
b eing pushed into you as the airbag de
pl oys.
- No persons (children) or animals shou ld
rid e in t he footwell in front of the pas
s enger seat. If the ai rbag dep loys, this
c an result in ser ious or fatal in juries.
- No ob jec ts of any kin d should be carried
in the footwell area in fr ont of the driv
er 's or p assenge r's se at. B ulky objects
(shopping bags, for example) can ham
pe r o r prevent proper deployment of the
airbag . Small ob jects can be thrown
through the vehicle if the airbag deploys
and inj ure you or your passenge rs.
-
 1
1 2
2 3
3 4
4 5
5 6
6 7
7 8
8 9
9 10
10 11
11 12
12 13
13 14
14 15
15 16
16 17
17 18
18 19
19 20
20 21
21 22
22 23
23 24
24 25
25 26
26 27
27 28
28 29
29 30
30 31
31 32
32 33
33 34
34 35
35 36
36 37
37 38
38 39
39 40
40 41
41 42
42 43
43 44
44 45
45 46
46 47
47 48
48 49
49 50
50 51
51 52
52 53
53 54
54 55
55 56
56 57
57 58
58 59
59 60
60 61
61 62
62 63
63 64
64 65
65 66
66 67
67 68
68 69
69 70
70 71
71 72
72 73
73 74
74 75
75 76
76 77
77 78
78 79
79 80
80 81
81 82
82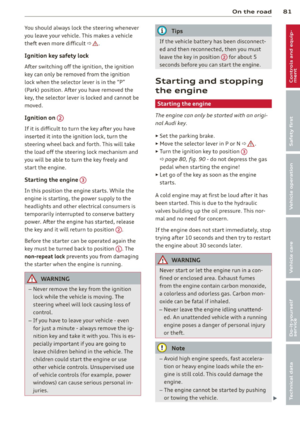 83
83 84
84 85
85 86
86 87
87 88
88 89
89 90
90 91
91 92
92 93
93 94
94 95
95 96
96 97
97 98
98 99
99 100
100 101
101 102
102 103
103 104
104 105
105 106
106 107
107 108
108 109
109 110
110 111
111 112
112 113
113 114
114 115
115 116
116 117
117 118
118 119
119 120
120 121
121 122
122 123
123 124
124 125
125 126
126 127
127 128
128 129
129 130
130 131
131 132
132 133
133 134
134 135
135 136
136 137
137 138
138 139
139 140
140 141
141 142
142 143
143 144
144 145
145 146
146 147
147 148
148 149
149 150
150 151
151 152
152 153
153 154
154 155
155 156
156 157
157 158
158 159
159 160
160 161
161 162
162 163
163 164
164 165
165 166
166 167
167 168
168 169
169 170
170 171
171 172
172 173
173 174
174 175
175 176
176 177
177 178
178 179
179 180
180 181
181 182
182 183
183 184
184 185
185 186
186 187
187 188
188 189
189 190
190 191
191 192
192 193
193 194
194 195
195 196
196 197
197 198
198 199
199 200
200 201
201 202
202 203
203 204
204 205
205 206
206 207
207 208
208 209
209 210
210 211
211 212
212 213
213 214
214 215
215 216
216 217
217 218
218 219
219 220
220 221
221 222
222 223
223 224
224 225
225 226
226 227
227 228
228 229
229 230
230 231
231 232
232 233
233 234
234 235
235 236
236 237
237 238
238 239
239 240
240 241
241 242
242 243
243 244
244 245
245 246
246 247
247 248
248 249
249 250
250 251
251 252
252 253
253 254
254 255
255 256
256 257
257 258
258 259
259