Page 57 of 364

Variable power top storage bay
Fig. 47 Lugga ge
co mpar tme nt: th e
v ari able powe r to p
s t o rag e bay is lo wer ed
F ig . 4 8 Lugga ge
c o mpart ment : emer
genc y rele ase le ver for
the var iab le powe r to p
st or ag e ba y
The var iable power top storage bay lowers automatically
when the power top opens .
Raising the power top storage bay
-Press the trim in the direction o f the arrow to raise the
variable power top storage bay=> fig. 47 .
Lowering the power top storage bay
manually (emergency operation)
-Open the lift side trim and press the release lever down to
lower t he variable power top storage bay=> fig. 48.
Con tro ls a nd e quip
m en t Vehicle
OP-eration
Power top
The var iable power top sto rage bay can be raised when the power top
is clo sed .
Thi s prov ides mo re ca rgo space in the l uggage comp art
ment .
T he
open power top stores complete ly in the compartment des igned
for it . This a rea is p rotected w ith the variable powe r top storage bay
to prevent objects from be ing stored there unintent ionally. The cargo
area in the luggage compartmen t is smaller when the powe r top is
open than whe n it is closed. The variable power top storage bay
canno t be r aised when the power top is open .•
App lies to ve hicl es: with w ind defle ctor
Wind deflector
The wind deflector decreases air movement inside the
v ehicle and increases driving comfor t.
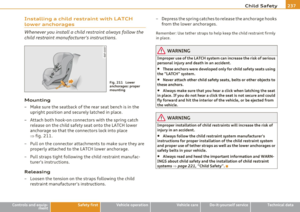
F ig. 4 9 Inse rt in g th e
wi nd deflec tor ( 1) .,
Vehicle care Do-it-yourselt service iTechnical data
Page 58 of 364

Power top
Fig. 5 0 Inse rt in g th e
wind d eflec tor (2)
Reta ining p ins are located on the lo ng en ds of the wind
deflector . They secure the deflector in the mounts on the
vehicle's rear s ide trim . For safety reasons, inserting the win d
deflector from the side farthest from traff ic.
Inserting and positioning the wind deflector
- Open th e rear side wi ndow on the side fa rt hes t from
t raffic.
- Read the assembly instructions on the wind deflector
storage bag.
- Remove the wind deflector from the storage bag a nd fold
i t apart
once . The wind deflector is installed in the correct
position when the longest side is toward the front and the
wind deflector fra me is at the top .
- Insert both retaining pins in the mounts in the t rim above
the rear seat on the driver side=>
page 55, fig . 49 (D .
- Fold the handle @ at the front and center of the w ind
deflector upward and lift the deflector slig htly in the
center => fig. 50
® ·
- Now gu ide th e w ind deflector into the mounts in the sid e
tr im o n the passenger s ide
0 and press ligh tly i n the
midd le ® until the handle locks in place .
- Set t he w ind deflector up completely .
Removing the wind deflector
-Fold the w ind deflector frame bac k.
- Fold the handle=>
page 55, fig. 49 @ at the front and
center of the wind deflector upward and lift the deflector
slightly in the center .
- Remove the win d deflector fro m the mounts in the si de
tr im on the passenger side .
- Pull the wind de flector out of the moun ts on the driver
side and lift it out.
- Fold it toget her .
- Store the wind deflector in the storage bag.
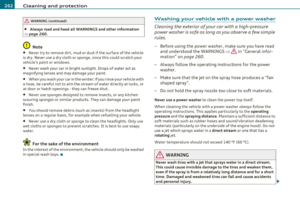
& WARNING
• Do not u se the wind deflector t o se cure cargo .
• Be ca refu l when installing so you do not pinch your fingers.
• Pay attenti on to the traffi c when in stalling the wind defle ctor ,
i f necessary.
0 Note
Do not lean against the vehicle when install ing the wind deflector .
H ar d obje cts and decorations on clo thing such as belt buckles can
scratch the paint . Your clothing could also become dirty . _,,,
Page 59 of 364
![AUDI A5 CABRIOLET 2011 Owners Manual (]] Tips
• The w ind deflecto r wo rks best when all of the windows are ro lled
up while driving.
• Only store the w ind deflector in the sto rage bag when it is dry .•
AUDI A5 CABRIOLET 2011 Owners Manual (]] Tips
• The w ind deflecto r wo rks best when all of the windows are ro lled
up while driving.
• Only store the w ind deflector in the sto rage bag when it is dry .•](/manual-img/6/57571/w960_57571-58.png)
(]] Tips
• The w ind deflecto r wo rks best when all of the windows are ro lled
up while driving.
• Only store the w ind deflector in the sto rage bag when it is dry .•
Power top emergency operation
General information
The power top can be closed by hand if there is a malfunc
tion.
- Activate the parking brake.
- Open t he wi ndows
- Remove the key from the ignition.
Only close the power top manually in an emergency . T he best solut ion
is to have yo ur authorized Audi dealer cor rect the ca use of the
malfunctio n.
Power top emergency operation consists of the fo llowi ng steps:
• Unlocking the power top compartment cover : The cover on the
power top compartment must be released by hand .
• Closing the power top : The power top must be lifted o ut of the
tray and closed.
• Locking the power top : The power to p latches m ust be locked
with the emergency key.
& WARNING
• When position ing the power top , avoid conta ct with the
s upports or other moving parts . Make sure all of the window s are
lowered . Otherwise you could pinch your hands.
Con tro ls a nd e qui p
ment Vehicle
OP-eration
Power top
& WARNI NG (continued )
• Never drive when the power top is not lo cked co rrectly. The
wind from driv ing could cau se the power top to open. This can
re sult in injuries and damage to the vehicle.
[ i ] Tips
Have a second person assist when closing the power top. Positioning
t he power top is easier when there is a se cond person to help. •
Step 1: Unlocking the power top
compartment cover
The release lever for the power top c ompartment is
located under the trim in the luggage compartment.
- --
Vehicle care
Fi g. 51 Lu ggage
c omp artm ent : re leas e
le ver ..
Do-it-yourselt service iTechnical data
Page 60 of 364

Power top
Fig. 52 Luggage
compa rt m ent: side
t rim
- Open the luggage compartment lid. The emergency
release can be used if the luggage compartment lid will
not open ~
page 48.
-Reach your finger into the gap behind the trim n ear the
center of the vehicle .
- Pull the release lever down to release the power top
compartment cover~
page 57, fig. 51 .
- Open the left side trim and press the yellow lever in the
direction of the arrow~
page 58, fig. 52 .
- Remove the emergency key from the compartment on the
left side ~
page 58, fig. 52 @.
Open the right side trim and press the yellow lever in the
direction of t he arrow . •
Step 2: Lifting the power top compartment
cover out
Fi g. 53 Luggage
com partme nt li d
co mp le te ly ope n
Fig . 54 Sto rage bay
cov er partia lly o pen
- Press the luggage compartment lid in the direction of the
arr ow ~ fig . 53 .
- Raise the power top compartment cover out of the power top tray and ho ld it in place~ fig . 54
~ & .
Have a second person assist when raising the power top compart
ment cover. That pe rson should stand on the opposite side of the
vehicle and perfo rm the same steps .
Page 61 of 364
& WARNING
When raising the power top compartment cover, avoid contact
with the supports or other moving parts. Otherwise you could
pinch your hands. •
Step 3: Lifting the power top storage bay
cover out
-Close the luggage compartment lid.
Fig . 55 Luggage
compartment lid
closed
Fig. 56 Power top
storage bay cover
completely open
- Open the power top storage bay cover completely
=> fig. 56.
Con tro ls a nd e quip
m en t Vehicle
OP-eration
Power top
& WARNING
When raising the power top storage bay cover, avoid contact with
the supports or other moving parts. Otherwise you could pinch
your hands. •
Step 4: Closing the power top
-Remove the cap on the trim.
Fig. 57 Removing the
cover
Fig . 58 Emergency
key for opening the
latches
- Insert the emergency key in the opening (hex socket).
- Turn the release key counterclockwise until it stops to
open the latch .
Vehicle care Do-it-yourselt service iTechnical data
Page 62 of 364

Power top
-Remove the emergency key. •
Step 5: Closing the power top
The power top must be positioned by hand.
Fig. 59 Power top
partially open
Fig . 60 Windshield :
Power top
- Raise the power top out of the tray~ & in "Step 2 :
Lifting the power top compartment cover out" on
page 58.
-Pull the power top out completely .
- Press the power top onto the windshield frame~ fig. 60 .
Have a second person assist when positioning the power top . That
person should stand on the opposite side of the vehicle and perform
the same steps.
& WARNING
• When positioning the power top, avoid contact with the
supports or other moving parts. Otherwise you could pinch your
hands.
• When pressing the power top down onto the windshield frame,
make sure that you do not pinch yourself or anyone else. •
Step 6: Retracting the power top
compartment cover
The power top compartment cover must be retracted by
hand.
~ 0
;i; co a,
Fig. 61 Power top
raised
- Raise the rear of the power top and hold it in place
~ fig. 61 (D ~ & in "Step 2 : Lifting the power top
compartment cover out" on
page 58.
-Slide the power top compartment forward until it reaches
the end position ~ fig. 61
@. Release the power top. .,
Page 63 of 364

& WARNING
Do not pinch yourself or others when closing the power top
compartment. •
Step 7: Locking the power top
The locking system for the power top latches are located
on the inside of the power top.
Fig. 62 Inside of the
power top: hex key for
emergency operation
- Insert the emergency key in the opening and turn it clock
wise until it stops to lock the power top.
- Remove the emergency key.
- Cover the opening with the cap.
(J] Tips
Make sure the locking mechanisms are locked securely. •
Contro ls a nd e quip
m en t Vehicle
OP-eration
Power top
Step 8: Loosening the headliner
Fig. 63 Power top:
area around the right
side of the rear window
Fig. 64 Area around
the right side of the
rear window: headliner
partially loosened
Perform the following steps in the rear window area of the
power top on each side.
- Pull the loops (marked in yellow) with the emergency key
to loosen the headliner.
- Pull at the yellow marking again to loosen the headliner
around the rear window (approximately 30 cm).
Vehicle care Do-it-yourselt service iTechnical data
Page 64 of 364
Power top
Step 9: Securing the latch
. . : . . . . .. ·
. . .
Fig. 65 Rea r of the
powe r top: Securing
t he latc h
The latches must be secured on the left and right sides of the
vehicle.
- Pull the power top headliner to the side in the area around
the rear headrests to secure the latches=> fig. 65 =>
& in
"Step 2: Lift ing the power top compartment cover out" on
page 58.
- Then remove the emergency key and insert the short end
into the power top s upport at the yellow marking.
- Press the emergency key in the d irection of t he arrow
=> fig. 65
@ until t he latch is secure .
& WARNING
Do not pinch y ou rself or other s when clo sing the power top
compartment. •