Page 9 of 231
Cockpit
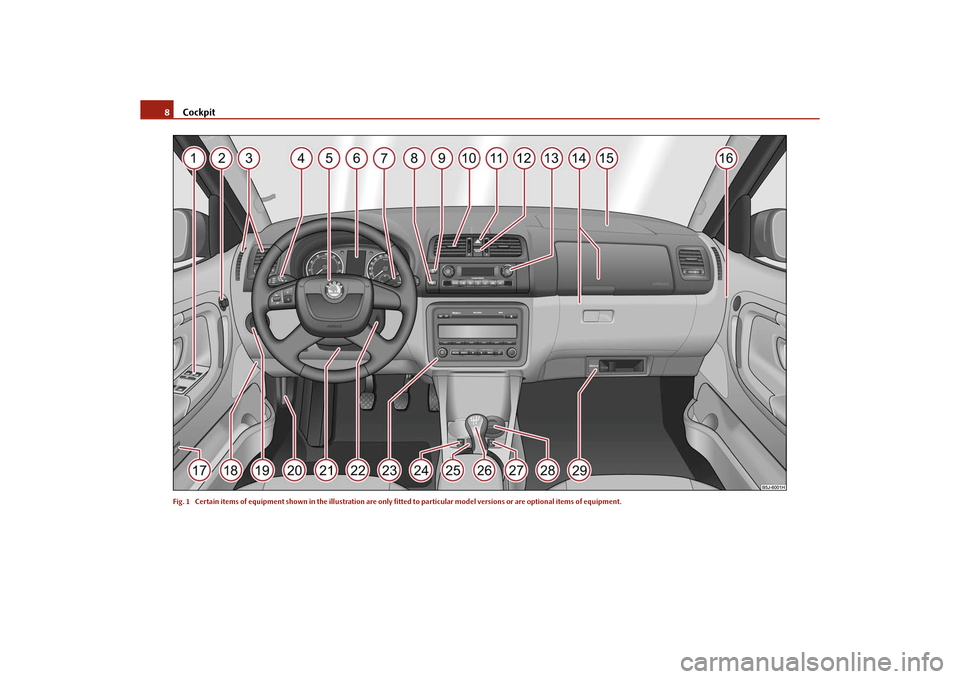
8Fig. 1 Certain items of equipment shown in the illustration are only fitted to partic ular model versions or are optional items of equipment.s16g.4.book Page 8 Wednesday, February 10, 2010 3:53 PM
Page 10 of 231

Cockpit9
Using the system
Safety
Driving Tips
General Maintenance
Breakdown assistance
Praktik
Technical Data
CockpitGeneral viewThis overview will help you to quickly familiarise yourself with the
displays and the control elements.
Electric power-operated window* . . . . . . . . . . . . . . . . . . . . . . . . . . . . . . .
Electric exterior mirror adjustment* . . . . . . . . . . . . . . . . . . . . . . . . . . . . .
Air outlet vents . . . . . . . . . . . . . . . . . . . . . . . . . . . . . . . . . . . . . . . . . . . . . . . .
Lever for the multi-functional switch:
Turn signal light, headlight and parking light, headlight flasher . .
Speed regulating system* . . . . . . . . . . . . . . . . . . . . . . . . . . . . . . . . . . . .
Steering wheel:
with horn
with driver airbag . . . . . . . . . . . . . . . . . . . . . . . . . . . . . . . . . . . . . . . . . . .
with pushbuttons for radio, navi gation system and mobile phone*
Instrument cluster: Instruments and indicator lights . . . . . . . . . . . . . .
Lever for the multi-functional switch:
Multi-functional indicator* . . . . . . . . . . . . . . . . . . . . . . . . . . . . . . . . . . .
Windshield wiper and wash system . . . . . . . . . . . . . . . . . . . . . . . . . . .
Switch for rear window heater . . . . . . . . . . . . . . . . . . . . . . . . . . . . . . . . . .
Switch for the TCS* . . . . . . . . . . . . . . . . . . . . . . . . . . . . . . . . . . . . . . . . . . . . .
Air outlet vents . . . . . . . . . . . . . . . . . . . . . . . . . . . . . . . . . . . . . . . . . . . . . . . .
Switch for hazard warning lights . . . . . . . . . . . . . . . . . . . . . . . . . . . . . . . . .
Indicator light for a switched off front seat passenger airbag* . . . . . .
Depending on equipment fitted:
Operating controls for the heating . . . . . . . . . . . . . . . . . . . . . . . . . . . .
Operating controls for Climatic* . . . . . . . . . . . . . . . . . . . . . . . . . . . . . .
Operating controls for Climatronic* . . . . . . . . . . . . . . . . . . . . . . . . . . .
Storage compartments on the front passenger side* . . . . . . . . . . . . . .
Front passenger airbag* . . . . . . . . . . . . . . . . . . . . . . . . . . . . . . . . . . . . . . . .
Switch for front passenger airbag* . . . . . . . . . . . . . . . . . . . . . . . . . . . . . . . Switch depending on equipment fitted:
Unlocking the boot lid* . . . . . . . . . . . . . . . . . . . . . . . . . . . . . . . . . . . . . .
Interior monitor* . . . . . . . . . . . . . . . . . . . . . . . . . . . . . . . . . . . . . . . . . . . .
Fuse box in the dash panel . . . . . . . . . . . . . . . . . . . . . . . . . . . . . . . . . . . . . .
Light switch and headlamp beam adjustment . . . . . . . . . . . . . . . . . . . .
Bonnet release lever . . . . . . . . . . . . . . . . . . . . . . . . . . . . . . . . . . . . . . . . . . . .
Lever for adjusting the steering wheel . . . . . . . . . . . . . . . . . . . . . . . . . . . .
Ignition lock . . . . . . . . . . . . . . . . . . . . . . . . . . . . . . . . . . . . . . . . . . . . . . . . . . .
Depending on equipment fitted:
Radio*
Navigation*
Rocker switch for the heating on the driver's seat* . . . . . . . . . . . . . . . .
Button for the central locking system* . . . . . . . . . . . . . . . . . . . . . . . . . . .
Depending on equipment fitted:
Gearshift lever (manual gearbox) . . . . . . . . . . . . . . . . . . . . . . . . . . . . . .
Selector lever (automatic gearbox*) . . . . . . . . . . . . . . . . . . . . . . . . . . .
Rocker switch for the heating on the front passenger seat* . . . . . . . .
Depending on equipment fitted:
Ashtray* . . . . . . . . . . . . . . . . . . . . . . . . . . . . . . . . . . . . . . . . . . . . . . . . . . . .
Storage compartment . . . . . . . . . . . . . . . . . . . . . . . . . . . . . . . . . . . . . . . .
MDI* . . . . . . . . . . . . . . . . . . . . . . . . . . . . . . . . . . . . . . . . . . . . . . . . . . . . . . . . . .
Note
Cars with factory-fitted radio or naviga tion system are supplied with separate
instructions for operating such equipment.
The arrangement of the control elements on right-hand drive models may differ to
some extent from that shown in page 8, fig. 1. However the symbols correspond to
the individual control elements.
A1
43
A2
55
A3
78
A4
5092
A5
119100
A6
15
A7
1853
A8
52
A9
133
A10
78
A11
49
A12
125
A13
788184
A14
74
A15
119
A16
125
A17
3942
A18
191
A19
46, 49
A20
161
A21
87
A22
87
A23A24
59
A25
38
A26
9095
A27
59
A28
7275
A29
107
s16g.4.book Page 9 Wednesda y, February 10, 2010 3:53 PM
Page 11 of 231

The brief instruction
10
The brief instructionBasic functions and im portant informationIntroduction
The chapter of the brief instruction is only used as a quick reference of
the most important operating elements of the vehicle. It is necessary to
observe all the information which is contained in the following chapters
of the Owner's Manual.Unlocking and locking the vehicle Unlocking the vehicle
Unlocking the boot lid
Locking the vehicle
Folding out/folding up of the key
Further information page 40, “Unlocking and locking car”.
Setting steering wheel positionFig. 3 Adjustable steering wheel: Lever on the steering column / the correct distance of the
driver from the steering wheelYou can set the height and the forward/back position of the steering wheel to the
desired position.
– Pull the lever below the steering column fig. 3 down.
– Set the steering wheel to the desired posi tion (concerning height and forward/back
position).
– Push the lever upwards as far as the stop.
You can set the height and the forward/back position of the steering wheel to the
desired position.
Further information page 87, “Setting steering wheel position”.
WARNING
Adjust the steering wheel so that the distance between the steering wheel
and your chest is at least 25 cm fig. 3 on the right. Not maintaining this
minimum distance will mean that the airbag system will not be able to properly
protect you - hazard!
You must not adjust the steering wheel when the vehicle is moving!
Fig. 2 Remote control key
A1A2A3A4s16g.4.book Page 10 Wednesda y, February 10, 2010 3:53 PM
Page 12 of 231

The brief instruction11
Using the system
Safety
Driving Tips
General Maintenance
Breakdown assistance
Praktik
Technical Data
For safety reasons the lever must always be firmly pushed up to avoid the
steering wheel alteri ng its position unintentionally when driving - risk of
accident!
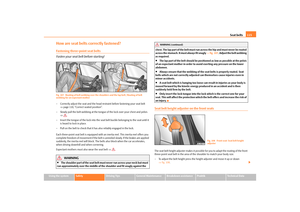
Seat belt height adjuster– To adjust the belt height press the height adjuster and move it up or down fig. 4 .
– Then pull firmly on the belt to ensure that the seat belt height adjuster has correctly
locked in place.
Further information page 115.
WARNING
Adjust the height of the belt in such a way that the shoulder part of the belt is
positioned approximately across the middle of your shoulder - on no account
across your neck!
Adjusting the front seats Adjusting a seat in a forward/back direction
Adjusting height of seat*
Adjust the angle of the seat backrest
Further information page 57, “Adjusting the front seats”.
WARNING
Only adjust the driver seat when the ve hicle is stationary - risk of injury!Electric exterior mirror adjustment*
WARNING (continued)
Fig. 4 Front seat: Seat belt height
adjuster
Fig. 5 Controls at seat
A1A2A3
Fig. 6 Inner part of door: Rotary knob
s16g.4.book Page 11 Wednesday, February 10, 2010 3:53 PM
Page 13 of 231
The brief instruction
12
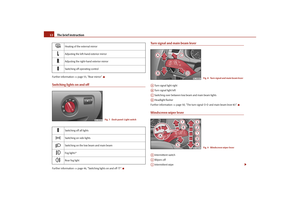
Further information page 55, “Rear mirror”.Switching lights on and offFurther information page 46, “Switching lights on and off ”.
Turn signal and main beam lever Turn signal light right
Turn signal light left
Switching over between low beam and main beam lights
Headlight flasher
Further information page 50, “The turn signal and main beam lever ”.Windscreen wiper lever Intermittent switch
Wipers off
Intermittent wipe
Heating of the external mirror
Adjusting the left-hand exterior mirror
Adjusting the right-hand exterior mirror
Switching off operating control
Switching off all lights
Switching on side lights
Switching on the low beam and main beam
Fog lights*
Rear fog light
Fig. 7 Dash panel: Light switch
Fig. 8 Turn signal and main beam lever
AAABACAD
Fig. 9 Windscreen wiper lever
AAA0A1
s16g.4.book Page 12 Wednesda y, February 10, 2010 3:53 PM
Page 14 of 231

The brief instruction13
Using the system
Safety
Driving Tips
General Maintenance
Breakdown assistance
Praktik
Technical Data
Slow wipe
Fast wipe
one time wipe
Automatic wipe/wash
Rear window wiper Intermittent wipe - every 6 seconds
Automatic wipe/wash
Further information page 53, “Windshield wiper”.
Power windows* Button for the power window in the driver's door
Button for the power window in the front passenger's door
Button for the power window in the rear door on the right*
Button for the power window in the rear door on the left*
Safety pushbutton*
Further information page 43, “Buttons for elec trical power windows”.
RefuellingFig. 11 Right rear side of the vehicle: Fuel filler flap / fuel filler flap with cap unscrewedOpening the fuel filler cap– Open the fuel filler flap with the hand.
– Unlock the fuel filler cap on the fuel filler tube to the left using the vehicle key.
– Unscrew the fuel filler ca p anti-clockwise and place the fuel filler cap from above
on the fuel filler flap fig. 11 on the right.Closing fuel filler cap– Screw on the cap by turning it to the right until it is heard to lock.
– Lock the fuel filler cap on the fuel filler tube by turning the vehicle key to the right
and withdraw the key.
– Press the fuel tank flap closed.
Further information page 159, “Refuelling”.
A2A3A4A5A6A7
Fig. 10 Buttons on the driver's door
AAABACADAS
s16g.4.book Page 13 Wednesda y, February 10, 2010 3:53 PM
Page 15 of 231
The brief instruction
14
Bonnet remote release– Pull the unlocking lever below the dash panel on the driver's side fig. 12 .
Further information page 161, “Bonnet remote release”.Opening the bonnetFig. 13 Radiator grille: Locking lever / se curing the bonnet with the bonnet support– Pull on the locking lever fig. 13 , the bonnet is then unlocked.
– Take the bonnet support out of its holder and set it in the opening designed for it fig. 13 on the right.
Further information page 161.
Inspecting the engine oil level Engine oil must not be refilled.
Engine oil can be refilled.
Engine oil must be refilled.
Further information page 163, “Check engine oil level”.
Fig. 12 Bonnet release lever
Fig. 14 Dipstick
AaAbAc
s16g.4.book Page 14 Wednesda y, February 10, 2010 3:53 PM
Page 16 of 231

Instruments and warning lights15
Using the system
Safety
Driving Tips
General Maintenance
Breakdown assistance
Praktik
Technical Data
Instruments and warning lightsOverview of the instrument cluster
Engine revolutions counter
Display
with counter for distance driven page 17
with Service Interval Display page 17
with digital clock page 18
with Multi-functional indicator* page 18
with Information display* page 22
Speedometer page 16
Coolant temperature gauge* page 16
Button for display mode:
Set hours / minutes
Activating / deactivating the second speed in mph or km/h*
Service interval - Display of the remaining number of days, kilometres or miles
to the next Inspection Service / Reset*
1)
Button for:
Reset trip counter for distance driven
Resetting Service Interval Display
Set hours / minutes
Activate / deactivate display mode
Fuel gauge* page 16
Engine revolutions counterThe red zone of the rev counter scale fig. 15 indicates the range in which the
engine control unit begins to limit the engi ne speed. The engine control unit restricts
the engine speed to a steady limit value.
Fig. 15 Instrument cluster
A1A2A3A4A5
1)Valid for countries where the values ar e indicated in British measuring units.A6A7
A1
s16g.4.book Page 15 Wednesday, February 10, 2010 3:53 PM