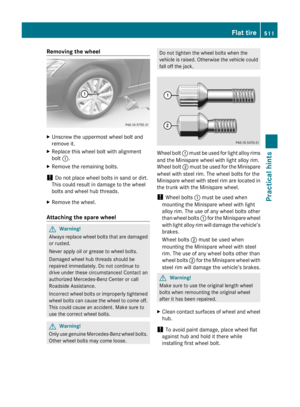
Page 497 of 548

ProblemPossible causes/consequences and M SolutionsåThe yellow ESC
OFF warning
lamp comes on
while the engine
is running.The ESC has been switched off.
Risk of accident!
When the ESC is switched off it will not stabilize the vehicle if the
system recognizes that the vehicle starts to skid or that a wheel
is spinning.XSwitch the ESC back on.
Exceptions: ( Y page 67).XIf leaving the ESC switched off, adapt your speed and driving to
the prevailing road and weather conditions.XIf the ESC cannot be switched back on: Have the system
checked at an authorized Mercedes-Benz Center as soon as
possible.÷
åThe yellow ESC
warning lamp
and the yellow
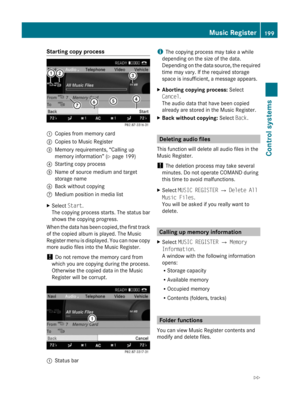
ESC OFF
warning lamp
come on while
the engine is
running.The ESC is not operational due to a malfunction.
The ABS, the BAS, the BAS PLUS, the hill-start assist system, the
HOLD function, the Adaptive Brake Lights, the PRE-SAFE ®
system,
and the PRE-SAFE ®
Brake are also switched off.
The brake system is still functioning normally but without the
systems specified above available.
The ATTENTION ASSIST is disabled.XRead and observe additional messages that may appear in the
multifunction display.XContinue driving with added caution. Wheels may lock during
hard braking, reducing steering capability.XAdapt your speed and driving to the prevailing road and weather
conditions.XHave the system checked at an authorized Mercedes-Benz
Center as soon as possible.
Failure to follow these instructions increases the risk of an
accident.
÷The yellow ESC
warning lamp
flashes while
driving.The ESC or the ETS/4-ETS has come into operation because of
detected traction loss in at least one tire.XWhen driving off, apply as little throttle as possible.XWhile driving, ease up on the accelerator pedal.XAdapt your speed and driving to the prevailing road and weather
conditions.XDo not deactivate the ESC.
Exceptions: ( Y page 67).
Failure to follow these instructions increases the risk of an
accident.
What to do if …495Practical hints221_AKB; 6; 20, en-USd2ugruen,Version: 2.11.8.12009-09-24T13:28:17+02:00 - Seite 495Z
Page 498 of 548

Driving systemsProblemPossible causes/consequences and M Solutions·DISTRONIC PLUS
or PRE-SAFE ®
Brake: The red
distance warning
lamp comes on
while driving and
an acoustic
warning sounds.You are gaining too rapidly on the vehicle ahead of you or
DISTRONIC PLUS or PRE-SAFE ®
Brake has recognized a stationary
obstacle on your probable line of travel.XApply the brakes immediately.XCarefully observe the traffic situation. You may need to brake
or maneuver to avoid hitting an obstacle.
Vehicle
ProblemPossible causes/consequences and M SolutionsThe yellow fuel tank
reserve warning lamp in
the fuel gauge comes
on while driving.The fuel level has gone below the reserve mark.XRefuel at the next gas station.
Engine
ProblemPossible causes/consequences and M Solutions;
The yellow engine
malfunction indicator
lamp comes on when
the engine is running.There may be a malfunction in
R the fuel management system
R the ignition system
R the emission control system
R systems which affect emissions
Such malfunctions may result in excessive emissions values and
may switch the engine to limp-home (emergency operation) mode.XHave the vehicle checked as soon as possible at an authorized
Mercedes-Benz Center.
i Some states may by law require you to visit a workshop as
soon as the engine malfunction indicator lamp comes on. Check
local requirements.
;
The yellow engine
malfunction indicator
lamp comes on when
the engine is running.A loss of pressure has been detected in the fuel system. The fuel
cap may not be closed properly or the fuel system may be leaky.XCheck the fuel cap ( Y page 402).XIf it is not closed properly: Close the fuel cap.XIf it is closed properly: Have the fuel system checked by an
authorized Mercedes-Benz Center.496What to do if …Practical hints
221_AKB; 6; 20, en-USd2ugruen,Version: 2.11.8.12009-09-24T13:28:17+02:00 - Seite 496
Page 499 of 548

TiresProblemPossible causes/consequences and M SolutionshUSA only:
Combination
low tire pressure
telltale/TPMS
malfunction
telltale for the
Advanced TPMS
illuminates
continuously.
Canada only:
Low tire
pressure telltale
for the
Advanced TPMS
illuminates
continuously.The Advanced TPMS detects a loss of pressure in at least one tire.XCarefully bring the vehicle to a halt, avoiding abrupt steering and
braking maneuvers. Observe the traffic situation around you.XRead and observe messages in the multifunction display
( Y page 452).
If the tire inflation pressure in the respective tire(s) has (have) been
corrected, the combination low tire pressure/TPMS malfunction
telltale goes out after a few minutes of driving.
hUSA only:
Combination
low tire pressure
telltale/TPMS
malfunction
telltale for the
Advanced TPMS
flashes 60
seconds and
then stays
illuminated.There is a malfunction in the Advanced TPMS.XRead and observe messages in the multifunction display
( Y page 452).XHave the Advanced TPMS checked at an authorized Mercedes-
Benz Center.
After the malfunction has been remedied, the combination low tire
pressure/TPMS malfunction telltale goes out after a few minutes
of driving.
GWarning!
Each tire, including the spare (if provided),
should be checked at least once a month
when cold and inflated to the inflation
pressure recommended by the vehicle
manufacturer on the Tire and Loading
Information placard on the driver’s door B-
pillar or the tire inflation pressure label on the
inside of the fuel filler flap. If your vehicle has
tires of a different size than the size indicated
on the Tire and Loading Information placard
or the tire inflation pressure label, you should
determine the proper tire inflation pressure
for those tires.
As an added safety feature, your vehicle has
been equipped with a tire pressure monitoring
system (TPMS) that illuminates a low tire
pressure telltale when one or more of your
tires are significantly underinflated.
Accordingly, when the low tire pressure
telltale illuminates, you should stop and check
your tires as soon as possible, and inflate
them to the proper pressure. Driving on a
significantly underinflated tire causes the tire
to overheat and can lead to tire failure.What to do if …497Practical hints221_AKB; 6; 20, en-USd2ugruen,Version: 2.11.8.12009-09-24T13:28:17+02:00 - Seite 497Z
Page 500 of 548

Underinflation also reduces fuel efficiency
and tire tread life, and may affect the vehicle’s
handling and stopping ability. Please note that
the TPMS is not a substitute for proper tire
maintenance, and it is the driver’s
responsibility to maintain correct tire
pressure, even if underinflation has not
reached the level to trigger illumination of the
TPMS low tire pressure telltale.
USA only:
Your vehicle has also been equipped with a
TPMS malfunction indicator to indicate when
the system is not operating properly. The
TPMS malfunction indicator is combined with
the low tire pressure telltale. When the
system detects a malfunction, the telltale will
flash for approximately 1 minute and thenremain continuously illuminated. This
sequence will continue upon subsequent
vehicle start-ups as long as the malfunction
exists. When the malfunction indicator is
illuminated, the system may not be able to
detect or signal low tire pressure as intended.
TPMS malfunctions may occur for a variety of
reasons, including the installation of
incompatible replacement or alternate tires
or wheels on the vehicle that prevent the
TPMS from functioning properly. Always
check the TPMS malfunction telltale after
replacing one or more tires or wheels on your
vehicle to ensure that the replacement or
alternate tires and wheels allow the TPMS to
continue to function properly.
Lamp in center console
ProblemPossible causes/consequences and M Solutions42
The front passenger
front air bag off
indicator lamp
illuminates and
remains illuminated
with the weight of a
typical adult or
someone larger than a
small individual on the
front passenger seat.The system is malfunctioning.XHave the system checked as soon as possible at an authorized
Mercedes-Benz Center.XRead and observe messages in the multifunction display and
follow corrective steps ( Y page 452).GWarning!
If the 42 indicator lamp
illuminates and remains illuminated with the
weight of a typical adult or someone larger
than a small individual on the front passenger
seat, do not have any passenger use the front
passenger seat until the system has been
repaired.498What to do if …Practical hints
221_AKB; 6; 20, en-USd2ugruen,Version: 2.11.8.12009-09-24T13:28:17+02:00 - Seite 498
Page 501 of 548

ProblemPossible causes/consequences and M Solutions42
The front passenger
front air bag off
indicator lamp does not
illuminate and/or does
not remain illuminated
with the weight of a
typical 12-month-old
child in a standard child
restraint or less on the
front passenger seat.
The system is malfunctioning.XMake sure there is nothing between seat cushion and child seat
and check installation of the child seat.
XMake sure no objects applying supplemental weight onto the
seat are present.
XIf the front passenger front air bag off indicator lamp remains
out, have the system checked as soon as possible at an
authorized Mercedes-Benz Center. Do not transport a child on
the front passenger seat until the system has been repaired.
XRead and observe messages in the multifunction display and
follow corrective steps (Y page 452).
GWarning!
If the 42 indicator lamp does not
illuminate or remains out with the weight of a
typical 12-month-old child in a standard child
restraint or less on the front passenger seat,
do not transport a child on the front
passenger seat until the system has been
repaired.
Unlocking/locking manually
Unlocking the vehicle
If you cannot unlock the vehicle with the
SmartKey or with KEYLESS-GO, unlock the
driver’s door and the trunk using the
mechanical key.
The anti-theft alarm system will trigger when
you
Runlock the driver’s door or the trunk with
the mechanical key
and
Ropen the driver’s door or the trunk
To cancel the alarm, insert the SmartKey into
the starter switch.
Removing the mechanical key
SmartKey
SmartKey with KEYLESS-GO
XMove locking tab : in the direction of
arrow.
XSlide mechanical key ; out of the housing.Unlocking/locking manually499Practical hints221_AKB; 6; 20, en-USd2ugruen,Version: 2.11.8.12009-09-24T13:28:17+02:00 - Seite 499Z
Page 502 of 548

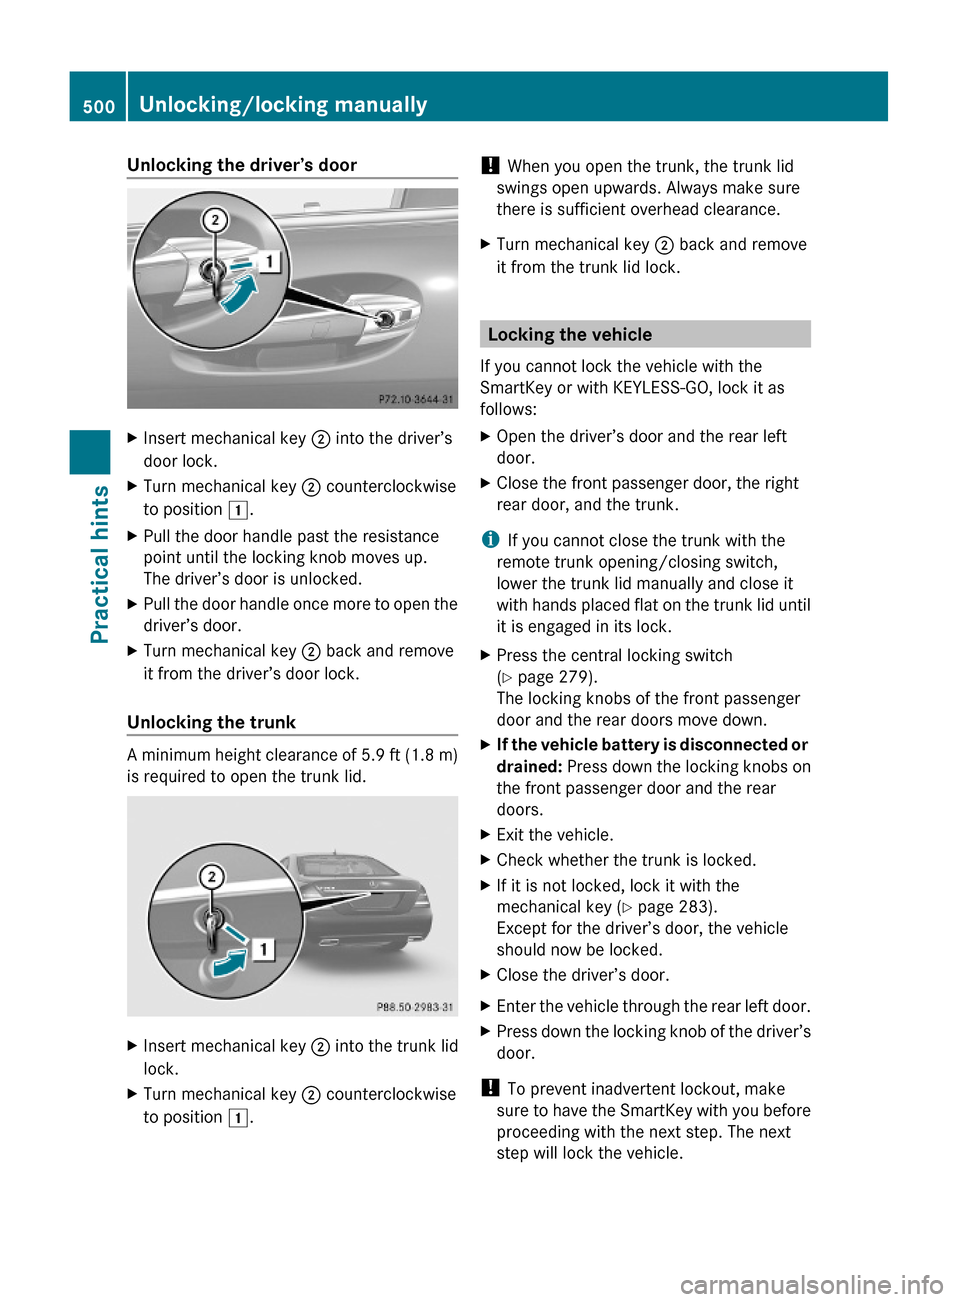
Unlocking the driver’s doorXInsert mechanical key ; into the driver’s
door lock.
XTurn mechanical key ; counterclockwise
to position 1.
XPull the door handle past the resistance
point until the locking knob moves up.
The driver’s door is unlocked.
XPull the door handle once more to open the
driver’s door.
XTurn mechanical key ; back and remove
it from the driver’s door lock.
Unlocking the trunk
A minimum height clearance of 5.9 ft (1.8 m)
is required to open the trunk lid.
XInsert mechanical key ; into the trunk lid
lock.
XTurn mechanical key ; counterclockwise
to position 1.
! When you open the trunk, the trunk lid
swings open upwards. Always make sure
there is sufficient overhead clearance.
XTurn mechanical key ; back and remove
it from the trunk lid lock.
Locking the vehicle
If you cannot lock the vehicle with the
SmartKey or with KEYLESS-GO, lock it as
follows:
XOpen the driver’s door and the rear left
door.
XClose the front passenger door, the right
rear door, and the trunk.
iIf you cannot close the trunk with the
remote trunk opening/closing switch,
lower the trunk lid manually and close it
with hands placed flat on the trunk lid until
it is engaged in its lock.
XPress the central locking switch
(Y page 279).
The locking knobs of the front passenger
door and the rear doors move down.
XIf the vehicle battery is disconnected or
drained: Press down the locking knobs on
the front passenger door and the rear
doors.
XExit the vehicle.XCheck whether the trunk is locked.XIf it is not locked, lock it with the
mechanical key (Y page 283).
Except for the driver’s door, the vehicle
should now be locked.
XClose the driver’s door.XEnter the vehicle through the rear left door.XPress down the locking knob of the driver’s
door.
! To prevent inadvertent lockout, make
sure to have the SmartKey with you before
proceeding with the next step. The next
step will lock the vehicle.
500Unlocking/locking manuallyPractical hints
221_AKB; 6; 20, en-USd2ugruen,Version: 2.11.8.12009-09-24T13:28:17+02:00 - Seite 500
Page 503 of 548

XExit the vehicle.XClose the rear left door.
The vehicle is locked.
iThis procedure does not arm the anti-
theft alarm system, nor does it lock the fuel
filler flap.
Resetting activated NECK-PRO active
front head restraints
If the NECK-PRO active front head restraints
have been triggered in a rear-end collision,
they must be reset.
You can tell that the NECK-PRO active front
head restraints have been triggered when
they have been moved forward and cannot be
adjusted.
GWarning!
For safety reasons, have the NECK-PRO active
front head restraints checked at an
authorized Mercedes-Benz Center after a
rear-end collision.
GWarning!
When pushing back the head restraint
cushion, make sure your fingers do not
become caught between the head restraint
cushion and the cover. Failing to do so may
lead to injury.
! Be careful not to damage upholstery.
iPressing the head restraint cushion back
requires high force. If you encounter
difficulties when pushing the head restraint
back, please have the procedure
performed at an authorized Mercedes-Benz
Center.
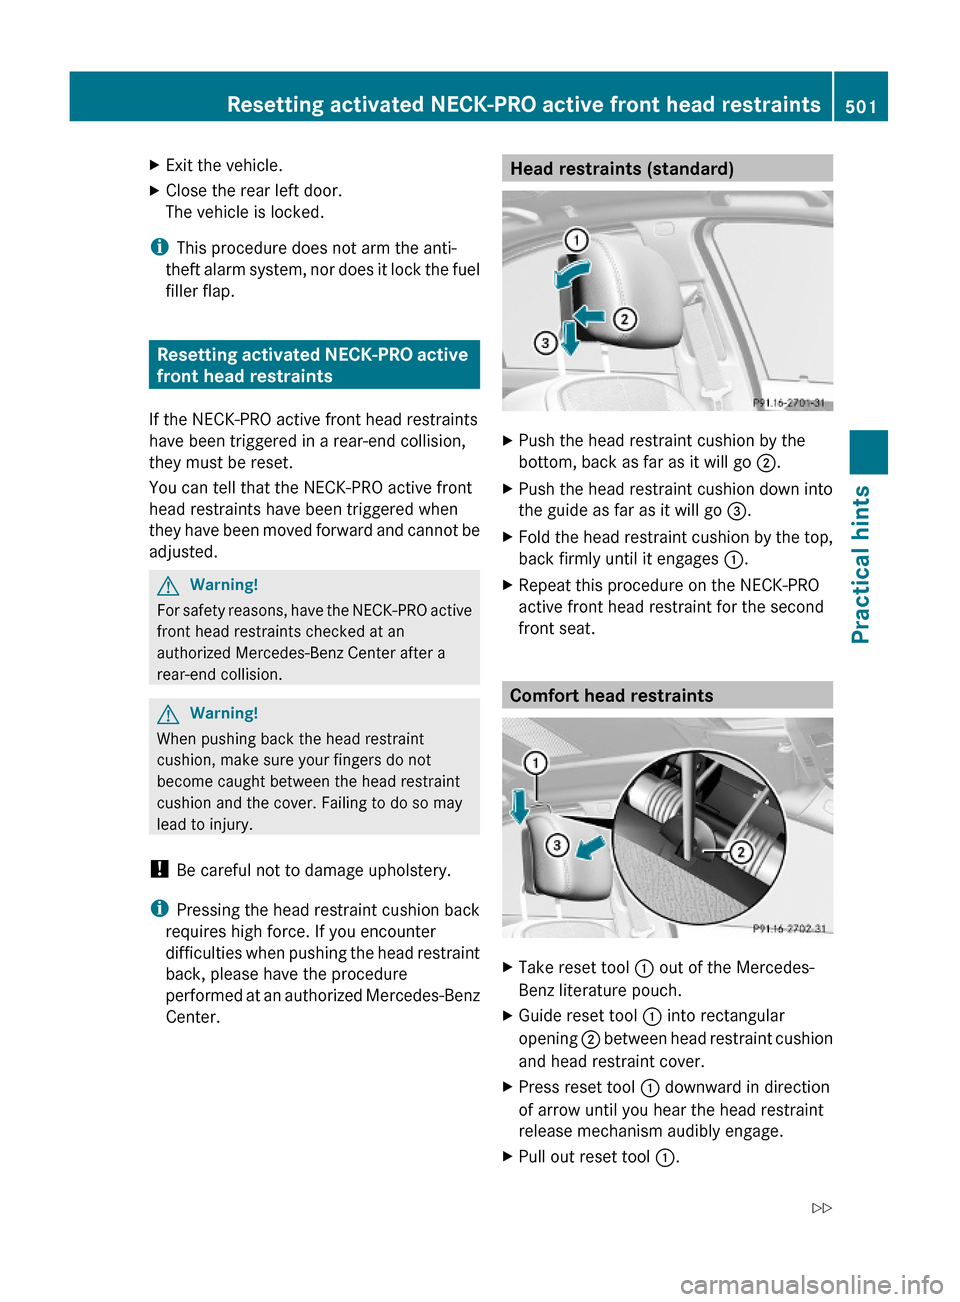
Head restraints (standard)XPush the head restraint cushion by the
bottom, back as far as it will go ;.
XPush the head restraint cushion down into
the guide as far as it will go =.
XFold the head restraint cushion by the top,
back firmly until it engages :.
XRepeat this procedure on the NECK-PRO
active front head restraint for the second
front seat.
Comfort head restraints
XTake reset tool : out of the Mercedes-
Benz literature pouch.
XGuide reset tool : into rectangular
opening ; between head restraint cushion
and head restraint cover.
XPress reset tool : downward in direction
of arrow until you hear the head restraint
release mechanism audibly engage.
XPull out reset tool :.Resetting activated NECK-PRO active front head restraints501Practical hints221_AKB; 6; 20, en-USd2ugruen,Version: 2.11.8.12009-09-24T13:28:17+02:00 - Seite 501Z
Page 504 of 548

XFirmly press the head restraint cushion
backward towards the head restraint cover
in direction of arrow = until it engages.
XRepeat this procedure for the second front
seat.
XAfter resetting the NECK-PRO active front
head restraints store reset tool : in the
Mercedes-Benz literature pouch.
For information on NECK-PRO active front
head restraints, see “NECK-PRO active front
head restraints” (Y page 55).
For information on head restraint adjustment,
see “Seats” (Y page 286).
Replacing batteries (SmartKey,
remote control, headphone)
Notes
If the batteries in the SmartKey are
discharged, the vehicle can no longer be
locked or unlocked. It is recommended to
have the batteries replaced at an authorized
Mercedes-Benz Center.
GWarning!
Batteries contain poisonous and corrosive
substances. Therefore, keep the batteries out
of reach of children.
If a battery is swallowed, seek medical help
immediately.
GWarning!
SmartKey batteries contain perchlorate
material, which may require special handling
and regard for the environment. Check with
your local government’s disposal guidelines.
California residents, see www.dtsc.ca.gov/
HazardousWaste/Perchlorate/
index.cfm.
Batteries contain materials that can harm the
environment if disposed of improperly.
Recycling of batteries is the preferred method
of disposal. Many states (USA only) or
provinces (Canada only) require sellers of
batteries to accept old batteries for recycling.
SmartKey
When inserting the batteries, make sure they
are clean and free of lint.
When replacing batteries, always replace
both batteries.
iThe required replacement batteries are
available at any authorized Mercedes-Benz
Center.
Replacement batteries: Lithium, type
CR 2025 or equivalent.
XRemove the mechanical key from the
SmartKey (Y page 499).
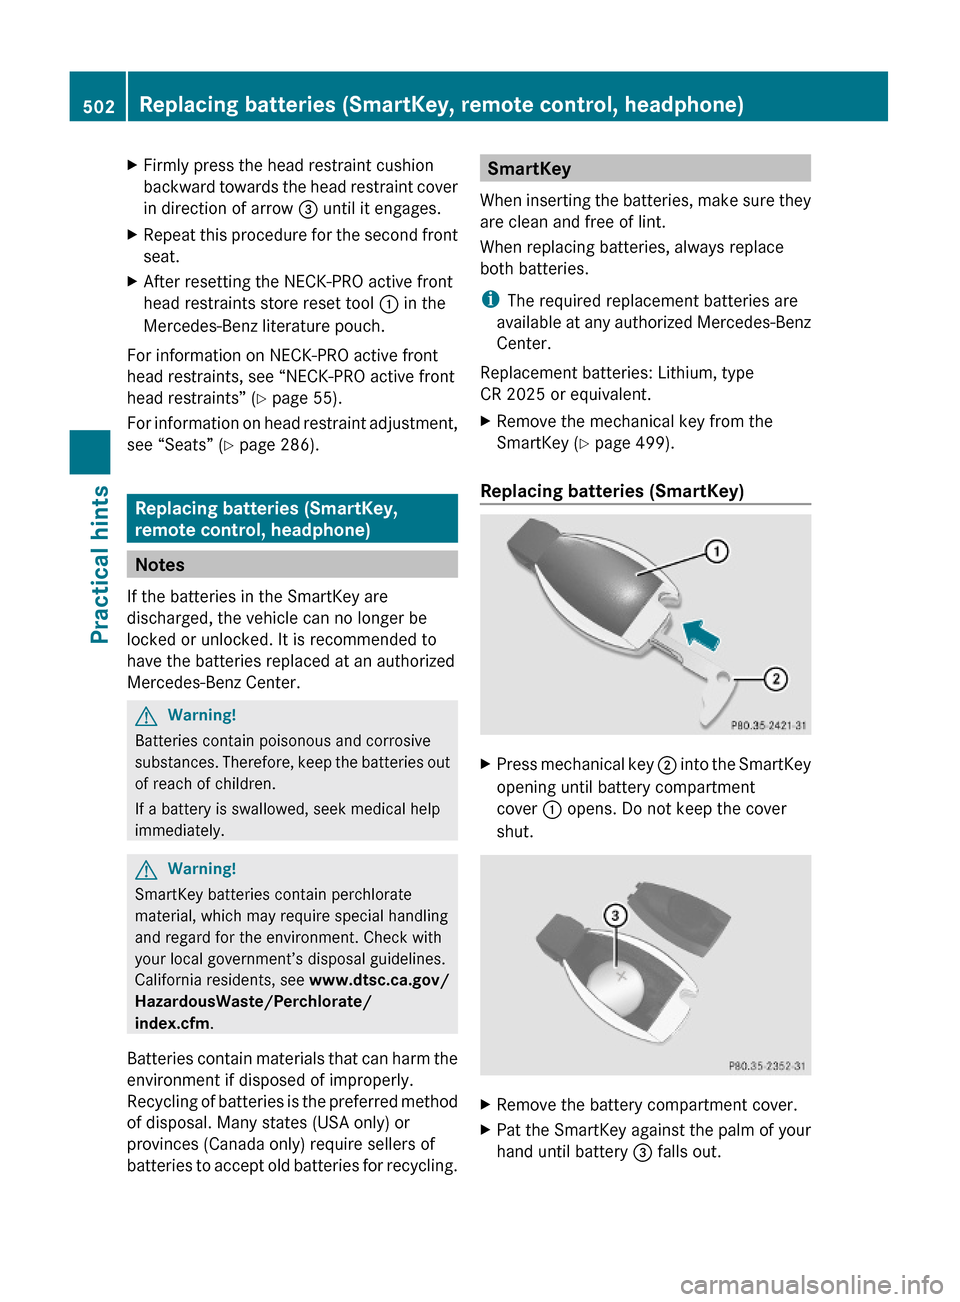
Replacing batteries (SmartKey)
XPress mechanical key ; into the SmartKey
opening until battery compartment
cover : opens. Do not keep the cover
shut.
XRemove the battery compartment cover.XPat the SmartKey against the palm of your
hand until battery = falls out.
502Replacing batteries (SmartKey, remote control, headphone)Practical hints
221_AKB; 6; 20, en-USd2ugruen,Version: 2.11.8.12009-09-24T13:28:17+02:00 - Seite 502