Page 385 of 548

Rear storage compartmentsGWarning!
To help avoid personal injury during a collision
or sudden maneuver, exercise care when
storing objects in the vehicle. Put luggage or
cargo in the trunk if possible.
Do not pile luggage or cargo higher than the
seat backrests.
Keep compartment lids closed. This will help
to prevent stored objects from being thrown
about and injuring vehicle occupants during
Rbraking
Rvehicle maneuvers
Ran accident
Rear armrest storage compartment
! Do not sit on or lean your body weight
against the armrest when it is folded down,
as you could otherwise damage it.
! Before storing the armrest in the seat
backrest, close the storage compartment
cover.
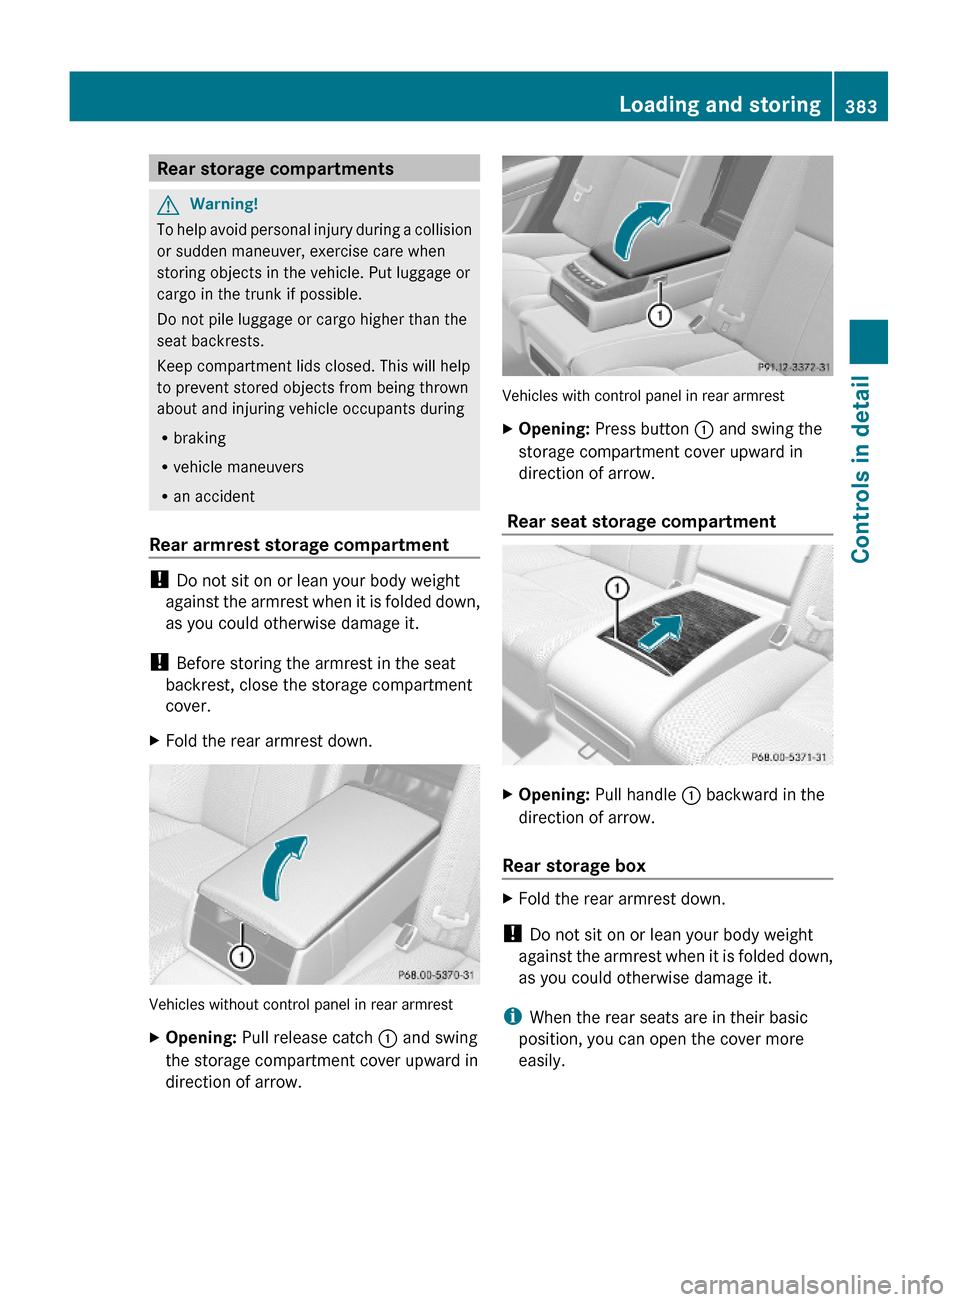
XFold the rear armrest down.
Vehicles without control panel in rear armrest
XOpening: Pull release catch : and swing
the storage compartment cover upward in
direction of arrow.
Vehicles with control panel in rear armrest
XOpening: Press button : and swing the
storage compartment cover upward in
direction of arrow.
Rear seat storage compartment
XOpening: Pull handle : backward in the
direction of arrow.
Rear storage box
XFold the rear armrest down.
! Do not sit on or lean your body weight
against the armrest when it is folded down,
as you could otherwise damage it.
iWhen the rear seats are in their basic
position, you can open the cover more
easily.
Loading and storing383Controls in detail221_AKB; 6; 20, en-USd2ugruen,Version: 2.11.8.12009-09-24T13:28:17+02:00 - Seite 383Z
Page 386 of 548

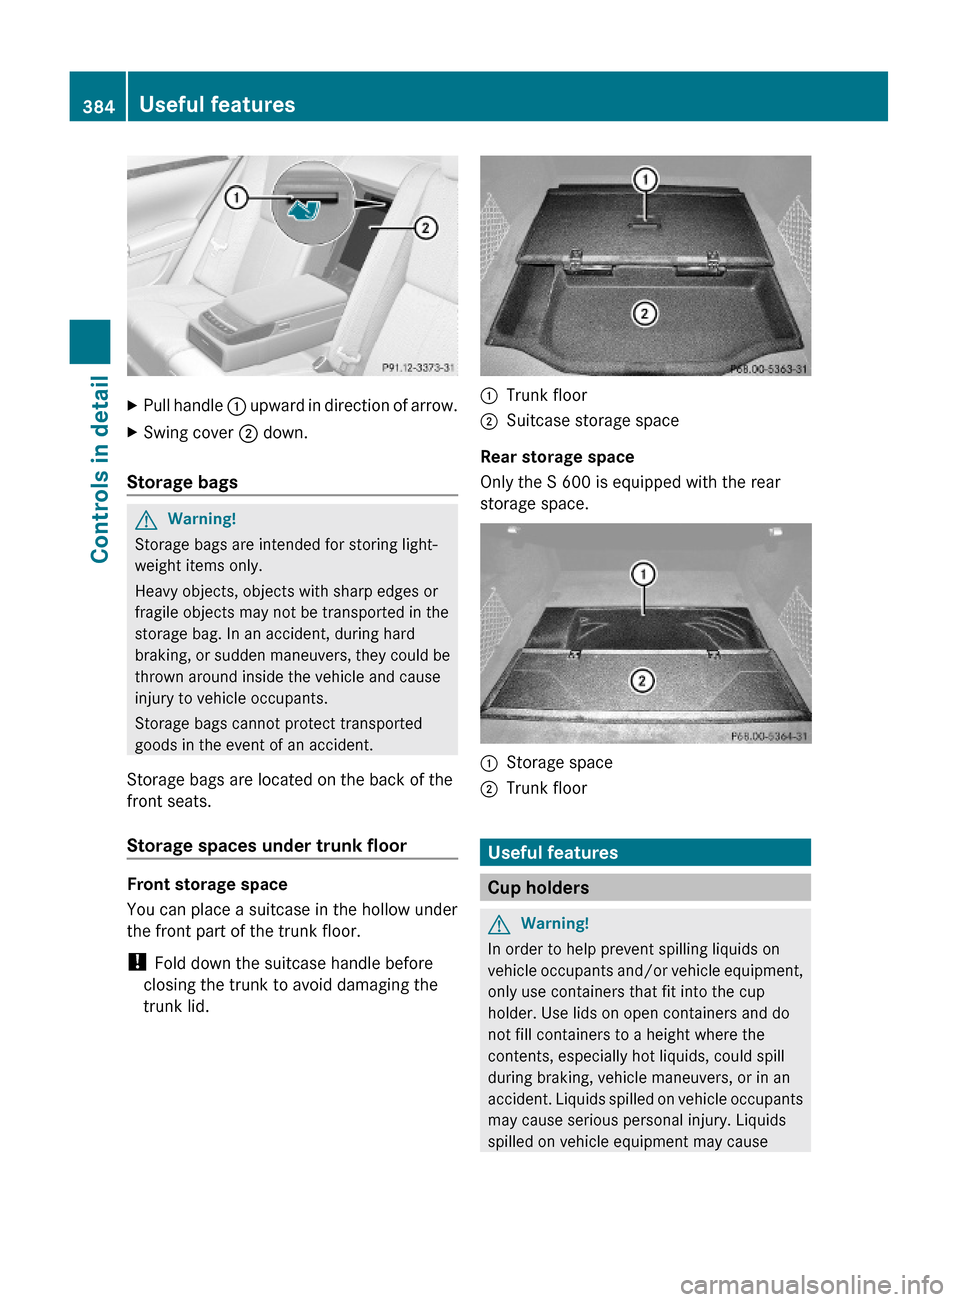
XPull handle : upward in direction of arrow.XSwing cover ; down.
Storage bags
GWarning!
Storage bags are intended for storing light-
weight items only.
Heavy objects, objects with sharp edges or
fragile objects may not be transported in the
storage bag. In an accident, during hard
braking, or sudden maneuvers, they could be
thrown around inside the vehicle and cause
injury to vehicle occupants.
Storage bags cannot protect transported
goods in the event of an accident.
Storage bags are located on the back of the
front seats.
Storage spaces under trunk floor
Front storage space
You can place a suitcase in the hollow under
the front part of the trunk floor.
! Fold down the suitcase handle before
closing the trunk to avoid damaging the
trunk lid.
:Trunk floor;Suitcase storage space
Rear storage space
Only the S 600 is equipped with the rear
storage space.
:Storage space;Trunk floor
Useful features
Cup holders
GWarning!
In order to help prevent spilling liquids on
vehicle occupants and/or vehicle equipment,
only use containers that fit into the cup
holder. Use lids on open containers and do
not fill containers to a height where the
contents, especially hot liquids, could spill
during braking, vehicle maneuvers, or in an
accident. Liquids spilled on vehicle occupants
may cause serious personal injury. Liquids
spilled on vehicle equipment may cause
384Useful featuresControls in detail
221_AKB; 6; 20, en-USd2ugruen,Version: 2.11.8.12009-09-24T13:28:17+02:00 - Seite 384
Page 387 of 548

damage not covered by the Mercedes-Benz
Limited Warranty.
When not in use, keep the cup holder closed.
An open cup holder may cause injury to you
or others when contacted during braking,
vehicle maneuvers, or in an accident.
Keep in mind that objects placed in the cup
holder may come loose during braking,
vehicle maneuvers, or in an accident and be
thrown around in the vehicle interior. Objects
thrown around in the vehicle interior may
cause an accident and/or serious personal
injury.
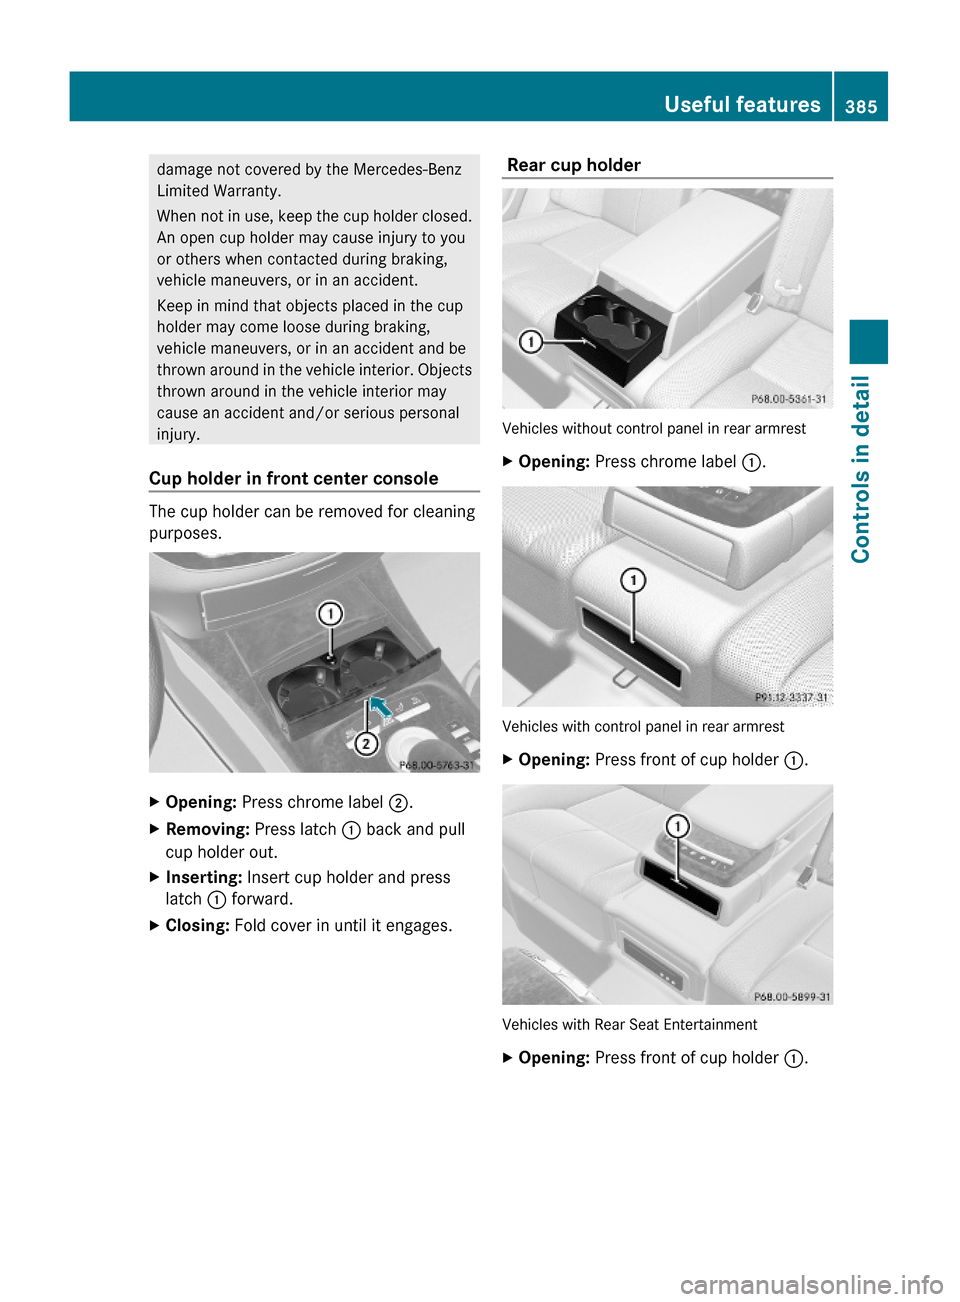
Cup holder in front center console
The cup holder can be removed for cleaning
purposes.
XOpening: Press chrome label ;.XRemoving: Press latch : back and pull
cup holder out.
XInserting: Insert cup holder and press
latch : forward.
XClosing: Fold cover in until it engages. Rear cup holder
Vehicles without control panel in rear armrest
XOpening: Press chrome label :.
Vehicles with control panel in rear armrest
XOpening: Press front of cup holder :.
Vehicles with Rear Seat Entertainment
XOpening: Press front of cup holder :.Useful features385Controls in detail221_AKB; 6; 20, en-USd2ugruen,Version: 2.11.8.12009-09-24T13:28:17+02:00 - Seite 385Z
Page 388 of 548

Sun visorsGWarning!
Do not use the vanity mirror while driving.
Keep the vanity mirrors in the sun visors
closed while vehicle is in motion. Reflected
glare can endanger you and others.
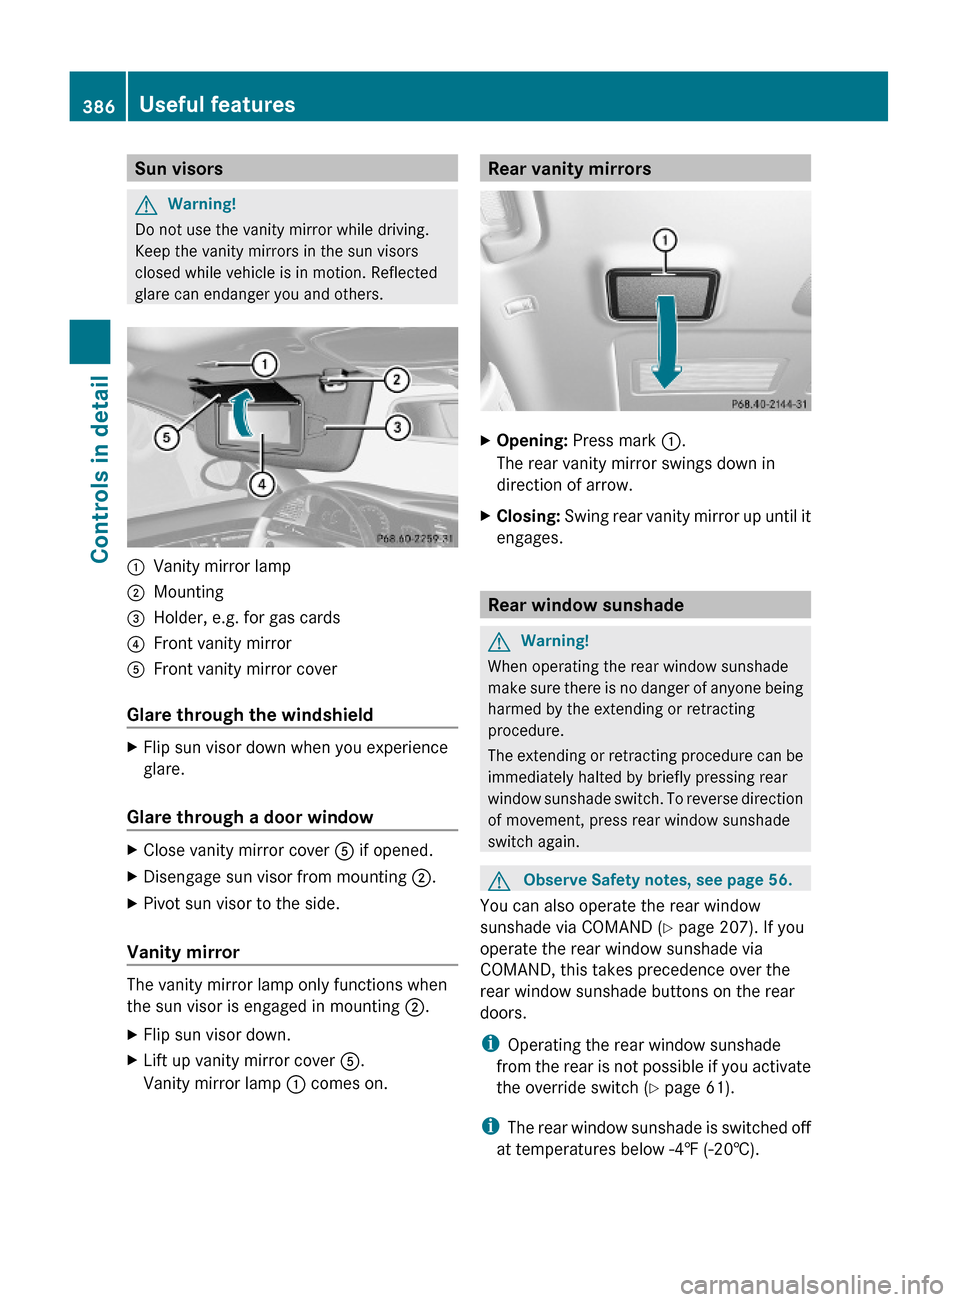
:Vanity mirror lamp;Mounting=Holder, e.g. for gas cards?Front vanity mirrorAFront vanity mirror cover
Glare through the windshield
XFlip sun visor down when you experience
glare.
Glare through a door window
XClose vanity mirror cover A if opened.XDisengage sun visor from mounting ;.XPivot sun visor to the side.
Vanity mirror
The vanity mirror lamp only functions when
the sun visor is engaged in mounting ;.
XFlip sun visor down.XLift up vanity mirror cover A.
Vanity mirror lamp : comes on.Rear vanity mirrorsXOpening: Press mark :.
The rear vanity mirror swings down in
direction of arrow.
XClosing: Swing rear vanity mirror up until it
engages.
Rear window sunshade
GWarning!
When operating the rear window sunshade
make sure there is no danger of anyone being
harmed by the extending or retracting
procedure.
The extending or retracting procedure can be
immediately halted by briefly pressing rear
window sunshade switch. To reverse direction
of movement, press rear window sunshade
switch again.
GObserve Safety notes, see page 56.
You can also operate the rear window
sunshade via COMAND (Y page 207). If you
operate the rear window sunshade via
COMAND, this takes precedence over the
rear window sunshade buttons on the rear
doors.
iOperating the rear window sunshade
from the rear is not possible if you activate
the override switch (Y page 61).
iThe rear window sunshade is switched off
at temperatures below -4‡ (-20†).
386Useful featuresControls in detail
221_AKB; 6; 20, en-USd2ugruen,Version: 2.11.8.12009-09-24T13:28:17+02:00 - Seite 386
Page 389 of 548

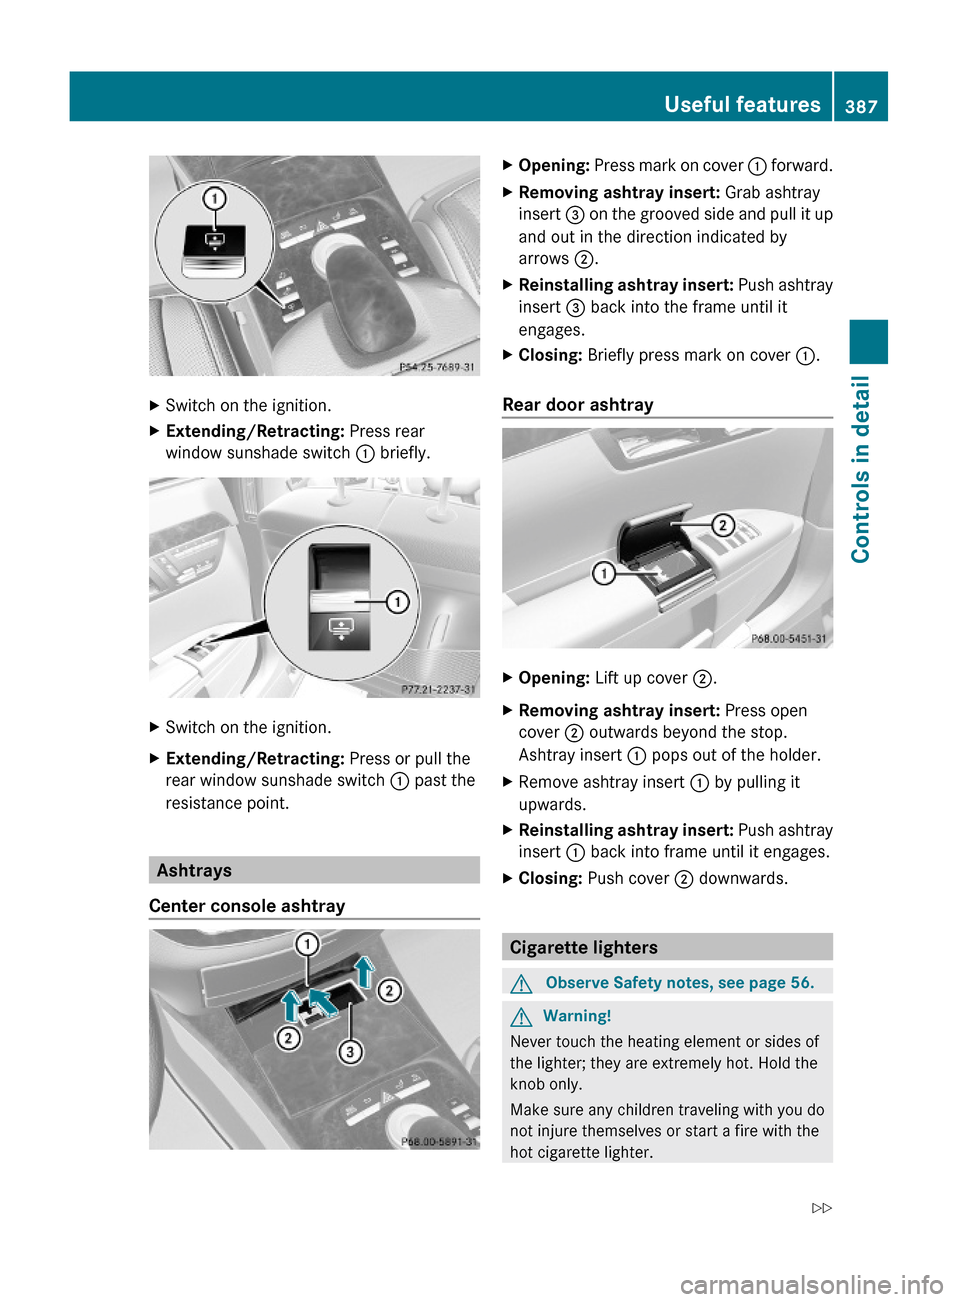
XSwitch on the ignition.XExtending/Retracting: Press rear
window sunshade switch : briefly.
XSwitch on the ignition.XExtending/Retracting: Press or pull the
rear window sunshade switch : past the
resistance point.
Ashtrays
Center console ashtray
XOpening: Press mark on cover : forward.XRemoving ashtray insert: Grab ashtray
insert = on the grooved side and pull it up
and out in the direction indicated by
arrows ;.
XReinstalling ashtray insert: Push ashtray
insert = back into the frame until it
engages.
XClosing: Briefly press mark on cover :.
Rear door ashtray
XOpening: Lift up cover ;.XRemoving ashtray insert: Press open
cover ; outwards beyond the stop.
Ashtray insert : pops out of the holder.
XRemove ashtray insert : by pulling it
upwards.
XReinstalling ashtray insert: Push ashtray
insert : back into frame until it engages.
XClosing: Push cover ; downwards.
Cigarette lighters
GObserve Safety notes, see page 56.GWarning!
Never touch the heating element or sides of
the lighter; they are extremely hot. Hold the
knob only.
Make sure any children traveling with you do
not injure themselves or start a fire with the
hot cigarette lighter.
Useful features387Controls in detail221_AKB; 6; 20, en-USd2ugruen,Version: 2.11.8.12009-09-24T13:28:17+02:00 - Seite 387Z
Page 390 of 548

To avoid possible injury to children sitting in
the rear seat, activate the override switch.
Activation of the override switch deactivates
the rear center console lighter.
If the engine is off and the cigarette lighter is
being used extensively, the vehicle battery
may become discharged.
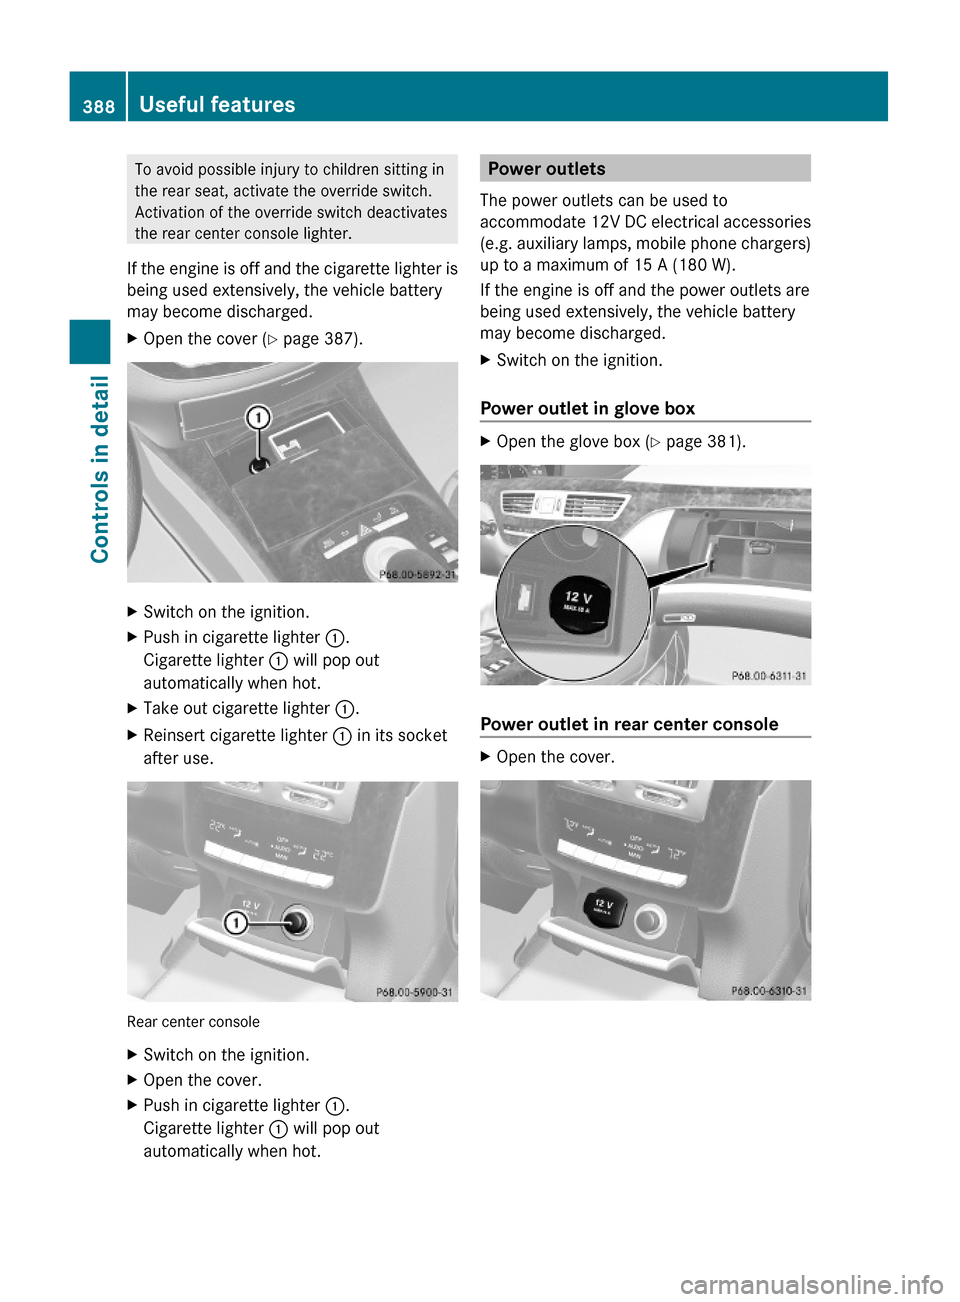
XOpen the cover (Y page 387).XSwitch on the ignition.XPush in cigarette lighter :.
Cigarette lighter : will pop out
automatically when hot.
XTake out cigarette lighter :.XReinsert cigarette lighter : in its socket
after use.
Rear center console
XSwitch on the ignition.XOpen the cover.XPush in cigarette lighter :.
Cigarette lighter : will pop out
automatically when hot.
Power outlets
The power outlets can be used to
accommodate 12V DC electrical accessories
(e.g. auxiliary lamps, mobile phone chargers)
up to a maximum of 15 A (180 W).
If the engine is off and the power outlets are
being used extensively, the vehicle battery
may become discharged.
XSwitch on the ignition.
Power outlet in glove box
XOpen the glove box (Y page 381).
Power outlet in rear center console
XOpen the cover.388Useful featuresControls in detail
221_AKB; 6; 20, en-USd2ugruen,Version: 2.11.8.12009-09-24T13:28:17+02:00 - Seite 388
Page 391 of 548

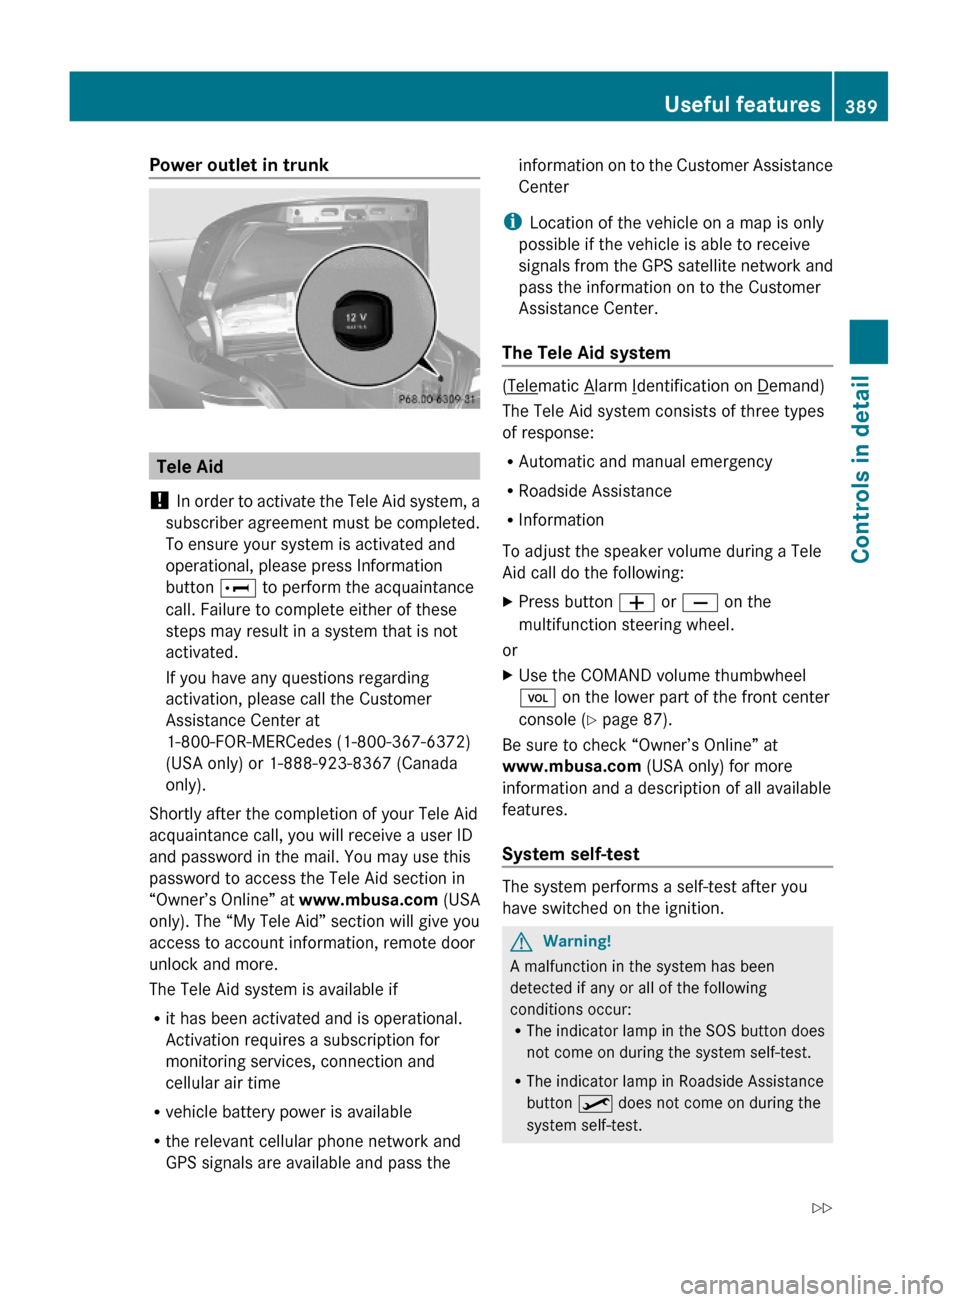
Power outlet in trunk
Tele Aid
! In order to activate the Tele Aid system, a
subscriber agreement must be completed.
To ensure your system is activated and
operational, please press Information
button E to perform the acquaintance
call. Failure to complete either of these
steps may result in a system that is not
activated.
If you have any questions regarding
activation, please call the Customer
Assistance Center at
1-800-FOR-MERCedes (1-800-367-6372)
(USA only) or 1-888-923-8367 (Canada
only).
Shortly after the completion of your Tele Aid
acquaintance call, you will receive a user ID
and password in the mail. You may use this
password to access the Tele Aid section in
“Owner’s Online” at www.mbusa.com (USA
only). The “My Tele Aid” section will give you
access to account information, remote door
unlock and more.
The Tele Aid system is available if
Rit has been activated and is operational.
Activation requires a subscription for
monitoring services, connection and
cellular air time
Rvehicle battery power is available
Rthe relevant cellular phone network and
GPS signals are available and pass the
information on to the Customer Assistance
Center
iLocation of the vehicle on a map is only
possible if the vehicle is able to receive
signals from the GPS satellite network and
pass the information on to the Customer
Assistance Center.
The Tele Aid system
(Telematic Alarm Identification on Demand)
The Tele Aid system consists of three types
of response:
RAutomatic and manual emergency
RRoadside Assistance
RInformation
To adjust the speaker volume during a Tele
Aid call do the following:
XPress button W or X on the
multifunction steering wheel.
or
XUse the COMAND volume thumbwheel
H on the lower part of the front center
console (Y page 87).
Be sure to check “Owner’s Online” at
www.mbusa.com (USA only) for more
information and a description of all available
features.
System self-test
The system performs a self-test after you
have switched on the ignition.
GWarning!
A malfunction in the system has been
detected if any or all of the following
conditions occur:RThe indicator lamp in the SOS button does
not come on during the system self-test.
RThe indicator lamp in Roadside Assistance
button º does not come on during the
system self-test.
Useful features389Controls in detail221_AKB; 6; 20, en-USd2ugruen,Version: 2.11.8.12009-09-24T13:28:17+02:00 - Seite 389Z
Page 392 of 548

RThe indicator lamp in Information button
E does not come on during the system
self-test.
R The indicator lamp in the SOS button,
Roadside Assistance button º, or
Information button E remains
illuminated constantly in red after the
system self-test.
R The message Tele Aid Inoperative or
Tele Aid Not Activated appears in the
multifunction display after the system self-
test
If a malfunction is indicated as outlined above,
the system may not operate as expected. In
case of an emergency, help will have to be
summoned by other means.
Have the system checked at the nearest
Mercedes-Benz Center or contact the
Customer Assistance Center at
1-800-FOR-MERCedes (1-800-367-6372)
(USA only) or 1-888-923-8367 (Canada only)
as soon as possible.
Emergency calls
! In order to activate the Tele Aid system, a
subscriber agreement must be completed.
To ensure your system is activated and
operational, please press Information
button E to perform the acquaintance
call. Failure to complete either of these
steps may result in a system that is not
activated.
If you have any questions regarding
activation, please call the Customer
Assistance Center at
1-800-FOR-MERCedes (1-800-367-6372)
(USA only) or 1-888-923-8367 (Canada
only).
An emergency call is initiated automatically
following an accident in which the Emergency
Tensioning Devices (ETDs) or air bags have
deployed.
i An automatically initiated Tele Aid
emergency call cannot be canceled.
An emergency call can also be initiated
manually ( Y page 391).
Once the emergency call is in progress, the
indicator lamp in the SOS button will begin to
flash. The message Connecting Call
appears in the multifunction display.
Emergency Call Activated appears in the
COMAND display and the audio system is
muted. When the connection is established,
the message Call Connected appears in the
multifunction display. Emergency Call
Activated appears in the COMAND display.
All information relevant to the emergency,
such as the location of the vehicle
(determined by the GPS satellite location
system), vehicle model, identification number
and color are generated.
i While the emergency call message
Emergency Call Activated is displayed,
operation of the audio system or COMAND
system is not possible.
The climate control system can be
operated using the climate control panel
( Y page 211).
A voice connection between the Customer
Assistance Center and the occupants of the
vehicle will be established automatically soon
after the emergency call has been initiated.
The Customer Assistance Center will attempt
to determine the nature of the emergency
more precisely, provided they can speak to
an occupant of the vehicle.
i If no vehicle occupant responds, an
ambulance will be sent to the vehicle
immediately.GWarning!
If the indicator lamp in the SOS button is
flashing continuously and there was no voice
connection to the Customer Assistance
Center established, then the Tele Aid system
could not initiate an emergency call (e.g. the
relevant cellular phone network is not
available).
390Useful featuresControls in detail
221_AKB; 6; 20, en-USd2ugruen,Version: 2.11.8.12009-09-24T13:28:17+02:00 - Seite 390