Page 105 of 548

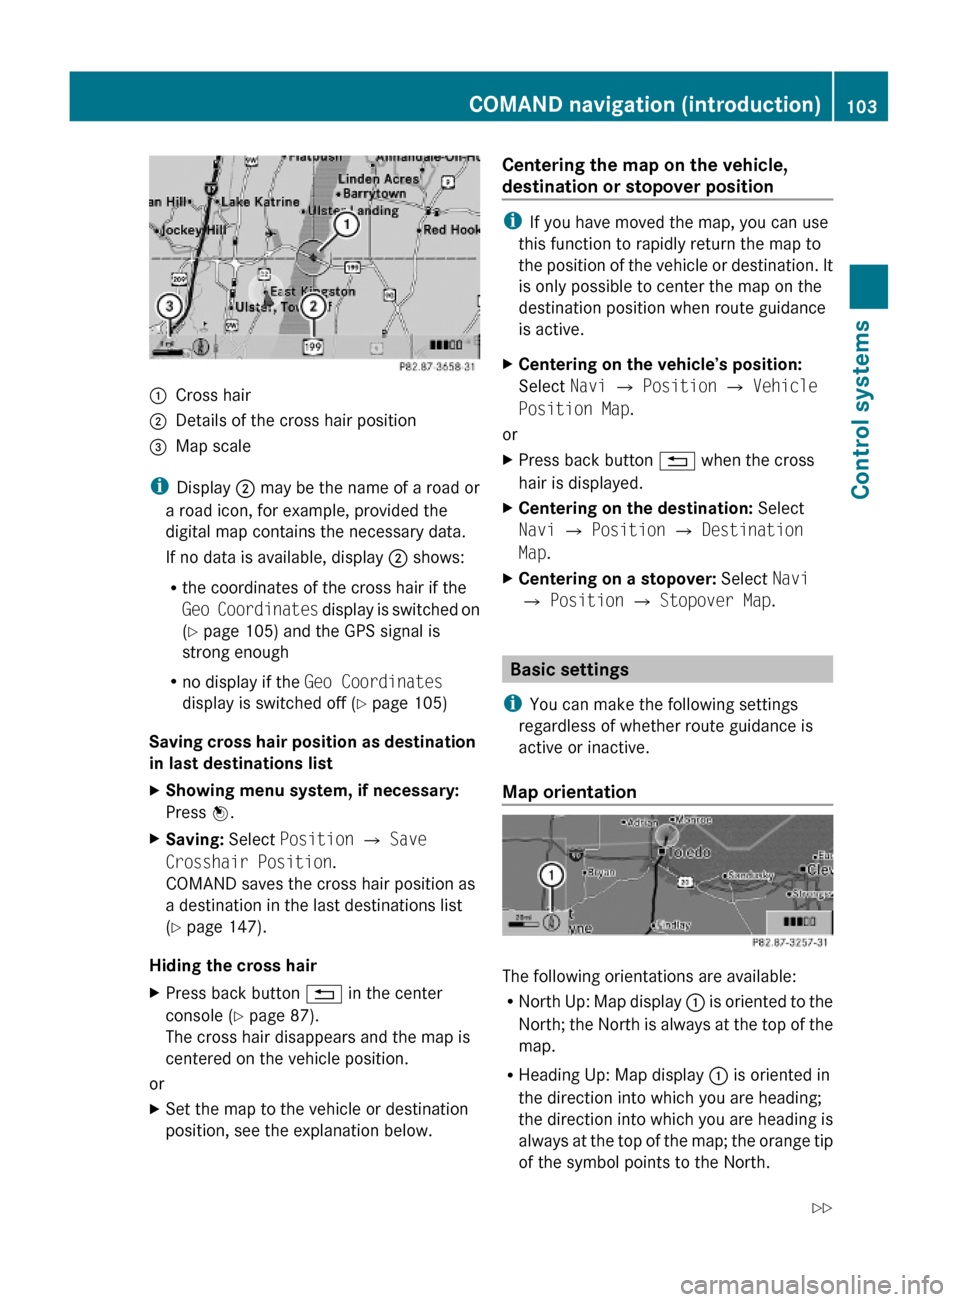
:Cross hair;Details of the cross hair position=Map scale
iDisplay ; may be the name of a road or
a road icon, for example, provided the
digital map contains the necessary data.
If no data is available, display ; shows:
Rthe coordinates of the cross hair if the
Geo Coordinates display is switched on
(Y page 105) and the GPS signal is
strong enough
Rno display if the Geo Coordinates
display is switched off (Y page 105)
Saving cross hair position as destination
in last destinations list
XShowing menu system, if necessary:
Press W.
XSaving: Select Position Q Save
Crosshair Position.
COMAND saves the cross hair position as
a destination in the last destinations list
(Y page 147).
Hiding the cross hair
XPress back button % in the center
console (Y page 87).
The cross hair disappears and the map is
centered on the vehicle position.
or
XSet the map to the vehicle or destination
position, see the explanation below.
Centering the map on the vehicle,
destination or stopover position
iIf you have moved the map, you can use
this function to rapidly return the map to
the position of the vehicle or destination. It
is only possible to center the map on the
destination position when route guidance
is active.
XCentering on the vehicle’s position:
Select Navi Q Position Q Vehicle
Position Map.
or
XPress back button % when the cross
hair is displayed.
XCentering on the destination: Select
Navi Q Position Q Destination
Map.
XCentering on a stopover: Select Navi
Q Position Q Stopover Map.
Basic settings
iYou can make the following settings
regardless of whether route guidance is
active or inactive.
Map orientation
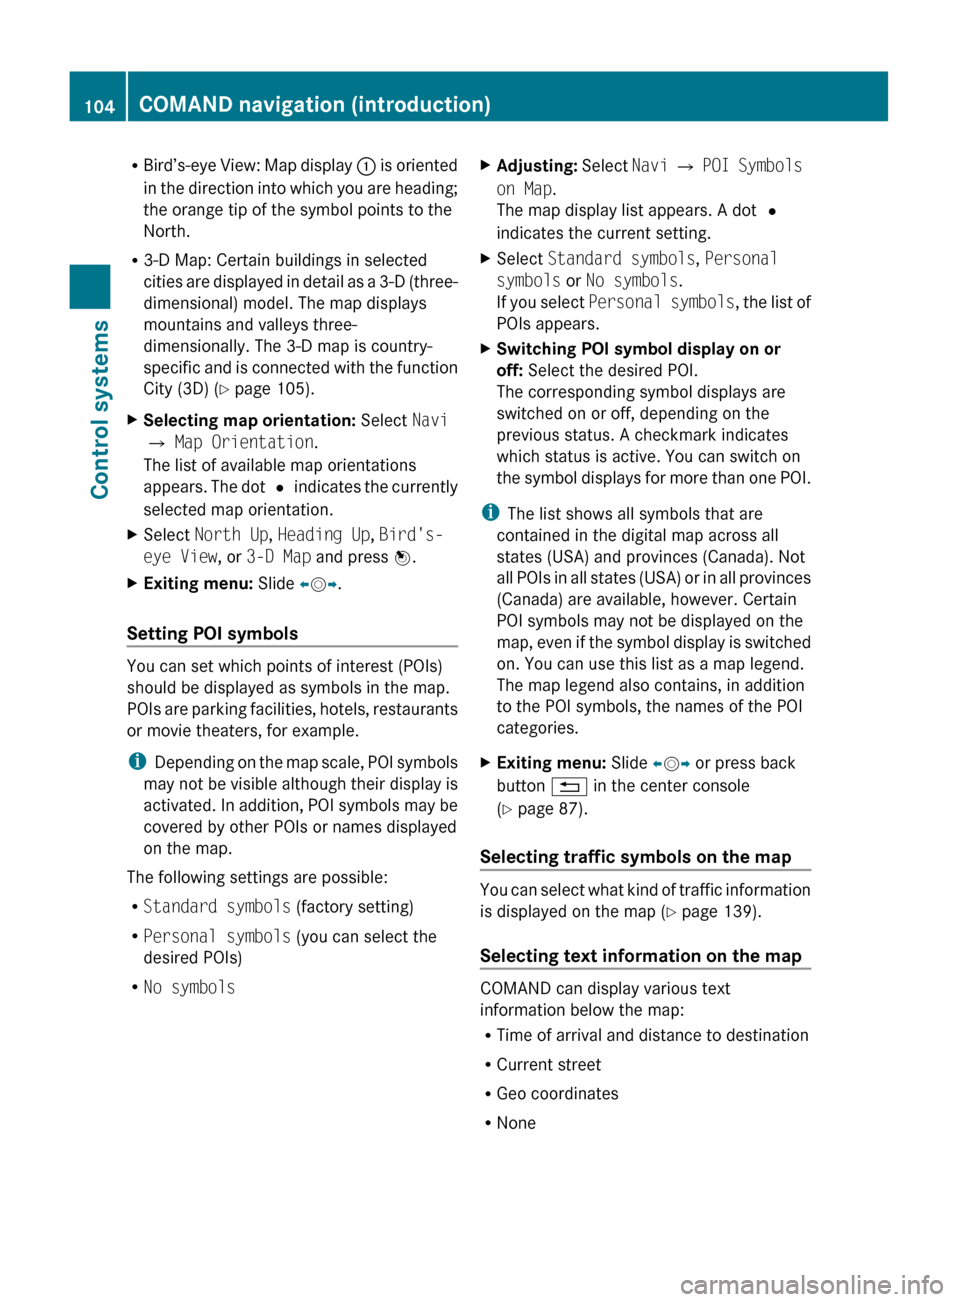
The following orientations are available:
RNorth Up: Map display : is oriented to the
North; the North is always at the top of the
map.
RHeading Up: Map display : is oriented in
the direction into which you are heading;
the direction into which you are heading is
always at the top of the map; the orange tip
of the symbol points to the North.
COMAND navigation (introduction)103Control systems221_AKB; 6; 20, en-USd2ugruen,Version: 2.11.8.12009-09-24T13:28:17+02:00 - Seite 103Z
Page 106 of 548

RBird’s-eye View: Map display : is oriented
in the direction into which you are heading;
the orange tip of the symbol points to the
North.
R 3-D Map: Certain buildings in selected
cities are displayed in detail as a 3-D (three-
dimensional) model. The map displays
mountains and valleys three-
dimensionally. The 3-D map is country-
specific and is connected with the function
City (3D) ( Y page 105).XSelecting map orientation: Select Navi
Q Map Orientation .
The list of available map orientations
appears. The dot # indicates the currently
selected map orientation.XSelect North Up , Heading Up , Bird's-
eye View , or 3-D Map and press W.XExiting menu: Slide XV Y.
Setting POI symbols
You can set which points of interest (POIs)
should be displayed as symbols in the map.
POIs are parking facilities, hotels, restaurants
or movie theaters, for example.
i Depending on the map scale, POI symbols
may not be visible although their display is
activated. In addition, POI symbols may be
covered by other POIs or names displayed
on the map.
The following settings are possible:
R Standard symbols (factory setting)
R Personal symbols (you can select the
desired POIs)
R No symbols
XAdjusting: Select Navi Q POI Symbols
on Map .
The map display list appears. A dot #
indicates the current setting.XSelect Standard symbols , Personal
symbols or No symbols .
If you select Personal symbols , the list of
POIs appears.XSwitching POI symbol display on or
off: Select the desired POI.
The corresponding symbol displays are
switched on or off, depending on the
previous status. A checkmark indicates
which status is active. You can switch on
the symbol displays for more than one POI.
i The list shows all symbols that are
contained in the digital map across all
states (USA) and provinces (Canada). Not
all POIs in all states (USA) or in all provinces
(Canada) are available, however. Certain
POI symbols may not be displayed on the
map, even if the symbol display is switched
on. You can use this list as a map legend.
The map legend also contains, in addition
to the POI symbols, the names of the POI
categories.
XExiting menu: Slide XV Y or press back
button % in the center console
( Y page 87).
Selecting traffic symbols on the map
You can select what kind of traffic information
is displayed on the map ( Y page 139).
Selecting text information on the map
COMAND can display various text
information below the map:
R Time of arrival and distance to destination
R Current street
R Geo coordinates
R None
104COMAND navigation (introduction)Control systems
221_AKB; 6; 20, en-USd2ugruen,Version: 2.11.8.12009-09-24T13:28:17+02:00 - Seite 104
Page 107 of 548

XCalling up menu: Select Navi Q Text
Information on Map.
The list of available text information
appears. The dot # indicates the currently
selected setting.
XExiting menu: Slide XVY.
Time of arrival and distance
XSelect Arrival Time/Distance.
The time of arrival and the distance for the
main destination are displayed by setting
the dot to Arrival Time/Distance.
Current street
XSelect Current Street.
The street you are currently on is displayed
by setting the dot to Current Street.
Geo coordinates
:Altitude;Geo coordinates=Number of receivable GPS satellites
iGPS reception must be sufficient in order
to display :, ; and =. The displayed
altitude : may differ from the actual
altitude as the navigation system uses the
GPS signals to compute the value.
Display options with geo coordinates
selected
When the map shows the cross hair (map has
been moved manually), only geo
coordinates ; are displayed. In this case, the
geo coordinates of the cross hair or other
data for the cross hair position such as a
street name are displayed. Such data can only
be displayed when the digital map contains
that particular data.
iWhen the map does not show the cross
hair, :, ; and = are displayed. Geo
coordinates ; will then indicate the
current vehicle position.
XSelect Geo Coordinates.
The geo coordinates are displayed by
setting the dot to Geo Coordinates.
None
XSelect None.
The text information below the map is
hidden by setting the dot to None.
Topographical map
The map can be displayed as a topographical
map. Varying terrain levels can be recognized
by the different shades of colors. The color
shades are available for map scales of 10 mi
- 500 mi (10 km - 500 km).
XSelect Navi.XCheck the check box for menu item
Topographical Map.
City model
You can display selected cities three-
dimensionally when the map orientation is set
to 3-D map (Y page 103).
:Mountains;Buildings=Landmark buildingsCOMAND navigation (introduction)105Control systems221_AKB; 6; 20, en-USd2ugruen,Version: 2.11.8.12009-09-24T13:28:17+02:00 - Seite 105Z
Page 108 of 548

XSelect Navi.XCheck the check box for menu item City
(3D) .
Setting route type
You can set the following route types:
R Fast Route : COMAND calculates a route
with minimized driving time.
R Dynamic Route : COMAND calculates a
route with minimized driving time and takes
into account traffic messages received
along the route. Thus, the navigation
system can dynamically recalculate the
route. Roads that are blocked will be
avoided whenever possible. For
information on traffic messages see
( Y page 138).
R Short Route : COMAND calculates a route
with minimized route length.
XSelect Navi Q Mode .
The list of available rote types appears. The
dot # indicates the currently selected
setting.XSelect route type: Fast Route , Dynamic
Route or Short Route .XExit menu: Slide XV Y.
i
If you change the route type setting during
active route guidance, COMAND calculates
a new route. If you change the setting when
route guidance is inactive, COMAND uses
the new setting for the next route guidance.
Setting route mode
With this function you can select the following
options for route calculation:
R Minimize Highways
R Minimize Toll Roads
R Minimize Tunnels
R Minimize Ferries
R Minimize Motorail Trains
XSelect Navi Q Mode .
The mode list appears.XSwitching mode on or off: Select desired
modes.
Depending on the previous status, the
mode is switched on or off. A checkmark
indicates that the mode is switched on. It
is possible to switch on more than one
mode.XExiting menu: Slide XV Y or press back
button % in the center console
( Y page 87).
COMAND will verify whether it can
incorporate the modes if you select them
with route guidance active.
If possible, COMAND calculates a new
route considering the selected options.
If the route cannot be recalculated with the
selected options, a message appears and
an announcement is made. COMAND
calculates a new route. Only options that
are possible will be considered.
Displaying highway information
When this function is enabled, highway
information ahead will display automatically
( Y page 137).
Audio fadeout
XSelect Navi Q Audio Fadeout .
When the check box is checked U the
volume of the current audio source fades
during a navigation announcement.
COMAND navigation system
(entering a destination)
Introduction
GWarning!
For safety reasons, only enter a new
destination when the vehicle is stationary.
106COMAND navigation system (entering a destination)Control systems
221_AKB; 6; 20, en-USd2ugruen,Version: 2.11.8.12009-09-24T13:28:17+02:00 - Seite 106
Page 109 of 548

iIt is possible to enter a destination
regardless of whether route guidance is
active or not.
The following destination entry options are
available:
RBy address
RFrom the destination memory
RFrom a list of last destinations
RFrom a point on the map
RA stopover
RA POI
Entering a destination by address
Introduction
iIt is not possible to enter an address when
the vehicle has exceeded a certain speed.
As soon as the vehicle speed drops below
a certain value, the function is available
again.
iIf Russian or Chinese is set as the system
language, the address must be entered
using Latin characters. Setting the system
language (Y page 94).
To enter an address you may proceed as
follows:
REnter state (USA) or province (Canada),
street and city
REnter state (USA) or province (Canada), city
and street
REnter state (USA) or province (Canada), city
and city center
REnter state (USA) or province (Canada), zip
code/postal code and city center
REnter state (USA) or province (Canada), zip
code/postal code and street
iAs additional information to the street
entry, you can enter either a house number
or an intersection.
A zip code/postal code entry replaces the
city entry.
Calling up the address input menu
XSelect Navi Q Destination Q
Address Entry.
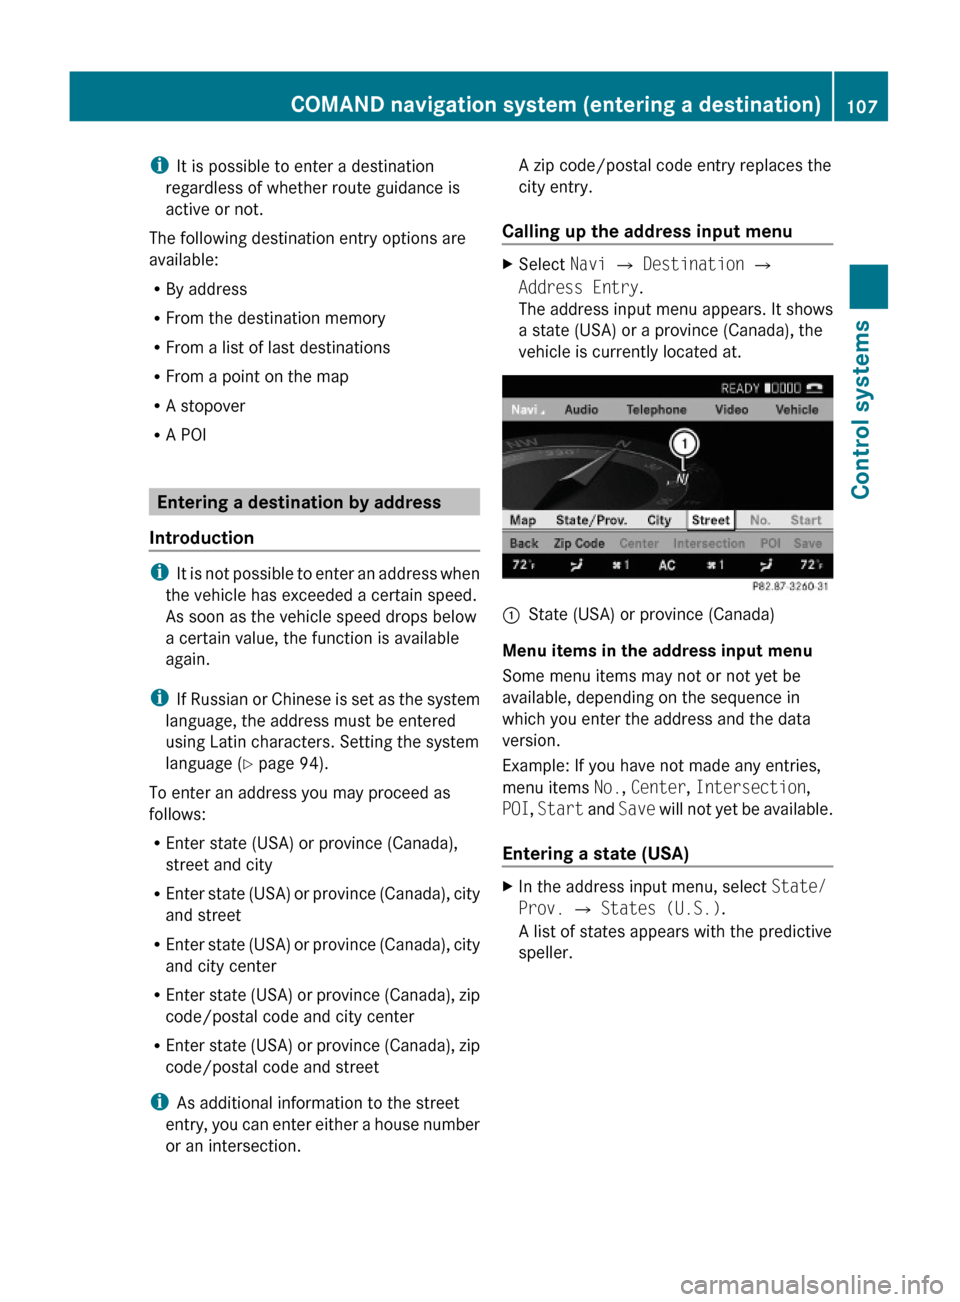
The address input menu appears. It shows
a state (USA) or a province (Canada), the
vehicle is currently located at.
:State (USA) or province (Canada)
Menu items in the address input menu
Some menu items may not or not yet be
available, depending on the sequence in
which you enter the address and the data
version.
Example: If you have not made any entries,
menu items No., Center, Intersection,
POI, Start and Save will not yet be available.
Entering a state (USA)
XIn the address input menu, select State/
Prov. Q States (U.S.).
A list of states appears with the predictive
speller.
COMAND navigation system (entering a destination)107Control systems221_AKB; 6; 20, en-USd2ugruen,Version: 2.11.8.12009-09-24T13:28:17+02:00 - Seite 107Z
Page 110 of 548

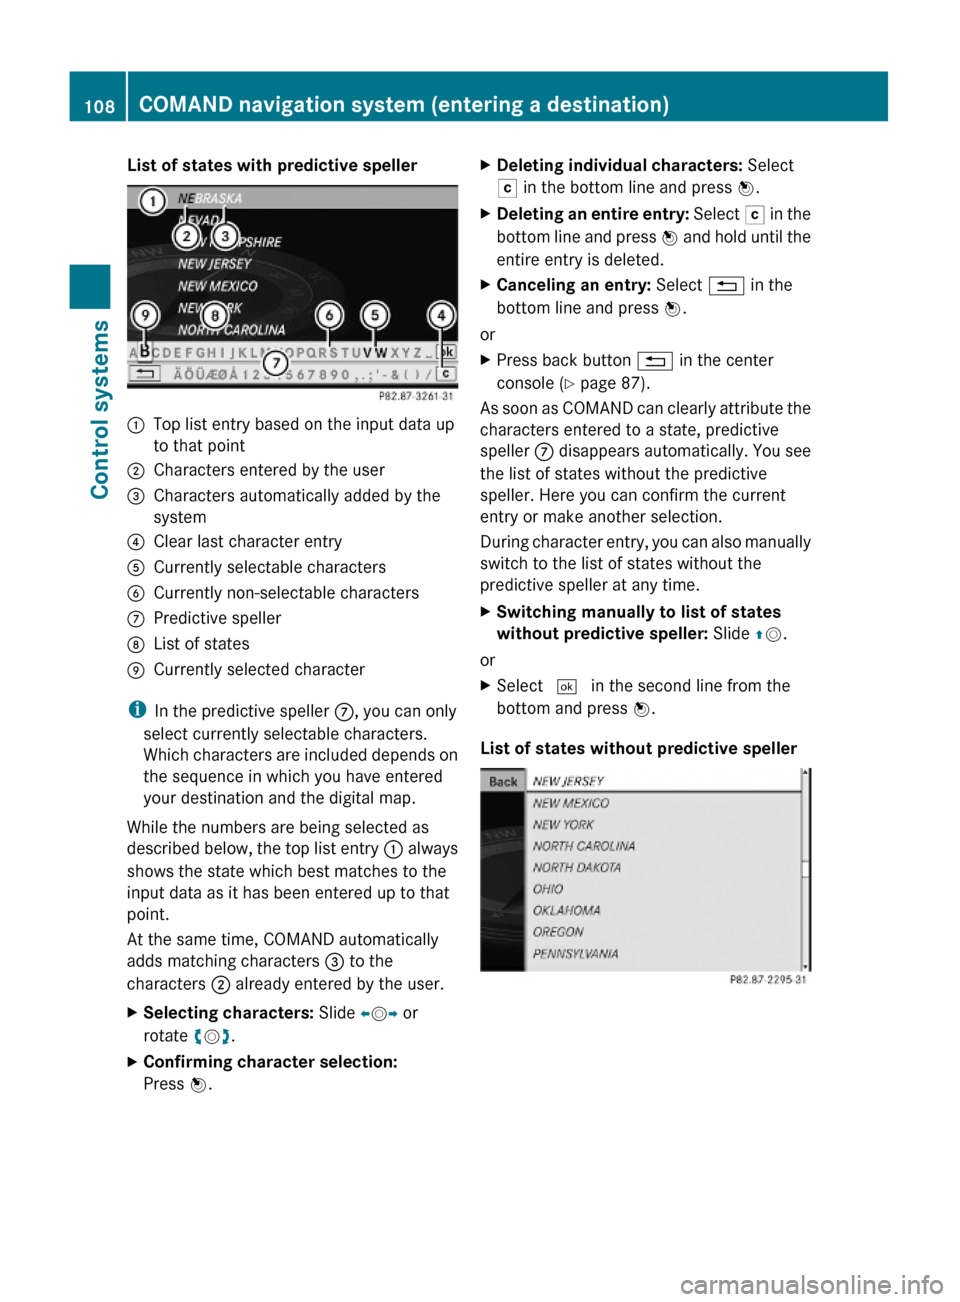
List of states with predictive speller:Top list entry based on the input data up
to that point
;Characters entered by the user=Characters automatically added by the
system
?Clear last character entryACurrently selectable charactersBCurrently non-selectable charactersCPredictive spellerDList of statesECurrently selected character
iIn the predictive speller C, you can only
select currently selectable characters.
Which characters are included depends on
the sequence in which you have entered
your destination and the digital map.
While the numbers are being selected as
described below, the top list entry : always
shows the state which best matches to the
input data as it has been entered up to that
point.
At the same time, COMAND automatically
adds matching characters = to the
characters ; already entered by the user.
XSelecting characters: Slide XVY or
rotate cVd.
XConfirming character selection:
Press W.
XDeleting individual characters: Select
F in the bottom line and press W.
XDeleting an entire entry: Select F in the
bottom line and press W and hold until the
entire entry is deleted.
XCanceling an entry: Select % in the
bottom line and press W.
or
XPress back button % in the center
console (Y page 87).
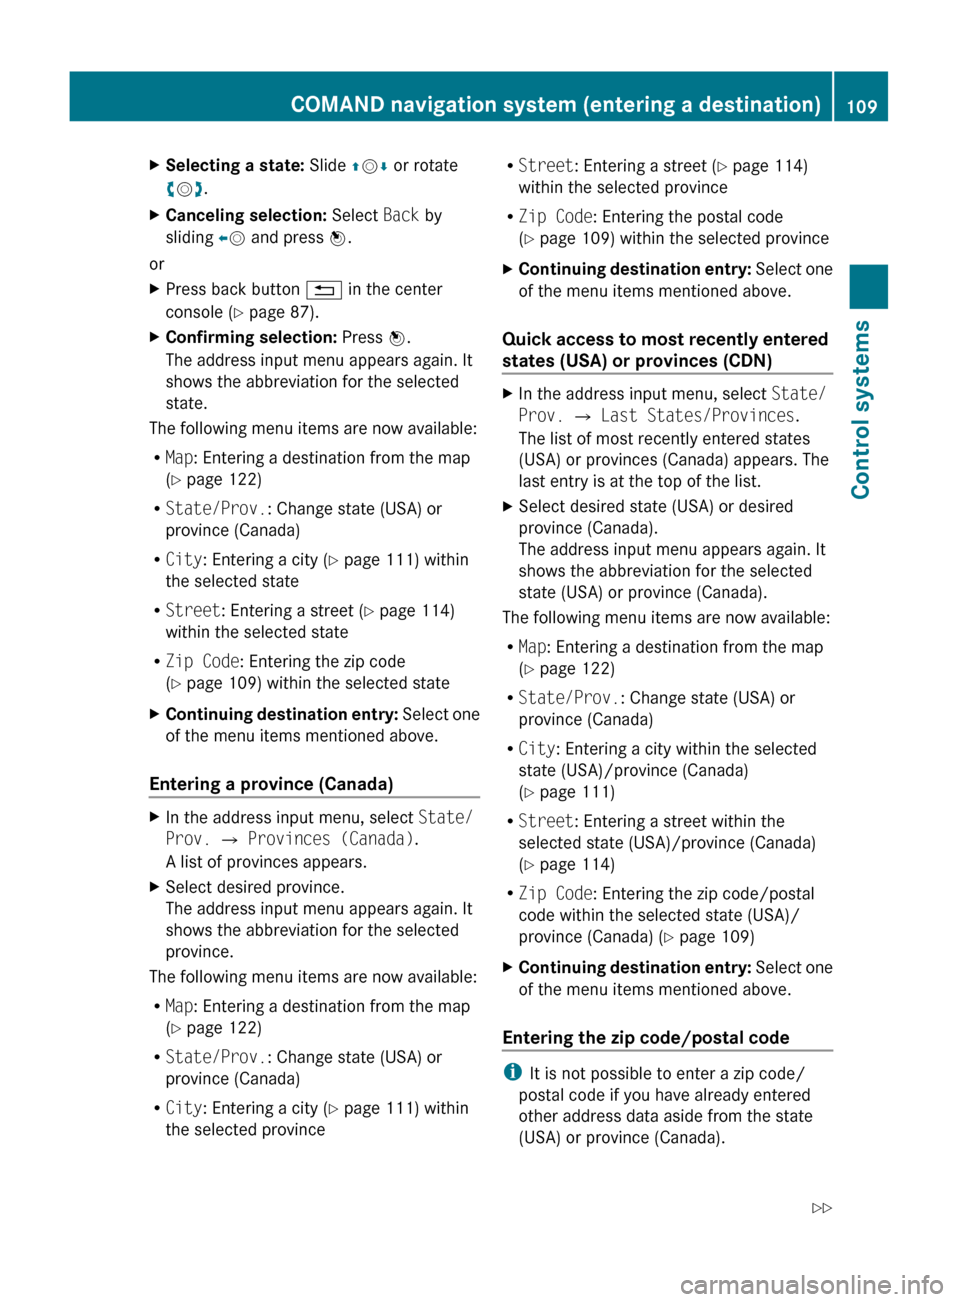
As soon as COMAND can clearly attribute the
characters entered to a state, predictive
speller C disappears automatically. You see
the list of states without the predictive
speller. Here you can confirm the current
entry or make another selection.
During character entry, you can also manually
switch to the list of states without the
predictive speller at any time.
XSwitching manually to list of states
without predictive speller: Slide ZV.
or
XSelect ¬ in the second line from the
bottom and press W.
List of states without predictive speller
108COMAND navigation system (entering a destination)Control systems
221_AKB; 6; 20, en-USd2ugruen,Version: 2.11.8.12009-09-24T13:28:17+02:00 - Seite 108
Page 111 of 548

XSelecting a state: Slide ZV Æ or rotate
c V d.XCanceling selection: Select Back by
sliding XV and press W.
or
XPress back button % in the center
console ( Y page 87).XConfirming selection: Press W.
The address input menu appears again. It
shows the abbreviation for the selected
state.
The following menu items are now available:
R Map : Entering a destination from the map
( Y page 122)
R State/Prov. : Change state (USA) or
province (Canada)
R City : Entering a city ( Y page 111) within
the selected state
R Street : Entering a street ( Y page 114)
within the selected state
R Zip Code : Entering the zip code
( Y page 109) within the selected state
XContinuing destination entry: Select one
of the menu items mentioned above.
Entering a province (Canada)
XIn the address input menu, select State/
Prov. Q Provinces (Canada) .
A list of provinces appears.XSelect desired province.
The address input menu appears again. It
shows the abbreviation for the selected
province.
The following menu items are now available:
R Map : Entering a destination from the map
( Y page 122)
R State/Prov. : Change state (USA) or
province (Canada)
R City : Entering a city ( Y page 111) within
the selected province
R Street : Entering a street ( Y page 114)
within the selected province
R Zip Code : Entering the postal code
( Y page 109) within the selected provinceXContinuing destination entry: Select one
of the menu items mentioned above.
Quick access to most recently entered
states (USA) or provinces (CDN)
XIn the address input menu, select State/
Prov. Q Last States/Provinces .
The list of most recently entered states
(USA) or provinces (Canada) appears. The
last entry is at the top of the list.XSelect desired state (USA) or desired
province (Canada).
The address input menu appears again. It
shows the abbreviation for the selected
state (USA) or province (Canada).
The following menu items are now available:
R Map : Entering a destination from the map
( Y page 122)
R State/Prov. : Change state (USA) or
province (Canada)
R City : Entering a city within the selected
state (USA)/province (Canada)
( Y page 111)
R Street : Entering a street within the
selected state (USA)/province (Canada)
( Y page 114)
R Zip Code : Entering the zip code/postal
code within the selected state (USA)/
province (Canada) ( Y page 109)
XContinuing destination entry: Select one
of the menu items mentioned above.
Entering the zip code/postal code
i It is not possible to enter a zip code/
postal code if you have already entered
other address data aside from the state
(USA) or province (Canada).
COMAND navigation system (entering a destination)109Control systems221_AKB; 6; 20, en-USd2ugruen,Version: 2.11.8.12009-09-24T13:28:17+02:00 - Seite 109Z
Page 112 of 548

You can only enter those zip codes/postal
codes which are saved on the digital map.
The available zip codes/postal codes
depend on the state (USA) or province
(Canada) currently entered.
XIn the address input menu, select Zip
Code. A list of zip codes/postal codes
appears with the predictive speller.
List of zip codes/postal codes with
predictive speller
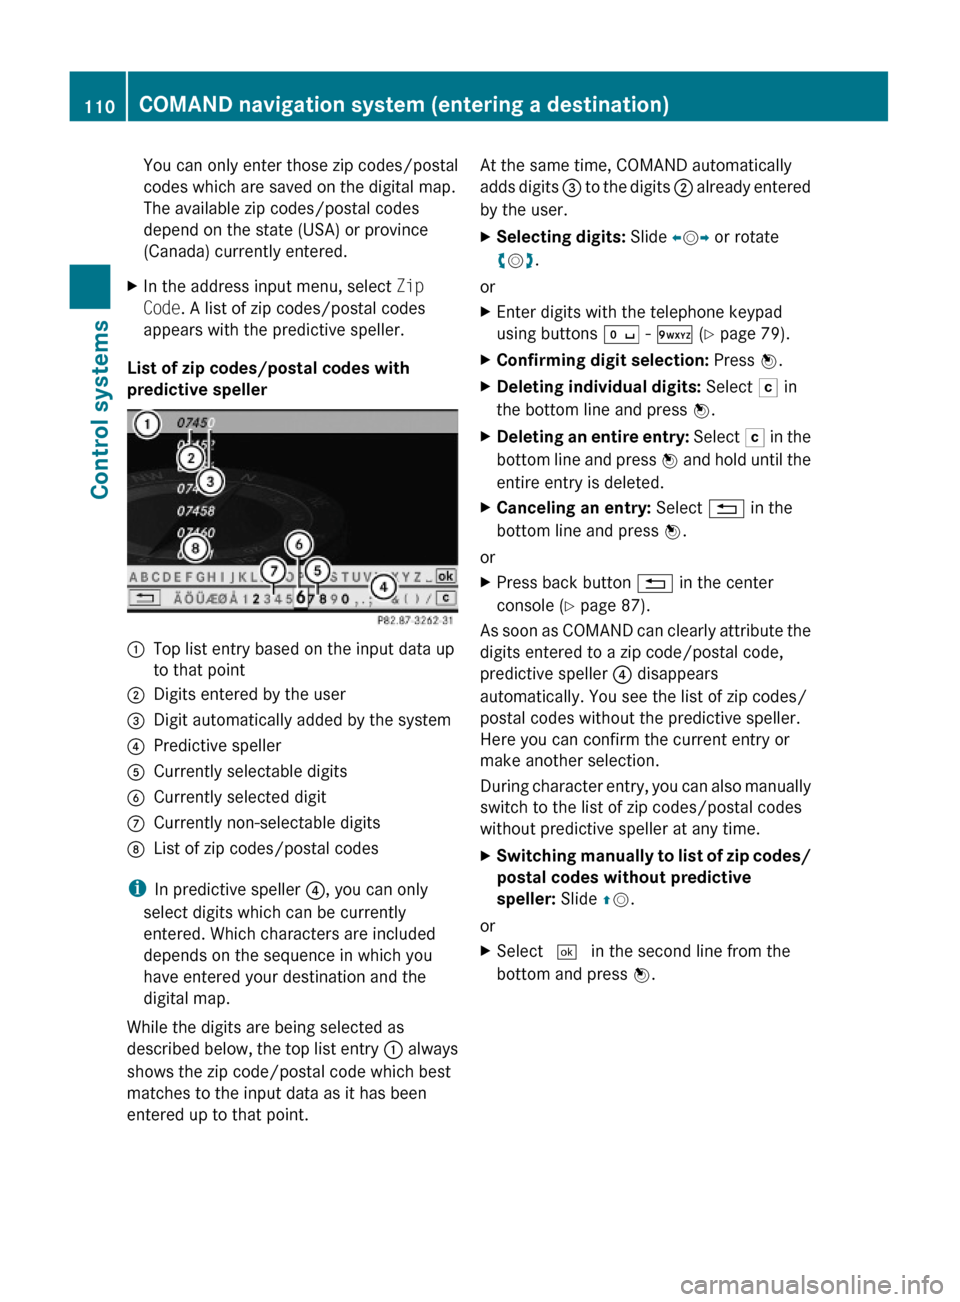
:Top list entry based on the input data up
to that point
;Digits entered by the user=Digit automatically added by the system?Predictive spellerACurrently selectable digitsBCurrently selected digitCCurrently non-selectable digitsDList of zip codes/postal codes
iIn predictive speller ?, you can only
select digits which can be currently
entered. Which characters are included
depends on the sequence in which you
have entered your destination and the
digital map.
While the digits are being selected as
described below, the top list entry : always
shows the zip code/postal code which best
matches to the input data as it has been
entered up to that point.
At the same time, COMAND automatically
adds digits = to the digits ; already entered
by the user.
XSelecting digits: Slide XVY or rotate
cVd.
or
XEnter digits with the telephone keypad
using buttons Å - Ã (Y page 79).
XConfirming digit selection: Press W.XDeleting individual digits: Select F in
the bottom line and press W.
XDeleting an entire entry: Select F in the
bottom line and press W and hold until the
entire entry is deleted.
XCanceling an entry: Select % in the
bottom line and press W.
or
XPress back button % in the center
console (Y page 87).
As soon as COMAND can clearly attribute the
digits entered to a zip code/postal code,
predictive speller ? disappears
automatically. You see the list of zip codes/
postal codes without the predictive speller.
Here you can confirm the current entry or
make another selection.
During character entry, you can also manually
switch to the list of zip codes/postal codes
without predictive speller at any time.
XSwitching manually to list of zip codes/
postal codes without predictive
speller: Slide ZV.
or
XSelect ¬ in the second line from the
bottom and press W.
110COMAND navigation system (entering a destination)Control systems
221_AKB; 6; 20, en-USd2ugruen,Version: 2.11.8.12009-09-24T13:28:17+02:00 - Seite 110