2010 JAGUAR XFR window
[x] Cancel search: windowPage 2177 of 3039
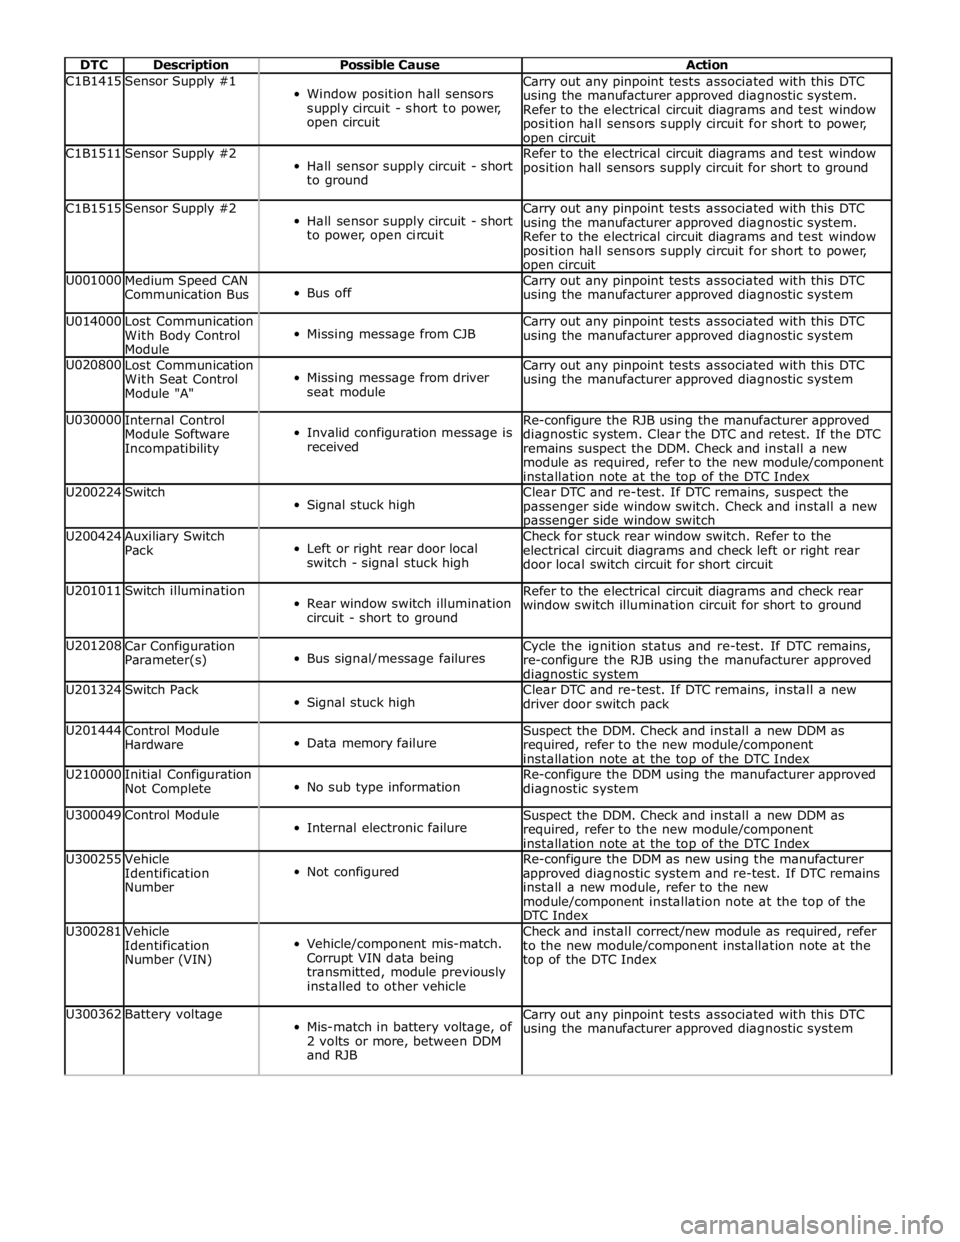
DTC Description Possible Cause Action C1B1415 Sensor Supply #1
Window position hall sensors
supply circuit - short to power,
open circuit Carry out any pinpoint tests associated with this DTC
using the manufacturer approved diagnostic system.
Refer to the electrical circuit diagrams and test window
position hall sensors supply circuit for short to power, open circuit C1B1511 Sensor Supply #2
Hall sensor supply circuit - short
to ground Refer to the electrical circuit diagrams and test window
position hall sensors supply circuit for short to ground C1B1515 Sensor Supply #2
Hall sensor supply circuit - short
to power, open circuit Carry out any pinpoint tests associated with this DTC
using the manufacturer approved diagnostic system.
Refer to the electrical circuit diagrams and test window
position hall sensors supply circuit for short to power, open circuit U001000
Medium Speed CAN
Communication Bus
Bus off Carry out any pinpoint tests associated with this DTC
using the manufacturer approved diagnostic system U014000
Lost Communication
With Body Control
Module
Missing message from CJB Carry out any pinpoint tests associated with this DTC
using the manufacturer approved diagnostic system U020800
Lost Communication
With Seat Control
Module "A"
Missing message from driver
seat module Carry out any pinpoint tests associated with this DTC
using the manufacturer approved diagnostic system U030000
Internal Control
Module Software
Incompatibility
Invalid configuration message is
received Re-configure the RJB using the manufacturer approved
diagnostic system. Clear the DTC and retest. If the DTC
remains suspect the DDM. Check and install a new
module as required, refer to the new module/component
installation note at the top of the DTC Index U200224 Switch
Signal stuck high Clear DTC and re-test. If DTC remains, suspect the
passenger side window switch. Check and install a new passenger side window switch U200424
Auxiliary Switch
Pack
Left or right rear door local
switch - signal stuck high Check for stuck rear window switch. Refer to the
electrical circuit diagrams and check left or right rear
door local switch circuit for short circuit U201011 Switch illumination
Rear window switch illumination
circuit - short to ground Refer to the electrical circuit diagrams and check rear
window switch illumination circuit for short to ground U201208
Car Configuration
Parameter(s)
Bus signal/message failures Cycle the ignition status and re-test. If DTC remains,
re-configure the RJB using the manufacturer approved diagnostic system U201324 Switch Pack
Signal stuck high Clear DTC and re-test. If DTC remains, install a new
driver door switch pack U201444
Control Module
Hardware
Data memory failure Suspect the DDM. Check and install a new DDM as
required, refer to the new module/component
installation note at the top of the DTC Index U210000
Initial Configuration
Not Complete
No sub type information Re-configure the DDM using the manufacturer approved
diagnostic system U300049 Control Module
Internal electronic failure Suspect the DDM. Check and install a new DDM as
required, refer to the new module/component
installation note at the top of the DTC Index U300255
Vehicle
Identification
Number
Not configured Re-configure the DDM as new using the manufacturer
approved diagnostic system and re-test. If DTC remains
install a new module, refer to the new
module/component installation note at the top of the
DTC Index U300281
Vehicle
Identification
Number (VIN)
Vehicle/component mis-match.
Corrupt VIN data being
transmitted, module previously
installed to other vehicle Check and install correct/new module as required, refer
to the new module/component installation note at the
top of the DTC Index U300362 Battery voltage
Mis-match in battery voltage, of
2 volts or more, between DDM
and RJB Carry out any pinpoint tests associated with this DTC
using the manufacturer approved diagnostic system
Page 2184 of 3039

DTC Description Possible Cause Action B116515
Left Front Puddle
Lamp Output
Left front puddle lamp control
circuit - short to power, open
circuit Carry out any pinpoint tests associated with this DTC
using the manufacturer approved diagnostic system.
Refer to the electrical circuit diagrams and test left front
puddle lamp control circuit for short to power, open
circuit B116611
Right Front Puddle
Lamp Output
Right front puddle lamp control
circuit - short to ground Refer to the electrical circuit diagrams and test right
front puddle lamp control circuit for short to ground B116615
Right Front Puddle
Lamp Output
Right front puddle lamp control
circuit - short to power, open
circuit Carry out any pinpoint tests associated with this DTC
using the manufacturer approved diagnostic system.
Refer to the electrical circuit diagrams and test right
front puddle lamp control circuit for short to power, open
circuit B117C07
Rear Power Window
Up
Mechanical failure Check rear window mechanism for mechanical failure B117C72
Rear Power Window
Up
Actuator stuck open Suspect the rear door module. Check and install a new
module as required, refer to the new module/component
installation note at the top of the DTC Index B117C73
Rear Power Window
Up
Actuator stuck closed Suspect the rear door module. Check and install a new
module as required, refer to the new module/component
installation note at the top of the DTC Index B117C92
Rear Power Window
Up
Performance or incorrect
operation Refer to the electrical circuit diagrams and check rear
door module power and ground supplies B117D72
Rear Power Window
Down
Actuator stuck open Suspect the rear door module. Check and install a new
module as required, refer to the new module/component
installation note at the top of the DTC Index B117D73
Rear Power Window
Down
Actuator stuck closed Suspect the rear door module. Check and install a new
module as required, refer to the new module/component
installation note at the top of the DTC Index B117E07
Front Power Window
Up
Mechanical failure Check the front window mechanism for mechanical
failure B117E72
Front Power Window
Up
Actuator stuck open Suspect the PDM. Check and install a new PDM as
required, refer to the new module/component
installation note at the top of the DTC Index B117E73
Front Power Window
Up
Actuator stuck closed Suspect the PDM. Check and install a new PDM as
required, refer to the new module/component
installation note at the top of the DTC Index B117F72
Front Power Window
Down
Actuator stuck open Suspect the PDM. Check and install a new PDM as
required, refer to the new module/component
installation note at the top of the DTC Index B117F73
Front Power Window
Down
Actuator stuck closed Suspect the PDM. Check and install a new PDM as
required, refer to the new module/component
installation note at the top of the DTC Index B118929
Front Window
Position Sensor
Front window hall position
sensor - signal invalid Carry out any pinpoint tests associated with this DTC
using the manufacturer approved diagnostic system B118A29
Rear Window
Position Sensor
Rear window hall position sensor
- signal invalid Carry out any pinpoint tests associated with this DTC
using the manufacturer approved diagnostic system B11D183 LIN Bus Circuit "C"
Value of signal protection
calculation incorrect Suspect driver switchpack. Check and install a new
driver switchpack as required, refer to the new
module/component installation note at the top of the
DTC Index B11D186 LIN Bus Circuit "C" Signal invalid
Suspect driver switchpack. Check and install a new
driver switchpack as required, refer to the new
module/component installation note at the top of the
DTC Index B11D187 LIN Bus Circuit "C" Missing message
Suspect driver switchpack. Check and install a new
driver switchpack as required, refer to the new
module/component installation note at the top of the
DTC Index B11F711
Passenger Folding
Mirror Motor
Passenger folding mirror motor
control circuit - short to ground Refer to the electrical circuit diagrams and check
passenger folding mirror motor control circuit for short
to ground B11F715
Passenger Folding
Mirror Motor
Passenger folding mirror motor
control circuit - short to power,
open circuit Carry out any pinpoint tests associated with this DTC
using the manufacturer approved diagnostic system.
Refer to the electrical circuit diagrams and check
passenger folding mirror motor control circuit for short
to power, open circuit
Page 2185 of 3039

DTC Description Possible Cause Action B1A9883 LIN Bus Circuit #1
Value of signal protection
calculation incorrect Refer to the electrical circuit diagrams and check LIN
circuit between DDM and rear door module for
short/open circuits B1A9886 LIN Bus Circuit #1
Signal invalid Carry out any pinpoint tests associated with this DTC
using the manufacturer approved diagnostic system.
Refer to the electrical circuit diagrams and check LIN
circuit between DDM and rear door module for short/open circuits B1A9887 LIN Bus Circuit #1
Missing message Carry out any pinpoint tests associated with this DTC
using the manufacturer approved diagnostic system.
Refer to the electrical circuit diagrams and check LIN
circuit between DDM and rear door module for short/open circuits B1C1111
Passenger
Left/Right Mirror
Motor Circuit
Passenger left/right mirror motor
control circuit - short to ground Refer to the electrical circuit diagrams and test
passenger left/right mirror motor control circuit for short
to ground B1C1115
Passenger
Left/Right Mirror
Motor Circuit
Passenger left/right mirror motor
control circuit - short to power,
open circuit Carry out any pinpoint tests associated with this DTC
using the manufacturer approved diagnostic system.
Refer to the electrical circuit diagrams and test
passenger left/right mirror motor control circuit for short
to power, open circuit B1C1211
Passenger Up/Down
Mirror Motor Circuit
Passenger up/down mirror motor
control circuit - short to ground Refer to the electrical circuit diagrams and test
passenger up/down mirror motor control circuit for short
to ground B1C1215
Passenger Up/Down
Mirror Motor Circuit
Passenger up/down mirror motor
control circuit - short to power,
open circuit Carry out any pinpoint tests associated with this DTC
using the manufacturer approved diagnostic system.
Refer to the electrical circuit diagrams and test
passenger up/down mirror motor control circuit for short
to power, open circuit B1C1511
Passenger Up/Down
Mirror Motor
Feedback Circuit
Passenger up/down mirror motor
feedback circuit - short to
ground Refer to the electrical circuit diagrams and test
passenger up/down mirror motor feedback circuit for
short to ground B1C1515
Passenger Up/Down
Mirror Motor
Feedback Circuit
Passenger up/down mirror motor
feedback circuit - short to power,
open circuit Refer to the electrical circuit diagrams and test
passenger up/down mirror motor feedback circuit for
short to power, open circuit B1C1611
Passenger
Left/Right Mirror
Motor Feedback
Circuit
Passenger left/right mirror motor
feedback circuit - short to ground Refer to the electrical circuit diagrams and test
passenger left/right mirror motor feedback circuit for
short to ground B1C1615
Passenger
Left/Right Mirror
Motor Feedback
Circuit
Passenger left/right mirror motor
feedback circuit - short to power,
open circuit Refer to the electrical circuit diagrams and test
passenger left/right mirror motor feedback circuit for
short to power, open circuit B1D0611 Left Turn Indicator
Left side turn indicator repeater
lamp circuit - short to ground Refer to the electrical circuit diagrams and check left
side turn indicator repeater lamp circuit for short to
ground B1D0615 Left Turn Indicator
Left side turn indicator repeater
lamp circuit - short to power,
open circuit Carry out any pinpoint tests associated with this DTC
using the manufacturer approved diagnostic system.
Refer to the electrical circuit diagrams and check left
side turn indicator repeater lamp circuit for short to power, open circuit B1D0711 Right Turn Indicator
Right side turn indicator
repeater lamp circuit - short to
ground Refer to the electrical circuit diagrams and check right
side turn indicator repeater lamp circuit for short to
ground B1D0715 Right Turn Indicator
Right side turn indicator
repeater lamp circuit - short to
power, open circuit Refer to the electrical circuit diagrams and check right
side turn indicator repeater lamp circuit for short to
power, open circuit C1B1411 Sensor Supply #1
Front window position hall
sensor supply circuit - short to
ground Refer to the electrical circuit diagrams and test front
window position hall sensor supply circuit for short to
ground www.JagDocs.com
Page 2186 of 3039

DTC Description Possible Cause Action C1B1415 Sensor Supply #1
Front window position hall
sensor supply circuit - short to
power, open circuit Carry out any pinpoint tests associated with this DTC
using the manufacturer approved diagnostic system.
Refer to the electrical circuit diagrams and test front
window position hall sensor supply circuit for short to power, open circuit C1B1511 Sensor Supply #2
Hall sensor supply circuit - short
to ground Refer to the electrical circuit diagrams and test window
position hall sensors supply circuit for short to ground C1B1515 Sensor Supply #2
Hall sensor supply circuit - short
to power, open circuit Carry out any pinpoint tests associated with this DTC
using the manufacturer approved diagnostic system.
Refer to the electrical circuit diagrams and test window
position hall sensors supply circuit for short to power, open circuit U001000
Medium Speed CAN
Communication Bus
Bus off Carry out any pinpoint tests associated with this DTC
using the manufacturer approved diagnostic system U014000
Lost Communication
With Body Control
Module
Missing message from CJB Carry out any pinpoint tests associated with this DTC
using the manufacturer approved diagnostic system U020800
Lost Communication
With Seat Control
Module "A"
Missing message from driver
seat module Carry out any pinpoint tests associated with this DTC
using the manufacturer approved diagnostic system U030000
Internal Control
Module Software
Incompatibility
Invalid configuration message is
received Re-configure the RJB using the manufacturer approved
diagnostic system. Clear the DTC and retest. If the DTC
remains suspect the PDM. Check and install a new
module as required, refer to the new module/component
installation note at the top of the DTC Index U200224 Switch
Signal stuck high Clear DTC and re-test. If DTC remains, suspect the
passenger side window switch. Check and install a new passenger side window switch U200424
Auxiliary Switch
Pack
Left or right rear door local
switch - signal stuck high Check for stuck rear window switch. Refer to the
electrical circuit diagrams and check left or right rear
door local switch circuit for short circuit U201011 Switch illumination
Rear window switch illumination
circuit - short to ground Refer to the electrical circuit diagrams and check rear
window switch illumination circuit for short to ground U201208
Car Configuration
Parameter(s)
Bus signal/message failures Cycle the ignition status and re-test. If DTC remains,
re-configure the RJB using the manufacturer approved diagnostic system U201324 Switch Pack
Signal stuck high Clear DTC and re-test. If DTC remains, install a new
driver door switch pack U201444
Control Module
Hardware
Data memory failure Suspect the PDM. Check and install a new PDM as
required, refer to the new module/component
installation note at the top of the DTC Index U210000
Initial Configuration
Not Complete
No sub type information Re-configure the PDM using the manufacturer approved
diagnostic system U300049 Control Module
Internal electronic failure Suspect the PDM. Check and install a new PDM as
required, refer to the new module/component
installation note at the top of the DTC Index U300255
Vehicle
Identification
Number
Not configured Re-configure the PDM as new using the manufacturer
approved diagnostic system and re-test. If DTC remains
install a new module, refer to the new
module/component installation note at the top of the
DTC Index U300281
Vehicle
Identification
Number (VIN)
Vehicle/component mis-match.
Corrupt VIN data being
transmitted, module previously
installed to other vehicle Check and install correct/new module as required, refer
to the new module/component installation note at the
top of the DTC Index U300362 Battery voltage
Mis-match in battery voltage, of
2 volts or more, between PDM
and RJB Carry out any pinpoint tests associated with this DTC
using the manufacturer approved diagnostic system
Page 2212 of 3039
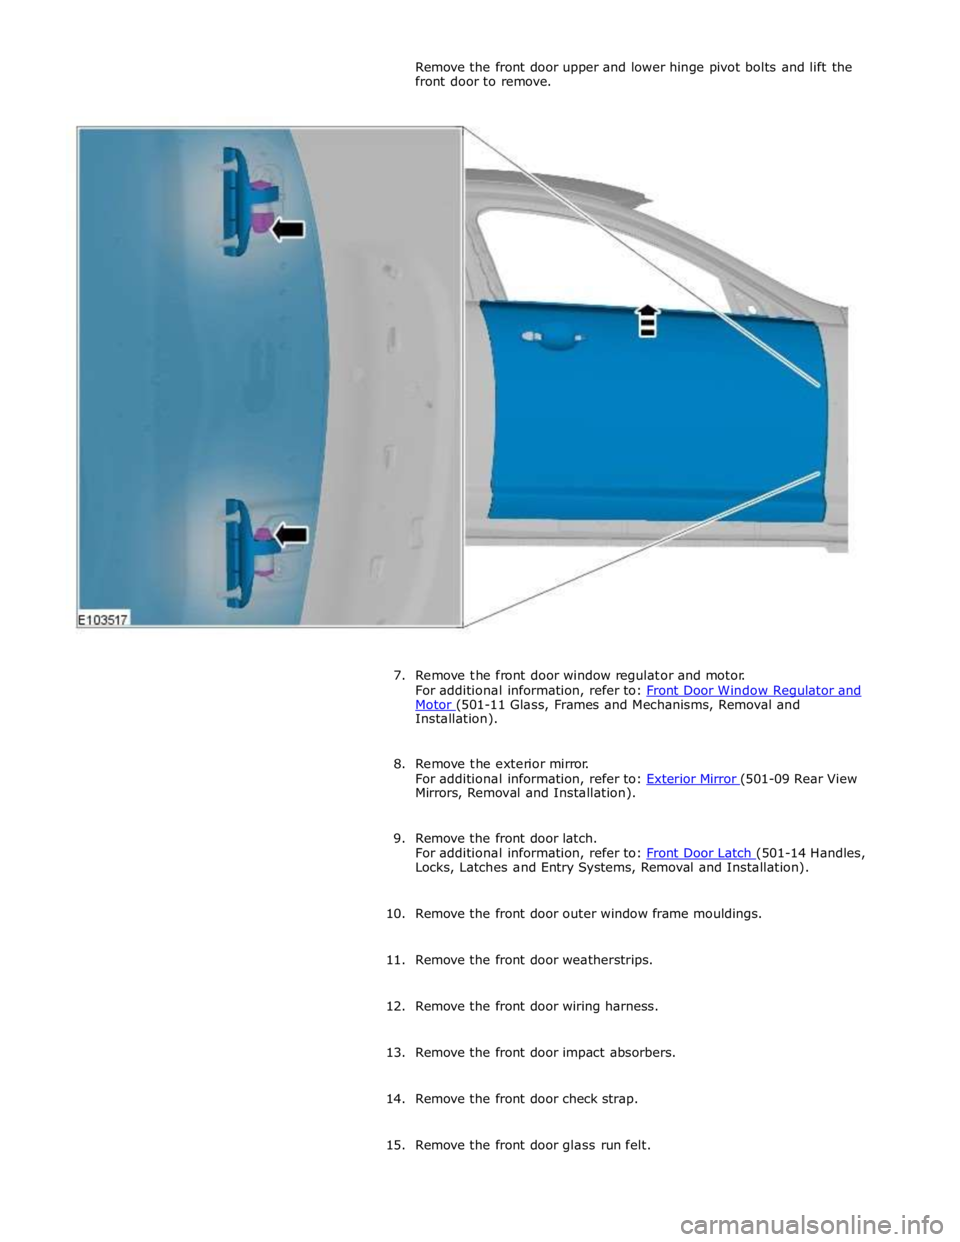
Motor (501-11 Glass, Frames and Mechanisms, Removal and Installation).
8. Remove the exterior mirror.
For additional information, refer to: Exterior Mirror (501-09 Rear View Mirrors, Removal and Installation).
9. Remove the front door latch.
For additional information, refer to: Front Door Latch (501-14 Handles, Locks, Latches and Entry Systems, Removal and Installation).
10. Remove the front door outer window frame mouldings.
11. Remove the front door weatherstrips.
12. Remove the front door wiring harness.
13. Remove the front door impact absorbers.
14. Remove the front door check strap.
15. Remove the front door glass run felt.
Page 2222 of 3039
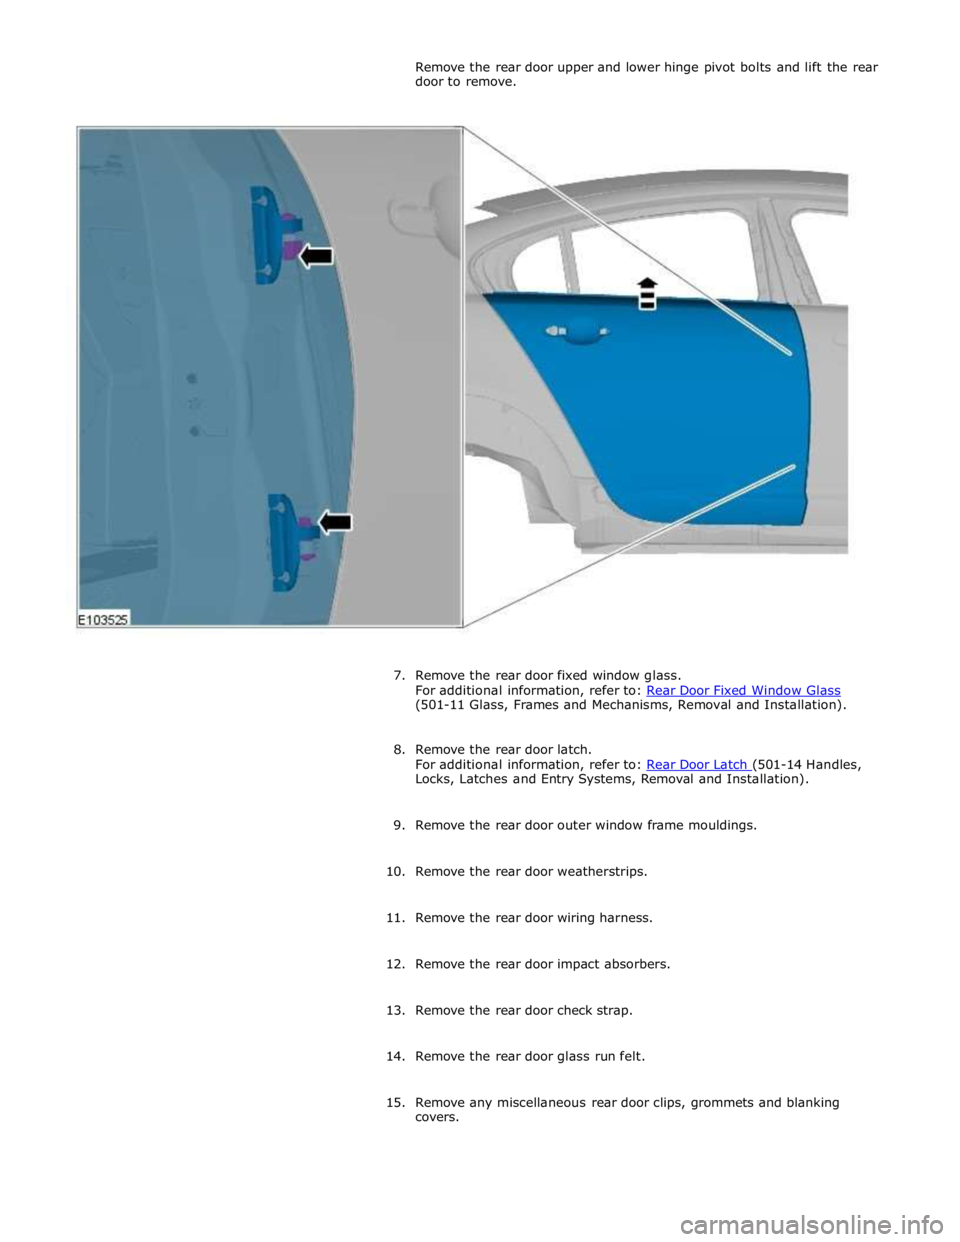
(501-11 Glass, Frames and Mechanisms, Removal and Installation).
8. Remove the rear door latch.
For additional information, refer to: Rear Door Latch (501-14 Handles, Locks, Latches and Entry Systems, Removal and Installation).
9. Remove the rear door outer window frame mouldings.
10. Remove the rear door weatherstrips.
11. Remove the rear door wiring harness.
12. Remove the rear door impact absorbers.
13. Remove the rear door check strap.
14. Remove the rear door glass run felt.
15. Remove any miscellaneous rear door clips, grommets and blanking
covers.
Page 2268 of 3039
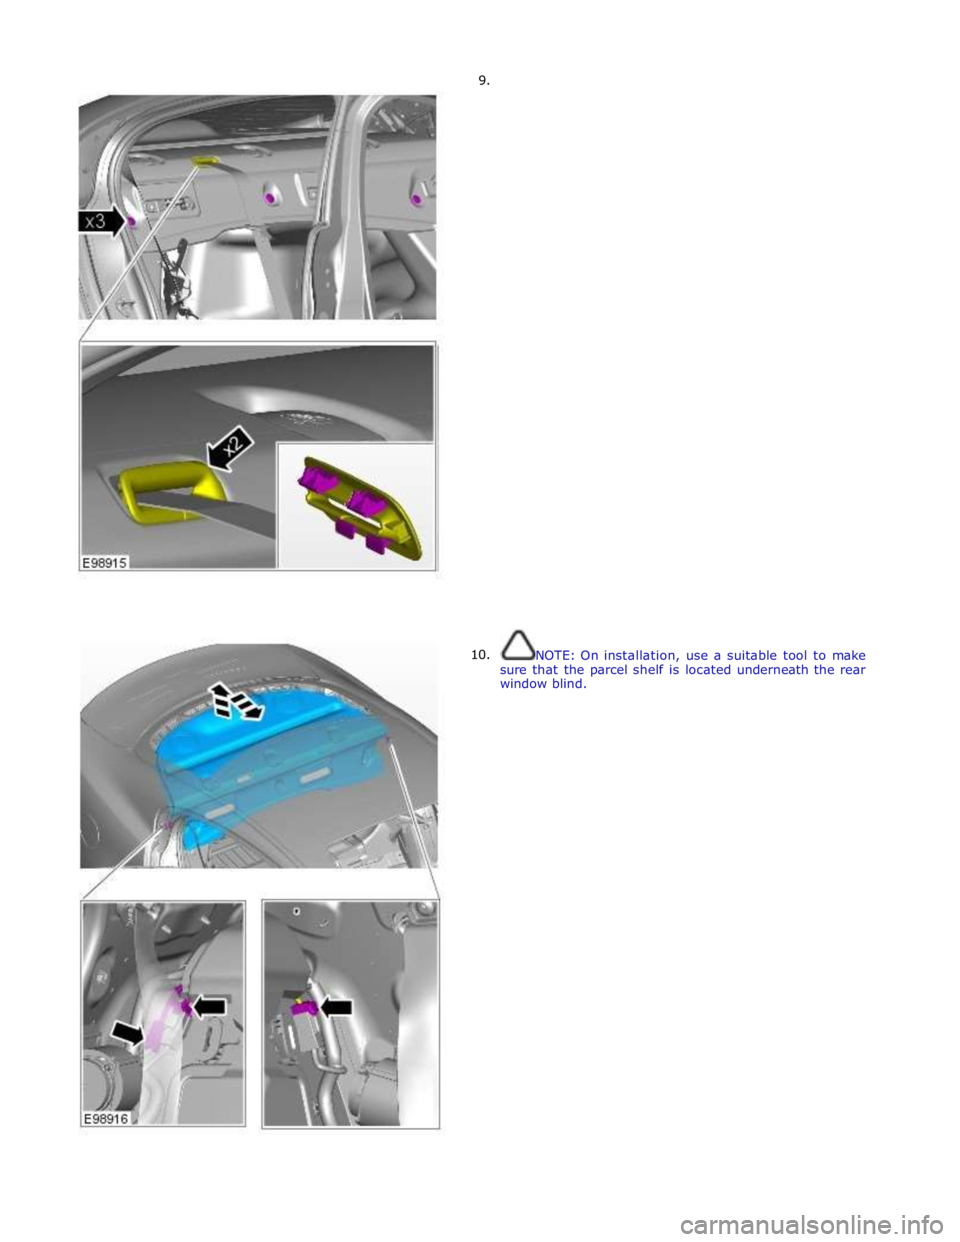
9.
10.
NOTE: On installation, use a suitable tool to make
sure that the parcel shelf is located underneath the rear
window blind.
Page 2294 of 3039
8 LH door module 9 Exterior mirror control switches
System Operation
The rear view mirrors comprise an interior mirror mounted to the windshield, and an exterior mirror mounted on each front door
cheater. The types of mirrors and associated operating functions installed depend on the specification and trim level of the
vehicle.
Interior Mirrors
The interior rear view mirror is provided as a manual dimming or an electrically operated automatic dimming type.
The manual dimming mirror comprises a prismatic glass housed within a surrounding case that is attached with a ball joint
connector to the mirror stem. Manual dimming of the mirror is achieved using the lever mounted on the underside of the mirror
body. Operating the lever will tilt the mirror head from the 'day' position to the 'night' position.
The automatic dimming mirror comprises an electro-chromatic glass housed within a surrounding case that is attached with a
ball joint connector to the mirror stem. The mirror stem incorporates an 8-pin electrical connector that is connected to the roof
panel wiring harness. The wiring harness provides hardwired and a LIN connection to the CJB.
Light sensors are mounted on the front and rear of the mirror surround case. The sensors control the automatic dimming
feature to reduce glare from the headlights of following vehicles.
The automatic dimming function is permanently active when the ignition is in power mode 4 (Accessory) and power mode 6
(Ignition). The forward facing light sensor monitors the ambient light level at the front of the vehicle; the rearward facing light
sensor monitors the light level coming from the rear of the vehicle. When light from the rear of the vehicle exceeds the
ambient light level from the front of the vehicle, the automatic dimming circuit darkens the interior mirror surface.
Automatic dimming is inhibited when reverse gear is selected to provide the driver with maximum vision. On vehicles with
automatic transmission, the reverse gear signal is provided by the TCM (transmission control module) via the high speed CAN bus to the CJB. The CJB then provides a power feed to the mirror. On vehicles with manual transmission, the reverse gear signal is provided by a transmission switch that is hardwired to the CJB.
Exterior Mirrors
Electrically operated and heated exterior mirrors are installed as standard. Depending on the specification and trim level of the
vehicle, the following options are available:
Power fold (switch pack operated feature) and auto fold (remote handset operated feature)
Memory recall
Reverse gear mirror dip
Mirror heating
Exterior mirror lamps.
The power fold/auto fold feature is available only when power fold mirrors are installed to the vehicle.
The mirrors can be configured to automatically fold when the vehicle is locked and unfold when unlocked. This feature can be
enabled or disabled via the Vehicle settings area of the touch screen:
Select 'Settings' from the touch screen Home menu.
Select ' Security/Vehicle'
Select 'Windows/Mirrors'
Select Power Fold 'On' or 'Off' as appropriate.
The pasenger side mirror can be configured to automatically dip when reverse gear is selected. This feature can be enabled or
disabled via the Vehicle settings area of the touch screen:
Select 'Settings' from the touch screen Home menu.
Select ' Security/Vehicle'
Select 'Windows/Mirrors'
Select Reverse dip 'On' or 'Off' as appropriate.
The LH door mirror incorporates an ambient air temperature sensor that is hardwired to the ECM (engine control module). The ECM is connected to the CJB and other control modules via the high speed CAN bus. The sensor provides information to the ECM that is then transmitted on the medium speed CAN bus for use by other control modules. On vehicles installed with a high-line instrument cluster, the CJB transmits the temperature signal to the instrument cluster that provides a display of the ambient temperature to the driver.
The exterior mirror lamps are controlled by the interior lighting function.
The door mirrors are controlled using a switch pack located on the driver's door. The switch pack contains 2 non-latching mirror
select switches labeled 'L' and 'R' and a 4-way directional joystick. The switch pack is connected to the driver door control
module via the LIN bus. The driver and front passenger door control modules are connected via the medium speed CAN bus. A hardwired connection between each door control module and the corresponding door mirror, provides the supply and ground
paths for the mirror motors.
Each exterior door mirror incorporates 2 motors to control horizontal (left/right) and vertical (up/down) adjustments. www.JagDocs.com