2010 JAGUAR XFR warning
[x] Cancel search: warningPage 294 of 3039

Jacking and Lifting - Jacking
Description and Operation
Safety Precautions Published: 11-May-2011
WARNING: The jack provided with the vehicle is intended to be used in an emergency for changing a deflated tire. To
avoid damage to the vehicle, never use the jack to raise the vehicle for any other purpose. Refer to the Driver Handbook when
using the jack supplied with the vehicle. Failure to follow these instructions may result in personal injury.
The following safety precautions must be observed when raising the vehicle to carry out service operations:
Never rely on a jack alone to support a vehicle. Always use suitable vehicle stands to provide rigid support.
When working beneath a vehicle, whenever possible use a vehicle hoist instead of a jack and vehicle stands.
Make sure that the vehicle is standing on firm, level ground before using a jack.
Do not rely on the parking brake alone; chock the wheels and put the automatic transmission into Park if possible.
Check that any lifting equipment used has adequate capacity for the load being lifted and is in correct working order.
Page 297 of 3039

Rear Suspended Tow
When the vehicle is being recovered by rear suspended tow:
The ignition key must be removed from the ignition switch to lock the steering.
The rear wheels must be correctly positioned in the lifting cradle and securely tied down.
Emergency Towing
WARNING: If the engine is not running, the steering will become heavy and the force necessary to effectively apply the
brakes will be greatly increased.
CAUTION: A vehicle with a defective transmission must be towed by rear suspended tow.
When the vehicle is being towed on its own wheels:
Local regulations for the towing of vehicles must be followed. In some countries the registration number of the towing
vehicle and an 'On Tow' sign or warning triangle must be displayed at the rear of the towed vehicle.
The gear selector lever must be in Neutral.
The ignition switch must be in position II to release the steering lock and make the direction indicators, horn and stop
lamps operate.
A distance of 0,8 km (0.5 mile) must not be exceeded.
A speed of 48 km/h (30 mph) must not be exceeded.
The tow rope must be attached to the front towing eye. www.JagDocs.com
Page 301 of 3039

it may turn out to be the most important.
2. Do not touch anything until a road test and a thorough visual inspection of the vehicle have been carried out. Leave the
tire pressures and vehicle load just where they were when the condition was first observed. Adjusting tire pressures,
vehicle load or making other adjustments may reduce the conditions intensity to a point where it cannot be identified
clearly. It may also inject something new into the system, preventing correct diagnosis.
3. Make a visual inspection as part of the preliminary diagnosis routine, writing down anything that does not look right.
Note tire pressures, but do not adjust them yet. Note leaking fluids, loose nuts and bolts, or bright spots where
components may be rubbing against each other. Check the luggage compartment for unusual loads.
4. Road test the vehicle and define the condition by reproducing it several times during the road test.
5. Carry out the Road Test Quick Checks as soon as the condition is reproduced. This will identify the correct diagnostic
procedure. Carry out the Road Test Quick Checks more than once to verify they are providing a valid result. Remember,
the Road Test Quick Checks may not tell where the concern is, but they will tell where it is not.
Road Test Quick Checks
1. 24-80 km/h (15-50 miles/h): With light acceleration, a moaning noise is heard and possibly a vibration is felt in the
front floor pan. It is usually worse at a particular engine speed and at a particular throttle setting during acceleration at
that speed. It may also produce a moaning sound, depending on what component is causing it. Refer to Tip-In Moan in
the Symptom Chart.
2. Acceleration/deceleration: With slow acceleration and deceleration, a shake is sometimes noticed in the steering
wheel/column, seats, front floor pan, front door trim panel or front end sheet metal. It is a low frequency vibration
(around 9-15 cycles per second). It may or may not be increased by applying brakes lightly. Refer to Idle Boom/Shake
/Vibration in the Symptom Chart.
3. High speed: A vibration is felt in the front floor pan or seats with no visible shake, but with an accompanying sound or
rumble, buzz, hum, drone or booming noise. Coast with the clutch pedal depressed or shift control selector lever in
neutral and engine idling. If vibration is still evident, it may be related to wheels, tires, front brake discs, wheel hubs
or front wheel bearings. Refer to High Speed Shake in the Symptom Chart.
4. Engine rpm sensitive: A vibration is felt whenever the engine reaches a particular rpm. It will disappear in neutral
coasts. The vibration can be duplicated by operating the engine at the problem rpm while the vehicle is stationary. It
can be caused by any component, from the accessory drive belt to the torque converter which turns at engine speed
when the vehicle is stopped. Refer to High Speed Shake in the Symptom Chart.
5. Noise/vibration while turning: Clicking, popping, or grinding noises may be due to a worn, damaged, or incorrectly
installed front wheel bearing, rear drive half shaft or CV joint.
6. Noise/vibration that is road speed relative: This noise/vibration can be diagnosed independent of engine speed or gear
selected (engine speed varies but torque and road speed remain constant). The cause may be a rear drive
axle/differential whine.
Road Conditions
An experienced technician will always establish a route that will be used for all NVH diagnosis road tests. The road selected
should be reasonably smooth, level and free of undulations (unless a particular condition needs to be identified). A smooth
asphalt road that allows driving over a range of speeds is best. Gravel or bumpy roads are unsuitable because of the additional
road noise produced. Once the route is established and consistently used, the road noise variable is eliminated from the test
results.
NOTE: Some concerns may be apparent only on smooth asphalt roads.
If a customer complains of a noise or vibration on a particular road and only on a particular road, the source of the concern
may be the road surface. If possible, try to test the vehicle on the same type of road.
Vehicle Preparation
Carry out a thorough visual inspection of the vehicle before carrying out the road test. Note anything which is unusual. Do not
repair or adjust any condition until the road test is carried out, unless the vehicle is inoperative or the condition could pose a
hazard to the technician.
After verifying the condition has been corrected, make sure all components removed have been installed.
Lift Test
After a road test, it is sometimes useful to do a similar test on a lift.
When carrying out the high-speed shake diagnosis or engine accessory vibration diagnosis on a lift, observe the following
precautions:
WARNING: If only one drive wheel is allowed to rotate, speed must be limited to 55 km/h (35 miles/h) indicated on the
speedometer since actual wheel speed will be twice that indicated on the speedometer. Speed exceeding 55 km/h (35 miles/h)
or allowing the drive wheel to hang unsupported could result in tire disintegration, differential failure, constant velocity joint
Page 324 of 3039
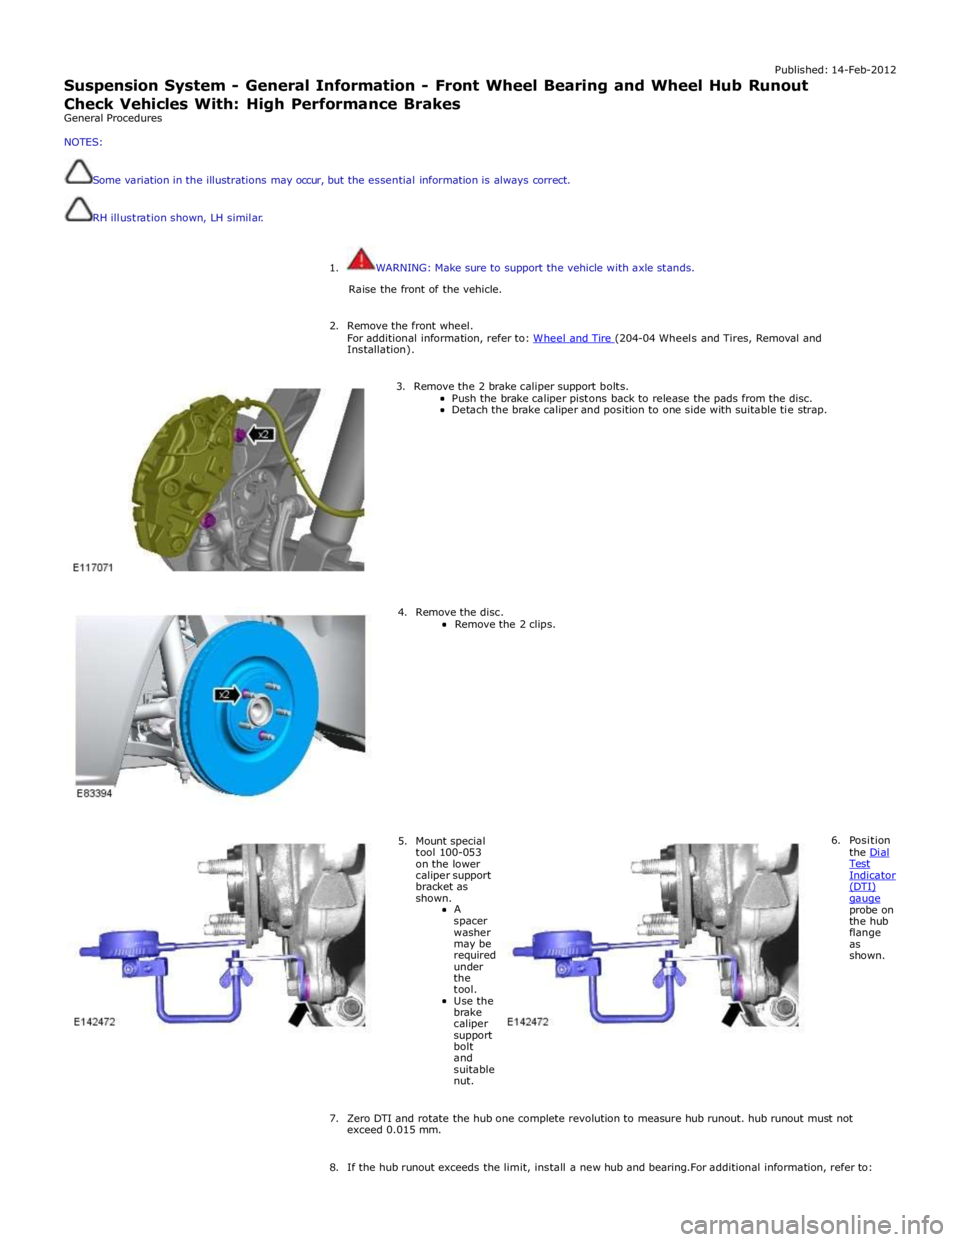
Published: 14-Feb-2012
Suspension System - General Information - Front Wheel Bearing and Wheel Hub Runout Check Vehicles With: High Performance Brakes
General Procedures
NOTES:
Some variation in the illustrations may occur, but the essential information is always correct.
RH illustration shown, LH similar.
1. WARNING: Make sure to support the vehicle with axle stands.
Raise the front of the vehicle.
2. Remove the front wheel.
For additional information, refer to: Wheel and Tire (204-04 Wheels and Tires, Removal and Installation).
3. Remove the 2 brake caliper support bolts.
Push the brake caliper pistons back to release the pads from the disc. Detach the brake caliper and position to one side with suitable tie strap.
4. Remove the disc.
Remove the 2 clips.
5. Mount special tool 100-053 on the lower caliper support bracket as shown.
A
spacer washer may be required under the tool.
Use the brake caliper support bolt and suitable nut. 6. Position
the Dial Test Indicator (DTI) gauge probe on the hub flange as shown.
7. Zero DTI and rotate the hub one complete revolution to measure hub runout. hub runout must not exceed 0.015 mm.
8. If the hub runout exceeds the limit, install a new hub and bearing.For additional information, refer to:
Page 326 of 3039
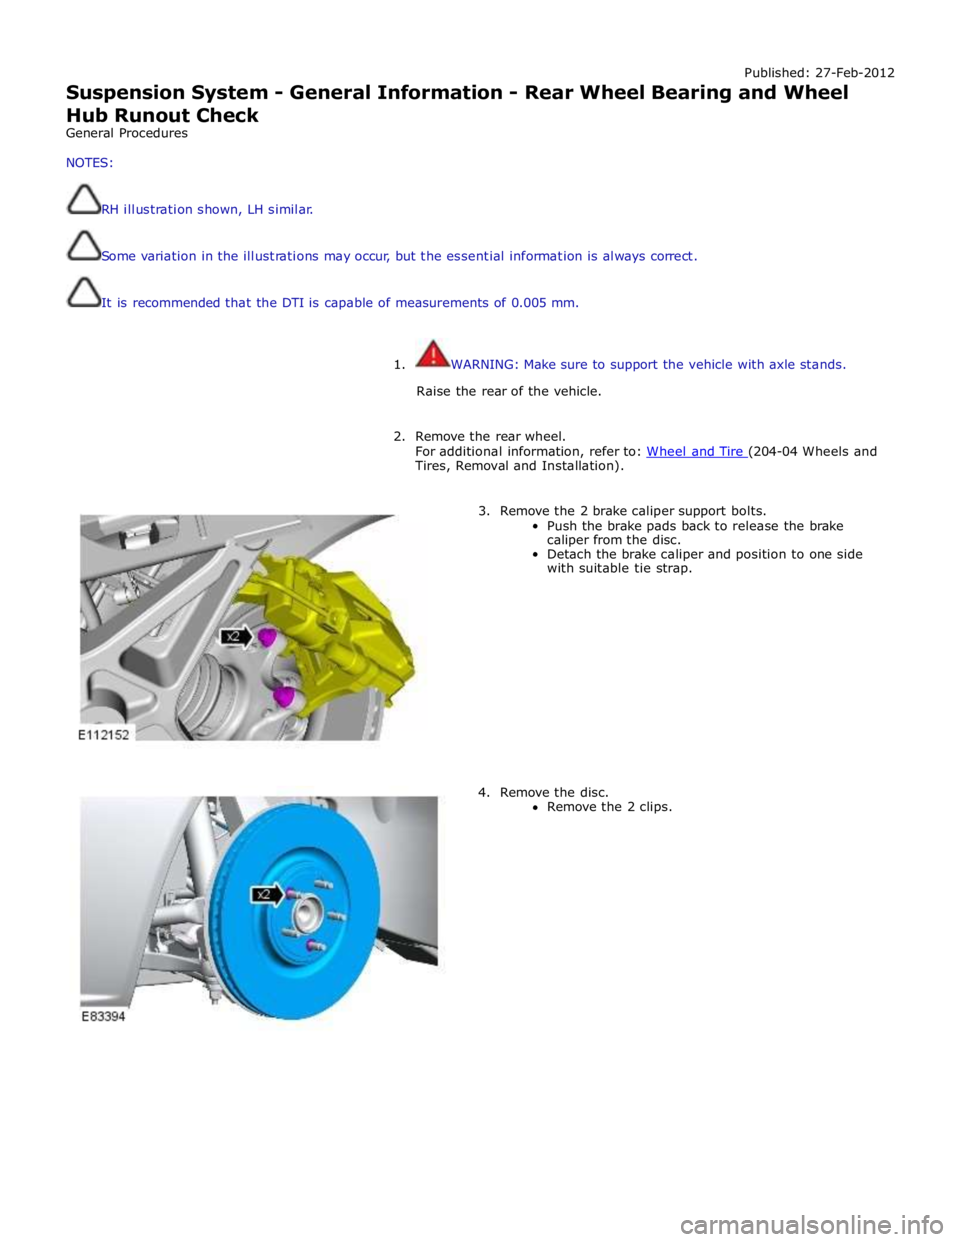
Published:
27-Feb-2012
Suspension System - General Information - Rear Wheel Bearing and Wheel
Hub Ru
nout Check
General Procedures
NOTES:
RH illustra tion shown, LH sim ilar.
Some variat ion i n the illustra tions may o ccur, but the es senti al informa tion is always co rrect.
It is recommended that the DTI is capable of measurements of 0.005 mm.
1. WARNING: Make sure to support the vehicle with axle stands.
Raise the rear of the vehicle.
2. Remove the rear wheel.
For additional information, refer to: Wheel and Tire (204-04 Wheels and Tires, Removal and Installation).
3. Remove the 2 brake caliper support bolts.
Push the brake pads back to release the brake
caliper from the disc.
Detach the brake caliper and position to one side
with suitable tie strap.
4. Remove the disc.
Remove the 2 clips.
Page 336 of 3039
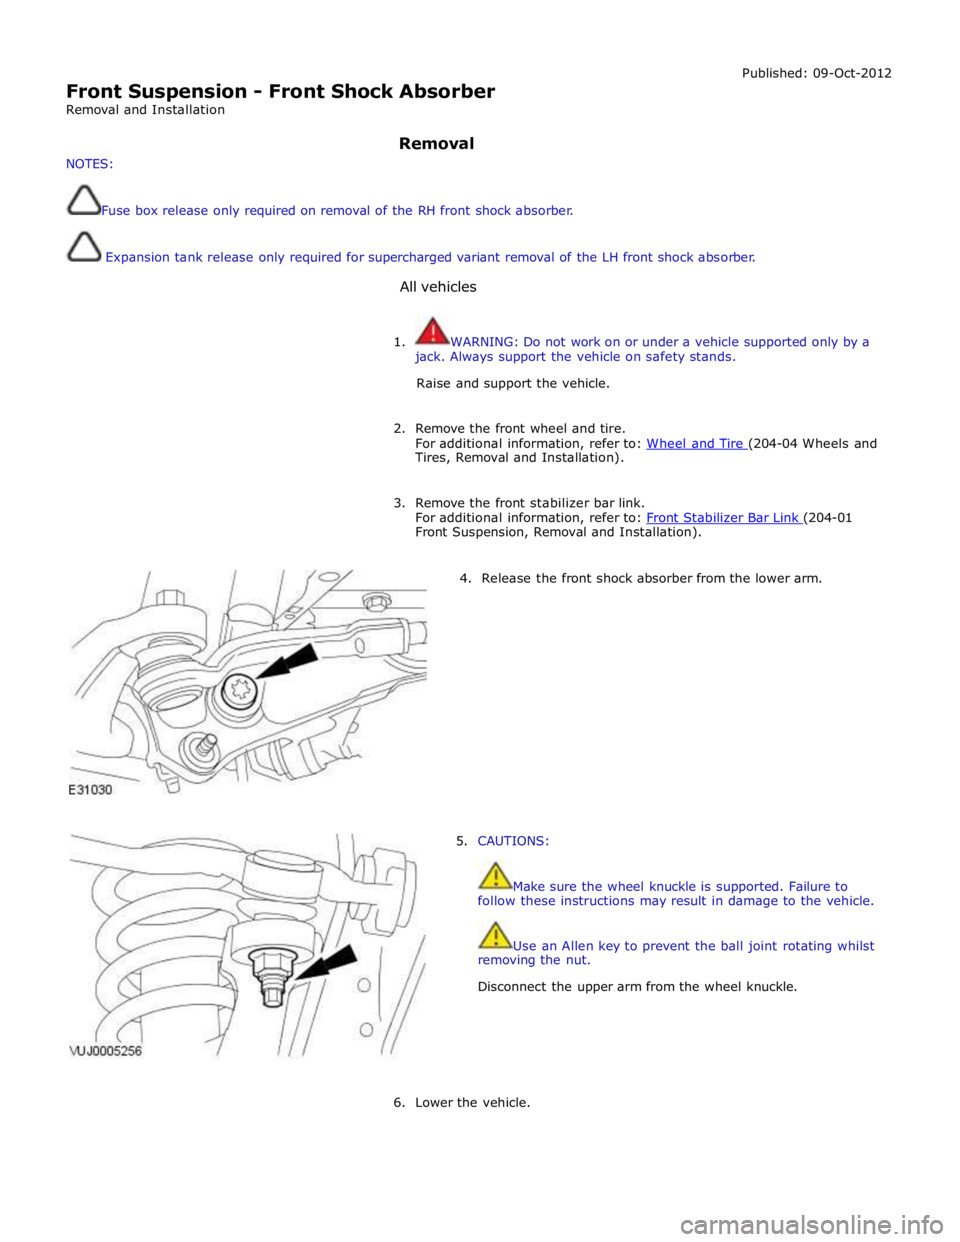
Front Suspension - Front Shock Absorber
Removal and Installation Published: 09-Oct-2012
NOTES: Removal
Fuse box release only required on removal of the RH front shock absorber.
Expansion tank release only required for supercharged variant removal of the LH front shock absorber.
All vehicles
1. WARNING: Do not work on or under a vehicle supported only by a
jack. Always support the vehicle on safety stands.
Raise and support the vehicle.
2. Remove the front wheel and tire.
For additional information, refer to: Wheel and Tire (204-04 Wheels and Tires, Removal and Installation).
3. Remove the front stabilizer bar link.
For additional information, refer to: Front Stabilizer Bar Link (204-01 Front Suspension, Removal and Installation).
4. Release the front shock absorber from the lower arm.
5. CAUTIONS:
Make sure the wheel knuckle is supported. Failure to
follow these instructions may result in damage to the vehicle.
Use an Allen key to prevent the ball joint rotating whilst
removing the nut.
Disconnect the upper arm from the wheel knuckle.
6. Lower the vehicle.
Page 338 of 3039
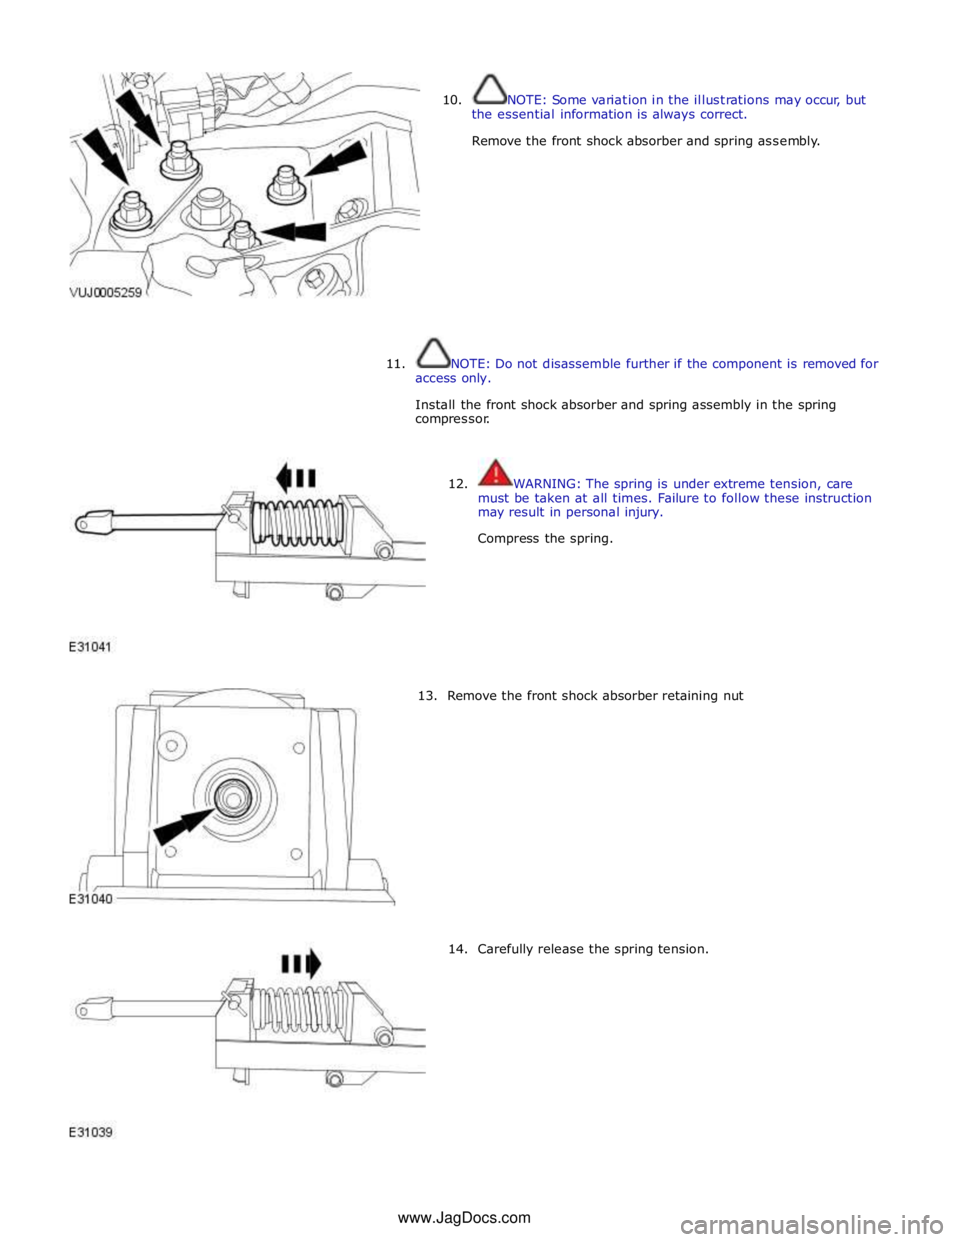
10. NOTE: Some variation in the illustrations may occur, but
the essential information is always correct.
Remove the front shock absorber and spring assembly.
11.
NOTE: Do not disassemble further if the component is removed for
access only.
Install the front shock absorber and spring assembly in the spring
compressor.
12. WARNING: The spring is under extreme tension, care
must be taken at all times. Failure to follow these instruction
may result in personal injury.
Compress the spring.
13. Remove the front shock absorber retaining nut
14. Carefully release the spring tension. www.JagDocs.com
Page 342 of 3039
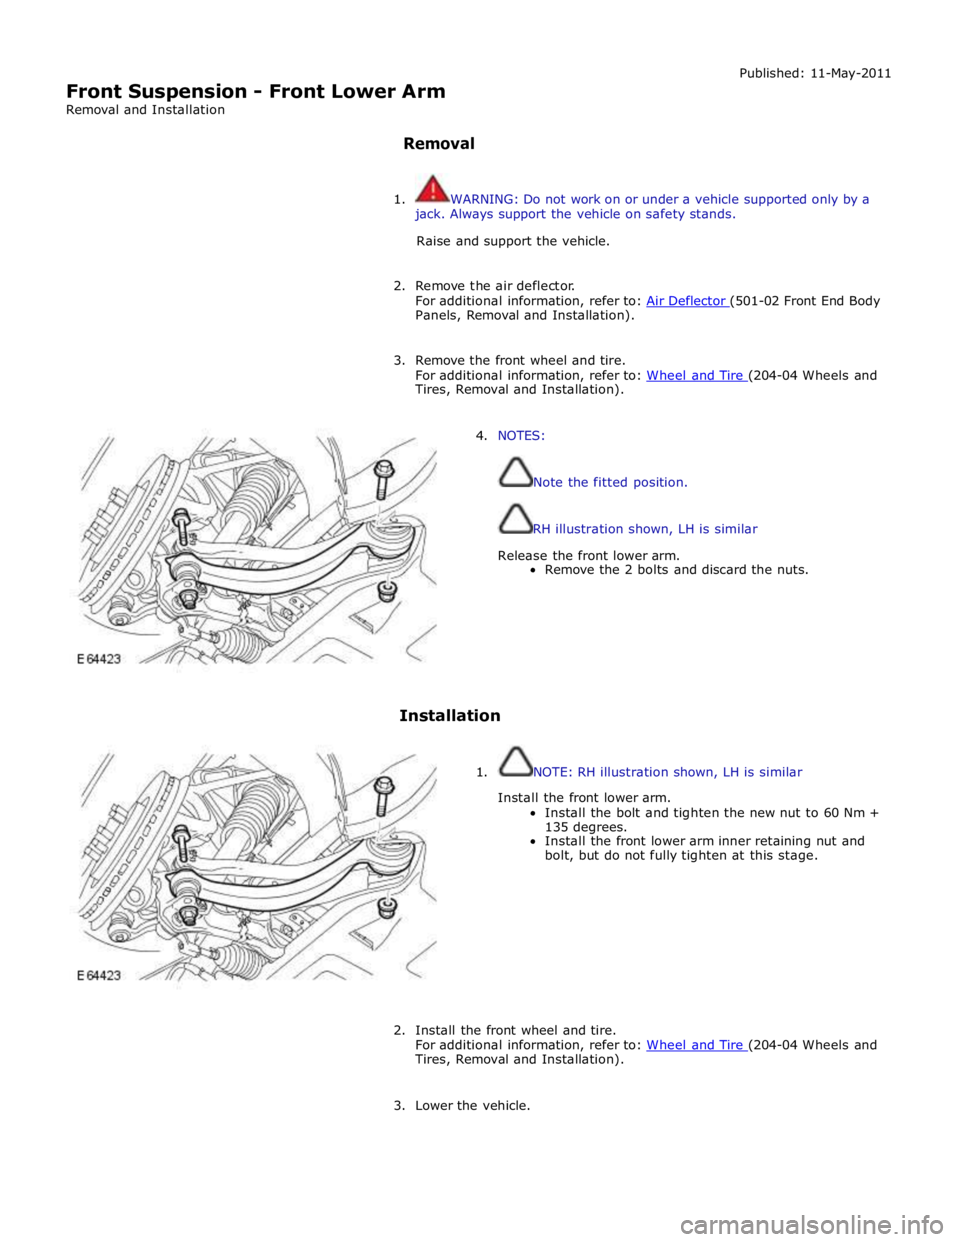
Front Suspension - Front Lower Arm
Removal and Installation
Removal Published: 11-May-2011
1. WARNING: Do not work on or under a vehicle supported only by a
jack. Always support the vehicle on safety stands.
Raise and support the vehicle.
2. Remove the air deflector.
For additional information, refer to: Air Deflector (501-02 Front End Body Panels, Removal and Installation).
3. Remove the front wheel and tire.
For additional information, refer to: Wheel and Tire (204-04 Wheels and Tires, Removal and Installation).
4. NOTES:
Note the fitted position.
RH illustration shown, LH is similar
Release the front lower arm.
Remove the 2 bolts and discard the nuts.
Installation
1. NOTE: RH illustration shown, LH is similar
Install the front lower arm.
Install the bolt and tighten the new nut to 60 Nm +
135 degrees.
Install the front lower arm inner retaining nut and
bolt, but do not fully tighten at this stage.
2. Install the front wheel and tire.
For additional information, refer to: Wheel and Tire (204-04 Wheels and Tires, Removal and Installation).
3. Lower the vehicle.