Page 344 of 3039
Panels, Removal and Installation).
3. WARNING: Do not work on or under a vehicle supported only by a jack.
Always support the vehicle on safety stands.
Raise and support the body.
4. Remove the wheel and tire.
For additional information, refer to: Wheel and Tire (204-04 Wheels and Tires, Removal and Installation).
5. Remove the stabilizer bar link.
For additional information, refer to: Front Stabilizer Bar Link (204-01 Front Suspension, Removal and Installation).
6. Release the tie rod. Ball joint splitter
204-327 Special Tool(s)
Page 346 of 3039

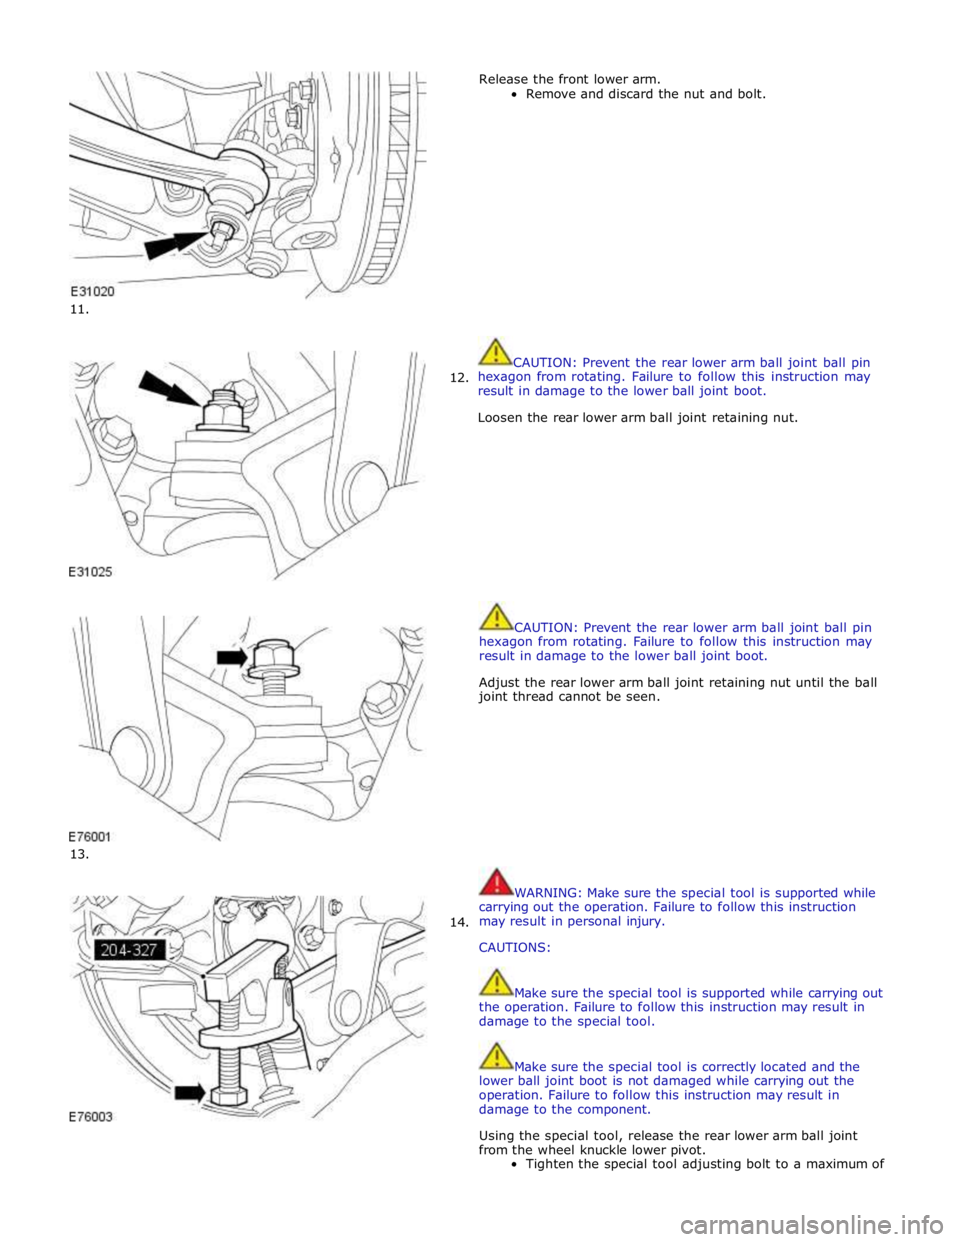
11.
12.
13.
14. Release the front lower arm.
Remove and discard the nut and bolt.
CAUTION: Prevent the rear lower arm ball joint ball pin
hexagon from rotating. Failure to follow this instruction may
result in damage to the lower ball joint boot.
Loosen the rear lower arm ball joint retaining nut.
CAUTION: Prevent the rear lower arm ball joint ball pin
hexagon from rotating. Failure to follow this instruction may
result in damage to the lower ball joint boot.
Adjust the rear lower arm ball joint retaining nut until the ball
joint thread cannot be seen.
WARNING: Make sure the special tool is supported while
carrying out the operation. Failure to follow this instruction
may result in personal injury.
CAUTIONS:
Make sure the special tool is supported while carrying out
the operation. Failure to follow this instruction may result in
damage to the special tool.
Make sure the special tool is correctly located and the
lower ball joint boot is not damaged while carrying out the
operation. Failure to follow this instruction may result in
damage to the component.
Using the special tool, release the rear lower arm ball joint
from the wheel knuckle lower pivot.
Tighten the special tool adjusting bolt to a maximum of
Page 347 of 3039

60 Nm.
If the rear lower arm ball joint releases from the wheel
knuckle lower pivot, using no more than 60 Nm on the
special tool adjusting bolt, proceed to step 13.
If the rear lower arm ball joint does not release from
the wheel knuckle lower pivot, using no more than 60
Nm on the special tool adjusting bolt, proceed to step
12.
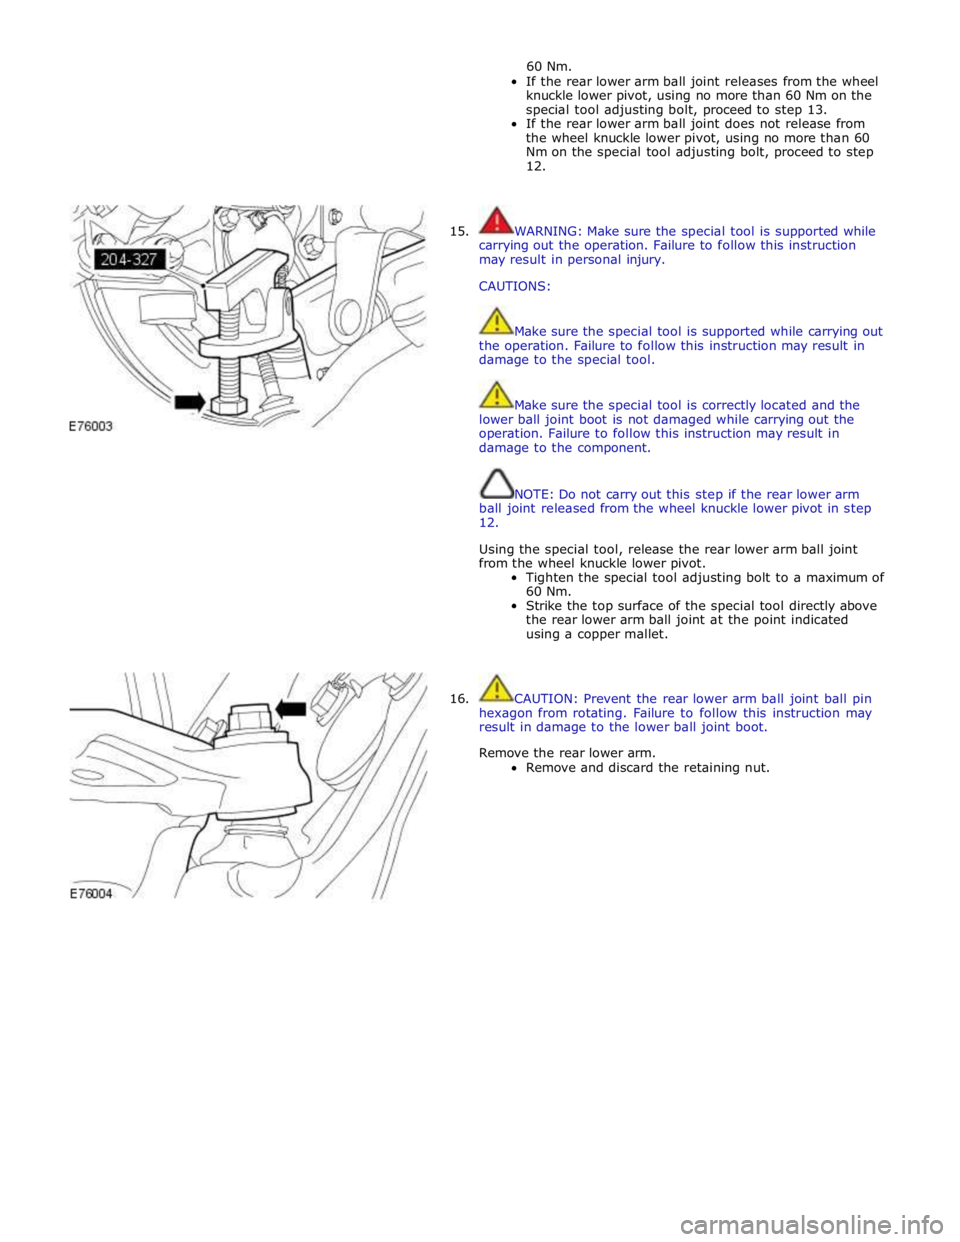
15. WARNING: Make sure the special tool is supported while
carrying out the operation. Failure to follow this instruction
may result in personal injury.
CAUTIONS:
Make sure the special tool is supported while carrying out
the operation. Failure to follow this instruction may result in
damage to the special tool.
Make sure the special tool is correctly located and the
lower ball joint boot is not damaged while carrying out the
operation. Failure to follow this instruction may result in
damage to the component.
NOTE: Do not carry out this step if the rear lower arm
ball joint released from the wheel knuckle lower pivot in step
12.
Using the special tool, release the rear lower arm ball joint
from the wheel knuckle lower pivot.
Tighten the special tool adjusting bolt to a maximum of
60 Nm.
Strike the top surface of the special tool directly above
the rear lower arm ball joint at the point indicated
using a copper mallet.
16. CAUTION: Prevent the rear lower arm ball joint ball pin
hexagon from rotating. Failure to follow this instruction may
result in damage to the lower ball joint boot.
Remove the rear lower arm.
Remove and discard the retaining nut.
Page 348 of 3039
Installation
1. WARNING: Make sure that a new lower arm ball joint nut
is installed.
CAUTION: Prevent the rear lower arm ball joint ball pin
hexagon from rotating. Failure to follow this instruction may
result in damage to the lower ball joint boot.
Install the rear lower arm.
Tighten the nut to 92 Nm.
2. NOTE: Install a new retaining nut and bolt.
Secure the front lower arm.
Stage 1: Tighten to 60 Nm.
Stage 2: Tighten to a further 135 degrees.
3. Secure the rear lower arm.
Install the rear lower arm inner retaining nut, but do
not tighten fully at this stage.
4. Install the shock absorber and spring assembly.
Tighten the bolt to 175 Nm. www.JagDocs.com
Page 351 of 3039
Front Suspension - Rear Lower Arm Bushing
Removal and Installation
Special Tool(s)
Rear lower arm bushing remover and installer
204-464
Rear lower arm bushing remover
204-333
Rear lower arm bushing installer
204-332
Rear lower arm bushing installer
204-465
Rear lower arm bushing installer
204-334
Removal
CAUTION: Nuts and bolts must be tightened with the weight of the vehicle on the suspension. Published: 11-May-2011
1. WARNING: Do not work on or under a vehicle supported only by a jack.
Always support the vehicle on safety stands.
Raise and support the vehicle.
2. Remove the rear lower arm.
For additional information, refer to: Rear Lower Arm (204-01 Front Suspension, Removal and Installation).
Page 354 of 3039
Front Suspension - Shock Absorber Bushing
Removal and Installation
Special Tool(s)
Replacer support-bush
204-337
Replacer-bush
204-338
Remover-bush
204-336
Remover support-bush
204-335
Removal
CAUTION: Nuts and bolts must be tightened with the weight of the vehicle on the suspension. Published: 11-May-2011
1. WARNING: Do not work on or under a vehicle supported only by a jack.
Always support the vehicle on safety stands.
Raise the vehicle on a 4 post lift.
2. Remove the rear lower arm.
For additional information, refer to: Rear Lower Arm (204-01 Front Suspension, Removal and Installation).
Page 356 of 3039

Published: 06-Jun-2013
Front Suspension - Front Stabilizer Bar V8 5.0L Petrol/V8 S/C 5.0L Petrol
Removal and Installation
Removal
NOTE: Removal steps in this procedure may contain installation details.
1. Refer to: Battery Disconnect and Connect (414-01 Battery, Mounting and Cables, General Procedures).
2. WARNING: Do not work on or under a vehicle supported only by a jack.
Always support the vehicle on safety stands.
Raise and support the vehicle.
3. Refer to: Air Conditioning (A/C) System Recovery, Evacuation and Charging (412-00 Climate Control System - General Information, General Procedures).
4. Refer to: Radiator Splash Shield (501-02 Front End Body Panels, Removal and Installation).
5. Refer to: Air Deflector (501-02 Front End Body Panels, Removal and Installation).
6. Refer to: Front Wheel Bearing and Wheel Hub - TDV6 3.0L Diesel /V8 5.0L Petrol/V8 S/C 5.0L Petrol (204-01 Front Suspension, Removal and Installation).
7. Refer to: Engine Cover - V8 5.0L Petrol/V8 S/C 5.0L Petrol (501-05 Interior Trim and Ornamentation, Removal and Installation).
8.
Secure the radiator assembly. 303-021
Engine support bracket Special Tool(s) www.JagDocs.com
Page 361 of 3039
22.
23. Torque:
M6 9 Nm M10 40 Nm
CAUTIONS:
Support the engine on a jack. The angle may need to
be adjusted during this procedure.
Make sure to protect the paintwork.
Special Tool(s): 303-021
24. WARNING: Do not work on or under a vehicle supported only by a
jack. Always support the vehicle on safety stands.
Raise and support the vehicle.
25. www.JagDocs.com