2010 JAGUAR XFR light
[x] Cancel search: lightPage 2722 of 3039

Sealing - - Polyurethane cartridge extruded seam sealer - grey - this is not a weld through product 3M 08684 Polyurethane cartridge extruded seam sealer - white - this is not a weld through product 3M 08689 Polyurethane cartridge extruded seam sealer - black - this is not a weld through product 3M 08694 Polyurethane sachet 310ml - grey - this is not a weld through product 3M 08782 Polyurethane sachet 310ml - white - this is not a weld through product 3M 08787 Polyurethane sachet 310ml - black - this is not a weld through product 3M 08789 Polyurethane sachet 600ml - grey - this is not a weld through product 3M 08783 Polyurethane sachet 600ml - white - this is not a weld through product 3M 08788 Polyurethane sachet 600ml - black - this is not a weld through product 3M 08793 Sprayable seam sealer 2K polyurethane 150ml - grey 3M 08823 Sprayable seam sealer 2K polyurethane 250ml - grey 3M 08800 Sprayable seam sealer MS polymer grey 3M 08851 Super seam sealer can - grey 3M 08537 Super seam sealer - brush 3M 08540 Butyl cartridge highly flexible for joints greater than 3mm - grey 3M 08645 Terostat 9100 (1K PUR) adhesive sealant Teroson 153.65B Terostat 9100 (1K PUR) adhesive sealant Teroson 112.72C Terostat 9100 (1K PUR) adhesive sealant Teroson 129.19S Terostat 9200 (1K PUR) adhesive sealant - black Teroson 120.20Q Terostat 9200 (1K PUR) adhesive sealant - black Teroson 120.25W Terolan light vehicle body sealant Teroson 128.60D Terostat 9320 sprayable seam sealant - grey Teroson 139.15A Terostat 9320 sprayable seam sealant - black Teroson 139.16B Terostat 9320 sprayable seam sealant - ochre Teroson 139.17C Terolan special sealant brushable Teroson 179.70H Terostat II sprayable sealant band Teroson 193.00D Terostat VII round profile plastic sealing band Teroson 112.46Z Terostat IX putty Teroson 157.86J MS Polymer Sealing - - MS Polymer caulkable sealer - white 3M 0855 Terostat 9120 (MS Polymer) adhesive sealant - white Teroson 102.78X Terostat 9120 (MS Polymer) adhesive sealant - black Teroson 113.23H Terostat 9120 (MS Polymer) adhesive sealant - black Teroson 104.41R Seam Sealing Light - - Drip Chek clear 3M 08401 Drip Chek heavy 3M 08531 Silicone Sealant - - Terostat 9140 silicone sealant - transparent Teroson 140.08B Terostat 9140 silicone sealant - black Teroson 140.04X Body Caulking - - Body caulking 3M 08568 Structural Adhesive - - Two component epoxy adhesive 3M 08122 Manual applicator gun 3M 08190 Panel Bonding Adhesive - - Panel bonding adhesive + (nozzle 08193) 3M 08115 Requires manual applicator gun + nozzle 3M 08117 Tape and Film - - Acrylic tape PT1100 double sided - 6mm x 40m 3M 80318 Acrylic tape PT1100 double sided -9mm x 20m 3M 80319 Acrylic tape PT1100 double sided 12mm x 20m 3M 80320 Acrylic tape PT1100 double sided 19mm x 20m 3M 80322 Acrylic tape PT1100 double sided 25mm x 20m 3M 80323 Polyolefin adhesion promoter 3M 05917 Abrasion resistance film 3M 08210 Abrasion resistance film 3M 08219 Sealing Tape and Primer - - Terotape seam sealing tape 8mm x 6mm Teroson 8164590 Terotape seam sealing tape 10mm x 16mm Teroson 8164600 Terotape primer 420ml Teroson 8164610 Cavity Wax - - Body shultz coatings - black - 1L can 3M 08861 Body shultz coatings - black - 500ml aerosol 3M 08877 Inner cavity wax aerosol (transparent) 3M 08909 Inner cavity wax aerosol (amber) 3M 08901 Inner cavity wax 1L can (amber) 3M 08911 Inner cavity wax 1L can (transparent) 3M 08919 Inner cavity wax 10L drum (amber) 3M 08921 Inner cavity wax 10L drum (transparent) 3M 08929
Page 2723 of 3039

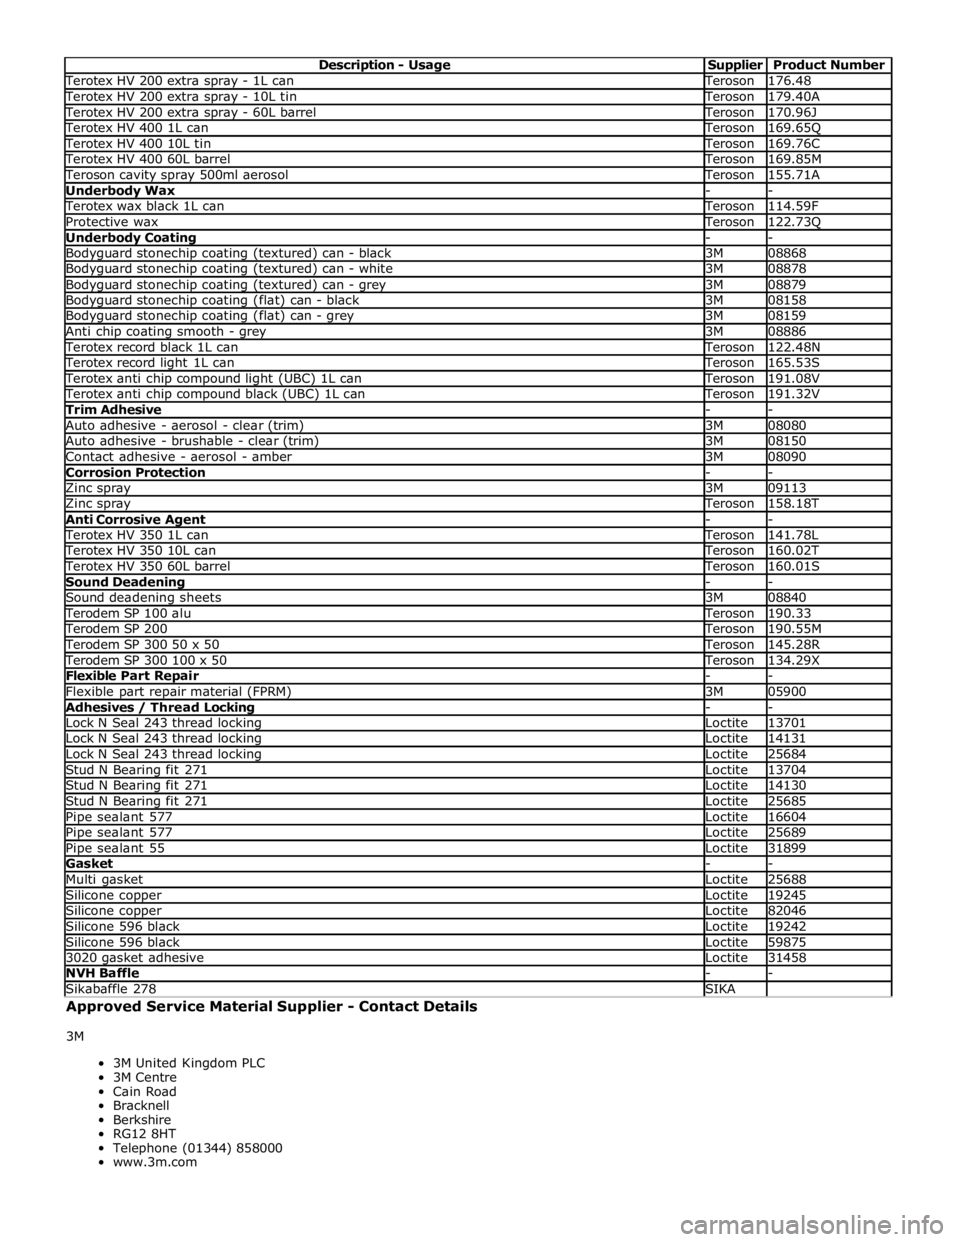
Terotex HV 200 extra spray - 1L can Teroson 176.48 Terotex HV 200 extra spray - 10L tin Teroson 179.40A Terotex HV 200 extra spray - 60L barrel Teroson 170.96J Terotex HV 400 1L can Teroson 169.65Q Terotex HV 400 10L tin Teroson 169.76C Terotex HV 400 60L barrel Teroson 169.85M Teroson cavity spray 500ml aerosol Teroson 155.71A Underbody Wax - - Terotex wax black 1L can Teroson 114.59F Protective wax Teroson 122.73Q Underbody Coating - - Bodyguard stonechip coating (textured) can - black 3M 08868 Bodyguard stonechip coating (textured) can - white 3M 08878 Bodyguard stonechip coating (textured) can - grey 3M 08879 Bodyguard stonechip coating (flat) can - black 3M 08158 Bodyguard stonechip coating (flat) can - grey 3M 08159 Anti chip coating smooth - grey 3M 08886 Terotex record black 1L can Teroson 122.48N Terotex record light 1L can Teroson 165.53S Terotex anti chip compound light (UBC) 1L can Teroson 191.08V Terotex anti chip compound black (UBC) 1L can Teroson 191.32V Trim Adhesive - - Auto adhesive - aerosol - clear (trim) 3M 08080 Auto adhesive - brushable - clear (trim) 3M 08150 Contact adhesive - aerosol - amber 3M 08090 Corrosion Protection - - Zinc spray 3M 09113 Zinc spray Teroson 158.18T Anti Corrosive Agent - - Terotex HV 350 1L can Teroson 141.78L Terotex HV 350 10L can Teroson 160.02T Terotex HV 350 60L barrel Teroson 160.01S Sound Deadening - - Sound deadening sheets 3M 08840 Terodem SP 100 alu Teroson 190.33 Terodem SP 200 Teroson 190.55M Terodem SP 300 50 x 50 Teroson 145.28R Terodem SP 300 100 x 50 Teroson 134.29X Flexible Part Repair - - Flexible part repair material (FPRM) 3M 05900 Adhesives / Thread Locking - - Lock N Seal 243 thread locking Loctite 13701 Lock N Seal 243 thread locking Loctite 14131 Lock N Seal 243 thread locking Loctite 25684 Stud N Bearing fit 271 Loctite 13704 Stud N Bearing fit 271 Loctite 14130 Stud N Bearing fit 271 Loctite 25685 Pipe sealant 577 Loctite 16604 Pipe sealant 577 Loctite 25689 Pipe sealant 55 Loctite 31899 Gasket - - Multi gasket Loctite 25688 Silicone copper Loctite 19245 Silicone copper Loctite 82046 Silicone 596 black Loctite 19242 Silicone 596 black Loctite 59875 3020 gasket adhesive Loctite 31458 NVH Baffle - - Sikabaffle 278 SIKA Approved Service Material Supplier - Contact Details
3M
3M United Kingdom PLC
3M Centre
Cain Road
Bracknell
Berkshire
RG12 8HT
Telephone (01344) 858000
www.3m.com
Page 2733 of 3039

- Air flow checker
- Sealing compound (tape and plastic compound)
- Multi-purpose sticker
- Clinched flange sealer
- Window sealing compound
- Water shield (PVC)
- Double-sided adhesive tape for water shield
- Methylated spirit (available from trade outlets)
- PU adhesive
- Silicone remover
- Tar remover
Water leaks according to mileage or running time
Increasing mileage has an effect on the problem of leaks in a vehicle. Possible influencing factors are:
Servicing and maintenance of seals:
- No maintenance, lack of maintenance or incorrect maintenance
- Using an incorrect agent
Damaged seals:
- As a result of aging, wear or incorrect handling/assembly.
Heavy soiling of the vehicle:
- Heavy soiling of a vehicle can seriously impair the function of water drainage channels in particular, and also of
rubber seals.
Age-related factors:
- Environmental factors
- UV radiation
- Extreme climatic conditions
Corrosion can have a serious impact on bodywork, in particular as a result of:
- Lightly or heavily rusted seal carriers
- Rusted body seal welds
- Perforation corrosion
Water leaks after body repairs
If a vehicle develops a leak after body repairs, the following points must be taken into consideration in particular:
The correct seating of ancillary components and their seals must be checked.
The correct alignment of doors/tailgate and liftgate must be checked. The associated seals must not be damaged and
must be installed correctly.
Check that panel seams are correctly sealed.
The correct seating of rubber grommets must be checked.
Directly-glazed windows must have correct and complete bonding.
Water drainage system
If a vehicle develops water leaks, then areas into which water is routed or drained should be checked first.
Page 2735 of 3039

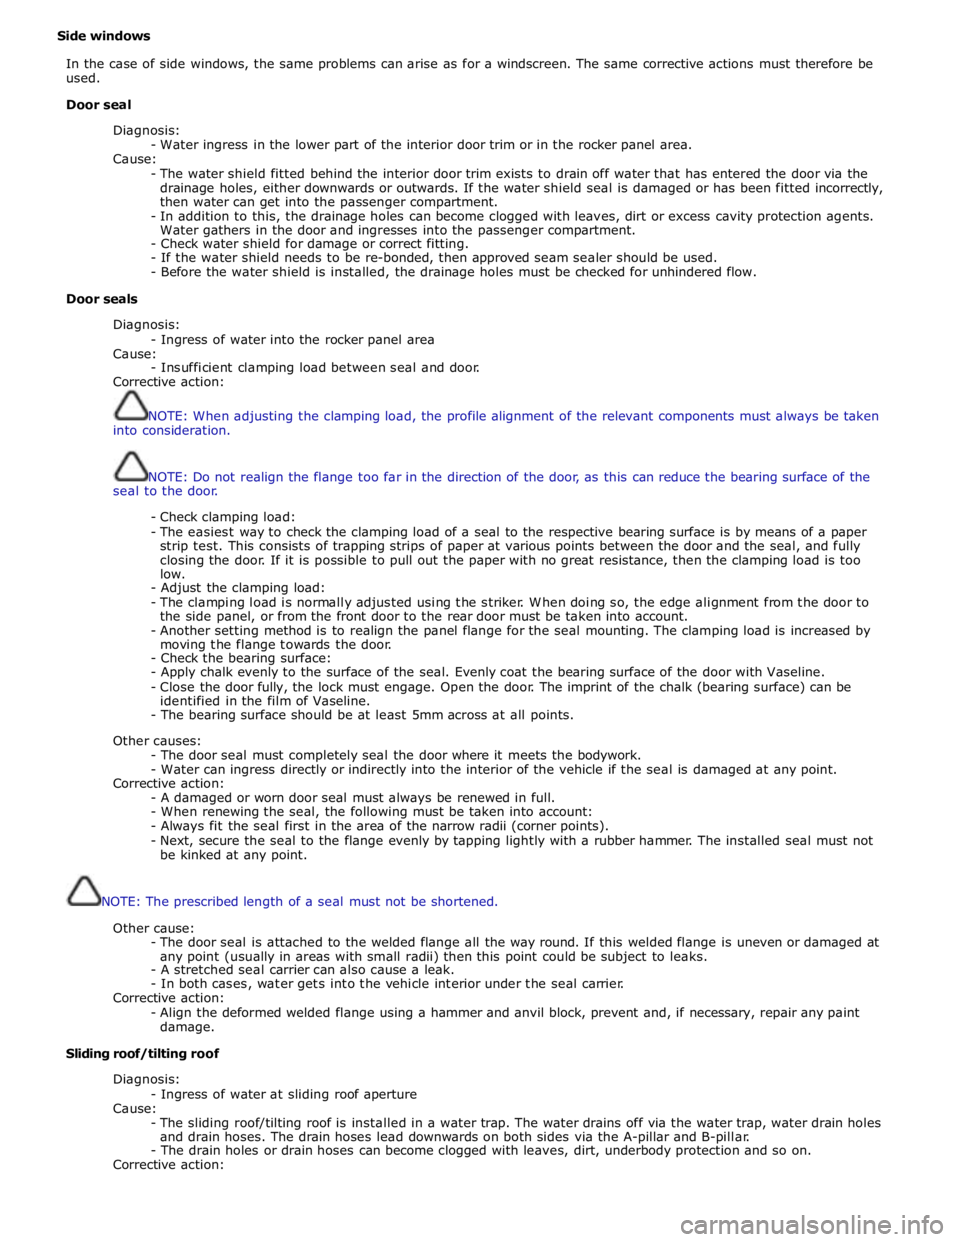
Side windows
In the case of side windows, the same problems can arise as for a windscreen. The same corrective actions must therefore be
used.
Door seal
Diagnosis:
- Water ingress in the lower part of the interior door trim or in the rocker panel area.
Cause:
- The water shield fitted behind the interior door trim exists to drain off water that has entered the door via the
drainage holes, either downwards or outwards. If the water shield seal is damaged or has been fitted incorrectly,
then water can get into the passenger compartment.
- In addition to this, the drainage holes can become clogged with leaves, dirt or excess cavity protection agents.
Water gathers in the door and ingresses into the passenger compartment.
- Check water shield for damage or correct fitting.
- If the water shield needs to be re-bonded, then approved seam sealer should be used.
- Before the water shield is installed, the drainage holes must be checked for unhindered flow.
Door seals
Diagnosis:
- Ingress of water into the rocker panel area
Cause:
- Insufficient clamping load between seal and door.
Corrective action:
NOTE: When adjusting the clamping load, the profile alignment of the relevant components must always be taken
into consideration.
NOTE: Do not realign the flange too far in the direction of the door, as this can reduce the bearing surface of the
seal to the door.
- Check clamping load:
- The easiest way to check the clamping load of a seal to the respective bearing surface is by means of a paper
strip test. This consists of trapping strips of paper at various points between the door and the seal, and fully
closing the door. If it is possible to pull out the paper with no great resistance, then the clamping load is too
low.
- Adjust the clamping load:
- The clamping load is normally adjusted using the striker. When doing so, the edge alignment from the door to
the side panel, or from the front door to the rear door must be taken into account.
- Another setting method is to realign the panel flange for the seal mounting. The clamping load is increased by
moving the flange towards the door.
- Check the bearing surface:
- Apply chalk evenly to the surface of the seal. Evenly coat the bearing surface of the door with Vaseline.
- Close the door fully, the lock must engage. Open the door. The imprint of the chalk (bearing surface) can be
identified in the film of Vaseline.
- The bearing surface should be at least 5mm across at all points.
Other causes:
- The door seal must completely seal the door where it meets the bodywork.
- Water can ingress directly or indirectly into the interior of the vehicle if the seal is damaged at any point.
Corrective action:
- A damaged or worn door seal must always be renewed in full.
- When renewing the seal, the following must be taken into account:
- Always fit the seal first in the area of the narrow radii (corner points).
- Next, secure the seal to the flange evenly by tapping lightly with a rubber hammer. The installed seal must not
be kinked at any point.
NOTE: The prescribed length of a seal must not be shortened.
Other cause:
- The door seal is attached to the welded flange all the way round. If this welded flange is uneven or damaged at
any point (usually in areas with small radii) then this point could be subject to leaks.
- A stretched seal carrier can also cause a leak.
- In both cases, water gets into the vehicle interior under the seal carrier.
Corrective action:
- Align the deformed welded flange using a hammer and anvil block, prevent and, if necessary, repair any paint
damage.
Sliding roof/tilting roof
Diagnosis:
- Ingress of water at sliding roof aperture
Cause:
- The sliding roof/tilting roof is installed in a water trap. The water drains off via the water trap, water drain holes
and drain hoses. The drain hoses lead downwards on both sides via the A-pillar and B-pillar.
- The drain holes or drain hoses can become clogged with leaves, dirt, underbody protection and so on.
Corrective action:
Page 2778 of 3039

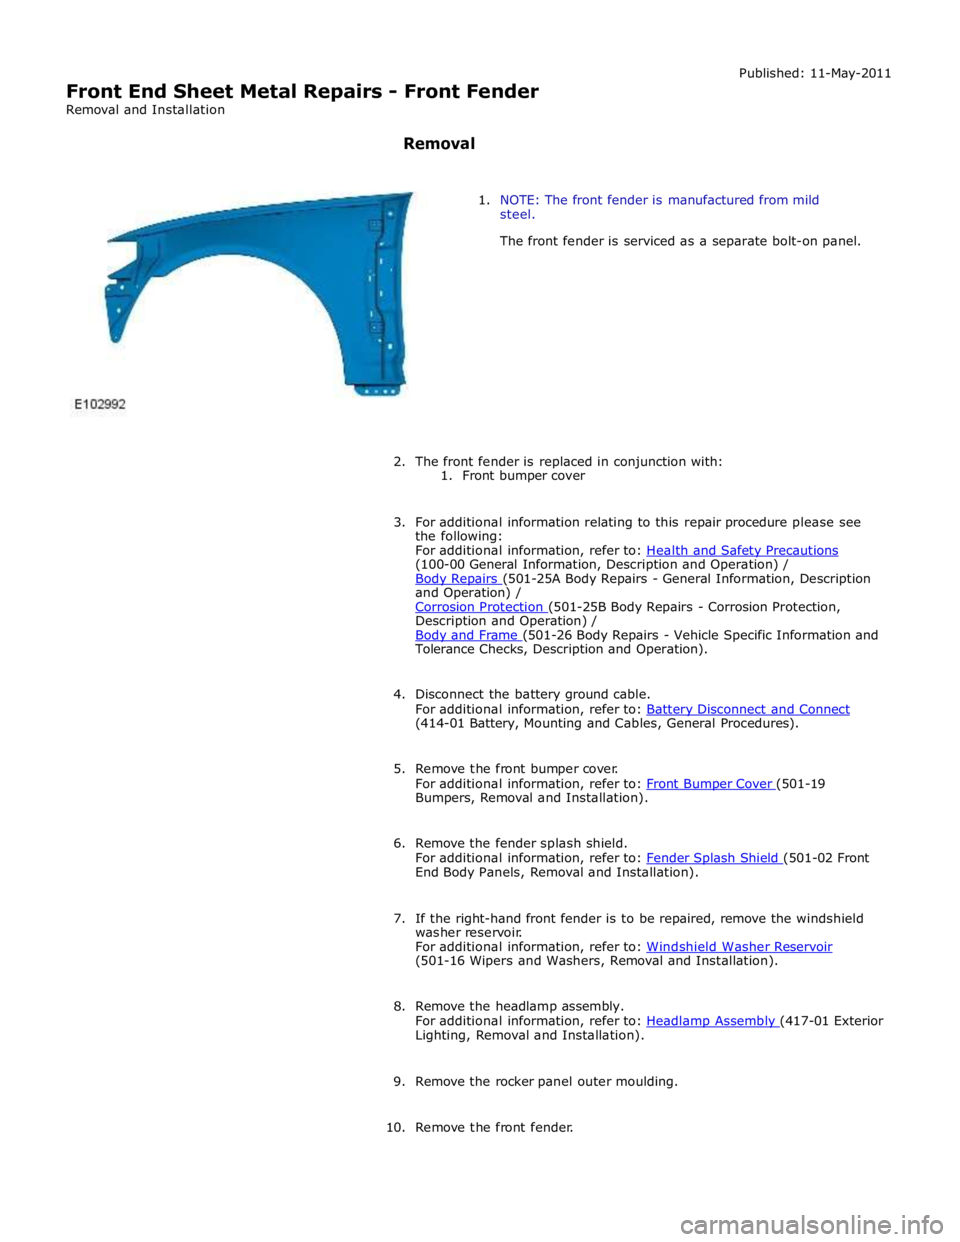
(100-00 General Information, Description and Operation) /
Body Repairs (501-25A Body Repairs - General Information, Description and Operation) /
Corrosion Protection (501-25B Body Repairs - Corrosion Protection, Description and Operation) /
Body and Frame (501-26 Body Repairs - Vehicle Specific Information and Tolerance Checks, Description and Operation).
4. Disconnect the battery ground cable.
For additional information, refer to: Battery Disconnect and Connect (414-01 Battery, Mounting and Cables, General Procedures).
5. Remove the front bumper cover.
For additional information, refer to: Front Bumper Cover (501-19 Bumpers, Removal and Installation).
6. Remove the fender splash shield.
For additional information, refer to: Fender Splash Shield (501-02 Front End Body Panels, Removal and Installation).
7. If the right-hand front fender is to be repaired, remove the windshield
washer reservoir.
For additional information, refer to: Windshield Washer Reservoir (501-16 Wipers and Washers, Removal and Installation).
8. Remove the headlamp assembly.
For additional information, refer to: Headlamp Assembly (417-01 Exterior Lighting, Removal and Installation).
9. Remove the rocker panel outer moulding.
10. Remove the front fender.
Page 2821 of 3039

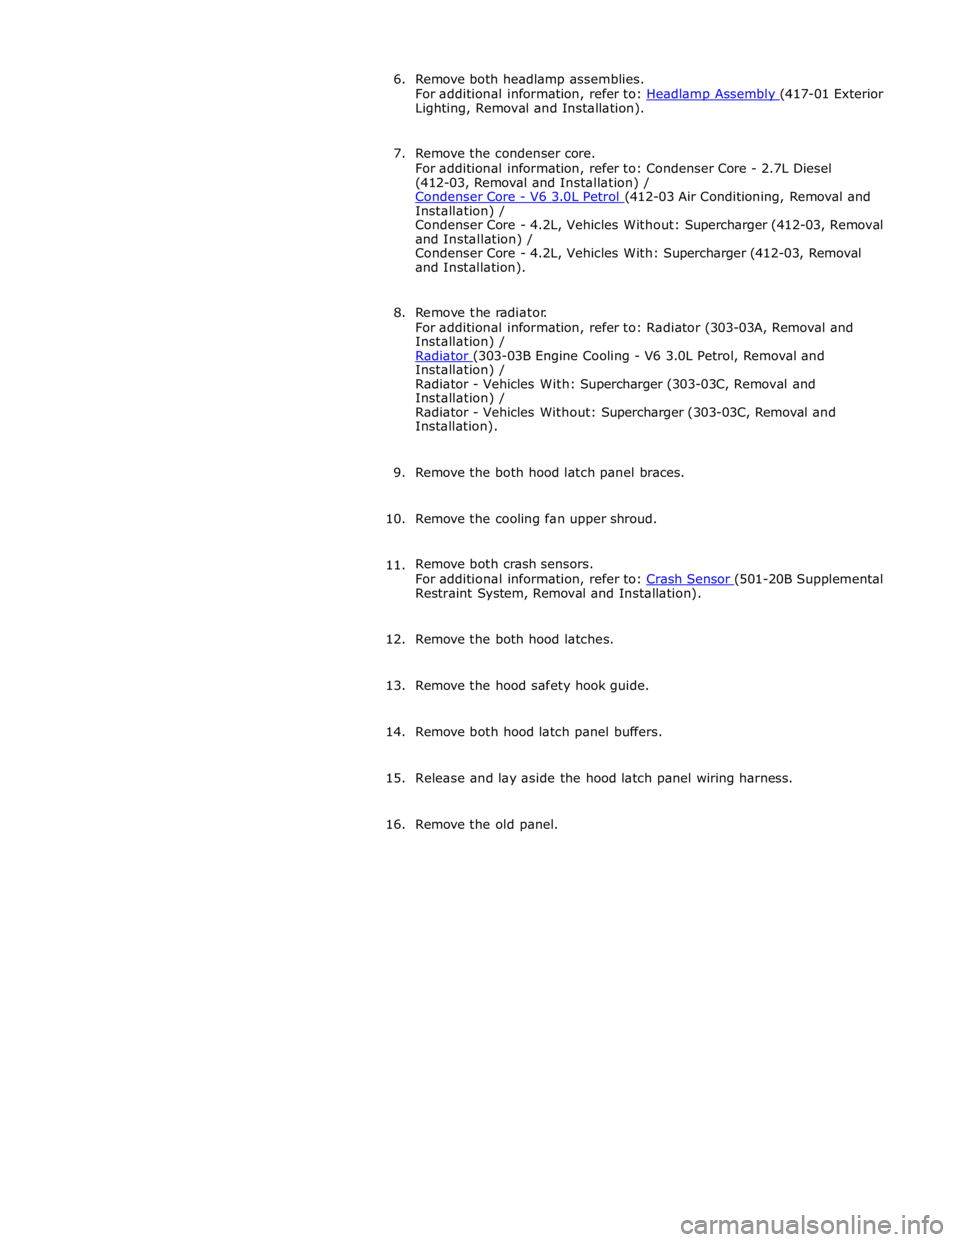
Lighting, Removal and Installation).
7. Remove the condenser core.
For additional information, refer to: Condenser Core - 2.7L Diesel
(412-03, Removal and Installation) /
Condenser Core - V6 3.0L Petrol (412-03 Air Conditioning, Removal and Installation) /
Condenser Core - 4.2L, Vehicles Without: Supercharger (412-03, Removal
and Installation) /
Condenser Core - 4.2L, Vehicles With: Supercharger (412-03, Removal
and Installation).
8. Remove the radiator.
For additional information, refer to: Radiator (303-03A, Removal and
Installation) /
Radiator (303-03B Engine Cooling - V6 3.0L Petrol, Removal and Installation) /
Radiator - Vehicles With: Supercharger (303-03C, Removal and
Installation) /
Radiator - Vehicles Without: Supercharger (303-03C, Removal and
Installation).
9. Remove the both hood latch panel braces.
10. Remove the cooling fan upper shroud.
11. Remove both crash sensors.
For additional information, refer to: Crash Sensor (501-20B Supplemental Restraint System, Removal and Installation).
12. Remove the both hood latches.
13. Remove the hood safety hook guide.
14. Remove both hood latch panel buffers.
15. Release and lay aside the hood latch panel wiring harness.
16. Remove the old panel.